
Scheduling on Linux mostly happens with cron or any of it’s variations. Although cron is very powerful, it lacks a few features to use it in a flexible way and especially when you want to create dependencies or “communicate” with jobs running on other hosts, it has it’s shortcomings. Cron wasn’t really designed with those features in mind. Fortunately there are a few nice schedulers out there which can be used to overcome those limitations. A few of them are SOS Jobscheduler, GNUBatch and openlava. Openlava is a limited open source fork of LSF which is now owned by IBM. Openlava doesn’t come with a GUI but there is another project, Openlava web which enables control over openlava via a web interface.
Openlava is a limited fork of an old version of platform LSF, which allows job scheduling on multiple nodes. The scheduler is designed to work in large clusters but can be used to schedule jobs on a few nodes as well. Managing openlava is limited to the CLI but to get an overview of the running and planned jobs in openlava, I will also install Openlava web which is created by David Irvine. Openlava itself has a clear documentation, the webgui part isn’t that good documented, especially if you don’t have a lot of experience with Django and Python packaging.
More information about openlava: http://www.openlava.org/
More information about openlava web: https://www.clusterfsck.io/static/openlava-web/index.html
In this post, I’ll install openlava on two nodes (node01 and node02). Node01 will be used as the master.
The firs thing we’ll do is install openlava on two nodes and get them to communicate and schedule jobs. As with many of my posts, I used CentOS 7 to put this together. Once we get the scheduler to work, I’ll add the web interface on top of it.
Prepare the system
Before we start, we need to make sure that both nodes know their own hostname and can communicate with each other using that name:
[jensd@node01 ~]$ hostname -f
node01
[jensd@node01 ~]$ ping -c 1 node02
PING node02 (192.168.202.102) 56(84) bytes of data.
64 bytes from node02 (192.168.202.102): icmp_seq=1 ttl=64 time=0.380 ms

--- node02 ping statistics ---
1 packets transmitted, 1 received, 0% packet loss, time 0ms
rtt min/avg/max/mdev = 0.380/0.380/0.380/0.000 ms
[jensd@node02 ~]$ hostname -f
node02
[jensd@node02 ~]$ ping -c1 node01
PING node01 (192.168.202.101) 56(84) bytes of data.
64 bytes from node01 (192.168.202.101): icmp_seq=1 ttl=64 time=0.211 ms

--- node01 ping statistics ---
1 packets transmitted, 1 received, 0% packet loss, time 0ms
rtt min/avg/max/mdev = 0.211/0.211/0.211/0.000 ms
In case this doesn’t work or you get a message saying: hostname: Name or service not known, change /etc/hosts to include the hostname of this node and the other node. If the machine can’t resolve it’s own fqdn, you might get messages in syslog similar to this when starting openlava
addCluster: Invalid host node01 for cluster openlava, ignoring
setMyClusterName/ls_getmyhostname failed: Above fatal error(s) found.
init_res: ls_getmyhostname() failed, Bad host name.
Set up system mail
Although this step is optional, it’s highly recommended. By default, openlava is sending a mail when a job finishes in the schedule. This mail contains more information about the job and the job’s output. In order for this to function correctly, we need to configure our hosts to allow them to send mails.
Sending mail can be done in a lot of ways. The most popular packages for this are Sendmail or Postfix. This time, I’ll configure Postfix. I’ll only put the actions and output here for node01 but you need to apply the exact same configuration on node02.
Let’s start with installing the Postfix package:
[jensd@node01 ~]$ sudo yum -y install postfix
...
Complete !
If you want to, you can set your SMTP-server as relayhost in /etc/postfix/main.cf but I’ll let each host be it’s own relay so I don’t need to touch any of the configuration files of Postfix.
To let mails be send to my own e-mail when sent to my userid, I need to associate my own address to the Linux user. This can be done in /etc/aliases:
...
# trap decode to catch security attacks
decode:         root

# Person who should get root's mail
#root:          marc
jensd:          jensd@xyz.com
After editing the file, you need to reload the contents of the aliases:
[jensd@node01 ~]$ sudo newaliases
Al that’s left to do is to start Postfix:
[jensd@node01 ~]$ sudo systemctl start postfix
In case you experience problems with mail, you can check the contents of /var/log/maillog.
Allow communication trough the firewall
The last step of the preparation is to open the necessary ports in the firewall to allow communication between both nodes. Although there are four fixed port numbers in the configuration file /opt/openlava-2.2/etc/lsf.conf, I noticed that openlava also uses dynamic ports to communicate and they’re somewhere between 1024 and 65535… Unfortunately, I couldn’t find any clear information about this in the documentation and on the mailinglist, people only suggest to stop iptables. So the best I could do is to allow the range of ports through the firewall.
[jensd@node01 ~]$ sudo iptables -I INPUT -p tcp --match multiport --dports 1024:65535 -j ACCEPT
[jensd@node01 ~]$ sudo iptables -I INPUT -p udp --match multiport --dports 1024:65535 -j ACCEPT
[jensd@node01 ~]$ sudo iptables-save|sudo tee /etc/sysconfig/iptables
# Generated by iptables-save v1.4.21 on Fri Dec  5 11:19:28 2014
*filter
:INPUT ACCEPT [0:0]
:FORWARD ACCEPT [0:0]
:OUTPUT ACCEPT [148:16468]
-A INPUT -p udp -m multiport --dports 1024:65535 -j ACCEPT
-A INPUT -p tcp -m multiport --dports 1024:65535 -j ACCEPT
-A INPUT -m state --state RELATED,ESTABLISHED -j ACCEPT
-A INPUT -p icmp -j ACCEPT
-A INPUT -i lo -j ACCEPT
-A INPUT -p tcp -m state --state NEW -m tcp --dport 22 -j ACCEPT
-A INPUT -j REJECT --reject-with icmp-host-prohibited
-A FORWARD -j REJECT --reject-with icmp-host-prohibited
COMMIT
# Completed on Fri Dec  5 11:19:28 2014
[jensd@node02 ~]$ sudo iptables -I INPUT -p tcp --match multiport --dports 1024:65535 -j ACCEPT
[jensd@node02 ~]$ sudo iptables -I INPUT -p udp --match multiport --dports 1024:65535 -j ACCEPT
[jensd@node02 ~]$ sudo iptables-save|sudo tee /etc/sysconfig/iptables
# Generated by iptables-save v1.4.21 on Fri Dec  5 11:20:50 2014
*filter
:INPUT ACCEPT [0:0]
:FORWARD ACCEPT [0:0]
:OUTPUT ACCEPT [4:440]
-A INPUT -p udp -m multiport --dports 1024:65535 -j ACCEPT
-A INPUT -p tcp -m multiport --dports 1024:65535 -j ACCEPT
-A INPUT -m state --state RELATED,ESTABLISHED -j ACCEPT
-A INPUT -p icmp -j ACCEPT
-A INPUT -i lo -j ACCEPT
-A INPUT -p tcp -m state --state NEW -m tcp --dport 22 -j ACCEPT
-A INPUT -j REJECT --reject-with icmp-host-prohibited
-A FORWARD -j REJECT --reject-with icmp-host-prohibited
COMMIT
# Completed on Fri Dec  5 11:20:50 2014
Install openlava
Now that we’re sure that the hosts know their name, can talk with each other and send mail to myself, it’s time to install openlava. Openlava is available in an RPM package so we can download install openlava directly with Yum on both nodes:
[jensd@node01 ~]$ sudo yum -y install http://www.teraproc.com/openlava-2.2-1.x86_64.rpm
...
Complete !
[jensd@node02 ~]$ sudo yum -y install http://www.teraproc.com/openlava-2.2-1.x86_64.rpm
...
Complete !
Once we installed openlava on both nodes, we need to make the nodes aware of each other by editing the file /opt/openlava-2.2/etc/lsf.cluster.openlava:
#-----------------------------------------------------------------------
# T H I S   I S   A    O N E   P E R   C L U S T E R    F I L E
#
# This is a sample cluster definition file.  There is a cluster
# definition file for each cluster.  This file's name should be
# lsf.cluster.<cluster-name>.
# See lsf.cluster(5) and the "LSF Administrator's Guide".
#

Begin   ClusterAdmins
Administrators = openlava
End    ClusterAdmins

Begin   Host
HOSTNAME          model          type  server  r1m  RESOURCES
node01                  IntelI5      linux   1      3.5    (cs)
node02                  IntelI5      linux   1      3.5    (cs)
End     Host

Begin ResourceMap
RESOURCENAME  LOCATION
# tmp2          [default]
# nio           [all]
# console       [default]
End ResourceMap
This file needs to be present on both nodes with the same content.
During RPM installation, openlava was automatically started so in order to let the changed configuration become active, we need to restart it. Openlava still used init scripts while, since CentOS 7, systemd is used. For now this isn’t really a problem but it would be more clean to create a systemd service file openlava too (maybe later). The init script is using the killall command which isn’t part of CentOS anymore by default.
Let’s first install killall, which is part of the psmisc package:
[jensd@node01 ~]$ sudo yum -y install psmisc
...
Complete !
[jensd@node02 ~]$ sudo yum -y install psmisc
...
Complete !
And then we’ll restart openlava:
[jensd@node01 ~]$ sudo /etc/init.d/openlava restart
Stopping daemons...
Starting daemons...
lim started
res started
sbatchd started
[jensd@node02 ~]$ sudo /etc/init.d/openlava restart
Stopping daemons...
Starting daemons...
lim started
res started
sbatchd started
The RPM package also created a file in /etc/profile.d/openlava.sh which sets a few environment variables in order for openlava to function properly. To load those variables, we need to login again, su to the same user or simply source the script once manually. For all next times you log in to the machine, the script should be loaded automatically.
[jensd@node01 ~]$ source /etc/profile.d/openlava.sh
[jensd@node02 ~]$ source /etc/profile.d/openlava.sh
Now, the directory, which contains the openlava binaries, is added to $PATH and we can check out the status of our cluster nodes:
[jensd@node01 ~]$ lsid
openlava project 2.2, Nov  6 2014

My cluster name is openlava
My master name is node01
[jensd@node02 ~]$ lsid
openlava project 2.2, Nov  6 2014

My cluster name is openlava
My master name is node01
As you can see in the above output, node02 has node01 as it’s master because of the order in the configuration file.
To see if both nodes can communicate and see each other:
[jensd@node01 ~]$ bhosts
HOST_NAME          STATUS       JL/U    MAX  NJOBS    RUN  SSUSP  USUSP    RSV
node01             ok              -      1      0      0      0      0      0
node02             ok              -      2      0      0      0      0      0
Everything seems to be running fine so let’s submit our first job on both nodes. You can submit jobs using the bsub command. The command takes a lot of arguments since it defines all conditions and options that have to do with the job. The complete syntax can be found here.
To submit and check a job on the first node:
[jensd@node01 ~]$ bsub -m "node01" "hostname;whoami;sleep 60"
Job <210> is submitted to default queue <normal>.
[jensd@node01 ~]$ bjobs
JOBID   USER    STAT  QUEUE      FROM_HOST   EXEC_HOST   JOB_NAME   SUBMIT_TIME
210     jensd   PEND  normal     node01      node01      *;sleep 60 Dec  5 11:49
[jensd@node01 ~]$ bjobs
JOBID   USER    STAT  QUEUE      FROM_HOST   EXEC_HOST   JOB_NAME   SUBMIT_TIME
210     jensd   RUN   normal     node01      node01      *;sleep 60 Dec  5 11:50
[jensd@node01 ~]$ bjobs
No unfinished job found
[jensd@node01 ~]$ bjobs -d
JOBID   USER    STAT  QUEUE      FROM_HOST   EXEC_HOST   JOB_NAME   SUBMIT_TIME
...
210     jensd   DONE  normal     node01      node01      *;sleep 60 Dec  5 11:50
In the output we can see that the job was added to the queue called normal and ended up in the status PEND (pending). Shortly after that, the status changed to RUN (running) and after the job completed it got status DONE.
As soon as the job finishes, we received a mail containing the following:
Job <hostname;whoami;sleep 60> was submitted from host <node01> by user <jensd>.
Job was executed on host(s) <node01>, in queue <normal>, as user <jensd>.
</home/jensd> was used as the home directory.
</home/jensd> was used as the working directory.
Started at Fri Dec  5 11:50:29 2014
Results reported at Fri Dec  5 11:51:29 2014

Your job looked like:

------------------------------------------------------------
# LSBATCH: User input
hostname;whoami;sleep 60
------------------------------------------------------------

Successfully completed.

Resource usage summary:

    CPU time   :      0.01 sec.
    Max Memory :         3 MB
    Max Swap   :       233 MB

    Max Processes  :         3

The output (if any) follows:

node01
jensd
The mail contains the job output, saying the result of hostname and whoami.
Let’s try the same on node02 from the master node (node01):
[jensd@node01 ~]$ bsub -m "node02" "hostname;whoami;sleep 60"
Job <211> is submitted to default queue <normal>.
[jensd@node01 ~]$ bjobs
JOBID   USER    STAT  QUEUE      FROM_HOST   EXEC_HOST   JOB_NAME   SUBMIT_TIME
211     jensd   RUN   normal     node01      node02      *;sleep 60 Dec  5 11:54
The mail contains very similar output like our first job, only the output was different since the result of hostname was different to show that it actually ran on the second node.
...
The output (if any) follows:

node02
jensd
Submit jobs with dependencies
Some other useful example of the bsub command:
Submit a job that will be executed at 20:30 and give it a name first_job:
[jensd@node01 ~]$ bsub -m "node01" -J first_job -b 20:30 "hostname;whoami;sleep 60"
Job <212> is submitted to default queue <normal>.
Job will be scheduled after Fri Dec  5 20:30:00 2014
Submit a job that will only start after first_job is finished:
[jensd@node01 ~]$ bsub -m "node02" -J second_job -w'done("first_job")' "hostname;whoami;sleep 60"
Job <213> is submitted to default queue <normal>.
To get more information about pending jobs and the exact reason that they’re pending:
[jensd@node01 ~]$ bjobs -p
JOBID   USER    STAT  QUEUE       FROM_HOST      JOB_NAME           SUBMIT_TIME
212     jensd   PEND  normal      node01         first_job          Dec  5 12:00
 The job has a specified start time: 1 host;
213     jensd   PEND  normal      node01         second_job         Dec  5 12:02
 Job dependency condition not satisfied: 1 host;
[jensd@node01 ~]$ bjobs -l

Job <212>, Job Name <first_job>, User <jensd>, Project <default>, Status <PEND>
                     , Queue <normal>, Command <hostname;whoami;sleep 60>
Fri Dec  5 12:00:21: Submitted from host <node01>, Specified Start Time <Fri De
                     c  5 20:30:00>, CWD <$HOME>, Specified Hosts <node01>;
 PENDING REASONS:
 The job has a specified start time: 1 host;

 SCHEDULING PARAMETERS:
           r15s   r1m  r15m   ut      pg    io   ls    it    tmp    swp    mem
 loadSched   -     -     -     -       -     -    -     -     -      -      -
 loadStop    -     -     -     -       -     -    -     -     -      -      -
------------------------------------------------------------------------------

Job <213>, Job Name <second_job>, User <jensd>, Project <default>, Status <PEND
                     >, Queue <normal>, Command <hostname;whoami;sleep 60>
Fri Dec  5 12:02:05: Submitted from host <node01>, CWD <$HOME>, Dependency Cond
                     ition <done("first_job")>, Specified Hosts <node02>;
 PENDING REASONS:
 Job dependency condition not satisfied: 1 host;

 SCHEDULING PARAMETERS:
           r15s   r1m  r15m   ut      pg    io   ls    it    tmp    swp    mem
 loadSched   -     -     -     -       -     -    -     -     -      -      -
 loadStop    -     -     -     -       -     -    -     -     -      -      -

[jensd@node01 ~]$
Install Openlava web
Now that our scheduler is up and running and we know how to submit and control jobs, it could be nice to get a good overview with a GUI. A web interface was made for openlava called Openlava web so let’s get this up and running on the master.
The first step is to install all dependencies for the web interface:
[jensd@node01 ~]$ sudo yum -y install python-django python-pip git python-devel gcc lighttpd lighttpd-fastcgi
...
Complete !
Next we’ll install the necessary Python modules using pip:
[jensd@node01 ~]$ sudo pip install flup cython
...
Successfully installed flup cython
Cleaning up...
First we need to get openlava-python ready on our system so let’s clone the git repository in /opt:
[jensd@node01 ~]$ cd /opt/
[jensd@node01 opt]$ sudo django-admin startproject openlava_webui
[sudo] password for jensd:
[jensd@node01 opt]$ sudo git clone https://github.com/irvined1982/openlava-python.git
Cloning into 'openlava-python'...
remote: Counting objects: 636, done.
remote: Total 636 (delta 0), reused 0 (delta 0)
Receiving objects: 100% (636/636), 3.03 MiB | 524.00 KiB/s, done.
Resolving deltas: 100% (411/411), done.
The setup.py script will look for certain files related to openlava but does that by default in the wrong paths. We need to adjust setup.py in order to look for the correct files:
[jensd@node01 opt]$ sudo vi openlava-python/openlava/setup.py
...
# Find lsbatch
try:
        lsfdir=os.environ['LSF_ENVDIR']
        lsfdir=os.path.join(libdir,"..")

except:
        lsfdir='/opt/openlava-2.2'
Adjust the lsfdir variable to search in /opt/openlava-2.2, the path that was used during the RPM-installation.
After correcting the path, we can compile and install openlava-ptyhon:
[jensd@node01 opt]$ cd openlava-python/openlava/
[jensd@node01 openlava]$ sudo python setup.py install
...
Writing /usr/lib64/python2.7/site-packages/openlava_bindings-1.0-py2.7.egg-info
Next is the webgui itself.
First clone the git repo and the submodules:
[jensd@node01 opt]$ sudo git clone https://github.com/irvined1982/openlava-web.git
Cloning into 'openlava-web'...
remote: Counting objects: 2187, done.
remote: Total 2187 (delta 0), reused 0 (delta 0)
Receiving objects: 100% (2187/2187), 1.07 MiB | 205.00 KiB/s, done.
Resolving deltas: 100% (1383/1383), done.
[jensd@node01 opt]$ cd openlava-web/
[jensd@node01 openlava-web]$ sudo git submodule update --init --recursive
...
Submodule path 'openlavaweb/static/openlavaweb/nvd3': checked out '6867ea693e4dbde657c34768c26ccf667d1f2da8'
After cloning the repository and it’s requirements, let’s install openlava-web:
[jensd@node01 openlava-web]$ sudo python setup.py install
Installed /usr/lib/python2.7/site-packages/django_openlavaweb-1.1-py2.7.egg
Processing dependencies for django-openlavaweb==1.1
Finished processing dependencies for django-openlavaweb==1.1
Now that we have all requirements to start, let’s create a new Django project in the /opt directory and copy the openlava directory in the project:
[jensd@node01 ~]$ cd /opt/
[jensd@node01 opt]$ sudo django-admin startproject openlava_webui
[jensd@node01 opt]$ sudo cp -r /opt/openlava-web/openlavaweb/ /opt/openlava_webui/
Now that all necessary files are in place, we need to enable the openlava webui in the Django project:
Edit /opt/openlava_webui/openlava_webui/urls.py and the openlavaweb.urls:
from django.conf.urls import patterns, include, url

from django.contrib import admin
admin.autodiscover()

urlpatterns = patterns('',
    # Examples:
    # url(r'^$', 'openlava_webui.views.home', name='home'),
    # url(r'^blog/', include('blog.urls')),

    url(r'^admin/', include(admin.site.urls)),
    url(r'^', include('openlavaweb.urls')),
)
Edit /opt/openlava_webui/openlava_webui/settings.py to include openlavaweb:
INSTALLED_APPS = (
    'django.contrib.admin',
    'django.contrib.auth',
    'django.contrib.contenttypes',
    'django.contrib.sessions',
    'django.contrib.messages',
    'django.contrib.staticfiles',
    'openlavaweb',
)
At this point, the web interface should be installed but before we can test it, we need to open up port 80 in our firewall:
[jensd@node01 opt]$ sudo iptables -I INPUT -p tcp -m state --state NEW -m tcp --dport 80 -j ACCEPT
[jensd@node01 opt]$ sudo iptables-save|sudo tee /etc/sysconfig/iptables
Now, let’s start a small webserver with our Django project to test the webinterface:
[jensd@node01 opt]$ sudo python /opt/openlava_webui/manage.py runserver 0.0.0.0:80
Validating models...

0 errors found
December 05, 2014 - 12:31:18
Django version 1.6.8, using settings 'openlava_webui.settings'
Starting development server at http://0.0.0.0:80/
Quit the server with CONTROL-C.
You can now connect with your browser to the ip or hostname of node01:
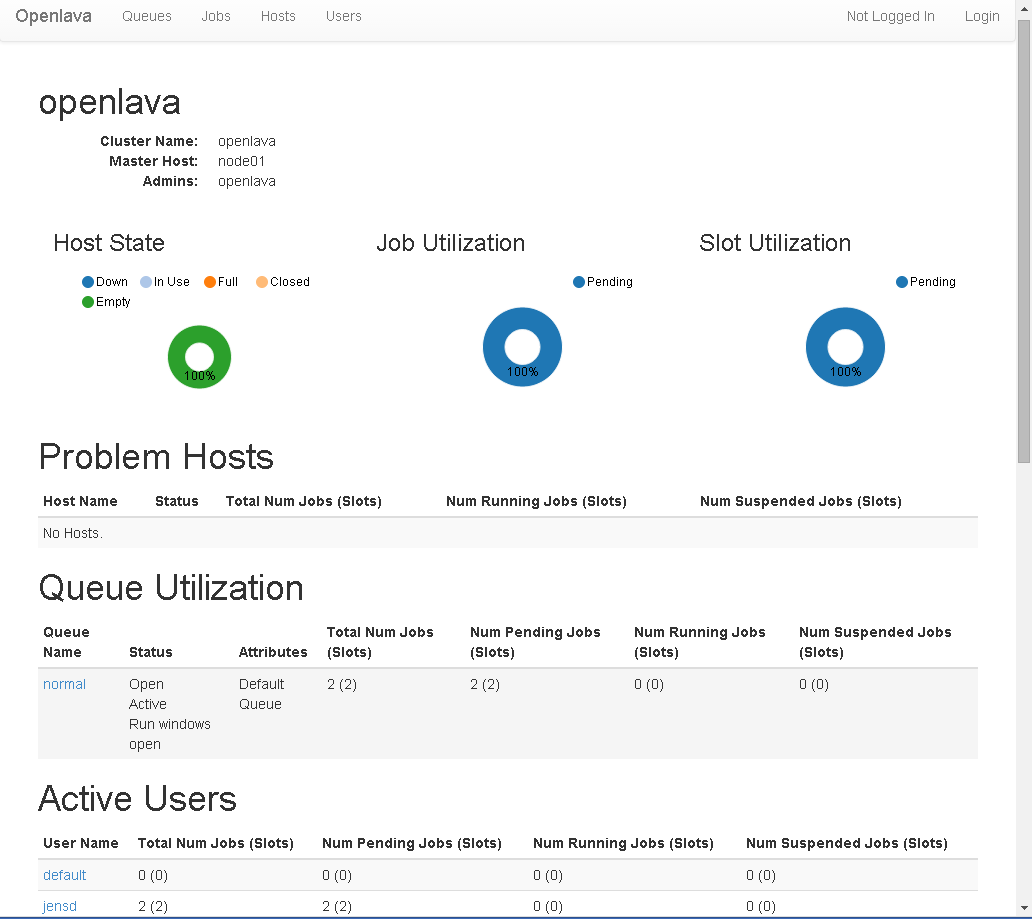
This interface already allows you to list all information from the scheduler and see running and pending jobs but logging in and changing anything won’t work yet. We need to talk with openlave as root and that can’t be done using the Django WSGI.
Enable control via the webinterface
In order to control openlava with the webinterface, we need to use FastCGI and that can be started as root. To connect to the FastCGI-server, we need to place a webserver in front of it which redirects our requests to the FastCGI from our Django project. To do this, we will use Lighttpd.
Lighttpd was already installed in the very first step of this post so the only thing that’s left is to configure it and start it.
Edit /etc/lighttpd/modules.conf and enable the alias and fastcgi modules:
server.modules = (
  "mod_access",
  "mod_alias",
  "mod_fastcgi",
#  "mod_auth",
#  "mod_evasive",
#  "mod_redirect",
#  "mod_rewrite",
#  "mod_setenv",
#  "mod_usertrack",
)
Edit /etc/lighttpd/lighttpd.conf and add the following to the end of the file:
alias.url = (
    "/static" => "/opt/openlava_webui/openlavaweb/static/",
    "/media" => "/var/www/olweb/media",
)

fastcgi.server = (
    "/olweb" => (
        "main" => (
            # Use host / port instead of socket for TCP fastcgi
            "host" => "127.0.0.1",
            "port" => 3033,
            #"socket" => "/home/user/mysite.sock",
            "check-local" => "disable",
        )
    ),
)
Start Lighttpd:
[jensd@node01 opt]$ sudo systemctl start lighttpd
To enable login at the web interface we need to create a user that can do so:
[jensd@node01 opt]$ sudo python /opt/openlava_webui/manage.py syncdb
Creating tables ...
Creating table django_admin_log
Creating table auth_permission
Creating table auth_group_permissions
Creating table auth_group
Creating table auth_user_groups
Creating table auth_user_user_permissions
Creating table auth_user
Creating table django_content_type
Creating table django_session

You just installed Django's auth system, which means you don't have any superusers defined.
Would you like to create one now? (yes/no): yes
Username (leave blank to use 'root'): jensd
Email address:
Password:
Password (again):
Superuser created successfully.
Installing custom SQL ...
Installing indexes ...
Installed 0 object(s) from 0 fixture(s)
Now our lighttpd server is started but we told it to forward requests to 127.0.0.1 on port 3033 for FastCGI so we need to start the Django project on that port:
[jensd@node01 opt]$ sudo python /opt/openlava_webui/manage.py runfcgi method=prefork host=127.0.0.1 port=3033 pidfile=olweb.pid
Now connect to the ip or hostname of node1 and go to http://node01/olweb to get to the web interface for openlave using Lighttpd.
In the top right corner, click login and enter the username and password which you entered with the syncdb step above:

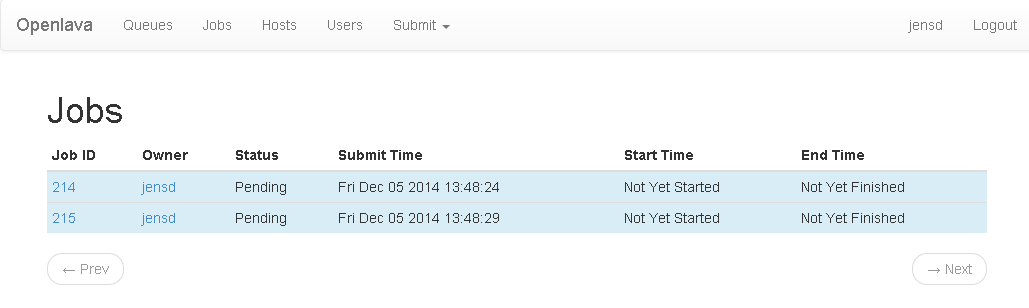
To list and manage jobs, you can use the jobs section as you could do in the read-only version:
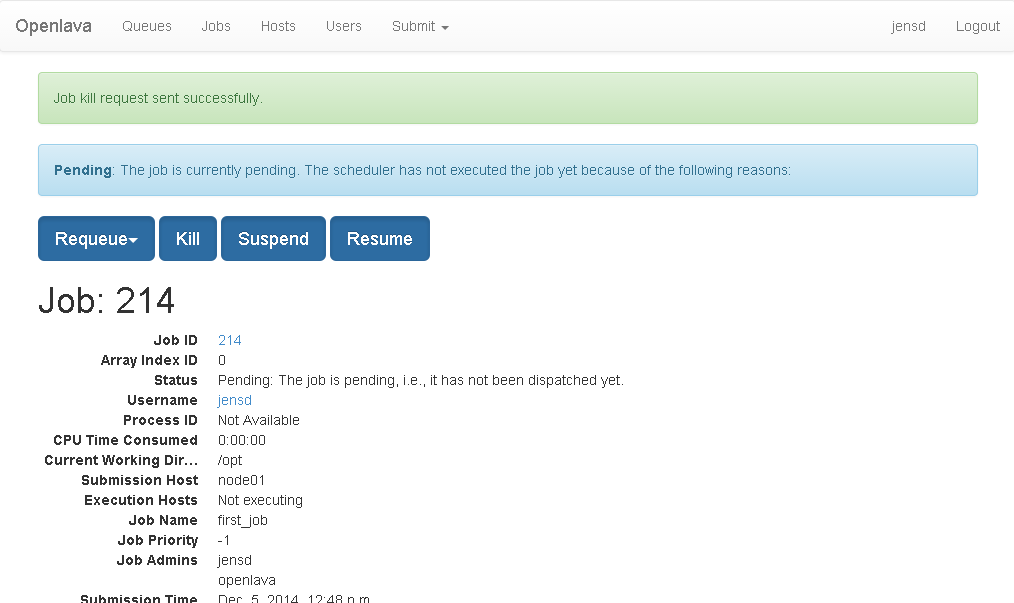
Now we can click on a job ID to edit the job and kill it for example:
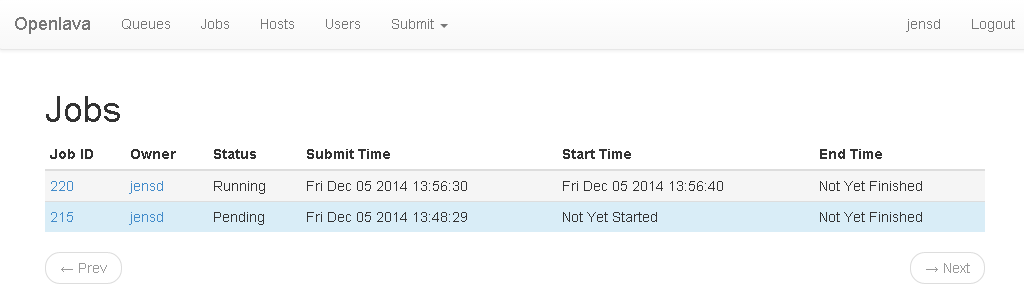
After logging in, there is also a new entry in the menu: Submit which allows you to submit new jobs, as we did with the bsub command:

After submitting, you get a summary:

And we can see that the job has started:
This is basically all that it takes to install openlava and configure it with a web interface. The web interface can probably installed in a better way but this is how I got it working since my knowledge of Django is very limited. For everything to work after a reboot, you need to enable the lighttpd service and create a service entry for the FastCGI of the Django project.
Excellent write up, rather than editing setup.py you can also run LSF_ENVDIR=/path/to/openlava python setup.py install if openlava is not installed in /opt/openlava, I will update setup.py to look in the default rpm location too.
Great guide!
I followed the instruction and successfully installed openlava web portal on CentOS 7. To enable yum to find required packages, I also installed Fedora EPEL:
# yum install epel-release
sudo python /opt/openlava_webui/manage.py runserver 0.0.0.0:80
but there is no manage.py there, actually there is nothing but a folder there named openlavaweb created one step before: sudo cp -r /opt/openlava-web/openlavaweb/ /opt/openlava_webui/
Do you know what could be the issue that i don’t have manage.py nowhere under /opt and i even checked the http git repository for it (https://github.com/irvined1982/openlava-web) with the same nowhere-to-be-found result
As far as I know, the command before the copy: “sudo django-admin startproject openlava_webui” should create the manage.py.
yes, that solved it, thank you now i have it running on SuSe SLED 11 SP3
When I try to install openlava-python, it fails spectacularly. Did something change? It would seem that the syntax has changed in gcc or something.
Using Centos 7 kernel 3.10.0-229.4.2.el7.x86_64
gcc version 4.8.3 20140911 (Red Hat 4.8.3-9) (GCC)
Openlava 3.0
Errors from “python setup.py install”:
/opt/openlava-3.0/include/lsf.h:19:0: warning: “_GNU_SOURCE” redefined [enabled by default]
#define _GNU_SOURCE
^
In file included from /usr/include/python2.7/pyconfig.h:6:0,
from openlava/lsblib.c:8:
/usr/include/python2.7/pyconfig-64.h:1160:0: note: this is the location of the previous definition
#define _GNU_SOURCE 1
^
openlava/lsblib.c: In function ‘__pyx_pf_8openlava_6lsblib_9JobMsgLog_5usrId___get__’:
openlava/lsblib.c:45603:55: error: ‘struct jobMsgLog’ has no member named ‘usrId’
__pyx_t_1 = __Pyx_PyInt_From_int(__pyx_v_self->_data->usrId); if (unlikely(!__pyx_t_1)) {__pyx_filename = __pyx_f[0]; __pyx_lineno = 4512; __pyx_clineno = __LINE__; goto __pyx_L1_error;}
^
openlava/lsblib.c: In function ‘__pyx_pf_8openlava_6lsblib_9JobMsgLog_5msgId___get__’:
openlava/lsblib.c:45729:55: error: ‘struct jobMsgLog’ has no member named ‘msgId’
__pyx_t_1 = __Pyx_PyInt_From_int(__pyx_v_self->_data->msgId); if (unlikely(!__pyx_t_1)) {__pyx_filename = __pyx_f[0]; __pyx_lineno = 4522; __pyx_clineno = __LINE__; goto __pyx_L1_error;}
^
openlava/lsblib.c: In function ‘__pyx_pf_8openlava_6lsblib_9JobMsgLog_4type___get__’:
openlava/lsblib.c:45792:55: error: ‘struct jobMsgLog’ has no member named ‘type’
__pyx_t_1 = __Pyx_PyInt_From_int(__pyx_v_self->_data->type); if (unlikely(!__pyx_t_1)) {__pyx_filename = __pyx_f[0]; __pyx_lineno = 4527; __pyx_clineno = __LINE__; goto __pyx_L1_error;}
^
openlava/lsblib.c: In function ‘__pyx_pf_8openlava_6lsblib_9JobMsgLog_3src___get__’:
openlava/lsblib.c:45856:59: error: ‘struct jobMsgLog’ has no member named ‘src’
__pyx_t_1 = __Pyx_PyBytes_FromString(__pyx_v_self->_data->src); if (unlikely(!__pyx_t_1)) {__pyx_filename = __pyx_f[0]; __pyx_lineno = 4532; __pyx_clineno = __LINE__; goto __pyx_L1_error;}
^
openlava/lsblib.c: In function ‘__pyx_pf_8openlava_6lsblib_9JobMsgLog_4dest___get__’:
openlava/lsblib.c:45924:59: error: ‘struct jobMsgLog’ has no member named ‘dest’
__pyx_t_1 = __Pyx_PyBytes_FromString(__pyx_v_self->_data->dest); if (unlikely(!__pyx_t_1)) {__pyx_filename = __pyx_f[0]; __pyx_lineno = 4537; __pyx_clineno = __LINE__; goto __pyx_L1_error;}
^
error: command ‘gcc’ failed with exit status 1
edit file: /opt/openlava-3.0/include/lsbatch.h
change:
struct jobMsgLog {
int jobId;
int idx;
char *msg;
int usrId;
int msgId;
int type;
char *src;
char *dest;
};
It should compile
OMG thank you
If you add “myorigin = $mydomain” to the top of main.cf you will not need to add any aliases. If the node is a send only postfix host then I recommend the following added to the top of the file.
###
myorigin = $mydomain
inet_interfaces = loopback-only
mydestination =
###
Thanks for this nice tutorial!
I encountered the following problem. As soon as I connect to the server with my browser I get the following error message:
ImportError at /
liblsf.so.0: cannot open shared object file: No such file or directory
in
/opt/openlava_webui/openlavaweb/cluster/openlavacluster.py in , line 22
I think this results from a not defined env variable, but I’m really not sure (I defined LD_LIBRARY_PATH as /opt/openlava-3.0/lib …where the not imported file is located)
Greets,
Markus
Update: I was right with the LD_LIBRARY-PATh environmental variable. Although I defined it the linker couldn’t find it. So i defined it in /etc/ld.so.conf –> updated ldconfig and repeated the procedure…now it is working!!!
Running into some trouble with the openlava-python build. The setup.py seems to run, but afterwards I can’t seem to import lsblib from openlava. I should have all the dependencies installed and the only difference between my version of openlava and the one in this guide is that I’m using openlava 3.0. Build details below:
System:
CentOS 7 3.10.0-229.11.1.el7.x86_64
gcc version 4.8.3 20140911 (Red Hat 4.8.3-9) (GCC)
running install
running build
running build_py
creating build
creating build/lib.linux-x86_64-2.7
creating build/lib.linux-x86_64-2.7/openlava
copying openlava/__init__.py -> build/lib.linux-x86_64-2.7/openlava
running build_ext
cythoning openlava/lsblib.pyx to openlava/lsblib.c
warning: openlava/openlava_base.pxd:23:16: Function signature does not match previous declaration
building ‘openlava.lsblib’ extension
creating build/temp.linux-x86_64-2.7
creating build/temp.linux-x86_64-2.7/openlava
gcc -pthread -fno-strict-aliasing -O2 -g -pipe -Wall -Wp,-D_FORTIFY_SOURCE=2 -fexceptions -fstack-protector-strong –param=ssp-buffer-size=4 -grecord-gcc-switches -m64 -mtune=generic -D_GNU_SOURCE -fPIC -fwrapv -DNDEBUG -O2 -g -pipe -Wall -Wp,-D_FORTIFY_SOURCE=2 -fexceptions -fstack-protector-strong –param=ssp-buffer-size=4 -grecord-gcc-switches -m64 -mtune=generic -D_GNU_SOURCE -fPIC -fwrapv -fPIC -I/opt/openlava-3.0/etc/../include -I. -I/usr/include/python2.7 -c openlava/lsblib.c -o build/temp.linux-x86_64-2.7/openlava/lsblib.o -O3 -Wall
In file included from /opt/openlava-3.0/etc/../include/lsbatch.h:26:0,
from openlava/lsblib.c:242:
/opt/openlava-3.0/etc/../include/lsf.h:19:0: warning: “_GNU_SOURCE” redefined [enabled by default]
#define _GNU_SOURCE
^
In file included from /usr/include/python2.7/pyconfig.h:6:0,
from /usr/include/python2.7/Python.h:8,
from openlava/lsblib.c:4:
/usr/include/python2.7/pyconfig-64.h:1160:0: note: this is the location of the previous definition
#define _GNU_SOURCE 1
^
gcc -pthread -shared -Wl,-z,relro build/temp.linux-x86_64-2.7/openlava/lsblib.o /opt/openlava-3.0/etc/../lib/liblsf.a /opt/openlava-3.0/etc/../lib/liblsbatch.a -L/opt/openlava-3.0/etc/../lib -L. -llsf -llsbatch -lnsl -lpython2.7 -o build/lib.linux-x86_64-2.7/openlava/lsblib.so -g
cythoning openlava/lslib.pyx to openlava/lslib.c
warning: openlava/openlava_base.pxd:23:16: Function signature does not match previous declaration
building ‘openlava.lslib’ extension
gcc -pthread -fno-strict-aliasing -O2 -g -pipe -Wall -Wp,-D_FORTIFY_SOURCE=2 -fexceptions -fstack-protector-strong –param=ssp-buffer-size=4 -grecord-gcc-switches -m64 -mtune=generic -D_GNU_SOURCE -fPIC -fwrapv -DNDEBUG -O2 -g -pipe -Wall -Wp,-D_FORTIFY_SOURCE=2 -fexceptions -fstack-protector-strong –param=ssp-buffer-size=4 -grecord-gcc-switches -m64 -mtune=generic -D_GNU_SOURCE -fPIC -fwrapv -fPIC -I/opt/openlava-3.0/etc/../include -I. -I/usr/include/python2.7 -c openlava/lslib.c -o build/temp.linux-x86_64-2.7/openlava/lslib.o -O3 -Wall
In file included from /opt/openlava-3.0/etc/../include/lsbatch.h:26:0,
from openlava/lslib.c:243:
/opt/openlava-3.0/etc/../include/lsf.h:19:0: warning: “_GNU_SOURCE” redefined [enabled by default]
#define _GNU_SOURCE
^
In file included from /usr/include/python2.7/pyconfig.h:6:0,
from /usr/include/python2.7/Python.h:8,
from openlava/lslib.c:4:
/usr/include/python2.7/pyconfig-64.h:1160:0: note: this is the location of the previous definition
#define _GNU_SOURCE 1
^
gcc -pthread -shared -Wl,-z,relro build/temp.linux-x86_64-2.7/openlava/lslib.o /opt/openlava-3.0/etc/../lib/liblsf.a /opt/openlava-3.0/etc/../lib/liblsbatch.a -L/opt/openlava-3.0/etc/../lib -L. -llsf -llsbatch -lnsl -lpython2.7 -o build/lib.linux-x86_64-2.7/openlava/lslib.so -g
running install_lib
copying build/lib.linux-x86_64-2.7/openlava/lsblib.so -> /usr/lib64/python2.7/site-packages/openlava
copying build/lib.linux-x86_64-2.7/openlava/lslib.so -> /usr/lib64/python2.7/site-packages/openlava
running install_egg_info
Removing /usr/lib64/python2.7/site-packages/openlava_bindings-1.0-py2.7.egg-info
Writing /usr/lib64/python2.7/site-packages/openlava_bindings-1.0-py2.7.egg-info
Traceback (most recent call last):
File “./test.py”, line 20, in
from openlava import lsblib
ImportError: liblsf.so.0: cannot open shared object file: No such file or directory
TESTS FAILED
HI .. Wanted to try OpenLAVA as our HPC clustering solution.
I am looking kind of software where i can build my Master .. install cluster software (OpenLAVA) and master to my new brand node machine which can be pushed thru the network boot on node machines.
How can i do this thru using OpenLAVA. Please suggest.
Regards,
Srikanth.K
+91-9986236963.
Attempting to install with openlava 3.0 on CentOS 6.7
Getting all the way to testing the web page and I get:
ClusterException at /
Unable to get list of queues: Failed in an LSF library call
Request Method: GET
Request URL: http://openlava.luxtera.com/
Django Version: 1.4.21
Exception Type: ClusterException
Exception Value:
Unable to get list of queues: Failed in an LSF library call
Exception Location: /opt/openlava_webui/openlavaweb/cluster/openlavacluster.py in raise_cluster_exception, line 262
Python Executable: /usr/bin/python
Python Version: 2.6.6
Python Path:
[‘/opt/openlava_webui’,
‘/usr/lib/python2.6/site-packages/django_openlavaweb-1.1-py2.6.egg’,
‘/usr/lib64/python26.zip’,
‘/usr/lib64/python2.6’,
‘/usr/lib64/python2.6/plat-linux2’,
‘/usr/lib64/python2.6/lib-tk’,
‘/usr/lib64/python2.6/lib-old’,
‘/usr/lib64/python2.6/lib-dynload’,
‘/usr/lib64/python2.6/site-packages’,
‘/usr/lib/python2.6/site-packages’,
‘/usr/lib/python2.6/site-packages/setuptools-0.6c11-py2.6.egg-info’]
Server time: Thu, 10 Sep 2015 17:27:59 -0500
I’ve already resolved the “/opt/openlava-3.0/include/lsbatch.h” issue and the “liblsf.so.0: cannot open shared object file: No such file or directory” issue.
Reloaded from scratch with CentOS 7. Same exact error message on web page. Unable to get list of queues.
Ran into the “/opt/openlava-3.0/include/lsbatch.h” issue and the “liblsf.so.0: cannot open shared object file: No such file or directory” issues as well during the install.
Hi,
Probably there have been some changes in the packages. I haven’t got a lot of time recently to spend time on this. I would need to look into it a little better to give you some useful information.
I am having the exact same issues as Bob on a fresh minimal CentOS7 install. I also had the “/opt/openlava-3.0/include/lsbatch.h” issue and the “liblsf.so.0: cannot open shared object file: No such file or directory” issues and corrected them.
Now I get the following error message
Any assistance would be greatly appreciated
ClusterException at /
Unable to get list of queues: Failed in an LSF library call
Request Method: GET
Request URL: http://192.168.30.149/
Django Version: 1.6.11
Exception Type: ClusterException
Exception Value:
Unable to get list of queues: Failed in an LSF library call
Exception Location: /opt/openlava_webui/openlavaweb/cluster/openlavacluster.py in raise_cluster_exception, line 262
Python Executable: /usr/bin/python
Python Version: 2.7.5
Python Path:
[‘/opt/openlava_webui’,
‘/usr/lib/python2.7/site-packages/django_openlavaweb-1.1-py2.7.egg’,
‘/usr/lib64/python27.zip’,
‘/usr/lib64/python2.7’,
‘/usr/lib64/python2.7/plat-linux2’,
‘/usr/lib64/python2.7/lib-tk’,
‘/usr/lib64/python2.7/lib-old’,
‘/usr/lib64/python2.7/lib-dynload’,
‘/usr/lib64/python2.7/site-packages’,
‘/usr/lib/python2.7/site-packages’]
Server time: Thu, 5 Nov 2015 00:17:52 +0000
Just an additional note, I just built a clean CentOS 6 box and tried it on that, same error. So both CentOS 6 & 7 are affected.
Also noticed this while going through the process when issuing the command
django-admin startproject openlava_webui
you have the same name twice and it complains about it already existed, perhaps this is causing some issues?
Here is the output when access the url
Thanks
Request Method: GET
Request URL: http://192.168.30.154/
Django Version: 1.4.21
Exception Type: ClusterException
Exception Value:
Unable to get list of queues: Failed in an LSF library call
Exception Location: /opt/openlava_webui/openlavaweb/cluster/openlavacluster.py in raise_cluster_exception, line 262
Python Executable: /usr/bin/python
Python Version: 2.6.6
Python Path:
[‘/opt/openlava_webui’,
‘/usr/lib/python2.6/site-packages/django_openlavaweb-1.1-py2.6.egg’,
‘/usr/lib64/python26.zip’,
‘/usr/lib64/python2.6’,
‘/usr/lib64/python2.6/plat-linux2’,
‘/usr/lib64/python2.6/lib-tk’,
‘/usr/lib64/python2.6/lib-old’,
‘/usr/lib64/python2.6/lib-dynload’,
‘/usr/lib64/python2.6/site-packages’,
‘/usr/lib/python2.6/site-packages’,
‘/usr/lib/python2.6/site-packages/setuptools-0.6c11-py2.6.egg-info’]
Hello, James
Could you please explain how you resolved “liblsf.so.0: cannot open shared object file: No such file or directory” issue?
Thank you in advance
Hello again
Looks like I resolved the issue.
But got ClusterException: Unable to get list of queues: Failed in an LSF library call
Did you manage to resolve it ?
Create a new configuration file for ld linker to pick your LSF shared libraries:
$ echo $LSF_TOP
/opt/openlava
$ echo “$LSF_TOP/lib” > /etc/ld.so.conf.d/openlava-x86_64.conf
$ cat /etc/ld.so.conf.d/openlava-x86_64.conf
/opt/openlava/lib
$ ldconfig -v | grep liblsf.so.0
…..
liblsf.so.0 -> liblsf.so.0.0.1
If that doesn’t help then you might need to run chrpath or patchelf on bin/* and sbin/*, as well as lib/*
As for the Unable to get list of queues error message, before you start python manage.py runserver …., make sure you are sourced you open lava enviroment (openlava.sh or openlava.csh), where you need define additional vars. From my experience I have these defined in openlava.csh and openlava-web seems to be working every time: LSF_ENVDIR, LSF_BINDIR, LSF_SERVERDIR, LSF_LIBDIR, LSF_HOME, LSF_TOP, LSF_SHAREDIR
i still had this question “Unable to get list of queues: Failed in an LSF library call”, somebody could help resolve it?
I too have the exact same problem.
ClusterException at /
Unable to get list of queues: Failed in an LSF library call
Request Method: GET
Request URL: http://rjcaews015:84/
Django Version: 1.6.12
Exception Type: ClusterException
Exception Value:
Unable to get list of queues: Failed in an LSF library call
Exception Location: /opt/openlava_webui/openlavaweb/cluster/openlavacluster.py in raise_cluster_exception, line 262
Python Executable: /bin/python
Python Version: 2.7.5
Python Path:
[‘/opt/openlava_webui’,
‘/usr/lib/python2.7/site-packages/django_openlavaweb-1.1-py2.7.egg’,
‘/usr/lib64/python27.zip’,
‘/usr/lib64/python2.7’,
‘/usr/lib64/python2.7/plat-linux2’,
‘/usr/lib64/python2.7/lib-tk’,
‘/usr/lib64/python2.7/lib-old’,
‘/usr/lib64/python2.7/lib-dynload’,
‘/usr/lib64/python2.7/site-packages’,
‘/usr/lib64/python2.7/site-packages/gtk-2.0’,
‘/usr/lib/python2.7/site-packages’]
Server time: Fri, 3 Jun 2016 15:55:10 +0000
I am getting the following error when I access the django server:
ImportError: /opt/openlava-3.3/lib/liblsbatch.so.0: undefined symbol: mergeResreq
Any advice on how to resolve? I’ve tried building again but without much luck, full traceback is below:
Quit the server with CONTROL-C.
Internal Server Error: /
Traceback (most recent call last):
File “/usr/local/lib/python2.7/site-packages/django/core/handlers/base.py”, line 134, in get_response
resolver_match = resolver.resolve(request.path_info)
File “/usr/local/lib/python2.7/site-packages/django/core/urlresolvers.py”, line 376, in resolve
sub_match = pattern.resolve(new_path)
File “/usr/local/lib/python2.7/site-packages/django/core/urlresolvers.py”, line 376, in resolve
sub_match = pattern.resolve(new_path)
File “/usr/local/lib/python2.7/site-packages/django/core/urlresolvers.py”, line 248, in resolve
return ResolverMatch(self.callback, args, kwargs, self.name)
File “/usr/local/lib/python2.7/site-packages/django/core/urlresolvers.py”, line 255, in callback
self._callback = get_callable(self._callback_str)
File “/usr/local/lib/python2.7/site-packages/django/utils/lru_cache.py”, line 100, in wrapper
result = user_function(*args, **kwds)
File “/usr/local/lib/python2.7/site-packages/django/core/urlresolvers.py”, line 115, in get_callable
mod = import_module(mod_name)
File “/usr/lib64/python2.7/importlib/__init__.py”, line 37, in import_module
__import__(name)
File “/opt/openlava_webui/openlavaweb/views.py”, line 41, in
from openlavaweb.cluster.openlavacluster import Cluster, Host, Job, Queue, User, ExecutionHost, NoSuchHostError
File “/opt/openlava_webui/openlavaweb/cluster/openlavacluster.py”, line 22, in
from openlava import lslib, lsblib
ImportError: /opt/openlava-3.3/lib/liblsbatch.so.0: undefined symbol: mergeResreq
My assumption is that too much has changed between 2.2 and 3.3 for OpenLavaWeb to work with 3.3. I pulled 2.2 from the openlava github project and build from those sources, that allowed me to get the webserver up and running again. If anyone knows the latest version of OpenLava that works with openlavaweb I would greatly appreciate the information so I don’t have to keep trying (I’ve already tried 3.3 and 3.0).
Hi.
It not worked for me.
When I run “python /opt/openlava_webui/manage.py runserver 0.0.0.0:80” I saw in the browser a debug page and in the terminal I got:
System check identified no issues (0 silenced).
July 08, 2016 – 09:28:03
Django version 1.9.7, using settings ‘openlava_webui.settings’
Starting development server at http://0.0.0.0:80/
Quit the server with CONTROL-C.
Internal Server Error: /
Traceback (most recent call last):
File “/opt/rh/python27/root/usr/lib64/python2.7/site-packages/django/core/handlers/base.py”, line 134, in get_response
resolver_match = resolver.resolve(request.path_info)
File “/opt/rh/python27/root/usr/lib64/python2.7/site-packages/django/core/urlresolvers.py”, line 376, in resolve
sub_match = pattern.resolve(new_path)
File “/opt/rh/python27/root/usr/lib64/python2.7/site-packages/django/core/urlresolvers.py”, line 376, in resolve
sub_match = pattern.resolve(new_path)
File “/opt/rh/python27/root/usr/lib64/python2.7/site-packages/django/core/urlresolvers.py”, line 248, in resolve
return ResolverMatch(self.callback, args, kwargs, self.name)
File “/opt/rh/python27/root/usr/lib64/python2.7/site-packages/django/core/urlresolvers.py”, line 255, in callback
self._callback = get_callable(self._callback_str)
File “/opt/rh/python27/root/usr/lib64/python2.7/site-packages/django/utils/lru_cache.py”, line 100, in wrapper
result = user_function(*args, **kwds)
File “/opt/rh/python27/root/usr/lib64/python2.7/site-packages/django/core/urlresolvers.py”, line 115, in get_callable
mod = import_module(mod_name)
File “/opt/rh/python27/root/usr/lib64/python2.7/importlib/__init__.py”, line 37, in import_module
__import__(name)
File “/opt/openlava_webui/openlavaweb/views.py”, line 41, in
from openlavaweb.cluster.openlavacluster import Cluster, Host, Job, Queue, User, ExecutionHost, NoSuchHostError
File “/opt/openlava_webui/openlavaweb/cluster/openlavacluster.py”, line 22, in
from openlava import lslib, lsblib
ImportError: /opt/openlava-3.3/lib/liblsbatch.so.0: undefined symbol: make_link
[08/Jul/2016 09:28:05] “GET / HTTP/1.1” 500 110336
[08/Jul/2016 09:28:05] “GET /favicon.ico HTTP/1.1” 404 8305
.
.
I got this
error __init__()
while install (/opt/openlava-web/python setup.py install
Take a look on this screenshot :
http://imgur.com/a/mT690
Guys help me to resolve this/.
Thanks.
gcc -pthread -fno-strict-aliasing -O2 -g -pipe -Wall -Wp,-D_FORTIFY_SOURCE=2 -fexceptions -fstack-protector-strong –param=ssp-buffer-size=4 -grecord-gcc-switches -m64 -mtune=generic -D_GNU_SOURCE -fPIC -fwrapv -DNDEBUG -O2 -g -pipe -Wall -Wp,-D_FORTIFY_SOURCE=2 -fexceptions -fstack-protector-strong –param=ssp-buffer-size=4 -grecord-gcc-switches -m64 -mtune=generic -D_GNU_SOURCE -fPIC -fwrapv -fPIC -I/opt/openlava-3.2/include -I. -I/usr/include/python2.7 -c openlava/lsblib.c -o build/temp.linux-x86_64-2.7/openlava/lsblib.o -O3 -Wall
In file included from /opt/openlava-3.2/include/lsbatch.h:26:0,
from openlava/lsblib.c:274:
/opt/openlava-3.2/include/lsf.h:19:0: warning: “_GNU_SOURCE” redefined [enabled by default]
#define _GNU_SOURCE
^
In file included from /usr/include/python2.7/pyconfig.h:6:0,
from /usr/include/python2.7/Python.h:8,
from openlava/lsblib.c:4:
/usr/include/python2.7/pyconfig-64.h:1160:0: note: this is the location of the previous definition
#define _GNU_SOURCE 1
^
openlava/lsblib.c: In function ‘__pyx_pf_8openlava_6lsblib_9JobMsgLog_5usrId___get__’:
openlava/lsblib.c:44539:55: error: ‘struct jobMsgLog’ has no member named ‘usrI ’
__pyx_t_1 = __Pyx_PyInt_From_int(__pyx_v_self->_data->usrId); if (unlikely(!__pyx_t_1)) __PYX_ERR(0, 4512, __pyx_L1_error)
^
openlava/lsblib.c: In function ‘__pyx_pf_8openlava_6lsblib_9JobMsgLog_5msgId___get__’:
openlava/lsblib.c:44659:55: error: ‘struct jobMsgLog’ has no member named ‘msgI ’
__pyx_t_1 = __Pyx_PyInt_From_int(__pyx_v_self->_data->msgId); if (unlikely(!__pyx_t_1)) __PYX_ERR(0, 4522, __pyx_L1_error)
^
openlava/lsblib.c: In function ‘__pyx_pf_8openlava_6lsblib_9JobMsgLog_4type___get__’:
openlava/lsblib.c:44719:55: error: ‘struct jobMsgLog’ has no member named ‘type’
__pyx_t_1 = __Pyx_PyInt_From_int(__pyx_v_self->_data->type); if (unlikely(!__pyx_t_1)) __PYX_ERR(0, 4527, __pyx_L1_error)
^
openlava/lsblib.c: In function ‘__pyx_pf_8openlava_6lsblib_9JobMsgLog_3src___get__’:
openlava/lsblib.c:44780:59: error: ‘struct jobMsgLog’ has no member named ‘src’
__pyx_t_1 = __Pyx_PyBytes_FromString(__pyx_v_self->_data->src); if (unlikely(!__pyx_t_1)) __PYX_ERR(0, 4532, __pyx_L1_error)
^
openlava/lsblib.c: In function ‘__pyx_pf_8openlava_6lsblib_9JobMsgLog_4dest___get__’:
openlava/lsblib.c:44845:59: error: ‘struct jobMsgLog’ has no member named ‘dest’
__pyx_t_1 = __Pyx_PyBytes_FromString(__pyx_v_self->_data->dest); if (unlikely(!__pyx_t_1)) __PYX_ERR(0, 4537, __pyx_L1_error)
^
error: command ‘gcc’ failed with exit status 1
thanks, but when i execute this step, some errors happed as follows. why? how can i solve it
openlava_webui]# python manage.py syncdb
ImproperlyConfigured: settings.DATABASES is improperly configured. Ple
ase supply the ENGINE value. Check settings documentation for more details.