
When configuring a Linux host running either Red Hat Linux 6, Red Hat Linux 7, CentOS 6 or CentOS7 with two network interface cards (NIC) that each have an IP address in a different network or subnet, you could end up in a situation where one of the IP addresses isn’t reachable outside it’s own network. Both IP’s will be responding to a ping from another host in the same network as those IP addresses but only one is responding to ping from another network. On most other distributions, like Debian, this issue, which is caused by asymmetric routing, doesn’t seem to exist.
When you’re experiencing this issue, it is most probably caused by asymmetric routing. In short this means that the interface that has received a packet doesn’t respond to the source of the packet by itself but via another interface. While this causes one of the interfaces to be unavailable from the outside on Red Hat based distributions, the problems with asymmetric routing also do exist on the other distributions although it seems to work fine.
Asymmetric routing
Asymmetric routing isn’t a big problem but it can cause issues related to NAT on firewalls and it has some impact on network performance.
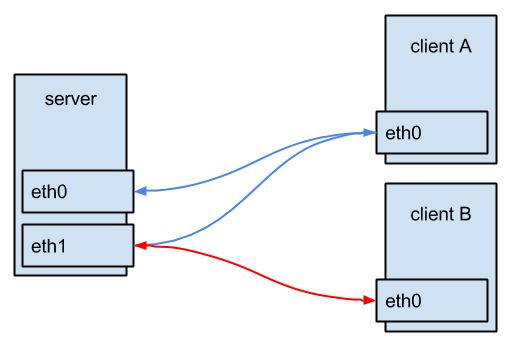 The above image shows asymmetric routing: a packet sent from client A to the server, enters the server via network-interface eth0 but, due to the routing, it’s routed back to client A via interface eth1 of the server. For the client, it looks like everything is working normal. Packets do flow in and out from the server. It’s clear that interface eth1 will have a higher load that eth0 and while you’re thinking that you have two full 1Gbit interfaces, the speed is limited to the speed of eth1.
rp_filter
Since RHEL 6 (and CentOS 6), asymmetric routing doesn’t work anymore out of the box. The cause of the issue is a change in the default value for kernel parameter rp_filter.
Rp_filter stands for reverse path filtering. The reverse path filter will check if the source of a packet that was received on a certain interface is reachable trough the same interface it was received. The purpose is to prevent spoofed packets, with a changed source address, not being processed/routed further. In a router it could also prevent routing packets that have a private IP as source to the internet as they obviously will never find their way back.
Since RHEL 6 and its derivative CentOS 6, rp_filter, which can be controlled by kernel parameters, is set on a default value of 1. This means that the rp_filter is operational in strict mode and does exactly what it is designed for.
Possible value are:
- 0: No source validation
- 1: Strict mode (failed packets are discarded), described in RFC3704
- 2: Loose mode, only discards the packet when it isn’t routable over any of the interfaces on the host.
To test this behavior, I set up a system that is connected to two networks: 192.168.0.0/24 and 192.168.1.0/24. I have a client in both networks and a client which is in another network.
The server:
[jensd@server ~]$ ip a|grep "inet "
    inet 127.0.0.1/8 scope host lo
    inet 192.168.0.10/22 brd 192.168.0.255 scope global ens192
    inet 192.168.1.10/24 brd 192.168.1.255 scope global ens224
[jensd@server ~]$ ip route
default via 192.168.0.1 dev ens192
169.254.0.0/16 dev ens192  scope link  metric 1002
169.254.0.0/16 dev ens224  scope link  metric 1003
192.168.1.0/24 dev ens224  proto kernel  scope link  src 192.168.1.10
192.168.0.0/24 dev ens192  proto kernel  scope link  src 192.168.0.10
[jensd@server ~]$ sysctl -a|grep rp_filter
...
net.ipv4.conf.all.arp_filter = 0
net.ipv4.conf.all.rp_filter = 0
net.ipv4.conf.default.arp_filter = 0
net.ipv4.conf.default.rp_filter = 1
net.ipv4.conf.ens192.arp_filter = 0
net.ipv4.conf.ens192.rp_filter = 1
net.ipv4.conf.ens224.arp_filter = 0
net.ipv4.conf.ens224.rp_filter = 1
net.ipv4.conf.lo.arp_filter = 0
net.ipv4.conf.lo.rp_filter = 0
Ping to the server from a client in the 192.168.0.0/24 network:
[jensd@clienta ~]$ ip a|grep "inet "
    inet 127.0.0.1/8 scope host lo
    inet 192.168.0.5/24 brd 192.168.0.255 scope global eth0
[jensd@clienta ~]$ ping 192.168.0.10 -c 1
PING 192.168.0.10 (192.168.0.10) 56(84) bytes of data.
64 bytes from 192.168.0.10: icmp_seq=1 ttl=64 time=0.300 ms

--- 192.168.0.10 ping statistics ---
1 packets transmitted, 1 received, 0% packet loss, time 0ms
rtt min/avg/max/mdev = 0.300/0.300/0.300/0.000 ms
Ping to the server from a client in the 192.168.1.0/24 network
[jensd@clientb ~]$ ip a|grep "inet "
    inet 127.0.0.1/8 scope host lo
    inet 192.168.1.5/24 brd 192.168.1.255 scope global eth0
[jensd@clientb ~]$ ping 192.168.1.10 -c 1
PING 192.168.1.10 (192.168.1.10) 56(84) bytes of data.
64 bytes from 192.168.1.10: icmp_seq=1 ttl=64 time=0.362 ms

--- 192.168.1.10 ping statistics ---
1 packets transmitted, 1 received, 0% packet loss, time 0ms
rtt min/avg/max/mdev = 0.362/0.362/0.362/0.000 ms
Ping to both IP’s from a client in another network:
[jensd@clientc ~]# ip a|grep "inet "
    inet 127.0.0.1/8 scope host lo
    inet 192.168.2.5/24 brd 192.168.2.255 scope global eth0
[jensd@clientc ~]$ ping 192.168.0.10 -c 1
PING 192.168.0.10 (192.168.0.10) 56(84) bytes of data.
64 bytes from 192.168.0.10: icmp_seq=1 ttl=63 time=1.09 ms

--- 192.168.0.10 ping statistics ---
1 packets transmitted, 1 received, 0% packet loss, time 1ms
rtt min/avg/max/mdev = 1.093/1.093/1.093/0.000 ms
[jensd@clientc ~]$ ping 192.168.1.10 -c 1
PING 192.168.1.10 (192.168.1.10) 56(84) bytes of data.

--- 192.168.1.10 ping statistics ---
1 packets transmitted, 0 received, 100% packet loss, time 10000ms
As you can see, both IP’s are reachable from within the same network but only one, the one that has it’s default gateway in the routing table, is reachable from other networks.
In the output from the server, you can see that rp_filter for both interfaces has a value of 1, strict mode.
The quick and dirty solution
The easiest solution is just to change the value of rp_filter to allow packets to flow out of another interface that the source interface.
Now, let’s change the value of rp_filter to loose mode, value 2 and see what happens:
[jensd@server ~]$ sudo sysctl net.ipv4.conf.all.rp_filter=2
net.ipv4.conf.all.rp_filter = 2
[jensd@clientc ~]$ ping 192.168.0.10 -c 1
PING 192.168.0.10 (192.168.0.10) 56(84) bytes of data.
64 bytes from 192.168.0.10: icmp_seq=1 ttl=63 time=0.282 ms

--- 192.168.0.10 ping statistics ---
1 packets transmitted, 1 received, 0% packet loss, time 0ms
rtt min/avg/max/mdev = 0.282/0.282/0.282/0.000 ms
[jensd@clientc ~]$ ping 192.168.1.10 -c 1
PING 192.168.1.10 (192.168.1.10) 56(84) bytes of data.
64 bytes from 192.168.1.10: icmp_seq=1 ttl=63 time=0.550 ms

--- 192.168.1.10 ping statistics ---
1 packets transmitted, 1 received, 0% packet loss, time 0ms
rtt min/avg/max/mdev = 0.550/0.550/0.550/0.000 ms
With a minimum of effort, both IP addresses are reachable from the outside. To make the change to rp_filter permanent, you can do the following:
For RHEL 6 and CentOS 6:
Edit /etc/sysctl.conf and change the value for rp_filter:
# Kernel sysctl configuration file for Red Hat Linux
#
# For binary values, 0 is disabled, 1 is enabled.  See sysctl(8) and
# sysctl.conf(5) for more details.

# Controls IP packet forwarding
net.ipv4.ip_forward = 1

# Controls source route verification
net.ipv4.conf.default.rp_filter = 2
...
For RHEL 7 and CentOS 7:
[jensd@server ~]$ echo "net.ipv4.conf.all.rp_filter = 2"|sudo tee /etc/sysctl.d/99-rp_filter.conf
The best solution
Besides the quick solution, there is also a better solution. While changing the value for rp_filter is getting both interfaces and IP-addresses to respond from other networks, the setup is still asymmetric. The best solution is to get rid of the asymmetric routing and let each interface route it’s own packets to the default gateway.
The goal is to become symmetric routing:
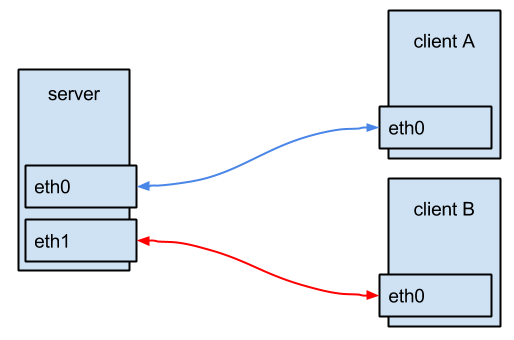
Each interface on the server should have it’s own default gateway, which allows that interface to reply itself to incoming packets from other networks.
A normal routing table can only have one default gateway. This is quite logical since it’s the place where to send packets that do not match anything else in the rest of the table. To be able to have two default gateways, one for each interface, you need to setup policy based routing.
Policy based routing allows you to have multiple routing tables. Which table is used, depends on a set of rules.
To setup policy based routing for our example case, we will use two policy based tables. While it is possible to give a nice name to the tables (in /etc/iproute2/rt_tables), it’s not really when you only plan to have a few. Without a name, the tables are automatically created when you’re adding something to them.
Let’s start with adding a route for the network itself (link) and one for the default gateway for each interface. ens192 (192.168.0.10) will use table 1, ens224 (192.168.1.10) will use table 2.
[jensd@server ~]$ sudo ip route add 192.168.0.0/24 dev ens192 tab 1
[jensd@server ~]$ sudo ip route add 192.168.1.0/24 dev ens224 tab 2
[jensd@server ~]$ sudo ip route add default via 192.168.0.1 dev ens192 tab 1
[jensd@server ~]$ sudo ip route add default via 192.168.1.1 dev ens224 tab 2
To define when table 1 or 2 will be used, we’ll add a rule, based on the source of the packet to the policy and refresh the policy based routing:
[jensd@server ~]$ sudo ip rule add from 192.168.0.10/32 tab 1 priority 100
[jensd@server ~]$ sudo ip rule add from 192.168.1.10/32 tab 2 priority 200
[jensd@server ~]$ sudo ip route flush cache
To check if we did everything correctly, let’s list the tables and the rules:
[jensd@server ~]$ ip route show tab 1
default via 192.168.0.1 dev ens192
192.168.0.0/24 dev ens192  scope link
[jensd@server ~]$ ip route show tab 2
default via 192.168.1.1 dev ens224
192.168.1.0/24 dev ens224  scope link
[jensd@server ~]$ ip rule show
0:      from all lookup local
100:    from 192.168.0.10 lookup 1
200:    from 192.168.1.10 lookup 2
32766:  from all lookup main
32767:  from all lookup default
[jensd@server ~]$ ip route
default via 192.168.0.10 dev ens192
169.254.0.0/16 dev ens192  scope link  metric 1002
169.254.0.0/16 dev ens224  scope link  metric 1003
192.168.1.0/24 dev ens224  proto kernel  scope link  src 192.168.1.10
192.168.0.0/24 dev ens192  proto kernel  scope link  src 192.168.0.10
As you can see in the output from ip rule show, our policy based tables have a higher priority than the main table, which can be viewed with ip route. Nevertheless it’s import to still have a default route in the main table since packets leaving the machine itself can have a source IP of 0.0.0.0 and would not match any of the rules in our policy.
Make the changes permanent
Up to now, the changes would get lost after a reboot or restart of the networking. To make the changes permanent, create a route and rule file for every interface. For the above example, the contents would look like this:
[jensd@server ~]$ cat /etc/sysconfig/network-scripts/route-ens192
192.168.0.0/24 dev ens192 tab 1
default via 192.168.0.1 dev ens192 tab 1
[jensd@server ~]$ cat /etc/sysconfig/network-scripts/route-ens224
192.168.1.0/24 dev ens224 tab 2
default via 192.168.1.1 dev ens224 tab 2
[jensd@server ~]$ cat /etc/sysconfig/network-scripts/rule-ens192
from 192.168.0.10/32 tab 1 priority 100
[jensd@server ~]$ cat /etc/sysconfig/network-scripts/rule-ens224
from 192.168.1.10/32 tab 2 priority 200
Now your configuration should be persistent.
Some people pointed out in the comments that, in order for the routers to be persistent, you need to first perform the following actions:
yum install NetworkManager-config-routing-rules
systemctl enable NetworkManager-dispatcher.service
systemctl start NetworkManager-dispatcher.service
While this solution is slightly more work than changing the value for rp_filter, it isn’t that hard and has a lot of advantages over the other solution.
Hey, how do I make the routing tables persist after reboot?
Hi, I edited the post to include instructions for this. I forgot this in the original post.
It’s not working, I still have to enter the commands after reboot.
And moreover, it messed up 2 of my network connections (1 nic with multiple aliases), I had to reset them from Network Settings in GUI.
I’m running Centos 7.
Sorry but without any knowledge of your exact config it’s hard to tell exactly what you need to do. The commands and config in this post are what I setup and tested. The idea is that you get the principle and you can use it as an example but you’ll have to adjust it to fit for your needs.
I think the problem with this is that while you are creating your initial tables with ‘ip route add’ that it’s not persistent in with the reboot. You probably want to manually add these tables to rt_tables prior?
orientalsniper: On centos 7 to get this to stick use: net.ipv4.conf.all.rp_filter = 2 (all instead of default) in /etc/sysctl.conf worked for me.
this is great guidance !! its working :-)
Thanks for writing this post! We ran into this problem at work, and this helped to identify and properly resolve the issue real quick.
Thank for the post.
I would like to add for permanent section that ‘NetworkManager doesn’t natively support policy routing but it can support Legacy route-[interface] files via NetworkManager-config-routing-rules package.’ says raatti on page https://www.centos.org/forums/viewtopic.php?f=50&t=50400
Therefore permanent changes on CentOS 7 requires;
yum install NetworkManager-config-routing-rules
systemctl enable NetworkManager-dispatcher.service
systemctl start NetworkManager-dispatcher.service
You’re my savior!
This works for me as well. Thanks.
Author might want to update the article with this information.
just an update the name of the package to install (Duispatcher) is NetworkManager-dispatcher-routing-rules
Many thanks for this post!! I spent hours to try and figure why two nics in different vlans wasn’t working properly, while in old CentOS 5 it worked fine. Both solutions here solved these problems!
What if “ens224” interface is getting IP via DHCP? How to make the rule?
Nice catch. And a good question. I would need to look into this but for sure you could generate the rule-files using a script which is filling in the leased ip dynamically.
how does this apply to earlier versions of redhat like version 5.2?
i am about to come up against this problem,
I have two different switches that go to my sonicwall firewall,
switch a is on the 10.0.1.x subnet and switch b is on the 10.0.3.x subnet,
on switch A is the Redhat 5.2 fileserver 10.0.1.5
right now it has 2 active network connections –
IB0 is an infiniband connection to a separate subnet 192.168.100.x this network is local and doesn’t goto the firewall.
eth0 which is a 10gbe nic card that is connected to the 10gb switch on 10.0.1.x network, 10.0.1.5/255.255.255.0 gateway 10.0.1.1
I have 2 spare 1gb ports on the server eth1 and eth2
I need clients on the 10.0.3.x network to have access to the server without going through the firewall, as the speed through the firewall is horribly slow due to packets being analyzed.
So i was thinking about running a cat 6 cable from eth1 nic to switch 2 – 10.0.3.x network switch and assigning it an ip 10.0.3.5/255.255.255.0 gateway 10.0.3.1
and then having the clients that happen to be macs connect via nfs to the server using that ip address 10.0.3.5, however I’m worried about causing broadcast storms or other issues.
whats the best way to tackle this? or will this work without any other problems
Hello I just what to ask if there is any way that Client A and B can ping one another in this scence. Thanks a lot.
The ability for client A & B to ping each other is not really relevant for this article. Both clients should have a route (or via the default route) to each others subnet. In case you want routing to be done by the server, you will need to add routes on the clients for that.
Dear sir,
in my Scenario i have two nic with different network one is global and one is local with your giving setting both networks are accessible in local network but when i come from another global network (internet) i can’t access those both network only one network can accessible some time global or some time local kindly give me smooth and possible solution of my problem
Thanks.
and sir one more thing i use centos 7 for this purpose
Hi Mohammad,
What you’re looking for is not really what this post is about. You should search for a guide to configure NAT and port forwarding. This will allow you to reach the local addresses from the public IP and to reach the public network from the local addresses.
Much thanks.
its working for me..thanks a lot…..valuable info too…
What if server have 3 NICs?
2 the same as in this case and third (i.e. eth2 and IP 10.10.0.1) is connected to Internet.
On eth2 masquerade is on. Both nets see the internet, but could connect each other. It is necessary that some or all clients from 192.168.0.0/24 could connect with 192.168.1.0/24 and vice versa and at the same time they should have internet connection using eth2
You would need to add another entry for the 3rd card. Same for iptables and masquerade, you will need to specify the interface names on your iptables statements.
Please need your help, i am getting this error
[root@server iproute2]# ip route add 64.x.x.x/24 dev em1 tab 1
RTNETLINK answers: Invalid argument
Helo,
Thank you for this post!)
Everything works well, but I have warning message in the system log:
NetworkManager[879]: ‘rule-‘ or ‘rule6-‘ file is present; you will need to use a dispatcher script to apply these routes
If it’s not working for you on a CentOS 7
just make sure you install the following packages first
yum -y install NetworkManager-config-routing-rules
systemctl enable NetworkManager-dispatcher.service
Just wanted to say thank you for this post. It helped me out of a jam. appreciate it :)
Thanks a lot for the post.
Persistent routing and rules won’t work without following package.
I think you should add following commands to your great manual
yum install NetworkManager-config-routing-rules
systemctl enable NetworkManager-dispatcher.service
systemctl start NetworkManager-dispatcher.service
Anyway thank you very much for this article!
There is a missing point (the article is great though):
The actual difference between for example Debian and RHEL6/7 systems is, that Debian does not have rp_filter enabled AT ALL and it’s configured to a default value of 0. There is no packet forwarding needed.
What rp_filter actually does – each incoming packet is tested against the FIB (Forwarding Information Base) and if the interface is not the best reverse path the packet check will fail. By default failed packets are discarded.
Changing the rp_filter value to 0 would change the behavior to the way Debian works without the need of enabling the packet forwarding, but having this on a value of 1 is currently a recommended practice in RFC3704 to prevent IP spoofing from DDos attacks.
Learning the IP routing behavior and to know how to define a ruleset should be a must-read for all IT admins.
Thanks a lot
Pingback: Linux multihome host with rule based routing | Programmer's diary
Thanks a lot. this is most important solution , which is working fine.
Pingback: Centos7 dual NICs: DMZ & Management - Ringing Liberty
mercikes voor de procedure!
Best how to ever, it worked flawlessly
Thanks man
Do we have a solution for the scenario if one of the NICs is getting IP via DHCP?
4 years later your article save my ass…if I could give you a kiss…I send it to you as I am kissing my screen right now. Love ya!
Thank you so much for this great post! I spent two days trying different appoaches to solve the similar issue on ubuntu, and this works like a charm. Just wanted to point out that the second method actually doesn’t work for me, while the quick and dirty way does.
Really god information.
Thank you.
This helped a lot in resolving a similar issue on RHEL 7.7. Really well explained article, thanks for your help!
Almost six years later and this article clarified for me why I was having the problem and solved it. Thanks
Thank you for publishing this, it also resolved an issue for us as we have 2 networks and wanted to ensure any sends out came back in the same network.
However, we did struggle with the persistency, after adding to the /etc/sysconfig/network-scripts the route and rule, a reboot made it disappeared. Then read this………
Although it is still possible to define the network configuration through the files in the /etc/sysconfig/network-scripts directory, it’s not the preferred way any more (don’t forget to execute # nmcli con reload if you manually modify the files!).
nmcli con reload
and all the config remained yey!
Thank you so f……. much
Thank you for this information. I’ve been googling for the last 2 days and this was the best explanation and only solution that worked for me
Pingback: Port forwarding not working for certain LAN IP - Boot Panic
Pingback: Centos7 dual NICs: DMZ & Management - Boot Panic
Pingback: Port forwarding not working for certain LAN IP
THIS is what I was looking for an entire week! Thank you in 2023 !!!!