
Sometimes you just need some kind of setup which is not so standard. This was the case which lead to this post. For some testing, I needed a minimal environment containing only a BusyBox shell and that was accessible via Dropbear SSH-server. Probably this setup is quite useless for daily use but it can be used as a base for testing with a minimum set of libraries available. Using this setup gives you the flexibility to experiment with a minimal environment without rebuilding small Linux images.
First of all, it might be a good idea to elaborate a little more on the setup. My goal was to create a Linux system that was accessible via SSH (it had to be Dropbear, an alternative to OpenSSH-server) and to have as less as possible libraries in it. Since you do need a shell, BusyBox seemed to be a good choice. BusyBox is a single executable that contains alternatives for common Linux utilities. One of the options would be to build a small system from scratch. I chose to use an existing installation and start my test-environment in a chroot jail. A chroot jail is an isolated environment running on top of another one. The name itself actually tells you what it is, it runs processes under a changed root (a subdirectory of the original root).
How I see this graphically, if it could help:
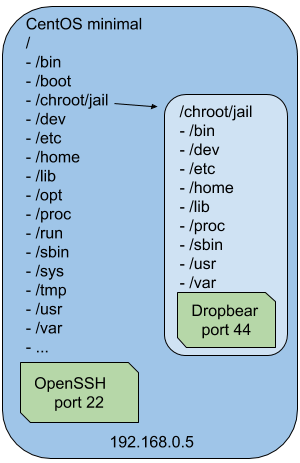
As you can see, Dropbear will be running under the chroot jail. The root filesystem for dropbear is actually /chroot/jail. Access to the SSH-server in the jail can be done using the same IP and the port that Dropbear is listening on. While this environment is in place, we can easily add or remove libraries to check for dependencies or compatibility. These libraries do not need to match with the ones in the real /lib.
To start the setup, we need a CentOS or RHEL (or other distro if you prefer) installation. For this post, I used a minimal CentOS 7.1.
Chroot preparation
First thing to do is to create the root filesystem structure which we need for a minimal system under the directory which we chose as our root jail. In this example: /chroot/busybox.
[root@cen7 ~]# mkdir -pv /chroot/busybox
mkdir: created directory ‘/chroot’
mkdir: created directory ‘/chroot/busybox’
[root@cen7 ~]# cd /chroot/busybox/
[root@cen7 busybox]# mkdir -pv dev/pts proc etc lib usr/lib var/run var/log
mkdir: created directory ‘dev’
mkdir: created directory ‘dev/pts’
mkdir: created directory ‘proc’
mkdir: created directory ‘etc’
mkdir: created directory ‘lib’
mkdir: created directory ‘usr’
mkdir: created directory ‘usr/lib’
mkdir: created directory ‘var’
mkdir: created directory ‘var/run’
mkdir: created directory ‘var/log’
[root@cen7 busybox]# ln -s lib/ lib64
[root@cen7 busybox]# ln -s usr/lib/ usr/lib64
Besides the directory structure, we also need some devices and link to the original /dev/pts and /proc directory:
[root@cen7 busybox]# mknod dev/urandom c 1 9
[root@cen7 busybox]# chmod 0666 dev/urandom
[root@cen7 busybox]# mknod dev/ptmx c 5 2
[root@cen7 busybox]# chmod 0666 dev/ptmx
[root@cen7 busybox]# mknod dev/tty c 5 0
[root@cen7 busybox]# chmod 0666 dev/tty
[root@cen7 busybox]# mount -o bind /dev/pts dev/pts/
[root@cen7 busybox]# mount -o bind /proc proc/
Since we want to login to the chroot, we’ll need some other files too:
[root@cen7 busybox]# cp /etc/localtime etc/
[root@cen7 busybox]# cp /etc/nsswitch.conf etc/
[root@cen7 busybox]# cp /etc/resolv.conf etc/
[root@cen7 busybox]# cp /etc/host.conf etc/
[root@cen7 busybox]# cp /etc/hosts etc/
[root@cen7 busybox]# cp /etc/shells etc/
[root@cen7 busybox]# touch var/log/lastlog
[root@cen7 busybox]# touch var/run/utmp
[root@cen7 busybox]# touch var/log/wtmp
Dropbear compilation for chroot
Now that the base of our chroot is ready, we can compile the latest Dropbear version for the chroot.
First of all, let’s install all components which we’ll need to compile Dropbear, we need a compiler, make and some dependencies.
[root@cen7 busybox]# yum install wget gcc make zlib-devel bzip2 -y
...
Complete!
Let’s download the source of Dropbear and extract it. You can find the source for the latest version at: https://matt.ucc.asn.au/dropbear/releases/.
[root@cen7 ~]# wget https://matt.ucc.asn.au/dropbear/releases/dropbear-2015.71.tar.bz2
--2015-12-09 16:49:38--  https://matt.ucc.asn.au/dropbear/releases/dropbear-2015.71.tar.bz2
Resolving matt.ucc.asn.au (matt.ucc.asn.au)... 130.95.13.18, 2405:3c00:5200:100::18
Connecting to matt.ucc.asn.au (matt.ucc.asn.au)|130.95.13.18|:443... connected.
HTTP request sent, awaiting response... 200 OK
Length: 1616280 (1.5M) [application/x-bzip2]
Saving to: ‘dropbear-2015.71.tar.bz2’

100%[=====================================================>] 1,616,280    596KB/s   in 2.7s

2015-12-09 16:49:42 (596 KB/s) - ‘dropbear-2015.71.tar.bz2’ saved [1616280/1616280]

[root@cen7 ~]# tar -xvjf dropbear-2015.71.tar.bz2
...
[root@cen7 ~]#
At this point, we need to run ./configure to generate an options.h and makefile to do the compilation. We set the prefix to the location of the chroot jail.
[root@cen7 dropbear-2015.71]# ./configure --prefix=/chroot/busybox
checking for gcc... gcc
...
configure: Now edit options.h to choose features.
As the output of ./configure suggests, we’ll edit options.h to disable X-forwarding. This would require us to have Xauth and some dependencies. Since we want to have a minimal set of dependent libraries, I wanted to avoid that.
[root@cen7 dropbear-2015.71]# sed -i '/define\ XAUTH_COMMAND/d' options.h
[root@cen7 dropbear-2015.71]# sed -i '/define\ ENABLE_X11FWD/d' options.h
After editing the file, feel free to look at all definitions in the file to customize a little more if you feel like. After the changes, we can compile Dropbear and install it in the chroot jail:
[root@cen7 dropbear-2015.71]# make
...
[root@cen7 dropbear-2015.71]# make install
install -d /chroot/busybox/sbin
install dropbear /chroot/busybox/sbin
install -d /chroot/busybox/share/man/man8
install -m 644 ./dropbear.8 /chroot/busybox/share/man/man8/dropbear.8
install -d /chroot/busybox/bin
install dbclient /chroot/busybox/bin
install -d /chroot/busybox/share/man/man1
if test -e dbclient.1; then install -m 644 dbclient.1 /chroot/busybox/share/man/man1/dbclient.1; fi
install -d /chroot/busybox/bin
install dropbearkey /chroot/busybox/bin
install -d /chroot/busybox/share/man/man1
if test -e dropbearkey.1; then install -m 644 dropbearkey.1 /chroot/busybox/share/man/man1/dropbearkey.1; fi
install -d /chroot/busybox/bin
install dropbearconvert /chroot/busybox/bin
install -d /chroot/busybox/share/man/man1
if test -e dropbearconvert.1; then install -m 644 dropbearconvert.1 /chroot/busybox/share/man/man1/dropbearconvert.1; fi
All that’s left to do for the Dropbear part, is to generate some keys which will be used by Dropbear. Dropbear has it’s own key format so it’s better to use those utilities:
[root@cen7 dropbear-2015.71]# mkdir -pv /chroot/busybox/etc/dropbear
mkdir: created directory ‘/chroot/busybox/etc/dropbear’
[root@cen7 dropbear-2015.71]# /chroot/busybox/bin/dropbearkey -t dss -f /chroot/busybox/etc/dropbear/dropbear.dss
Generating key, this may take a while...
Public key portion is:
ssh-dss AAAAB3NzaC1kc3MAAACBAMaVlM+SXpO6y7SSkPZcW87XvAw5oGXq1TAk+guDWEOezUN0Q8HNfYtmE8z7WwiXPOabJEaJgpOCfJWFxjpcc2OtZ+lDYesNJ8tfEFx6Pi3ObFp6UH0X9DCbZNes6iwxjuJRkRdB95rId3t4Cu/jKaqqJAY/U2U1TDXTVMwohQi/AAAAFQCqJbXOrkLadJ9+CF4ct96VJIDjewAAAIEAxIS6PfvqhPGGiaHbbSuu/60cUukdn6+SgJy11G1fUw70FssLndBSdMLHFQWMfl1CtYACC+f6sX4MoqzAKJoAKDwwt5ro+Q7afVj2XgeCghyosL9IoBx7HWzDXu+9ESCnGh9GQ1XtCoHS0wj9NFSjVT2KwUuE9LDh5qIRHnmql/IAAACAKr2ZePSW7ovjIx7By4EjhdJaOScnDxRMXWfmmURBDvSf7RWt+1icBr2zkBKSgyA8u4/v9Qhv9TijW98Y+/G84vcFW6L9qfkI1ZLo1wSDFpVo/bg4YjIqsnwY2W8AxVxNgJAj3TovPMk74GMcVwTllA8KVNugEvglwmNU2D9wapA= root@cen7
Fingerprint: md5 b0:e1:25:d7:c1:2f:18:24:55:94:2b:d2:88:6f:98:76
[root@cen7 dropbear-2015.71]# /chroot/busybox/bin/dropbearkey -t rsa -s 4096 -f /chroot/busybox/etc/dropbear/dropbear.rsa
Generating key, this may take a while...
Public key portion is:
ssh-rsa AAAAB3NzaC1yc2EAAAADAQABAAACAQDTCBH2uVvrzmQHoW93dX52DnqT8jIkb0XI3Y6mdSN8ziepaGe9vQLYZs6rN4TfYqJTvpUFziS3Bj2FwKFKamrfvTw1uomTB/7YcfRtXnZLfuY3YXO+yKFcQfGzte7ulzcFKXZsnZhM1tDIH42+50z/qOdW7ZpnCtaMGD6ue3E6j0m/eqCQjkpRrEMNxTt5YKDIhtmq/zZOCGdTuUTvxzkqQwFWz2hwS5gruCHrcZtkRv9RzRnjspbbcQ0fDKns4jbjOhbsJtH06bW4FtSCdy67ySX88HzIwiAqGzJF0R8HtYM/yFgdemdOsgn+BEfgzcQjkdAdkLL1tmmgyTQZfndwTy1Q4zMHcwv3HCZJecGjQe67xJyWTNf5uH17Dlc5FYkyjf8MhPACWqbxyyRCSf3XOm0Y4JMyYtSGvR2iWnolNnrvdjYH+zhEWs8gfA2U74c5pvk6GrIprXnp9Ys/P0ItDXWA2kserN2JBWbuUyRWUPhJJAcDHSeV3SpCPNwwBmWPBkkduzqJCEkjJklTlPgBYEQxMcxrx6TkicsasFJEMzeD++s/tc5dMaedsMH5fwiEMQXT7n/9NTB3tEyY8PezoNai47HUjytzbiFsaPf5H8jFZ9xeEMP2Ce96+4A4elAzL4zZbEqqbyntCwkC9vqb+dIClU9+WF+2haQ9+NJjCQ== root@cen7
Fingerprint: md5 ee:33:a3:1d:7b:69:15:f4:38:25:1b:35:b3:aa:93:82
One last thing that is required in order to be able to run Dropbear in the chroot, is to check which libraries Dropbear needs:
[root@cen7 dropbear-2015.71]# ldd /chroot/busybox/sbin/dropbear
        linux-vdso.so.1 =>  (0x00007ffd8e70b000)
        libutil.so.1 => /lib64/libutil.so.1 (0x00007f2546bbd000)
        libz.so.1 => /lib64/libz.so.1 (0x00007f25469a7000)
        libcrypt.so.1 => /lib64/libcrypt.so.1 (0x00007f254676f000)
        libc.so.6 => /lib64/libc.so.6 (0x00007f25463ae000)
        libfreebl3.so => /lib64/libfreebl3.so (0x00007f25461ab000)
        /lib64/ld-linux-x86-64.so.2 (0x00007f2546dc6000)
        libdl.so.2 => /lib64/libdl.so.2 (0x00007f2545fa6000)
We can simply copy those libraries and some extra libraries required for login (and shadow passwords) to the lib (or lib64) of our chroot jail:
[root@cen7 dropbear-2015.71]# cp /lib64/libutil.so.1 /chroot/busybox/lib/
[root@cen7 dropbear-2015.71]# cp /lib64/libz.so.1 /chroot/busybox/lib/
[root@cen7 dropbear-2015.71]# cp /lib64/libcrypt.so.1 /chroot/busybox/lib/
[root@cen7 dropbear-2015.71]# cp /lib64/libc.so.6 /chroot/busybox/lib/
[root@cen7 dropbear-2015.71]# cp /lib64/libfreebl3.so /chroot/busybox/lib/
[root@cen7 dropbear-2015.71]# cp /lib64/libdl.so.2 /chroot/busybox/lib/
[root@cen7 dropbear-2015.71]# cp /lib64/ld-linux-x86-64.so.2 /chroot/busybox/lib/
[root@cen7 dropbear-2015.71]# cp /lib64/libnss_dns.so.2 /chroot/busybox/lib/
[root@cen7 dropbear-2015.71]# cp /lib64/libnss_files.so.2 /chroot/busybox/lib/
[root@cen7 dropbear-2015.71]# cp /lib64/libnspr4.so /chroot/busybox/lib/
[root@cen7 dropbear-2015.71]# cp /lib64/libfreeblpriv3.chk /chroot/busybox/lib/
[root@cen7 dropbear-2015.71]# cp /lib64/libfreeblpriv3.so /chroot/busybox/lib/
[root@cen7 dropbear-2015.71]# cp /usr/lib64/libz.so.1 /chroot/busybox/usr/lib/
BusyBox installation
Next part of the setup is to “install” BusyBox. Install is between quotes since installing BusyBox isn’t more than downloading a binary from the internet. You can find the latest version of BusyBox here: https://busybox.net/downloads/binaries/.
Let’s get BusyBox, rename it and give it enough permissions:
[root@cen7 dropbear-2015.71]# cd /chroot/busybox/bin/
[root@cen7 bin]# wget https://busybox.net/downloads/binaries/busybox-x86_64
--2015-12-09 17:10:52--  https://busybox.net/downloads/binaries/busybox-x86_64
Resolving busybox.net (busybox.net)... 140.211.167.224
Connecting to busybox.net (busybox.net)|140.211.167.224|:443... connected.
HTTP request sent, awaiting response... 200 OK
Length: 1009384 (986K) [text/plain]
Saving to: ‘busybox-x86_64’

100%[=====================================================>] 1,009,384    508KB/s   in 1.9s

2015-12-09 17:10:56 (508 KB/s) - ‘busybox-x86_64’ saved [1009384/1009384]

FINISHED --2015-12-09 17:10:56--
Total wall clock time: 4.4s
Downloaded: 1 files, 986K in 1.9s (508 KB/s)
[root@cen7 bin]# mv busybox-x86_64 busybox
[root@cen7 bin]# chmod 0755 busybox
That’s basically all it takes to “install” BusyBox.
User configuration
Now that we have Dropbear and BusyBox installed in our jail, it’s time to configure a user that will have access trough Dropbear. The easiest method is to create a normal user with useradd and then generate the necessary files based on the lines that were created by useradd. Another option is to create and write the files manually.
[root@cen7 bin]# useradd test
[root@cen7 bin]# passwd test
Changing password for user test.
New password:
Retype new password:
passwd: all authentication tokens updated successfully.
[root@cen7 bin]# grep ^test /etc/passwd > /chroot/busybox/etc/passwd
[root@cen7 bin]# grep ^test /etc/group > /chroot/busybox/etc/group
[root@cen7 bin]# grep ^test /etc/shadow > /chroot/busybox/etc/shadow
[root@cen7 bin]# cat /chroot/busybox/etc/passwd
test:x:1001:1001::/home/test:/bin/bash
As you can see in the last line of the above output. The /etc/passwd file in the chroot jail contains one user, test, with a home directory /home/test and shell /bin/bash. The home directory doesn’t exist in the jail and neither does /bin/bash. So let’s change that:
[root@cen7 bin]# mkdir -p /chroot/busybox/home/test
[root@cen7 bin]# chown test:test /chroot/busybox/home/test/
We need to replace the shell of our user test to BusyBox. In order to invoke BusyBox as a shell and not as a single command, it’s possible to create a symbolic from /bin/sh to /bin/busybox. For the user, we replace /bin/bash to /bin/sh to use that symlink:
[root@cen7 bin]# pwd
/chroot/busybox/bin
[root@cen7 bin]# ln -s busybox sh
[root@cen7 bin]# ls -l sh
lrwxrwxrwx. 1 root root 7 Dec  9 20:29 sh -> busybox
[root@cen7 bin]# sed -i 's/bash/sh/' ../etc/passwd
As you can see in the above output, it’s important to create the link from the correct path in order to have the relative path as the link for sh in /bin of the chroot jail.
Start the chroot jail
The installation of our testjail is a good as complete. The only thing that lasts is to start our jail and test if we can connect to port 44 with SSH.
[root@cen7 ~]# chroot /chroot/busybox/ /sbin/dropbear -d /etc/dropbear/dropbear.dss -r /etc/dropbear/dropbear.rsa -E -w -g -p 0.0.0.0:44
[13394] Dec 09 20:36:24 Failed loading /etc/dropbear/dropbear_rsa_host_key
[13394] Dec 09 20:36:24 Failed loading /etc/dropbear/dropbear_dss_host_key
[13394] Dec 09 20:36:24 Failed loading /etc/dropbear/dropbear_ecdsa_host_key
[root@cen7 ~]# [13395] Dec 09 20:36:24 Running in background

[root@cen7 ~]# ssh -p 44 localhost -l test
[13397] Dec 09 20:36:31 Child connection from 127.0.0.1:48570
The authenticity of host '[localhost]:44 ([127.0.0.1]:44)' can't be established.
RSA key fingerprint is ee:33:a3:1d:7b:69:15:f4:38:25:1b:35:b3:aa:93:82.
Are you sure you want to continue connecting (yes/no)? yes
Warning: Permanently added '[localhost]:44' (RSA) to the list of known hosts.
test@localhost's password:
[13397] Dec 09 20:36:35 Password auth succeeded for 'test' from 127.0.0.1:48570
~ $ help
Built-in commands:
------------------
        . : [ [[ alias bg break cd chdir command continue echo eval exec
        exit export false fg getopts hash help history jobs kill let
        local printf pwd read readonly return set shift source test times
        trap true type ulimit umask unalias unset wait

~ $ exit
Connection to localhost closed.
[root@cen7 ~]# [13397] Dec 09 20:36:47 Exit (test): Disconnect received

[root@cen7 ~]#
In the above output, we can see that Dropbear got started, I explicitely asked to output messages to stdout with option -E, and that it’s listening on port 44. The next step is a test to port 44 for user test. As a result, you can see that the connection succeeds and we end up in a BusyBox shell.
After a reboot
In case you want to start the chroot jail after a reboot, you will need to remount the bind mounts:
[root@cen7 ~]# mount -o bind /dev/pts dev/pts/
[root@cen7 ~]# mount -o bind /proc proc/
[root@cen7 ~]# chroot /chroot/busybox/ /sbin/dropbear -d /etc/dropbear/dropbear.dss -r /etc/dropbear/dropbear.rsa -E -w -g -p 0.0.0.0:44
...
[root@cen7 ~]# [13422] Dec 09 20:40:41 Running in background
And if you would like it to start automatically on boot, just add the above three commands to /etc/rc.d/rc.local :)
I followed your tutorial exactly and configured everything in Raspbian.
However everytime I log in through ssh into the chroot environment:
$ ssh -p 44 localhost -l admin
I am getting:
Login attempt for nonexistent user from 127.0.0.1:38178
I enter the correct password 3 times but I get a permission denied error.
Finally it fails with: Permission denied (publickey,password).
And obviously I have my passwd, group and shadow files correctly set up.
Is there a way I can check the logs?
I guess dropbear is properly configured, otherwise it would not run and accept ssh connections.
Can you help please?
Is there a way I can check the logs?