
When regularly installing Linux hosts or VM’s, it easily becomes annoying to constantly burn CD’s/DVD’s or mount ISO’s for all the Linux distributions that you want to deploy. Especially if you want to keep them current or customize them you’ll end up with a whole lot of discs. Booting your installations from the network, using a PXE boot server, makes life a lot easier and isn’t very hard to setup. In this post I’ll explain how to setup such a PXE boot server that is able to provide multiple Linux distribution installations for deployment over the network.
PXE stands for Preboot Execution Environment. It’s a small environment, launched before the actual operation system boot that is quite limited in functionality. All that PXE can do is read files over TFTP into the memory and execute them. Fortunately that’s all we need.
For this post and tutorial, I’ll use a minimal CentOS 7 installation to run as PXE boot server but the configuration files should be compatible with most other Linux distributions. I’ll configure DHCP and TFTP on the same machine. In an enterprise environment you’ll probably have these on a separate machine.
DHCP
In order for the PXE boot to connect to the network, the computer needs an IP configuration. Since we would like to be able to boot machines which are completely new and do not want to preconfigure them with a network configuration, DHCP is what we need. DHCP stands for Dynamic Host Configuration Protocol and is a protocol to automatically provide systems with an IP configuration (like IP address, netmask, default gateway, DNS-server) but it can also provide a TFTP-server IP for PXE booting.
Install and configure DHCP
Knowing the above, we need to start with setting up a DHCP server that will give network information and the TFTP-server to our fresh machines. Be aware that configuring two DHCP-servers in one network will certainly cause issues so check if your current network doesn’t have a DHCP-server running yet. If that’s the case, skip down to the next part where I’ll explain how to configure an existing Windows DHCP server for TFTP.
To install the DHCP server on a clean Linux machine, install the dhcp package:
[jensd@pxeserver ~]$ sudo yum -y install dhcp
...
Complete!
Change the configuration of the DHCP server in /etc/dhcp/dhcpd.conf
subnet 192.168.240.0 netmask 255.255.255.0 {
  range 192.168.240.200 192.168.240.240;
  option broadcast-address 192.168.240.255;
  option routers 192.168.240.1;
  option subnet-mask 255.255.255.0;
  option domain-name "test.local";
  option domain-name-servers 192.168.240.1;
  next-server 192.168.240.10;
  filename "pxelinux.0";
}
The above configuration assumes that the subnet where i’m working in, is 192.168.240.0/24 and that the IP of my TFTP-server is 192.168.240.10. You’ll need to adjust contents of the above file to match your environment.
After changing the configuration file, we can start the DHCP daemon and enable to start on boot for the future
[jensd@pxeserver ~]$ sudo systemctl start dhcpd
[jensd@pxeserver ~]$ sudo systemctl enable dhcpd
ln -s '/usr/lib/systemd/system/dhcpd.service' '/etc/systemd/system/multi-user.target.wants/dhcpd.service'
If all goes well, the DHCP server will now listen for requests on the interface that’s in the range that we defined.
In case you already have an DHCP server on Linux, edit the configuration to include the next-server and filename lines as in the example.
Configure DHCP for PXE boot on a Windows DHCP-server
When you’re running DHCP on an existing Windows server, you can add the information required for PXE booting there as well.
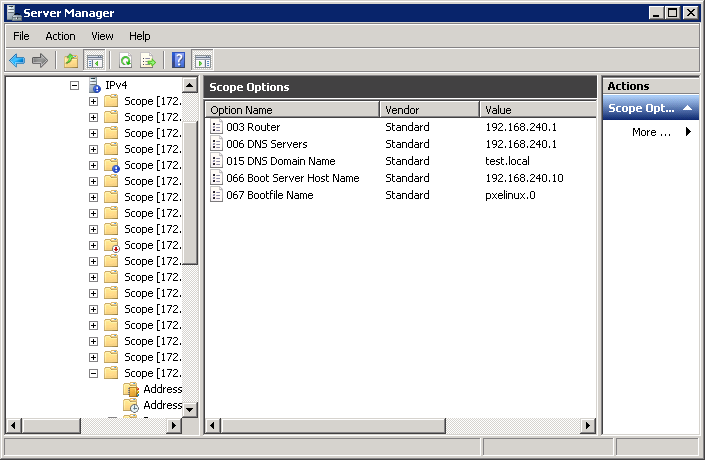
On the Windows server, navigate to Server Manager -> Roles -> DHCP Server -> your server -> IPv4 -> select the scope for which you want to configure the information -> Scope Options.
In the Scope Options, right click and choose click on Configure Options… The options which you need for PXE booting are option 066 Boot Server Host Name and option 067 Bootfile name
The result should be something like this:
TFTP
Now that we our new machines have a way to get an IP address and connect to the TFTP-server, it’s time to setup the TFTP-server which we configured in the DHCP options.
As with DHCP, we need to install the necessary packages:
[jensd@pxeserver ~]$ sudo yum -y install tftp-server
...
Complete!
The TFTP-server on CentOS is running under xinetd, the super daemon, so xinetd will be responsible for starting and controlling the TFTP server. By default, TFTP is disabled.
To allow xinetd to start TFTP, change /etc/xinetd.d/tftp:
# description: The tftp server serves files using the trivial file transfer \
#       protocol.  The tftp protocol is often used to boot diskless \
#       workstations, download configuration files to network-aware printers, \
#       and to start the installation process for some operating systems.
service tftp
{
        socket_type             = dgram
        protocol                = udp
        wait                    = yes
        user                    = root
        server                  = /usr/sbin/in.tftpd
        server_args             = -s /var/lib/tftpboot
        disable                 = no
        per_source              = 11
        cps                     = 100 2
        flags                   = IPv4
}
The only line that needed to be changed in the above file was disable = no.
After allowing xinetd to start TFTP, start xinetd and it should also take care of the start of the TFTP server:
[jensd@pxeserver ~]$ sudo systemctl start xinetd
Configure syslinux/pxelinux
At this point, a new computer should be able to get an IP from the DHCP server and it will try to receive the file pxelinux.0 from /var/lib/tftpboot since that’s the location which is configured on our TFTP-server and the filename for PXE-booting which we configured on the DHCP server.
Pxelinux.0 isn’t randomly chosen for the bootfile name. It’s the name of the file that will continue the start of Syslinux or PXElinux (a minimal environment that can transfer the rest of the files over TFTP and boot a kernel).
The required files are provided in a package pxelinux-tftpboot so all we need to do is install them and copy them to our TFTP-server location:
[jensd@pxeserver ~]$ sudo yum -y install syslinux-tftpboot
...
Complete!
[jensd@pxeserver ~]$ sudo cp /usr/share/syslinux/pxelinux.0 /var/lib/tftpboot
[jensd@pxeserver ~]$ sudo cp /usr/share/syslinux/menu.c32 /var/lib/tftpboot
[jensd@pxeserver ~]$ sudo cp /usr/share/syslinux/memdisk /var/lib/tftpboot
[jensd@pxeserver ~]$ sudo cp /usr/share/syslinux/mboot.c32 /var/lib/tftpboot
[jensd@pxeserver ~]$ sudo cp /usr/share/syslinux/chain.c32 /var/lib/tftpboot
The pxelinux.0 will point the booting host to it’s configuration. Either a default configuration or a specific configuration based on the MAC address of the host that is PXE-booting.
To be able to test our setup, let’s create a testconfig:
[jensd@pxeserver ~]$ sudo mkdir /var/lib/tftpboot/pxelinux.cfg
[jensd@pxeserver ~]$ sudo vi /var/lib/tftpboot/pxelinux.cfg/default
In the file /var/lib/tftpboot/pxelinux.cfg/default, enter something like follows:
default menu.c32
prompt 0
timeout 300
ONTIMEOUT local

MENU TITLE PXE Menu

LABEL testlabel
The files which we copied will need to be customized further but at this point let’s test the environment which we have created.
Boot a machine with PXE
A new physical or virtual machine need to be configured to boot over PXE. By default, most BIOS configurations try PXE when they can’t find any other way to boot an Operating System. If your machine isn’t booting over the network or it already has an OS installed, you will probably have to change that in you machines BIOS:

When booting the host, you can briefly see that the host gets an IP from DHCP and fetches the file required to display the menu:

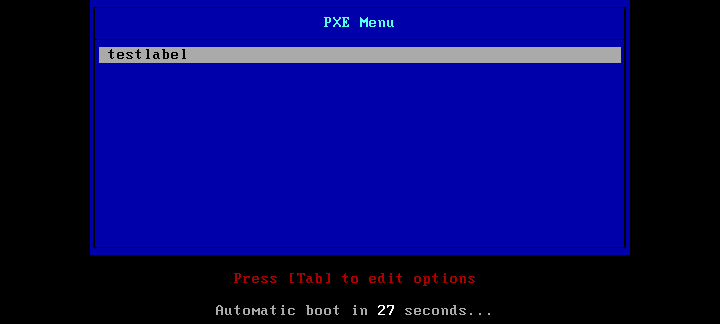
If all goes well, a menu, containing the information that we put in /var/lib/tftpboot/pxelinux.cfg/default should be displayed:
Add real entries to the bootmenu
The goal of this post was to provide a PXE bootserver that will allow us to install several distributions. To accomplish this, we need to copy the files required to boot the installation to our TFTP-server. Usually those are named vmlinuz (the kernel itself) and initrd.img (the initial ramdisk) and the easiest is to copy them from the netinstall installation ISO.
Add an entry for CentOS 6
For CentOS 6, the kernel and initrd to boot the installation can be found on the ISO in the directory /isolinux. ISOLinux is the variant of Syslinux used to boot from a CD. It works in the same way as PXELinux which we are using.
All we need to do is copy the required files (the kernel and initrd) to a directory that is accessible over TFTP:
[jensd@pxeserver ~]$ sudo mount ~/CentOS-6.6-x86_64-netinstall.iso /mnt/
mount: /dev/loop0 is write-protected, mounting read-only
[jensd@pxeserver ~]$ sudo mkdir /var/lib/tftpboot/centos6/
[jensd@pxeserver ~]$ sudo cp /mnt/isolinux/vmlinuz /var/lib/tftpboot/centos6/
[jensd@pxeserver ~]$ sudo cp /mnt/isolinux/initrd.img /var/lib/tftpboot/centos6/
[jensd@pxeserver ~]$ sudo umount /mnt
After copying the files, we need to add an entry to /var/lib/tftpboot/pxelinux.cfg/default for CentOS 6:
LABEL install CentOS 6
  kernel centos6/vmlinuz
  append initrd=centos6/initrd.img text

label rescue CentOS 6
  kernel centos6/vmlinuz
  append initrd=centos6/initrd.img rescue ip=dhcp
To make things easy, I also added an entry to, if needed, start a rescue system.
Add an entry for CentOS 7
Very similar to the actions which we needed to take for CentOS 6, we can add an entry for CentOS 7:
[jensd@pxeserver ~]$ sudo mount ~/CentOS-7.0-1406-x86_64-NetInstall.iso /mnt
mount: /dev/loop0 is write-protected, mounting read-only
[jensd@pxeserver ~]$ sudo mkdir /var/lib/tftpboot/centos7
[jensd@pxeserver ~]$ sudo cp /mnt/isolinux/vmlinuz /var/lib/tftpboot/centos7/
[jensd@pxeserver ~]$ sudo cp /mnt/isolinux/initrd.img /var/lib/tftpboot/centos7/
[jensd@pxeserver ~]$ sudo umount /mnt
Unfortunately the installer for CentOS 7 needs access to other files from the installation media in order to do it’s installation. We’ll configure the server to provide the files from mirror.centos.org but you could setup your own HTTP server that contains a copy of the required files to improve performance.
Add the following to /var/lib/tftpboot/pxelinux.cfg/default:
LABEL install CentOS 7
  kernel centos7/vmlinuz
  append initrd=centos7/initrd.img method=http://mirror.centos.org/centos/7/os/x86_64/

LABEL install CentOS 7
  kernel centos7/vmlinuz
  append initrd=centos7/initrd.img method=http://mirror.centos.org/centos/7/os/x86_64/ rescue
Add an entry for Debian Wheezy
The location of the files is different for the Debian netinstall ISO but the principle remains the same as with CentOS:
[jensd@pxeserver ~]$ sudo mount ~/debian-7.8.0-amd64-netinst.iso /mnt
mount: /dev/loop0 is write-protected, mounting read-only
[jensd@pxeserver ~]$ sudo mkdir /var/lib/tftpboot/debian7
[jensd@pxeserver ~]$ sudo cp /mnt/install.amd/vmlinuz /var/lib/tftpboot/debian7/
[jensd@pxeserver ~]$ sudo cp /mnt/install.amd/initrd.gz /var/lib/tftpboot/debian7/
[jensd@pxeserver ~]$ sudo umount /mnt
After copying the kernel and the initrd, we can add our entry for Debian:
LABEL install Debian Wheezy
  kernel debian7/vmlinuz
  append vga=788 initrd=debian7/initrd.gz

LABEL rescue Debian Wheezy
  kernel debian7/vmlinuz
  append vga=788 initrd=debian7/initrd.gz rescue
Add a local entry and make it default
It’s a good idea to add an entry to your menu that allows PXE to boot from the local hard disk. When setting a timeout on your menu and making the default entry the local one, you can always boot your systems from the network. This makes it easy to re-install or rescue existing systems while they boot up perfectly fine without interaction.
This makes our /var/lib/tftpboot/pxelinux.cfg/default look like this:
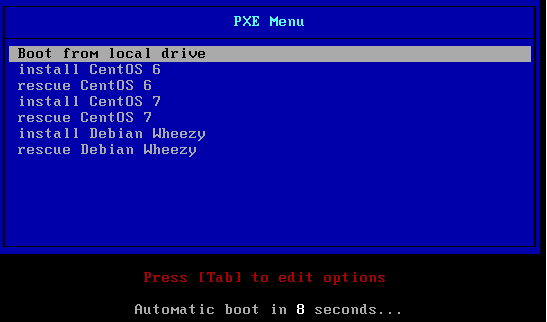
default menu.c32
prompt 0
timeout 100
ONTIMEOUT local

MENU TITLE PXE Menu

label local
  menu label Boot from local drive
  menu default
  localboot 0xffff

LABEL install CentOS 6
  kernel centos6/vmlinuz
  append initrd=centos6/initrd.img text

label rescue CentOS 6
  kernel centos6/vmlinuz
  append initrd=centos6/initrd.img rescue ip=dhcp

LABEL install CentOS 7
  kernel centos7/vmlinuz
  append initrd=centos7/initrd.img method=http://mirror.centos.org/centos/7/os/x86_64/

LABEL rescue CentOS 7
  kernel centos7/vmlinuz
  append initrd=centos7/initrd.img method=http://mirror.centos.org/centos/7/os/x86_64/ rescue

LABEL install Debian Wheezy
  kernel debian7/vmlinuz
  append vga=788 initrd=debian7/initrd.gz

LABEL rescue Debian Wheezy
  kernel debian7/vmlinuz
  append vga=788 initrd=debian7/initrd.gz rescue
As a result, the menu looks like this:
Go further
The above is only the top of the iceberg of what’s possible using PXE. You can go a lot further and make submenus or add entries that will kickstart an installation and do an unattended install. Most of those optional features can be provided by supplying more kernel parameters in the pxelinux.0/default file.
To add more or different Linux distributions, follow the same approach. When using an ISO as a source, most of them use ISOLinux to boot the installation so you could look for the extries in isolinux.cfg and reuse them in your pxelinux.0/default.
Pingback: Server Bug Fix: How to install Linux on multiple PCs at once? - TECHPRPR
Excellent post and works like a charm. I look forward to reading more posts from you!