
Like some other Belgians, unfortunately, my analog electricity meter was replaced by a digital one since a few months. Initially, I was quite happy with the change as it allows a much easier look into your consumption and solar panel injection to the net. But exactly that last turned out to be a bummer as the government decided to not keep their word regarding reversing consumption with solar panel injection. Nevertheless, I have the thing so I might as well take advantage of it. This post describes how to connect to and use the data from the P1 port on a digital electricity meter in Belgium.
YouTube Video
If you are interested, I also created a YouTube video from this blogpost. If you prefer classic text, you can just follow the rest of this article:
Introduction
Digital electricity meters are used in a variety of countries. While exploring this, I noticed that each country/region and even device model works in a slightly different way and standard (more about this further in the post). As this post mainly would be interesting for people living in Belgium, for the first time, I decided to also create a Dutch version. You can find this one over here: https://jensd.be/1205/linux/data-lezen-van-de-belgische-digitale-meter-met-de-p1-poort
The electricity meter is communicating back it’s reading, additional data and natural gas meter’s readings back to the distributor, using cellular, on regular times. This allows you to check that data on the site of the distributor itself:
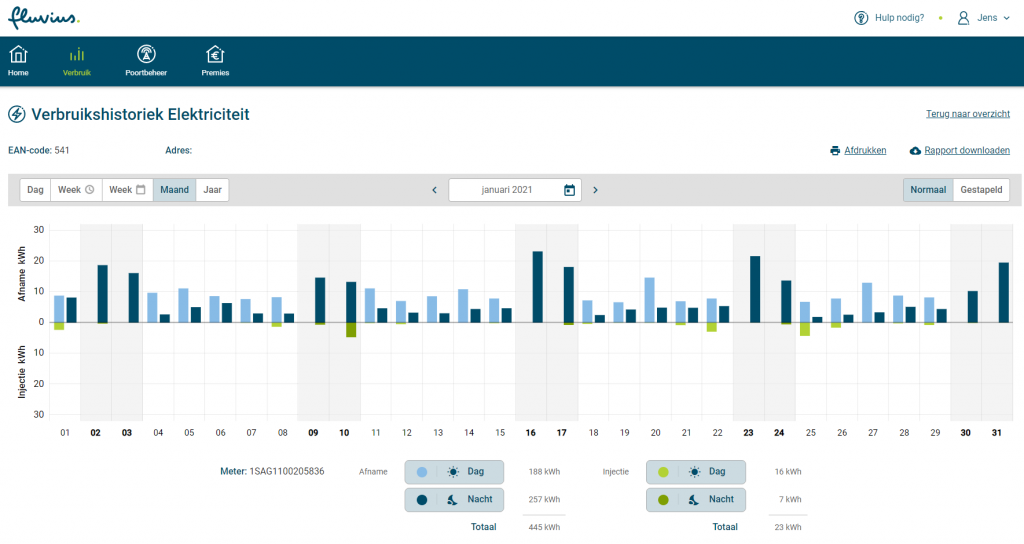
So if your goal is just to see the consumption in a nice graph there is no need to make use of the data coming from the P1 port. If you want to do something with the data on the other hand, like triggering automation or have the ability to use the near real-time information, you are at the right place.
The digital meter
In Belgium, distributor Fluvius has started distribution and installation of the digital meters. They are currently using only three types of digital meters for consumers. One for single phase installations, another for three-phase and a natural gas meter that uses the digital electricity meter to send it’s data as well to the distributor:
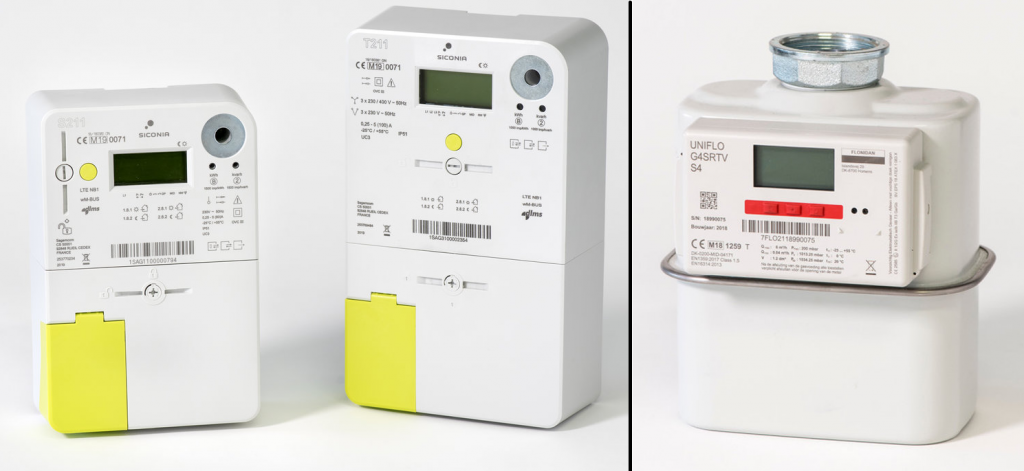
- Sagecom S211: Single phase
- Sagecom T211-D : Three-phase
- Flonidan – G4SRTV: Natural gas
The P1 and S1 ports
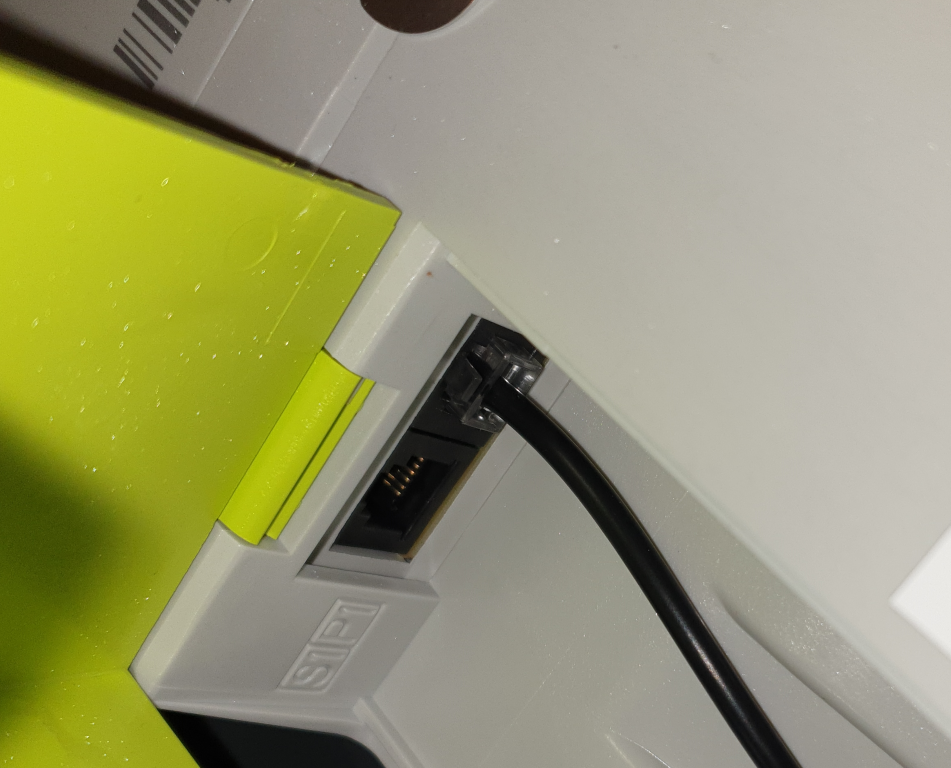
The electricity meters mentioned above, are having two serial ports on the front of the device, behind the yellow cover. Both these ports can be used to read data from. S1 is sending raw data around 2600-4000 times/second. P1 on the other hand is a bit calmer and provides information around once/second in a more formatted form.
The P1 port, which I will use through the rest of the article, is the most interesting for most users and automation integration.
Physical port
Both the P1 and S1 ports are following the serial RS422 standard and are using a RJ12 connector. (RJ11 works as well with the correct pinout). Important to know is that these ports are disabled by default. Fortunately, they can easily be enabled using the Fluvius webinterface through https://mijn.fluvius.be/poortbeheer/.
To connect to the ports, you can create a cable yourself with the following pinout:
| Pin | Signal | Description |
|---|---|---|
| 1 | +5V | Power supply for reading equipment (optional) |
| 2 | RTS | Input |
| 3 | GND | Data ground |
| 4 | – | – |
| 6 | RX | Output |
| 6 | Power GND | Power supply for reading equipment (optional) |
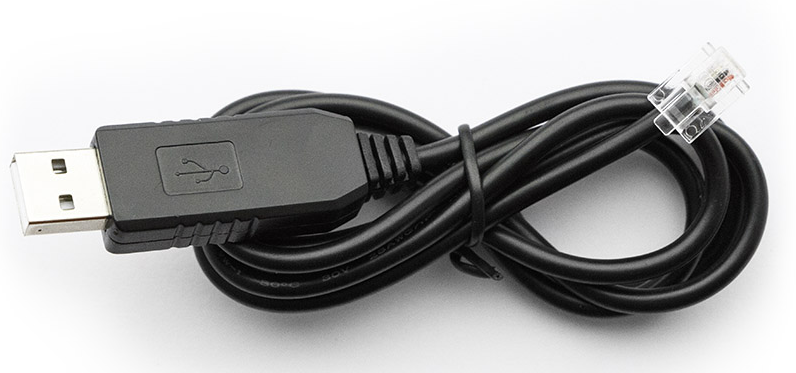
Another option, if you can’t make a cable or are lazy as me, is to buy one of the readily available cables with a serial to usb convertor integrated, like the following:
Data format
The data format of the P1 port, as well as the above discussed physical format, is using the DSMR 5.0.2 P1 standard. DSMR stands for Dutch Smart Meter Requirements. And as the name suggests, this was developed and is maintained by our northern neighbors. Unfortunately, while looking up information and seeing the various scripts that are available, I noticed that each model of meter seems to use the standard in slightly different ways. So most of what I will discuss in this post applies to other countries that use DSMR but it might needs some tweaks here and there.
You can find all details of the standard over here: https://www.netbeheernederland.nl/_upload/Files/Slimme_meter_15_a727fce1f1.pdf
To not go to deep but still make things understandable, I’ll try to go through the things you need to know from this in order to start using the data.
The whole message (called telegram or COSEM object), coming from the P1 port in DSMR like the following:

And the data itself, inside the telegram, looks like the following:

This gives us the following info:
- Each block of info (telegram) starts with a /
- After the start, there is a fixed, model specific identification, followed with a fixed device-unique identification
- The data lines start with an OBIS code, including identification from which meter (electricity or natural gas) the data comes and which type of info is next
- The values are inside parentheses and if a unit is preset, it’s separated by a *
- The block of info (telegram) ends with a !
- The CRC field contains a CRC16 calculated value of the rest of the block
In practice: reading and interpreting the data
So far I’ve only covered things from a theoretical angle. Next, let me explain how you can read the data and parse it to do something useful with it.
For this, I’ll start with a minimal install of Debian but another Linux distribution, like Ubuntu, CentOS, or even Windows/OS X should work in the same way.
First, I’ll install pyserial and crcmod using the package manager as I will use Python to parse the data coming from the P1 port.
jensd@deb10:~$ sudo apt install python3-serial python3-crcmod python3-tabulate
Reading package lists… Done
Building dependency tree
...
Setting up python3-serial (3.4-4) ...
Next, just to get started, we can try and read out the serial port. In my case, as I mentioned above, I use the P1 cable with integrated serial to USB convertor so my serial port is /dev/ttyUSB0. Port settings for P1 are 115200 baud, 8N1, Xon/Xoff.
In order for a non-root user to access the serial port, we need to set the right permissions:
jensd@deb10:~$ sudo chmod o+rw /dev/ttyUSB0
And to, finally, test the data coming in:
jensd@deb10:~$ python3 -m serial.tools.miniterm /dev/ttyUSB0 115200 --xonxoff
--- Miniterm on /dev/ttyUSB0  115200,8,N,1 ---
--- Quit: Ctrl+] | Menu: Ctrl+T | Help: Ctrl+T followed by Ctrl+H ---
925*m3)
!CE4E
/FLU5\253xxxxxx_A

0-0:96.1.4(xxxxx)
0-0:96.1.1(xxxxxxxxxxxxxxxxxxxxxxxxxxxx)
0-0:1.0.0(210204163628W)
1-0:1.8.1(000439.094kWh)
1-0:1.8.2(000435.292kWh)
1-0:2.8.1(000035.805kWh)
1-0:2.8.2(000012.156kWh)
0-0:96.14.0(0001)
1-0:1.7.0(00.233kW)
1-0:2.7.0(00.000kW)
1-0:21.7.0(00.233kW)
1-0:22.7.0(00.000kW)
1-0:32.7.0(236.2V)
1-0:31.7.0(002.04A)
0-0:96.3.10(1)
0-0:17.0.0(999.9kW)
1-0:31.4.0(999A)
0-0:96.13.0()
0-1:24.1.0(003)
0-1:96.1.1(xxxxxxxxxxxxxxxxxxxxxxxxxxxx)
0-1:24.4.0(1)
0-1:24.2.3(210204163500W)(00343.925*m3)
!1374
/FLU5\253xxxxxx_A

0-0:96.1.4(xxxxx)
0-0:96.1.1(xxxxxxxxxxxxxxxxxxxxxxxxxxxx)
0-0:1.0.0(210204163629W)
1-0:1.8.1(000439.094kWh)
1-0:1.8.2(000435.292kWh)
1-0:2.8.1(000035.805kWh)
1-0:2.8.2(000012.156kWh)
0-0:96.14.0(0001)
1-0:1.7.0(00.228kW)
1-0:2.7.0(00.000kW)
1-0:21.7.0(00.228kW)
1-0:22.7.0(00.000kW)
1-0:32.7.0(236.3V)
1-0:31.7.0(002.01A)
0-0:96.3.10(1)
0-0:17.0.0(999.9kW)
1-0:31.4.0(999A)
0-0:96.13.0()
0-1:24.1.0(003)
0-1:96.1.1(xxxxxxxxxxxxxxxxxxxxxxxxxxxx)
0-1:24.4.0(1)
0-1:24.2.3(210204163500W)(00343.925*m3)
!4BE6

 --- exit ---
As you can see, this matches with the message format for DSMR that I described above. Looking in the documentation, we can find the meaning of these values. This is not always easy as the codes are not an exact match and can contain channel or meter ID. For the examples above, the following applies. I added some other useful ones as well for completeness. More info, specifically for the Belgian meters can be found here as well: https://www.fluvius.be/sites/fluvius/files/2020-02/technische-info-displays-digitale-elektriciteitsmeter.pdf
| OBIS code | Meaning |
|---|---|
| 0-0:96.1.4 | ID |
| 0-0:96.1.1 | Serial number of electricity meter (in ASCII hex) |
| 0-0:1.0.0 | Timestamp of the telegram |
| 1-0:1.8.1 | Rate 1 (day) – total consumption |
| 1-0:1.8.2 | Rate 2 (night) – total consumption |
| 1-0:2.8.1 | Rate 1 (day) – total production |
| 1-0:2.8.2 | Rate 2 (night) – total production |
| 0-0:96.14.0 | Current rate (1=day,2=night) |
| 1-0:1.7.0 | All phases consumption |
| 1-0:2.7.0 | All phases production |
| 1-0:21.7.0 | L1 consumption |
| 1-0:41.7.0 | L2 consumption |
| 1-0:61.7.0 | L3 consumption |
| 1-0:22.7.0 | L1 production |
| 1-0:42.7.0 | L2 production |
| 1-0:62.7.0 | L3 production |
| 1-0:32.7.0 | L1 voltage |
| 1-0:52.7.0 | L2 voltage |
| 1-0:72.7.0 | L3 voltage |
| 1-0:31.7.0 | L1 current |
| 1-0:51.7.0 | L2 current |
| 1-0:71.7.0 | L3 current |
| 0-0:96.3.10 | Switch position electricity |
| 0-0:17.0.0 | Max. allowed power/phase |
| 1-0:31.4.0 | Max. allowed current/plase |
| 0-0:96.13.0 | Message |
| 0-1:24.1.0 | Other devices on bus |
| 0-1:96.1.1 | Serial number of natural gas meter (in ASCII hex) |
| 0-1:24.4.0 | Switch position natural gas |
| 0-1:24.2.3 | Reading from natural gas meter (timestamp) (value) |
Ptyhon script
Running this through a Python script to parse the data, results in the following:
jensd@deb10:~$ python3 test.py

 Description                         Value           Unit
 ----------------------------------  --------------  ------
 Meter serial electricity            XXXXXXXXXXXXXX
 Timestamp                           210204172711.0
 Rate 1 (day) - total consumption    439.33          kWh
 Rate 2 (night) - total consumption  435.292         kWh
 Rate 1 (day) - total production     35.805          kWh
 Rate 2 (night) - total production   12.156          kWh
 Current rate (1=day,2=night)        1.0
 All phases consumption              0.329           kW
 All phases production               0.0             kW
 L1 consumption                      0.329           kW
 L1 production                       0.0             kW
 L1 voltage                          238.3           V
 L1 current                          2.18            A
 Switch electricity                  1.0
 Meter serial gas                    XXXXXXXXXXXXXX
 Switch gas                          1.0
 Gas consumption                     343.925         m3
...
In case you are interested in this script, I uploaded it to GitHub: https://github.com/jensdepuydt/belgian_digitalmeter_p1
The script definitely needs more attention but I guess it can serve well as a source for someone that wants to set up his/her small project by using the data coming from the P1 port.
Let me know your thoughts in the comment section!
Pingback: Data lezen van de Belgische digitale meter met de P1 poort | Jensd's I/O buffer
Hi Jens,
I followed your tutorial but i’m not receiving any readable data. I only get question marks.
nevermind, was using the wrong port.
Hi, thanks for this article. From where did you buy the cable? I see all different kinds of pin out cables (mostly for the dutch meters) available and not sure which one would work. Thanks!
Mine came from bol.com. The cables for the Dutch meters should work in Belgium without issues as well as they (in theory) follow the same DSMR standards.
This cable works (in Belgium).
https://www.sossolutions.nl/slimme-meter-kabel
Thanks Jens great script!
Hi Jens,
Thanks for the work you have done, tried your python script but failed with errors.
python read_p1.py
File “read_p1.py”, line 62
print(f”Given checksum: {givencrc}, Calculated checksum: {calccrc}”)
^
SyntaxError: invalid syntax
using raspberry pi os with python Python 2.7.16
Hope you know what is failing, Thanks in Advance.
Python 3.7.3 en print (f schijnt in versie 3.6 veranderd te zijn, moest ook de modules met pip3 installeren en met python3 opstarten. Lijkt nu goed te werken.
Hi Jens! Thanks a lot for this article. It was super easy with your guideline to get the data out of the smart meter and saved me a lot of time. Also a big thanks for having it done in English.
Unfortunately my IT knowledge is limited I’ve nothing to contribute except that I can say that Sibelga (grid operator in Brussels?) has the P1 open/active by default (understood it’s different to Fluvius).
Hi Benjamin, that’s useful information. Thanks for sharing here.
Hi Jens,
Are you sure about the cable pinout?
I am using a Generic FTDI chip with 5V logic.
But when I use the pinout and software settings from your video I only receive “square” symbols every so often.
Or maybe I will need to wait even longer before the port is actually activated?
thanks\
Steven
Hello,
My FTDI USB to serial cable did not have RS422 capability.
Problem solved :)
New cable has same chip however.. FT232RL
br
Steven
Hello,
Having ordered a smart meter from Ores, I now discover your site.
Very interesting !
The installation of the new meter is scheduled for Tuesday, September 14, and I am preparing to collect and process the data provided on port P1.
I would like to point out a typo in the “Physical port” section, where it should probably read:
5 RX Output
and not ‘6’
Good continuation.
hello jens,
im trying to work in similar thing on C#, i can understand how u read , but my questions how can i send specific command to the meter ?? for example if i want to read energy for a specific timestamp
You cannot send any commands to the meter. There is no querying. It simply spits the data out and you can capture it…
So the meter send all the data that that is available in the registers ? i mean if want to read energy for specific a time for example (01/10/2021 00H00)
There is no data stored in the meter: The meter send continuous flow of current data, as it is displayed in the LCD screen.
I tried the script, but always get errors about reading the USBport.
I run Python 3.10 installed from python.org on a Windows10 PC.
First I got error that serial.Serial (….) was not known module in serial.
After installing pyserial this problem is solved but now I get errors that port /dev/ttyUSB0 can not be found
Traceback (most recent call last):
File “”, line 1, in
File “D:\Michel\Python\lib\site-packages\serial\serialwin32.py”, line 33, in __init__
super(Serial, self).__init__(*args, **kwargs)
File “D:\Michel\Python\lib\site-packages\serial\serialutil.py”, line 244, in __init__
self.open()
File “D:\Michel\Python\lib\site-packages\serial\serialwin32.py”, line 64, in open
raise SerialException(“could not open port {!r}: {!r}”.format(self.portstr, ctypes.WinError()))
serial.serialutil.SerialException: could not open port ‘/dev/ttyUSB0’: FileNotFoundError(2, ‘Het systeem kan het opgegeven pad niet vinden.’, None, 3)
Can someone help with the port configuration (/dev/ttyUSB0) ?
/dev/ttyUSB0 is how a device looks like under Linux. You will need to replace that with the correct COM-port under Windows (check device manager before and after inserting the USB cable).
Bonjour,
La visualisation miniterm est incompréhensible :
python3 -m serial.tools.miniterm /dev/ttyUSB0 115200 –xonxoff
— Miniterm on /dev/ttyUSB0 115200,8,N,1 —
— Quit: Ctrl+] | Menu: Ctrl+T | Help: Ctrl+T followed by Ctrl+H —
�����������������������������?�?�������������������������������������������␡���������������������������������������������������������o�����������������������������������␡����������������������������������������������������������������������������������������������������������������������������������������������o����������␡�������
I forgot to specify that it is on a PI4 with a USB to TTL CP2102 converter
https://www.amazon.fr/gp/product/B00AFRXKFU
Can confirm this works on MacOS X. Great work. We’re using this cable: https://webshop.cedel.nl/Slimme-meter-kabel-P1-naar-USB?gclid=Cj0KCQjwsrWZBhC4ARIsAGGUJurWx2467VCIBSOktx75sjb8miNxOrVryiyyfz29_CcM7vnYVhWuw3gaAk8UEALw_wcB
Thanx jens, got my cable in the mail yesterday, setup a small ubuntu server in the basement,, connected P1 to the server and was up and running in less then an hour thanx to your script. This tineframe includes opening the port on the Fluvius site. This does not include the couple of times I watched your video and read your blog the previous days :-)
Nice. I never succeeded in properly ‘syncing’ on the serial stream in (micro)python. This script is really helpful. Thanks for sharing.
Nice script, thanks! I added CSV export in my fork on GitHub.
Any idea why adding all values for ‘1-0:1.7.0’ (All phases consumption) gives me half of what my energy provider shows? (Same issue with ‘1-0:2.7.0’ (All phases production)).
Thanks for a very useful piece of work, it’s just what I was looking for.
I am in The Netherlands and have an Iskra MT382 meter from Liander. I am using a P1 cable from BOL.com and running your script on a Rapberry Pi 3A+ with Python 3.7.3 (Thonny).
I set everything up according to your instructions and as far as I can tell the serial data config I need is the same as in your script. I checked that the USB port is indeed /dev/ttyUSB0 (print(ser.name)).
The script does not get beyond “p1line = ser.readline().
When I replace ser.readline() with ser.read(), it returns b’\x00′
With ser.read(10) I get:
“`
Reading: b’\x00′
END
Reading: b”
END
Reading: b”
END
Reading: b”
END
Reading: b’\x00\x00\x00\x00\x00\x00\x00\x00\x00\x00′
END
Reading: b’\x00\x00\x00\x00\x00\x00\x00\x00\x00\x00′
END
Reading: b’\x00\x00\x00\x00\x00\x00\x00\x00\x00\x00′
END
Reading: b’\x00\x00\x00\x00\x00\x00\x00\x00\x00\x00′
END
Reading: b’\x00\x00\x00\x00\x00\x00\x00\x00\x00\x00′
END
Reading: b’\x00\x00\x00\x00\x00\x00\x00\x00\x00\x00′
END
Reading: b’\x00\x00\x00\x00\x00\x00\x00\x00\x00\x00′
END
Reading: b’\x00\x00\x00\x00\x00\x00\x00\x00\x00\x00′
END
………….
“`
where “END” is simply a print statement I put at the end of main()
Presumably I am not seeing the end of line characters and probably not reading the data correctly in the first place. Can you advise what I need to change? Any help would be much appreciated.
Maybe thonny screw it, try to run the .py in a terminal:
python read_p1.py
Sorry,
Typo in email adress – should be bobharris43@gmail.com
It looks as though my first post has disappeared. I will attempt to repeat it. Sorry if it is a duplicate.
Thanks for your post about the P1 meter, it was just what I was looking for.
I am attempting to read my smartmeter and to integrate the readings with those from other sensors (temp, pressure, humidity) around my home which deliver mqtt messages via node-red to InfluxDB/Grafana. These are housed on a RPi 4 (4GB) with USB SSD attached. That setup is working well.
For the smartmeter readings I am using a P1 cable (RJ11 to USBA) from BOL.com. I installed your script on a RPi 3A+ and set it up according to your instructions. I am in NL and have an Iskra MT382 meter from my supplier Liander. As far as I can judge from the documentation I need the same serial interface settings as in your article.
I checked (print(ser.name)) that the USB port is /dev/ttyUSB0.
The script seems to hang at the line
> p1line = ser.readline()
If I replace it by by ser.read() I get outputs, but only of the type b’\x00\x00 …..
Presumably the readline command is failing to find the end of line and I assume that I am not actually reading useful values in the first place.
Can you help in any way? (would be much appreciated)
I managed to read from my P1 port by changing to 9600 baud, 7E1.
I now get the following output (which is very promising), but with error messages concerning:
— ValueError
— Port not open.
———-
Reading: b”
Reading: b’/ISk5\\2MT382-1003′
Found beginning of P1 telegram
************************************************************
Reading: b”
Reading: b’0-0:96.1.1(5A424556303035313136303532393132)’
Reading: b’1-0:1.8.1(27115.317*kWh)’
Reading: b’1-0:1.8.2(20508.583*kWh)’
Reading: b’1-0:2.8.1(03395.553*kWh)’
Reading: b’1-0:2.8.2(08095.088*kWh)’
Reading: b’0-0:96.14.0(0001)’
Reading: b’1-0:1.7.0(0000.57*kW)’
Reading: b’1-0:2.7.0(0000.00*kW)’
Reading: b’0-0:17.0.0(0999.00*kW)’
Reading: b’0-0:96.3.10(1)’
Reading: b’0-0:96.13.1()’
Reading: b’0-0:96.13.0()’
Reading: b’0-1:24.1.0(3)’
Reading: b’0-1:96.1.0(3238313031353431313036303036303132)’
Reading: b’0-1:24.3.0(230326210000)(00)(60)(1)(0-1:24.2.1)(m3)’
Reading: b'(24027.445)’
Reading: b’0-1:24.4.0(1)’
Reading: b’!’
Found end, printing full telegram
****************************************
/ISk5\2MT382-1003
0-0:96.1.1(5A424556303035313136303532393132)
1-0:1.8.1(27115.317*kWh)
1-0:1.8.2(20508.583*kWh)
1-0:2.8.1(03395.553*kWh)
1-0:2.8.2(08095.088*kWh)
0-0:96.14.0(0001)
1-0:1.7.0(0000.57*kW)
1-0:2.7.0(0000.00*kW)
0-0:17.0.0(0999.00*kW)
0-0:96.3.10(1)
0-0:96.13.1()
0-0:96.13.0()
0-1:24.1.0(3)
0-1:96.1.0(3238313031353431313036303036303132)
0-1:24.3.0(230326210000)(00)(60)(1)(0-1:24.2.1)(m3)
(24027.445)
0-1:24.4.0(1)
!
****************************************
Traceback (most recent call last):
File “/home/pi/Smartmeter/jdepuyt_script.py”, line 137, in main
if checkcrc(p1telegram):
File “/home/pi/Smartmeter/jdepuyt_script.py”, line 58, in checkcrc
givencrc = hex(int(p1telegram[match.end() + 1:].decode(‘ascii’).strip(), 16))
ValueError: invalid literal for int() with base 16: ”
Something went wrong…
Traceback (most recent call last):
File “/home/pi/Smartmeter/jdepuyt_script.py”, line 163, in
main()
File “/home/pi/Smartmeter/jdepuyt_script.py”, line 160, in main
ser.flush()
File “/usr/lib/python3/dist-packages/serial/serialposix.py”, line 588, in flush
raise portNotOpenError
serial.serialutil.SerialException: Attempting to use a port that is not open
——–
Can anybody help me please?
Great topic. Thank you for this.
Unfortunately, I’m a newbee….
I would like to import the data in Home Assistant.
Do you think it would be possible to create an integration with Home Assistant ?
On the home assistant Computer, there is a usb cable connected to P1 port.
Thank you
Hi Jens,
my setup:
Libre computer Le Potato (since Raspberry Pi has become way too expensive) from Ali: https://nl.aliexpress.com/item/1005005163398168.html
USB cable from Ali: https://nl.aliexpress.com/item/1005001747429524.html
Power Supply from Ali: https://nl.aliexpress.com/item/1005001808187610.html
Case from Ali: https://nl.aliexpress.com/item/1005004321021256.html
Power Supply wire from Ali: https://nl.aliexpress.com/item/1005004993007922.html
SD card from Ali (64 Gb): https://nl.aliexpress.com/item/1005004495732671.html
Setup worked from the first time. All I had to do was to cut the +5V wire in the USB cable.
Cheers
Thanks a lot, work perfectly. Can you tell me where I can put a time.sleep(10) to slowdown the scrip ?
Thanks in advance.
Bernard
You can’t really slow down the script as it is driven by the data that comes from the serial port.
With a sleep, you would miss pieces of data.
Hi Jens, many thanks for your script. I’ve copied it and added an InfluxDB logger so I can visualise it in Grafana.
Hi Jens, nice article ! tx.
My current setup:
– easymeter 59€
https://easynrj.com/nl/products/easymeter-digitalmeter-informatie-p1?variant=44760509907248
and with this one I also see my capacity tariff info (monthly & 12-months peaks). Very usefull in Flanders with the new capaciteitstarief.
All info go directly to my homeassistant
Meb
Hi Jens,
thx for this script. I have taken the liberty to adapt it for release e-MUCS_P1_Ed_1_7_1, (firmware 1.99?) …
If anybody is interested let me know
Hi Peter Johannes,
I am interested :-)
I will receive my new meter in a few weeks and I’d like to be prepared to communicate with it.
Thanks.
Hi Jens and thanks a lot for what you’ve done here.
I am looking for a way to activate the P1 port for free. Yes, unfortunately Ores charges around 27€ for this and you’ve got to wait for the technician to come.
Any chance you could help me on that?
Cheers,
Thomas
Hi Jens,
Thank you very much for sharing.
I just tested this in my raspberry 4B on ubuntu 22.04LTS, connected to Fluvius digital meter, and works perfectly well from the first run. Awesome !
Thanks !
Hi,
I just wonder about the S1 port…
Specs says 2mbps but what about Bauds?
Do you have a trick to read this port?
Many thanks
Marc
Hello!
Thanks for this amazing article.
I connected my digital meter to an old Raspberry Pi 1 model B with a RJ11/USB cable (https://www.amazon.com.be/dp/B07JFNB6LL).
Like other people in comments, I only receive diamond question marks when I’m executing the following python command:
python3 -m serial.tools.miniterm /dev/ttyUSB0 115200 –xonxoff
I don’t really understand why.
Any idea?
Thanks in advance for your help :-)
Hello Jens,
Thanks for your tutorial.
Do you think it’s possible to use s1 port (p1 already used) to just get a steady 5V voltage to power something else?
I have a Watermeter close by and no power source for the datalogger.
Thanks for your feedback!
Hello, I have a meter from ores (wallonia). Do we need to invert the Serial signal as it is done on flamish forum if we connect the meter to an arduino ?
I will respond to my self: yes signal need to be inverted and in some case you also need to drop the voltage from 5V to 3.3V.
Also, I will thank you for this article with a lot of good advices and information!
Thanks for the script, I made a PHP webapp to visualize this data in combination with my solar panels. For those interested: The project can be downloaded at https://github.com/stubbornbe/realtime-energy with an extensive howto wiki.
Have fun!
Thanks Jens exactly what I was looking for!
Thanks for the script :-)
Added Pidpa meter to the list of codes
“0-2:96.1.1”: “Meter serial water”,
“0-2:24.2.1”: “Water consumption”
Hi Jens,
The link to the Slimme Meter PDF doesn’t seem to work anymore. Any chance you get an updated link?