
One subject that comes up very often is the ability to run Windows on an M1-based Mac. Even though many people swear by macOS, Bootcamp and Windows on a Mac still seems to be a widely used option. As these M1-based devices are using a different architecture: ARM, they are not compatible with Mac’s previous and most-used architecture for Windows-based computers: x86. That means that in order to run Windows on an M1 device, you basically have two options: Use an ARM-based version of Windows or emulate an x86-64 based machine and run a regular Windows version. For this article, I will get Windows 11 for ARM running on an M1 MacBook Air by using UTM.
YouTube Video
If you are interested, I also created a YouTube video from this blogpost. If you prefer classic text, you can just follow the rest of this article:
Introduction
As mentioned above, there are two options to get Windows running on an Apple M1-based device. The first involves virtualization, as we can’t (yet) run Windows natively on an M1-based machine. The second involves emulation, where we will translate instructions between the running operating system (Windows in this case) and the hardware. Both methods have their advantages and disadvantages. Emulation offers maximum compatibility as it doesn’t require software written for ARM specifically but it’s pretty slow. Virtualization is fast(er) but requires software written for the hardware platform it is running on.
Both of these methods can be accomplished with UTM (https://github.com/utmapp/UTM). UTM offers QEMU-based virtaluzation and emulation with a handy GUI for both IOS and macOS. As it’s using QEMU under the hood, it is capable of emulating different processor architectures (like x86-64) but it can do virtualization for the same as the host’s architecture as well.
After a quick test, on which I plan to create a more detailed article in the future, using emulation seems to cause a lot of overhead and turns out to be too slow to be usable currently.
Leaving only virtualization as a real option. The downside for this approach is that there is no official way, currently, to get a license for an ARM-based version of Windows. Microsoft decided that this is only available for sale for system builders. Another negative is that there are very little applications compiled for running on an ARM-based Windows version. Fortunately it is possible to run most 32-bit based Windows applications on the ARM-version of Windows, which are available for most applications out there.
For this article, I’ll be using a 2020 M1-based MacBook Air but this should work in the same way for an iMac, Mac Mini, MacBook Pro and even for the recently announced M1 Max and M1 Pro devices.
Getting Windows for ARM on your M1 device
Step 1) Create a Windows 11 for ARM ISO
The first thing we need is installation media for the ARM-based version of Windows 11. If you are part of the Windows Insider program, there is a version available for download, using a VHDX file. Unfortunately, I didn’t manage to get this to work properly and my VM was always stuck during the first boot in a “Getting Started” screen.
Since this didn’t work, I decided to use the UUP Dump method. UUP stands for Unified Update Platform. This is basically a deployment method that Microsoft introduced a few years ago that allows for a sort of incremental updates on parts of Windows, rather than re-deploying everything completely every time. The UUP Dump site allows you to generate a script that will download these UUPs from Microsoft and will combine them in a working ISO file.
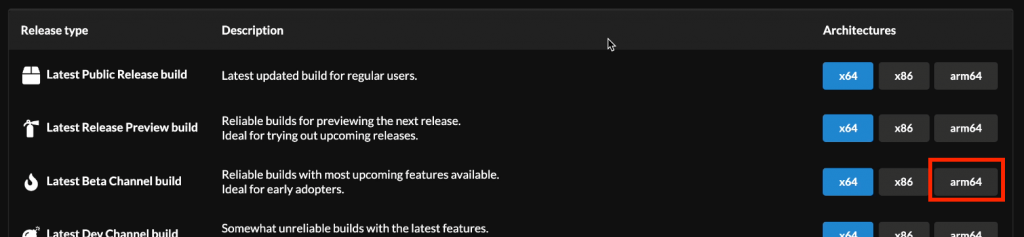
To get this all together, first navigate to the website of UUP dump: https://uupdump.net/. Over there, choose the arm64 version of the latest beta channel build:
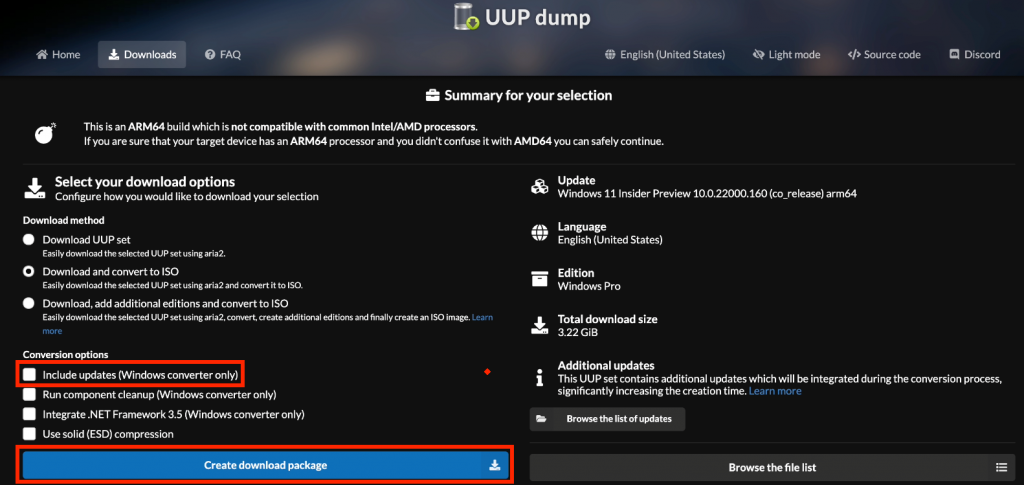
On the next page, choose the Windows 11 version. At the time of writing this article, this was 10.0.22000.160.

Next, I unchecked “Include updates” but this is not strictly necessary. Then click “Create download package”:
As you will see, this downloads a zip-file with a few scripts in it. The uup_download_macos.sh script is the one which we will need to run:

Before we can run the script, we need to install a few tools on our Mac first. The easiest method to do this, is by using Homebrew. Start by navigating to the Homebrew website (https://brew.sh/) and copy the command listed under “Install Homebrew”:

Open up a terminal window, paste the command in it and press enter. If asked, enter your user’s password:
jensd@jensds-MacBook-Air ~ % /bin/bash -c "$(curl -fsSL https://raw.githubusercontent.com/Homebrew/install/HEAD/install.sh)"
==> Checking for sudo access (which may request your password).
Password:
==> This script will install:
/opt/homebrew/bin/brew
/opt/homebrew/share/doc/homebrew
/opt/homebrew/share/man/man1/brew.1
/opt/homebrew/share/zsh/site-functions/_brew
/opt/homebrew/etc/bash_completion.d/brew
/opt/homebrew
==> The following new directories will be created:
/opt/homebrew/Cellar
/opt/homebrew/Caskroom
...
==> Next steps:
- Run these two commands in your terminal to add Homebrew to your PATH:
    echo 'eval "$(/opt/homebrew/bin/brew shellenv)"' >> /Users/jensd/.zprofile
    eval "$(/opt/homebrew/bin/brew shellenv)"
- Run `brew help` to get started
- Further documentation:
    https://docs.brew.sh
jensd@jensds-MacBook-Air ~ %
At this point, Homebrew is installed on your Mac but you need to add it to your PATH, as suggested in the last output of the previous command:
jensd@jensds-MacBook-Air ~ % echo 'eval "$(/opt/homebrew/bin/brew shellenv)"' >> /Users/jensd/.zprofile
jensd@jensds-MacBook-Air ~ % eval "$(/opt/homebrew/bin/brew shellenv)"
jensd@jensds-MacBook-Air ~ %
Now that is taken care of, we can install the required tools, using Homebrew, to be able to run the UUP dump script:
jensd@jensds-MacBook-Air ~ % brew tap sidneys/homebrew
==> Tapping sidneys/homebrew
...
Tapped 8 casks and 22 formulae (42 files, 157.3KB).

jensd@jensds-MacBook-Air ~ % brew install aria2 cabextract wimlib cdrtools sidneys/homebrew/chntpw
==> Downloading https://ghcr.io/v2/homebrew/core/ca-certificates/manifests/2021-09-30-1
######################################################################## 100.0%
...
x86_64cpuid.s:273:10: error: invalid operand
 cmpq $0,%rax
         ^
x86_64cpuid.s:274:9: error: unknown token in expression
 cmoveq %rcx,%rax
        ^
x86_64cpuid.s:274:9: error: invalid operand
 cmoveq %rcx,%rax
        ^
make[1]: *** [x86_64cpuid.o] Error 1
make: *** [build_crypto] Error 1

Do not report this issue to Homebrew/brew or Homebrew/core!

These open issues may also help:
Mac M1 chntpw not building (Openssl 1.0 requirement not satisfied) https://github.com/sidneys/homebrew-homebrew/issues/2
As you notice, the chntpw tool cannot be installed as it throws an error. The OpenSSL requirement is the issue but the error message also points us to the solution, which is to build OpenSSL ourselves. More details can be found on the Github link that is shared above. In essence, this is what needs to be executed:
jensd@jensds-MacBook-Air ~ % curl -LO https://gist.github.com/minacle/e9dedb8c17025a23a453f8f30eced3da/raw/908b944b3fe2e9f348fbe8b8800daebd87b5966c/openssl@1.0.rb
curl -LO https://gist.github.com/minacle/e9dedb8c17025a23a453f8f30eced3da/raw/908b944b3fe2e9f348fbe8b8800daebd87b5966c/chntpw.rb
brew install --formula --build-from-source ./openssl@1.0.rb
brew install --formula --build-from-source ./chntpw.rb
rm ./openssl@1.0.rb ./chntpw.rb
...
patching file Makefile
==> make
🍺  /opt/homebrew/Cellar/chntpw/0.99.6: 5 files, 296.3KB, built in 2 seconds
Removing: /Users/jensd/Library/Caches/Homebrew/chntpw--patch--dbf09ccee4eaf401e2680554990ee924bb0ad1dd7661a3c97d67bf796089fbbe.patch... (211B)
jensd@jensds-MacBook-Air ~ %
So far that were quite a lot of steps… But finally we are ready to execute the script which we got from the UUP Dump website. First navigate to the directory where you downloaded and extracted the files, then execute the macOS version of the script:
jensd@jensds-MacBook-Air ~ % cd Downloads
jensd@jensds-MacBook-Air Downloads % cd 22000.160_arm64_en-us_professional_fdb8a3c7_convert
jensd@jensds-MacBook-Air 22000.160_arm64_en-us_professional_fdb8a3c7_convert % bash uup_download_macos.sh
Retrieving aria2 script...

10/22 11:46:10 [NOTICE] Downloading 1 item(s)
[#8c33b1 0B/0B CN:1 DL:0B]
...
 99.63% done, estimate finish Fri Oct 22 11:51:38 2021
 99.86% done, estimate finish Fri Oct 22 11:51:38 2021
Total translation table size: 2048
Total rockridge attributes bytes: 0
Total directory bytes: 0
Path table size(bytes): 10
Max brk space used 0
2198094 extents written (4293 MB)
Done.
jensd@jensds-MacBook-Air 22000.160_arm64_en-us_professional_fdb8a3c7_convert %
As a result, you should end up with an ISO file in the directory from where you executed the script:
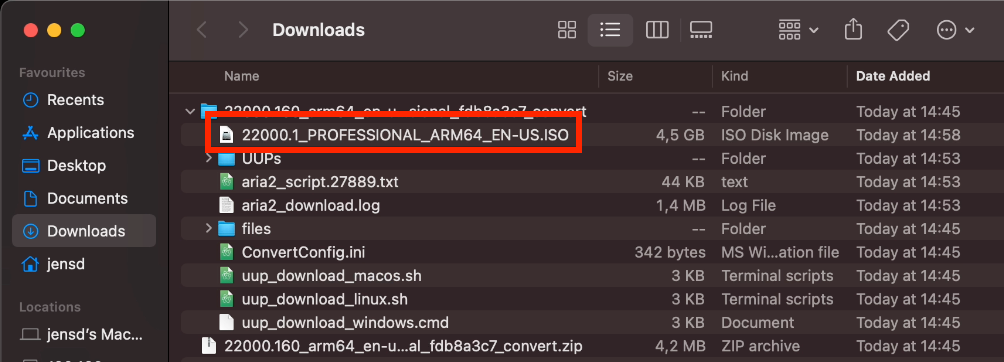
You can move this file to wherever you want, as long as you remember where for the next steps.
Step 2) Downlad and install UTM
Now that we have the ISO which we will use to get Windows installed, we need a way to create a virtual machine in which we can run the installer. There are several options available for this. The more known ones like Parallels or VMWare Fusion for example. Unfortunately these are not free but they should work as well. Instead, I will go for UTM.
UTM, as mentioned in the beginning, offers QEMU-based virtaluzation and emulation for both IOS and macOS. I tried to find what the UTM abbreviation stands for but was not able to find it.
You can download UTM from Github using: https://github.com/utmapp/UTM/releases/latest/download/UTM.dmg
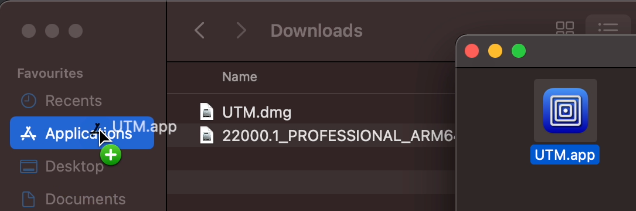
Once downloaded, simply open the .dmg file by double clicking on it and move UTM.app to your Applications folder using Finder:
Then start UTM, simply by launching it as any other application on your Mac.
Step 3) Create a VM for your Windows 11 ARM installation
At this point we have both the ISO file for installing Windows and we have our hypervisor, UTM, ready. Now we need to create a new virtual machine with UTM for use with the next step.
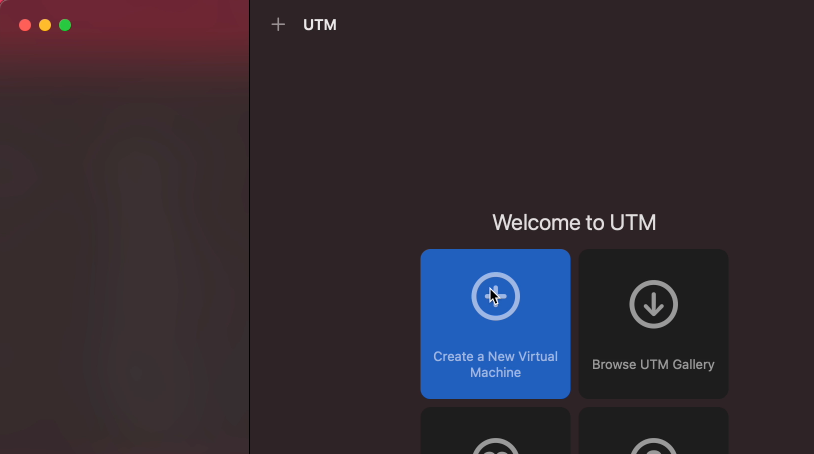
Start UTM and click on “Create a New Virtual Machine”:
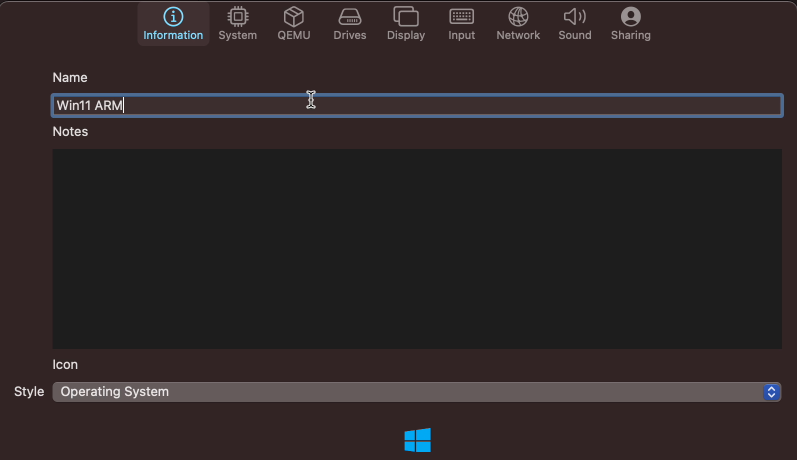
In the first tab: Information, choose a name for your VM and optionally choose a matching icon:
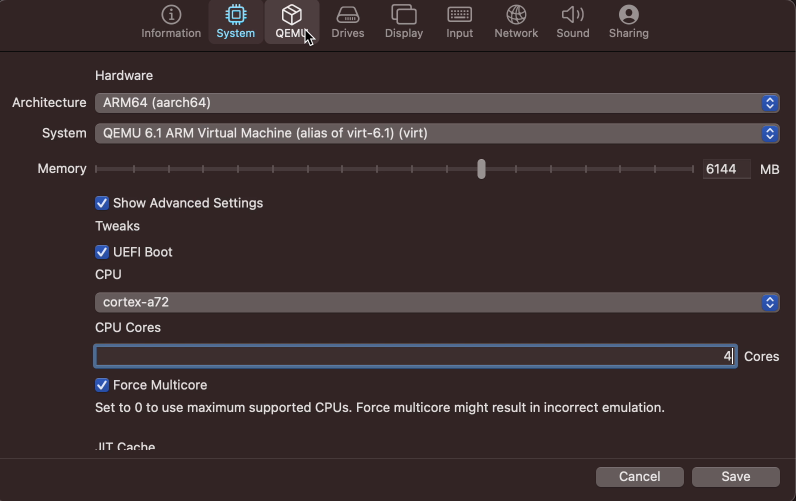
Navigate to the second tab: Sytem and select ARM64 (aarch64) as architecture. This matches the architecture of the M1-chip so we will not use emulation. Change the memory slider to have at least 4GB. I did notice that slightly more is really better (I took 6GB here for example). Optionally, click “Show Advanced Settings” and set a number of CPU cores (I chose 4 here) and enable “Force Multicore”:
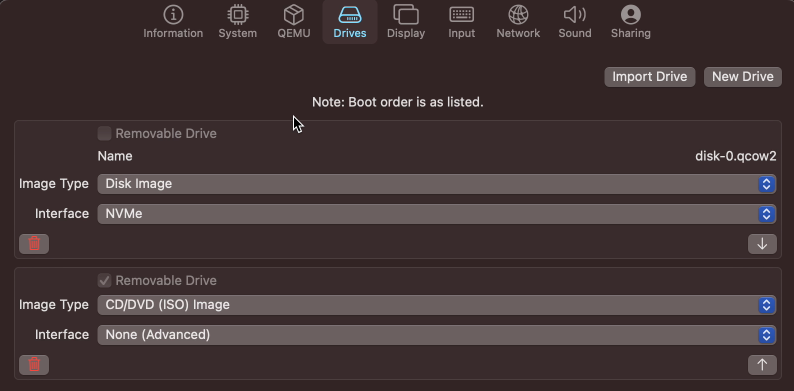
Now navigate to the Drives tab, click “New Drive” and change the interface to NVMe and give a size of at least 55GB. Then click “New Drive” again, check the removable option and choose “None (Advanced)” as interface:
Selecting None as interface is needed due to an issue/bug in QEMU. I’ve opened this on the UTM Github page but so far a workaround is still needed. Type None allows to specify the required parameters to give an interface for our virtual CD/DVD drive.
To do so, navigate to the QEMU tab and scroll all the way down in the list, until you reach the last line saying New…, then add two lines as follows:
-device
usb-storage,drive=drive1,removable=true,bootindex=1,bus=usb-bus.0
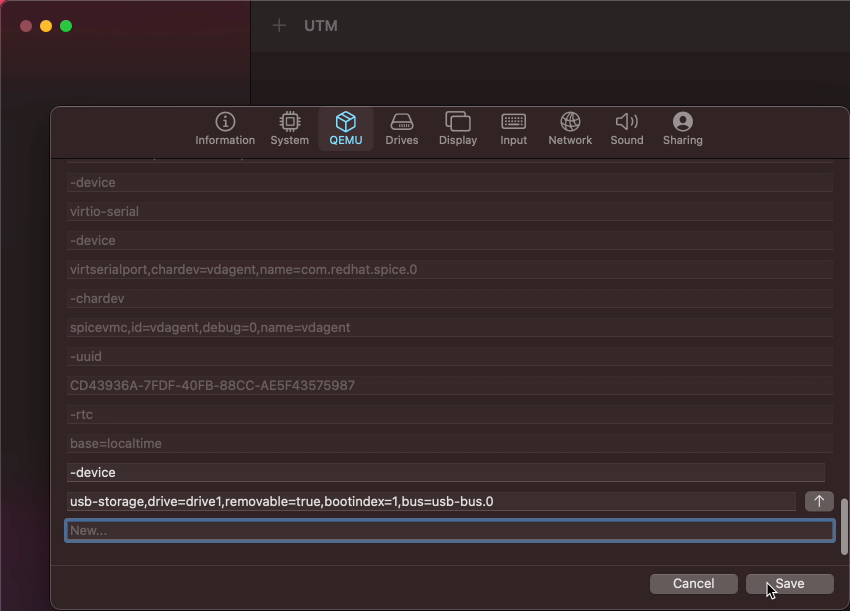
After all these steps, click Save to create the new VM in UTM.
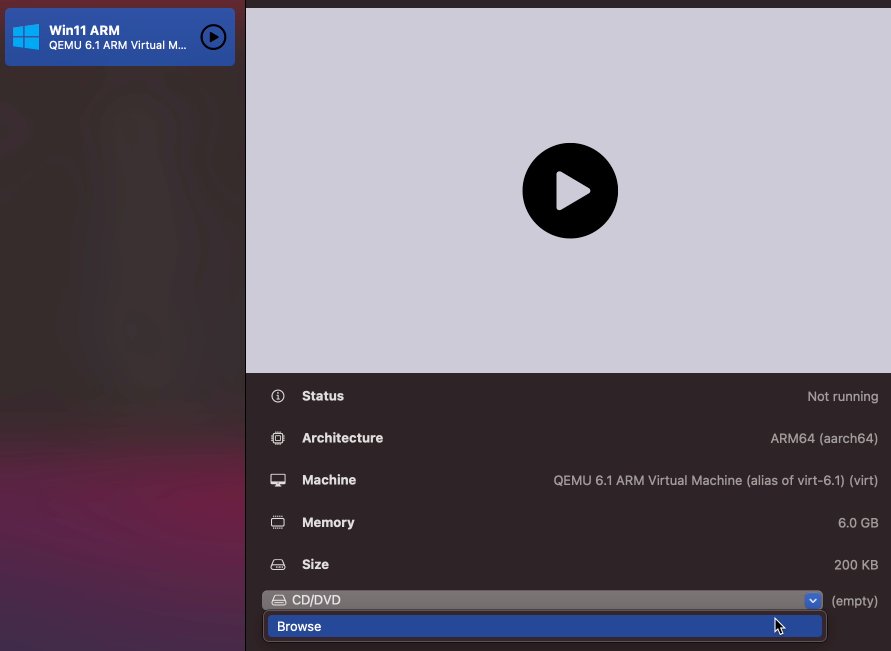
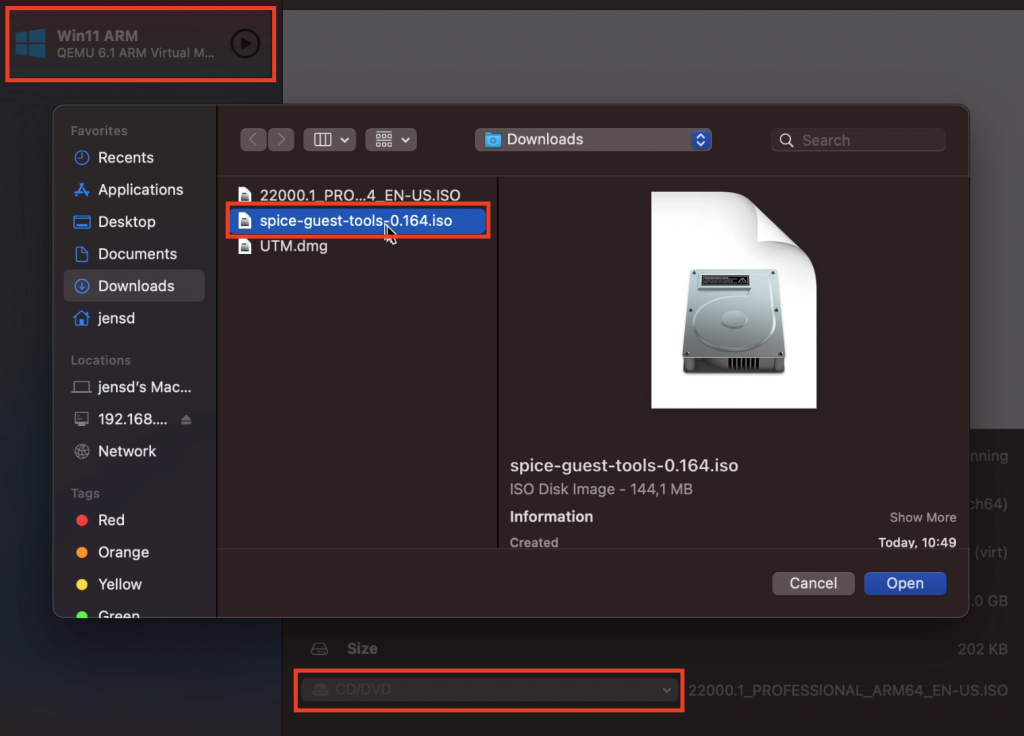
Only thing which is left, is to mount the Windows 11 ARM installation ISO, which we created in the first step to the VM. To do so, select the VM you just created from the list and on the CD/DVD dropdown, choose Browse:
Then navigate to your Downloads folder (or other location where you move the ISO file afterwards) and select the ISO which got created in step 1:

Step 4) Install Windows 11 ARM on your M1-based device
Now that we have our VM created, let’s get it started and run through the Windows 11 installation.
Start the VM by clicking on the large play icon (see previous two images). The VM will boot and you should see a large UTM logo.
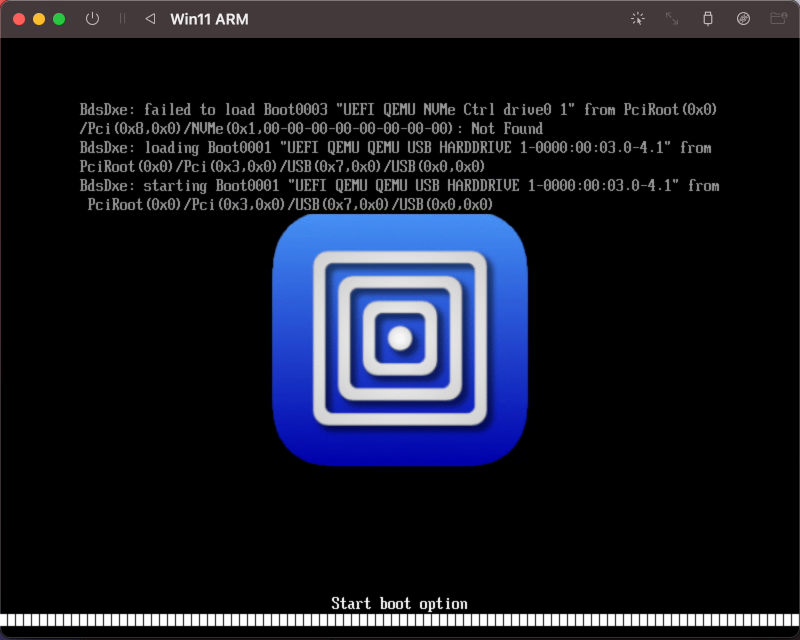
Make sure you click in the VM immediately as it will ask to press a key to boot from the ISO:

After pressing any key, the installer will start from the ISO and if all goes well, you should be able to see the standard Windows 11 installer, where you can select a language, locale and keyboard settings:
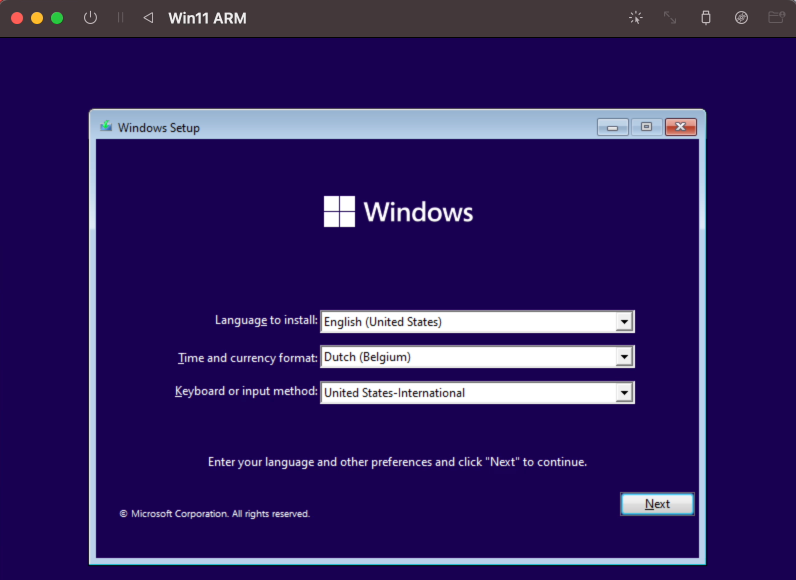
Set these as desired and click Next.
In the next screen, we need to do some modifications before we can click “Install Now”. Windows 11 has some strict requirements for the hardware it is allowed to run on. As our Macbook, and the VM, does not have Secure Boot nor TPM, we need to work around that by adding some keys in the register.
So on the screen where you seen Install Now, press Shift + F10. It might be that you need to use Fn+F10, depending on how you configured your function keys. This should bring up a command prompt where we can open regedit:

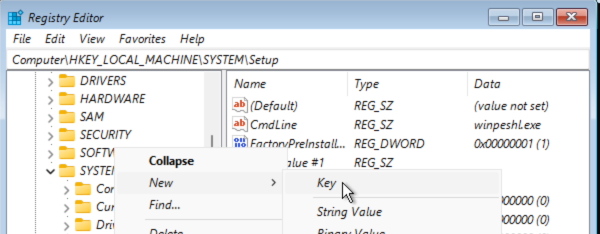
In the registry editor, navigate to: Computer\HKEY_LOCAL_MACHINE\SYSTEM\Setup and add a new key there called LabConfig. To do this, right click on Setup and choose New > Key:
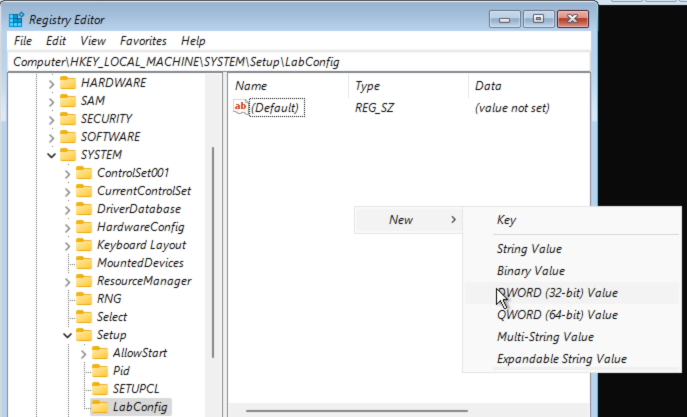
Give it the name LabConfig and in the key, right click and choose New – DWORD (32-bit) Value:
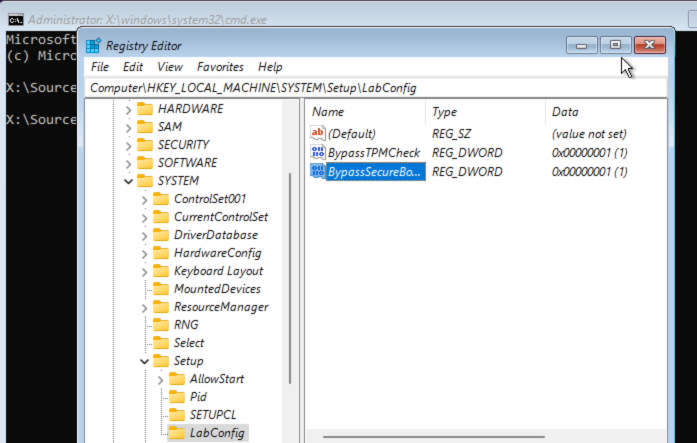
Give the name BypassTPMCheck to this DWORD. Repeat these steps a second time but nowgive the name BypassSecureBootCheck. Then double-click on each of these two DWORDs and change the value to 1. As a result, you should get the following:
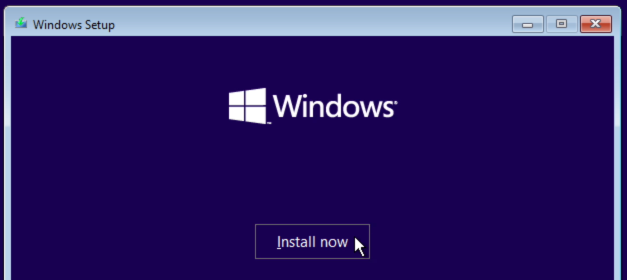
Now that’s done, we can close the Registry Editor and the command prompt we opened and continue with the install by clicking “Install Now”:
In the next screens, choose: “I don’t have a product key”, accept the license and choose for: “Custom: Install Windows only (advanced)”. You should end up with the “Where do you want to install Windows?” dialog:
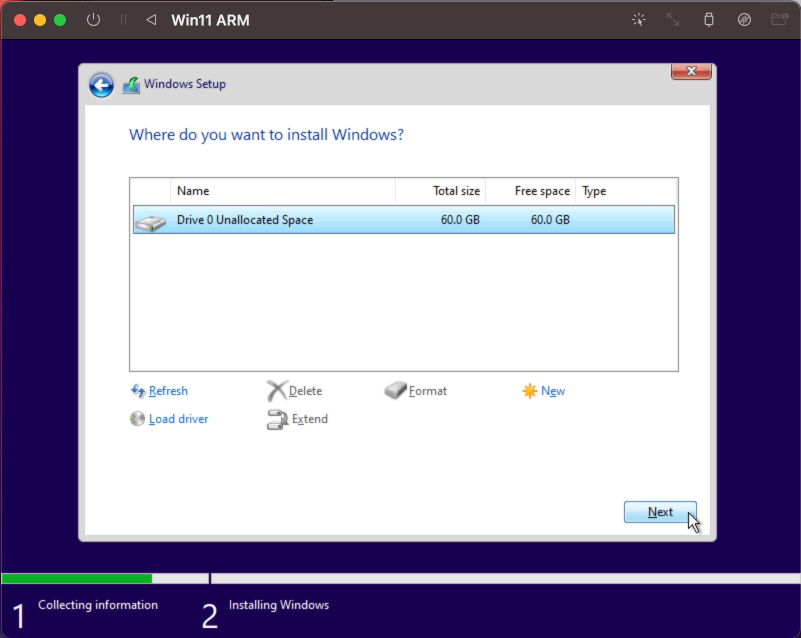
Here you can simply click next and let the installer create the necessary volumes on the virtual drive which we added in UTM. After that, Windows should copy the files to the drive and continue the installation:
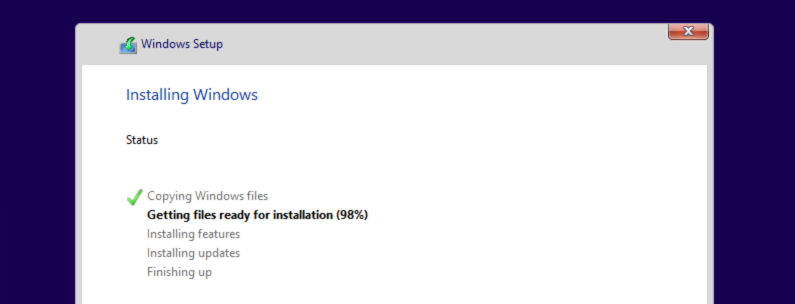
In case you run into an issues during the “Getting files read for installation” and the installer ends with an error like 0x800701B1 (Windows cannot install required files. Make sure all files required for installation are available.), Restart the VM and give it another try. This issue is the main reason for the custom QEMU-parameters for the USB-connected virtual CD/DVD drive. They seem to help but the issue still shows in some cases. Two tries at max. should do it normally.
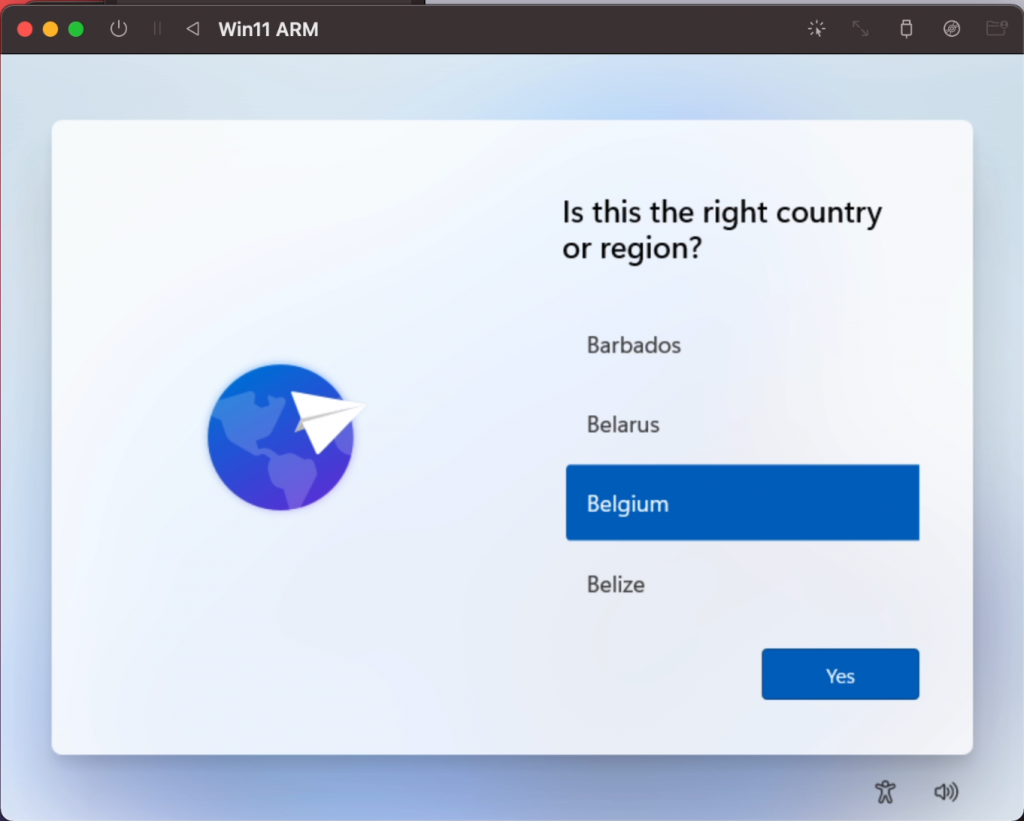
Once this all completes, the VM will reboot and you should be greeted with the following dialog where you need to answer the questions regarding location, keyboard layout, username, password and privacy settings:
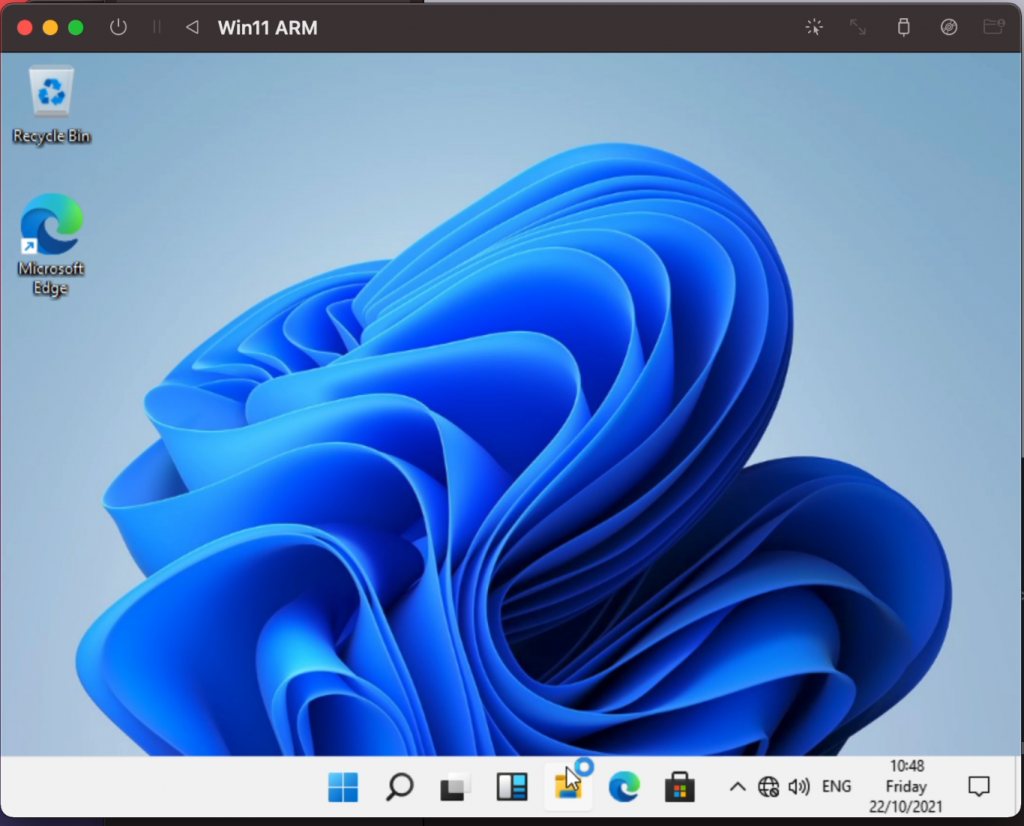
After completing the questions, the installation is getting finalized:

and you should end up with your fresh Windows 11 ARM desktop:
Step 5) Perform some post-installation tasks
In the previous steps, we managed to get a working Windows 11 installation on the M1-based device. But if you work a bit with it, you will notice that the system is not working very optimal yet. There is no network/internet connectivity and the resolution is stuck at 800×600.
Both these issues can be resolved by installing the SPICE Guest Tools and QEMU Drivers. These can be downloaded from the Support section on UTMs website:
Open your browser on macOS, navigate to https://mac.getutm.app/support/ and download the guest tools and drivers:

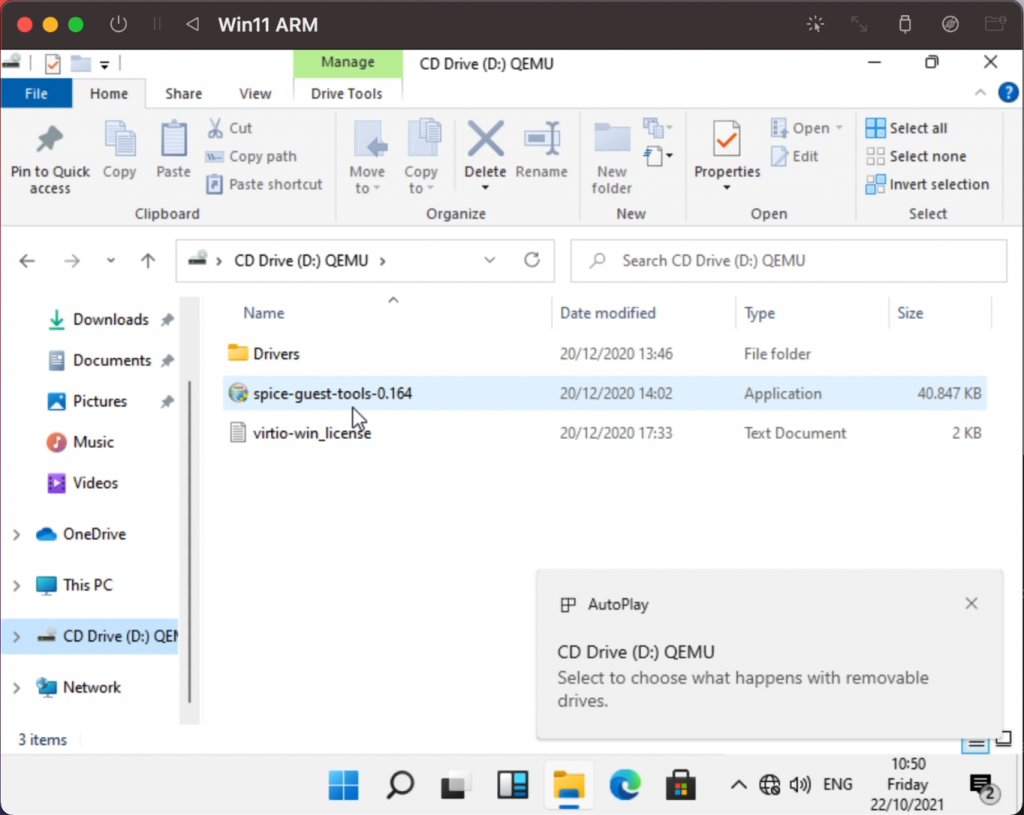
Then in UTM, go to your VM in the list, select it and change the ISO for the virtual CD/DVD drive to the downloaded ISO:
Then in your Windows 11 VM, navigate to the CD/DVD drive and run spice-guest-tools.0.164 (or the version you downloaded):
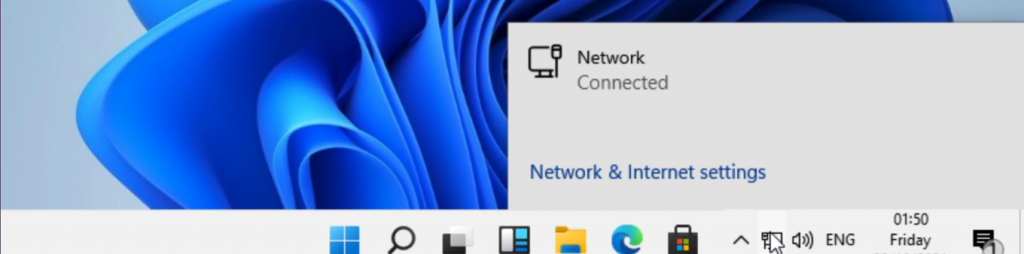
After that, you will notice that the network adapter will be available and connected:
After this step you can also change the resolution and size of the VM. To do so, right click on the desktop and choose “Display settings”. You will see that you have an additional virtual display now. Here you need to scroll down and choose to “Show only on 1”:
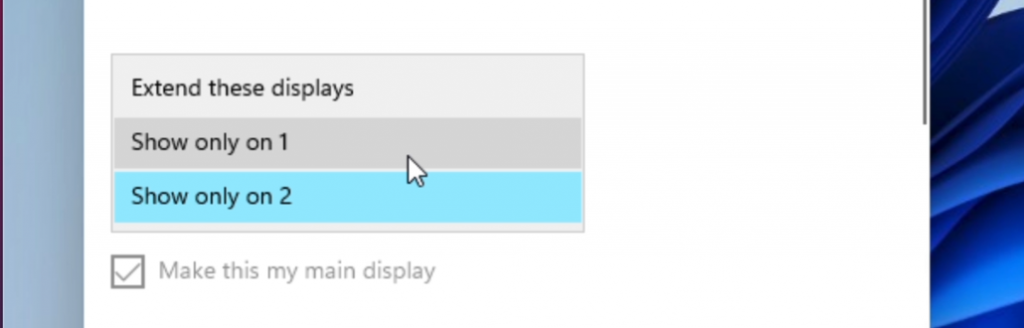
The display will flicker and you should end up with a better resolution already. When asked, choose to keep the changes. If desired, you can change the resolution to a higher value but you might notice that there can be issues with the mouse pointer being misaligned.
Best to do at this stage is a reboot. If you don’t manage with the mouse, just press Alt+F4 and reboot.
Step 6) Profit!
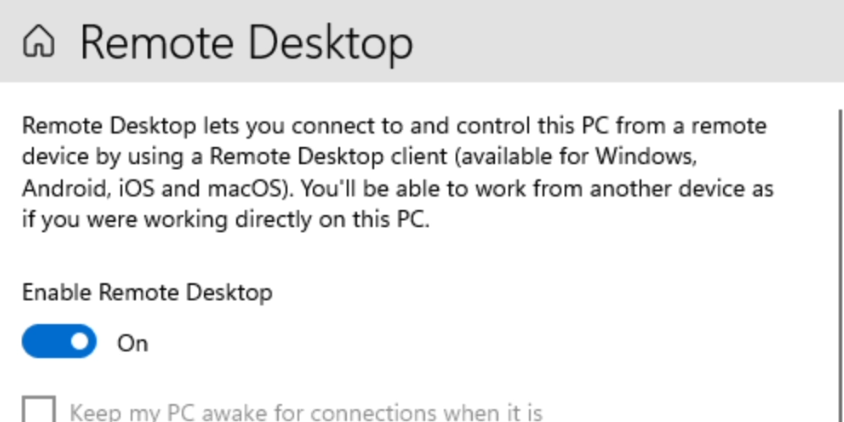
Using the VM directly might not give you the expected feeling. It feels a bit bulky/laggy although the performance really isn’t that bad. To my idea it works a lot better if you enable remote desktop and connect to it with Microsoft Remote Desktop from macOS instead.
First enable remote access on your VM:
Find the IP-address that your VM received. You can do so by opening a command prompt and run “ipconfig” or use the Settings dialogs:
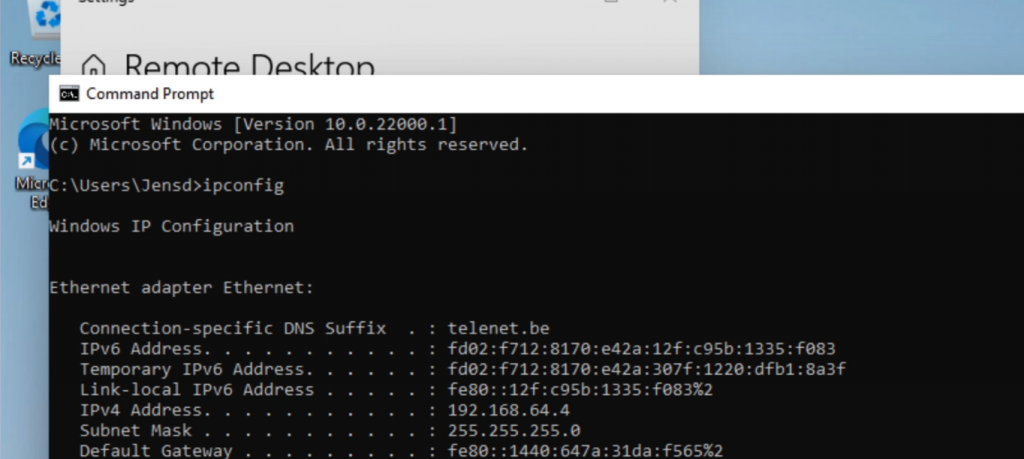
On macOS, install Microsoft Remote Desktop, you can find it in the App Store and add a PC with the IP-address which you found (192.168.64.4 in my case):

Connect to the VM’s IP address using Microsoft Remote Desktop and enter your Windows username and password. This will give you a good looking fullscreen Windows 11 experience:
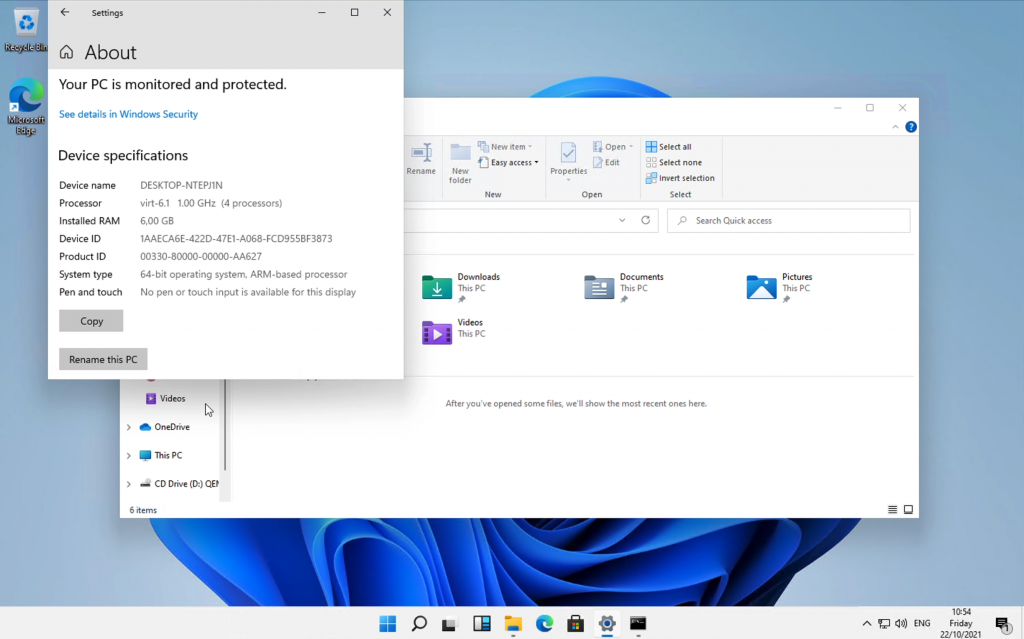
Looking briefly at the performance, with the 4 cores reserved for the VM and 6GB of RAM, the scores I managed to get from some basic benchmarks are really above expectation.
I’ll probably do another post going a bit deeper in performance but this is what I saw for Geekbench 5 for example, which is able to test on AArch64 native:
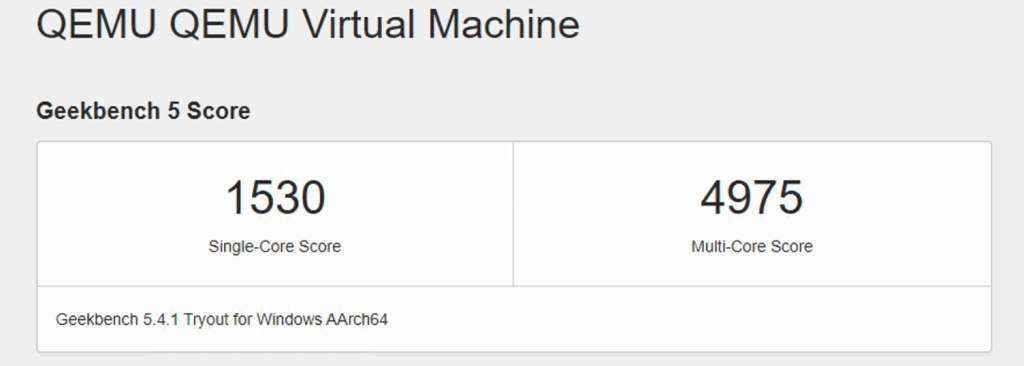
Browserbench gave a nice result as well:
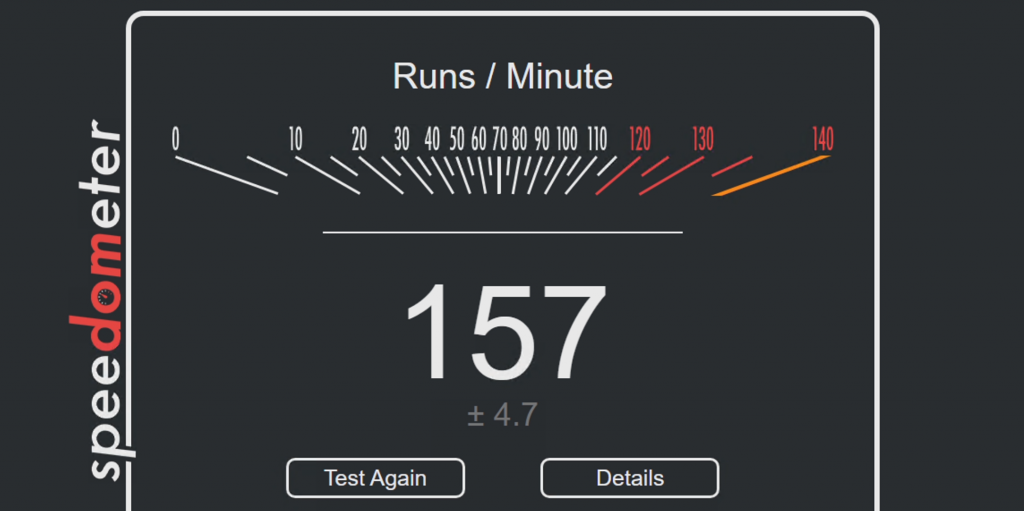
As you can see, a machine with these scores is not a punishment to work with for sure.
Although it takes quite some steps and time, this process should allow you to get a Windows 11 ARM-based VM on your M1 based device.
I followed your instructions exactly on the the MacBook Pro. The Windows 11 installer is giving me the error “this pc doesn’t meet minimum requirements” even though I’ve given it more ram and more virtual disk space than you specified. Please let me know if you have any ideas on this. Thanks!
Check the registry changes that are required. You can just go to the command prompt again and check in regedit after seeing this error. Maybe a typo or wrong location where you created the key/dwords?
https://www.youtube.com/watch?v=yLgg3b1tJEI
Looks like this is the answer here…
Trying now…
Now I’m getting this error:
“Windows cannot install required files. Make sure all files required for installation are available, and restart the installation. Error code:0x800701B1.
Ok I pushed past that error code like suggested in post but now I’m getting this:
Windows cannot install required files. The file does not exist. Make sure all files required for installation are available, and restart the installation. Error code: 0x80070003
You have to change the CPU type from arm whatever to Default. Architecture stays arm64 only the CPU type must be changed.
In the installation, remove other partition created, and save only one.
I am also facing the same issue and removed the partitions so that I have only 1 unallocated 100GB storage. My installation also fails with the same error at 8% Copying files.
@Abe Underwood Did you get it to work ?
Also make sure your disk created is at least 60GB. I got the error when the disk was 40GB.
It seems to be a disk space issue. It gets further the more space I have on my actual mac – try make sure you have 60gb free, delete the NVMe and re-create, and try again. The furthest I’ve gotten, though, is 87%
What fixed the issue for me was correcting where I was entering LabConfig. I was typing it at in the bar at the end of the path but I didn’t notice it wasn’t actually saving the name change. I renamed named it in the file explorer side bar and that allowed me to proceed. Hope that helps.
hello jensd,
have followed your instructions. unfortunately the boot process stops at the logo.
do you have a solution for it?
greeting
tomas
https://github.com/utmapp/UTM/issues/3130
with this solution I was also able to run the downloaded VHDX from windows insider, no need to create my own iso.
the solution was
“I solved this problem by changing the processor type from cortex * to default” in emulator settings
Thanks for this tutorial. Really good work. For me, installation only finished on the third attempt.
Dear Jens
Thank you for this more than awesome ho to guide.
Finally I have an issue with the resolution change to 1 monitor. You mentioned that mouse issues. I have those and if I change to one monitor the screen is frozen.The reboot with ALT + F4 doesn’t work anymore.
Do you have any idea how to change the resolution differently?
Thank you so much. Best guide ever.
Andre
Ok resolved.
After some minutes I got a Windows update. I was able to use the keyboard arrows to select the right option.
Good to hear and thanks for the update.
I followed the steps you mentioned except for downloading the iso from the DEV channel.
I get this error when I start the VM.
qemu-aarch64-softmmu: -device: requires an argument
What am I missing ?
Nevermind, there was an additional drive that UTM added which I wasn’t aware of. When I delete that drive, the VM starts.
Hi! Thank you for the tutorial. I managed to do everything. However, whenever I try to change the display setting. It keeps on making the screen froze and even when I try to reboot it, it doesnt work. The alt+f4 also doesn’t work. Hope you can help me with this.
I follow the instructions and all when well until the display change. My screen froze and final got back to rebooting. Installed windows update and then changed the display. After restart my mouse is not active and I can’t use it. Keyboard works to shut down. Any solutions for that.
could u solve the problem? I have same issue and still not solved.
I have same issue. Frozen after “Show only on 1” in display settings. Anyone know how to get past this?
I applied all updates. When I click on “Show only on 1”, it starts the count down. Click on “Keep changes” or “Revert” does nothing. “Make this my main display” is grayed out. Countdown stops at 1 and hangs there.
For anyone having problem bypassing “Let’s Connect You To A Network” screen, run cmd and cd into D: where you mounted spice-guest-tools, run the exe, it will install the network so button will get active so you can continue on installation.
Another thing I encountered is I am having problems switching to 1display. All sort of problems are happening when I try.
Could you provide more details as to how to rnthe spice guest tools? I’m stuck at this network screen? What exactly should I be doing?
* mount spice-guest-tools.iso before starting the VM
* when you are at the point “Let’s connect”…
* … press “Shift+F10” to open the terminal (it’s the same as above to open regedit)
* in the terminal enter “d:” and ENTER to change to the D-drive
* enter “spice” and press TAB to autocomplete name of the exe (in my case its ‘spice-guest-tools-0.164.exe’) and then press ENTER to run the application
* just go through the installer as always and afterwards your VM should have internet access …
How to mount spice tools ISO since I haven’t fully installed Win 11 yet and I don’t have the option to click “I don’t have internet”?
Thanks in advance!
That probably means you installed a home version of Windows 11. The option is not available there.
A workaround is to press Shift+F10 (Shift+Fn+F10, depending on your Mac config) and then run: taskkill /IM oobenetworkconnectionflow.exe /F
Hi and thanks a lot for this guide. I have managed to install win 11 through UTM on my Mac M1 (MacOS Big Sur 11.6). Spice guest tools is installed. The VM has internet access but is invisible on my home network. Machine address and DNS and DHCP have 10.0.2.X type adresses, therefore I cannot use remote desktop. Any clues?
You can change this in the settings of the VM. Instead of shared network, which allows only access directly from the host (your M1 Mac), choose for bridged. Then the VM should get an IP-address of your home router and should be reachable from other machines on the network.
Thank you for replying! But I cannot find such a setting in UTM (either in the QEMU, Network, or any other tabs).I have version 2.4.1 (latest) installed, and use virtio-net-pci adapter.
Nevermind I found it: it was due to my macOS version (11.2.2). It is only available from 11.3
Great stuff, appreciate your effort!! Very well documentation, I could successfully install Windows 11.
I was following all steps and stuck on step 4 when tried to begin Windows installarion with an error: “Error trying to restore removable drives: Failed to access drive image path.”
Maybe you know what I can do to avoid it or what I did wrong
I’ve found some other guys under your youtube video had faced with that and you already answered them. Gonna try what was written there.
Dealed with that :)
Good to hear :)
Hey man, what video did you watch to fix this? I’m trying to do the same for my PC.
Thank you so much Jens for sharing this tutorial, worked at 1st try, have internet. Only had to remember to activate directory sharing. You made my day, be blessed.
This didn’t work for me.
But I was able to download the full version of windows 11 ARM from Microsoft website and run it in UTM without any problem.
This is the setting worked for me:
1. Download the file from Microsoft website. Microsoft Windows 11 ARM version. its in .VHDX format.
2. Create a virtual machine in UTM and apply these settings:
A. System: Architecture = ARM64 (arch64)
System = QEMU 6.1 ARM Virtual Machine…Virt
[tick] show advanced settings
CPU = Default [this one is important]
CPU Cores = 4
Force Multicore
B. Drives:
Import Drive and select the windows.VHDX file you downloaded from Microsoft website.
Create new USB Drive to later install the Spice Guest Tools.
This is all and it is working great
All proceeded as indicated except I cannot get the UTM to move past the “start boot option” logo page to have Windows confirm the ocation, keyboard layout, username, password and privacy settings. Multiple VM restart events did not have any effect. This is the similar spot that I reached using the Windows Insider program (VHDX file). Any suggestions?
So after many restarts/reboots I was able to get past the UTM logo and to the Windows confirmation questions, but now my Internet connection isn’t recognized. I’ve tried WIFI and LAN connections and clearly have connectiviity. Suggestions as I keep trying?
Any tips to get past the “Let’s get you connected” page of the Windows installation? I don’t have the option to say no network.
If you have used the pro version, there should be a “I don’t have Internet” option.
If that is not available somehow, you can enter a command prompt with Shift + F10. And kill that window with: taskkill /IM oobenetworkconnectionflow.exe /F
Mine is Macbook air 2020 with 512 gb hard disk and 8 GB ram os updated to Monterey. I have already installed UTM. I saw a provision in UTM gallery for Windows 11 with ARM64. Can I install directly from there. Is 8 gb RAM sufficient? What will be size of download required (in GB) as I am in limited network. If I can not use provion in UTM gallery then I will try your method.
I had a boring day of bad weather in the Sinai Mountains by the Red Sea, so I thought of doing some work on my MBA M1. Your manual works perfectly fine! Thank you very much!
I am unable to get terminal to do regedit either with either with Shift+F10 nor with fn+F10. how to proceed further.
Shift+fn+F10
On mine shift + f10 didn’t work either, I went to the left hand side where it says “repair your computer” and then troubleshoot, and clicked on the command prompt from there. On his screen shots that option didn’t exist so maybe its new?
Bro, I found this error what shoud I do now?
Status Legend:
(OK):download completed.(ERR):error occurred.
aria2 will resume download if the transfer is restarted.
If there are any errors, then see the log file. See ‘-l’ option in help/man page for details.
We have encountered an error while downloading files.
Bro I found this error whar should I do now?
Status Legend:
(OK):download completed.(ERR):error occurred.
aria2 will resume download if the transfer is restarted.
If there are any errors, then see the log file. See ‘-l’ option in help/man page for details.
We have encountered an error while downloading files.
I installed VM after regedit as described. I also installed spice tools. Network is working. But after reboot, none of the icons at the bottom except explorer works. What to do?
Most likely your mouse pointer is not aligned. Click the mouse-pointer button in the top right corner of the VM window in UTM to fix this.
For anyone running this on an 8gb system, it made an _enormous_ difference in performance to _reduce_ the vm ram to 2GB. With 4gb I got 600/1500. With 2gb I got 1300/3900 !
I think it’s because with 4gb my laptop’s memory red-lined. Even the normal osx apps were running crazy slow.
Oh I’m quoting my GeekBench numbers, to be clear …
Did you manage to get folder/directory sharing working? Installed the spice package, enabled directory sharing but can’t find the folder I created in macOS anywhere in Windows 11.
Pingback: Create a bootable Windows 11 installation USB on macOS | Jensd's I/O buffer
Thank so much , you really did greate effort , I followed all steps and it works find , just small issue with network it works but not connected to internet
Does someone have an idea on why sound might be lagging about 300-400 MS? Trying to game on this is impossible because of these sound lagging issues. Thanks.
Gaming doesn’t really work on UTM, because it is so inefficient. I have a maxed out 16″ M1 Max, and I cannot even play e.g. Trine 2 on lowest settings. Anno 1800 is also unplayable at 7 FPS. Haven’t tried many other games, but going by the fact that even window dragging causes terrible tearing glitches, no game is going to run.
The problem is not really the (CPU) performance but the lack of 3D acceleration. As long as you play games that don’t need it, you will be fine.
There are some projects for GPU acceleration with QEMU, like Virgil. Not sure how easy it is to get this running on an M1-based machine though.
Hello Jensd,
I have followed your instructions, it worked for me.
I have an issue with USB ports. Can emulated Win11 determine just plugged in devices or not?
Or we have only ISO and folder that we choose when we are creating a new profile in UTM?
Maybe the solution is in creating new driver and QEMU settings with the code that you wrote there?
(This one:”-device
usb-storage,drive=drive1,removable=true,bootindex=1,bus=usb-bus.0″)
If it is, then can you help me and write the code for a new driver to make it work?
My Network Connection Page was not killing with the above mentioned command. I tried it by bypassing network by following command: OOBE\BYPASSNRO and it worked.
For me the network issue was resolved with
C:\Windows\System32>oobe\BypassNRO
spelled just like that. It took me a bit to figure out.
Shift + F10 didn’t work. I had to use control+option+F10 or fn+shift+F10. Can’t quite remember. Just tried other combinations to get the prompt required to edit the registry.
qemu-aarch64-softmmu: -device usb-storage,drive=drive1,removable=true,bootindex=1,bus=usb-bus.0: Drive ‘drive1’ is already in use by another device
I have this error.
could you please help me?
Thank you for the nice post. i have been struggling with UTM but your post makes it easy. it works for me flawlessly. I didn’t get any error nor need to change registry key.however on my win11 Processor shows only virt 7.0 1 GHz but no CPU. do you know why?
What a proprietorially-convoluted waste of time, thanks Apple. Far too much Windows hardware available on the cheap out there to bother with this mess.
Thanks for the post, but I’ve run into a issue extracting a cab. There’s open issue on GitHub for the problem I’m running into. Hopefully this get resolved in the future.
Source: https://github.com/utmapp/UTM/issues/4997
I have an issue. I followed your guide.
But I my keyboard is not properly mapped in win11. I cannot choosed apple keyboard, it is not there.
Excellent, step by step it worked nicely on a Macbook Air M1 with macOS Big Sur, thank you.
Windows11_InsiderPreview_Client_ARM64_en-us_26080.VHDX Installing a virtual image