
When your VM’s file systems are running out of space and you want to provide more space to your VM and you can’t afford any downtime, there are basically two options. Either you delete some files on the file system or you expand your current file system. Expanding your current file system can be accomplished by growing an existing virtual disk or adding a new virtual disk. Besides cleaning up, both other solutions work fine and I’ll try to explain how to get both of them active without rebooting the system or any downtime.
Available free space should be monitored at all times since a system really behaves unpredictable when there is no more free space on an (important) file system. When you see that a file system is filling up, you can’t keep deleting stuff since there is a reason that the storage is used.
To have the flexibility to dynamically grow or shrink file systems, you need to use LVM. The Logical Volume Manager adds an extra “virtual” layer above your real block devices which adds a lot of flexibility. When using virtual machines, that real block device is in fact also a virtual device. For the rest of this post, I assume you know what LVM is and how to use it. If not, take a look here.
Option 1: Add a new virtual disk to the VM
The first possible way to expand your storage online, is to add a new virtual disk to your running system. This is the only option when using VMWare Player. While this option is easier since it doesn’t involve trouble with the MBR-limitations, it’s less clean if you want to add space on a regular basis since your VM ends up with a lot of virtual disk drives and VMDK-files.
Our example machine has a virtual disk of only 5GB and before expanding the file system we can see that it’s running out of space in the /home filesystem:
[root@cen ~]# df -h
Filesystem                  Size  Used Avail Use% Mounted on
/dev/mapper/vg_sys-lv_root  2.0G  740M  1.3G  37% /
devtmpfs                    994M     0  994M   0% /dev
tmpfs                      1000M     0 1000M   0% /dev/shm
tmpfs                      1000M  8.4M  992M   1% /run
tmpfs                      1000M     0 1000M   0% /sys/fs/cgroup
/dev/mapper/vg_sys-lv_home  509M  509M   20K 100% /home
/dev/mapper/vg_sys-lv_tmp   509M   26M  483M   6% /tmp
/dev/mapper/vg_sys-lv_var   1.4G  121M  1.3G   9% /var
/dev/sda1                    97M   65M   33M  67% /boot
The /home filesystem is on a logical volume, so let’s check if the volume group for that volume still has some free space:
[root@cen ~]# vgdisplay
  --- Volume group ---
  VG Name               vg_sys
  System ID
  Format                lvm2
  Metadata Areas        2
  Metadata Sequence No  7
  VG Access             read/write
  VG Status             resizable
  MAX LV                0
  Cur LV                5
  Open LV               5
  Max PV                0
  Cur PV                1
  Act PV                1
  VG Size               4.88 GiB
  PE Size               32.00 MiB
  Total PE              156
  Alloc PE / Size       156 / 4.88 GiB
  Free  PE / Size       0 / 0 GiB
  VG UUID               pzPaBt-ylaD-olYT-8H5w-jODd-8hTY-bglG3y
As you can see, there are no more free extents in the volume group so we can’t simply expand the logical volume for /home.
Add a new virtual disk with the Vsphere Client
The first step for option 1, to resolve our problem, is to add a new virtual disk to the guest that is running out of space. This can be done via the Vsphere Client, the Vsphere Web-client, the API,…
In the vSphere client, right click on the VM that’s running out of space and click “Edit Settings…”:
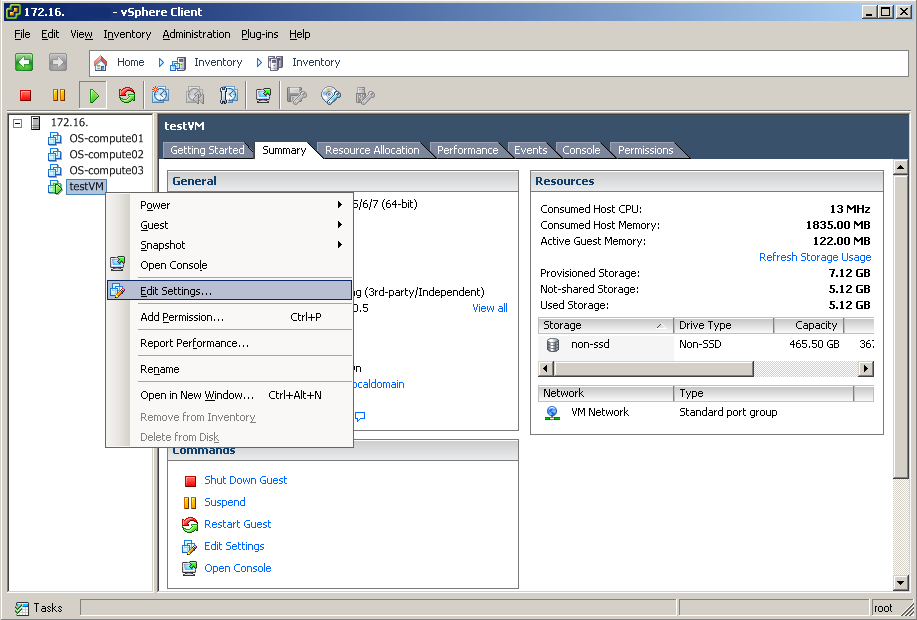
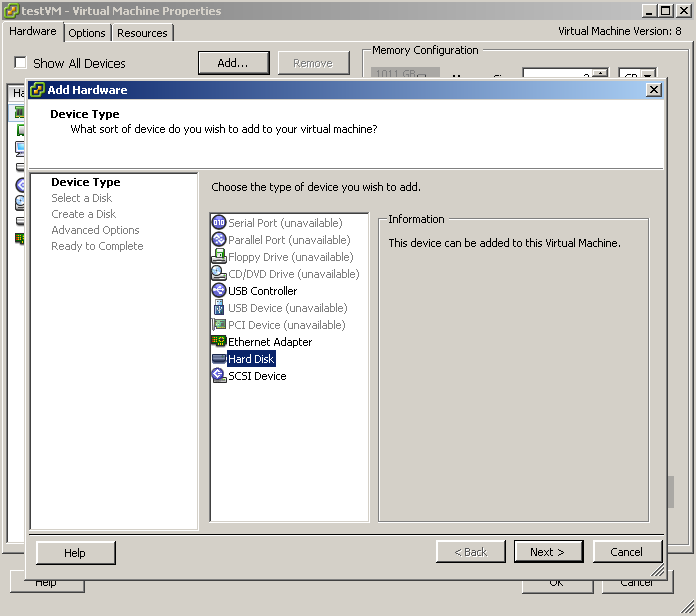
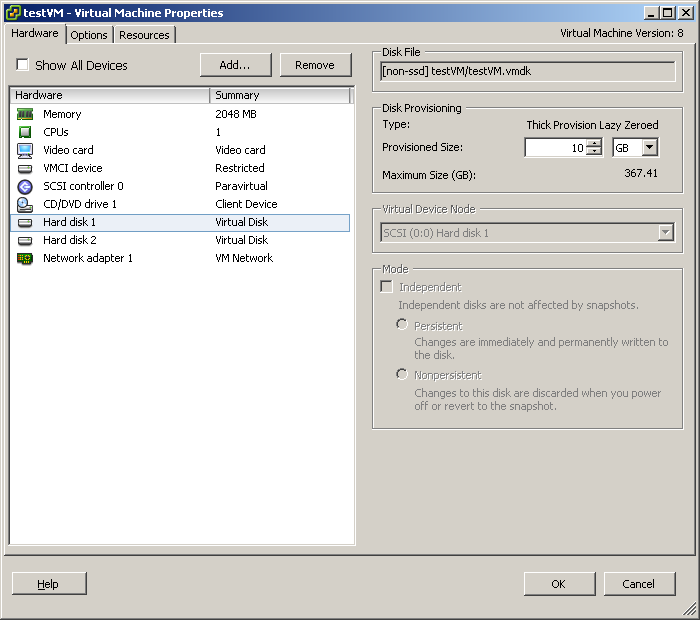
In the “Virtual Machine Properties”, click on “Add…” and select “Hard Disk” from the list.
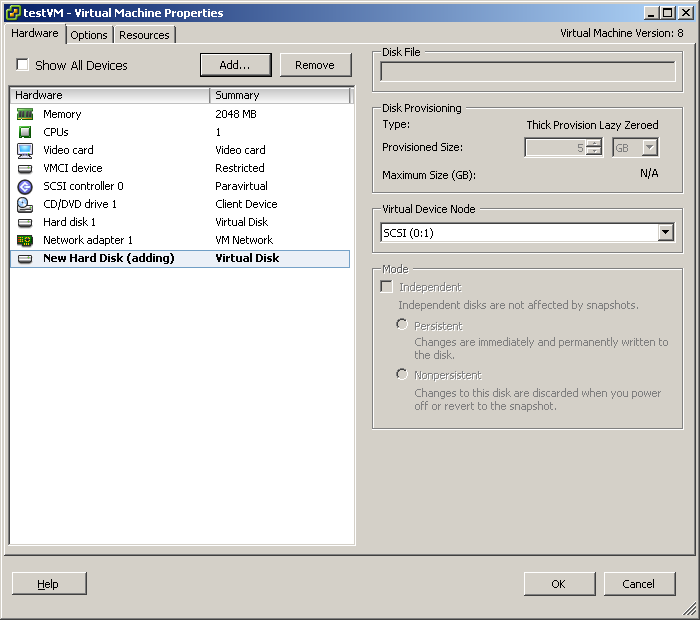
Click “Next >” and choose the size for the new disk, then continue.
As you can see in the above screenshot, a new virtual disk of 5GB was added to the system.
The same process can be done with VMWare Player in a similar way
Use the newly added disk to extend an existing Volume Group
After adding the new disk to the VM, we can start using it. The first step is to check which name our newly added disk has.
[root@cen ~]# tail -15 /var/log/messages
Jan  7 17:39:38 cen systemd-logind: New session 1 of user root.
Jan  7 17:47:50 cen kernel: vmw_pvscsi: msg type: 0x0 - MSG RING: 1/0 (5)
Jan  7 17:47:50 cen kernel: vmw_pvscsi: msg: device added at scsi0:1:0
Jan  7 17:47:50 cen kernel: scsi 0:0:1:0: Direct-Access     VMware   Virtual disk     1.0  PQ: 0 ANSI: 2
Jan  7 17:47:50 cen kernel: sd 0:0:1:0: Attached scsi generic sg2 type 0
Jan  7 17:47:50 cen kernel: sd 0:0:1:0: [sdb] 10485760 512-byte logical blocks: (5.36 GB/5.00 GiB)
Jan  7 17:47:50 cen kernel: sd 0:0:1:0: [sdb] Write Protect is off
Jan  7 17:47:50 cen kernel: sd 0:0:1:0: [sdb] Cache data unavailable
Jan  7 17:47:50 cen kernel: sd 0:0:1:0: [sdb] Assuming drive cache: write through
Jan  7 17:47:50 cen kernel: sd 0:0:1:0: [sdb] Cache data unavailable
Jan  7 17:47:50 cen kernel: sd 0:0:1:0: [sdb] Assuming drive cache: write through
Jan  7 17:47:50 cen kernel: sdb: unknown partition table
Jan  7 17:47:50 cen kernel: sd 0:0:1:0: [sdb] Cache data unavailable
Jan  7 17:47:50 cen kernel: sd 0:0:1:0: [sdb] Assuming drive cache: write through
Jan  7 17:47:50 cen kernel: sd 0:0:1:0: [sdb] Attached SCSI disk
[root@cen ~]# lsblk
NAME               MAJ:MIN RM  SIZE RO TYPE MOUNTPOINT
fd0                  2:0    1    4K  0 disk
sda                  8:0    0    5G  0 disk
├─sda1               8:1    0  100M  0 part /boot
└─sda2               8:2    0  4.9G  0 part
  ├─vg_sys-lv_swap 253:0    0  512M  0 lvm  [SWAP]
  ├─vg_sys-lv_root 253:1    0    2G  0 lvm  /
  ├─vg_sys-lv_var  253:2    0  1.4G  0 lvm  /var
  ├─vg_sys-lv_home 253:3    0  512M  0 lvm  /home
  └─vg_sys-lv_tmp  253:4    0  512M  0 lvm  /tmp
sdb                  8:16   0    5G  0 disk
sr0                 11:0    1  570M  0 rom
As you can see in the last messages in the syslog and in the output of lsblk, we can see that a device, named sdb was added with a size of 5GB.
In case the newly added device isn’t automatically detected, which tends to happen mostly with VMWare Player, you can execute the following to scan for new devices:
[root@cen jensd]# ls /sys/class/scsi_host/ | while read host ; do echo "- - -" > /sys/class/scsi_host/$host/scan ; done
Now that we know the name of our new virtual disk, we need to create a partition on the system before we can use it to expand a currently existing filesystem with LVM. This can be done with fdisk:
[root@cen ~]# fdisk /dev/sdb
Welcome to fdisk (util-linux 2.23.2).

Changes will remain in memory only, until you decide to write them.
Be careful before using the write command.

Device does not contain a recognized partition table
Building a new DOS disklabel with disk identifier 0x271cd89c.

Command (m for help): n
Partition type:
   p   primary (0 primary, 0 extended, 4 free)
   e   extended
Select (default p): p
Partition number (1-4, default 1): 1
First sector (2048-10485759, default 2048):
Using default value 2048
Last sector, +sectors or +size{K,M,G} (2048-10485759, default 10485759):
Using default value 10485759
Partition 1 of type Linux and of size 5 GiB is set

Command (m for help): t
Selected partition 1
Hex code (type L to list all codes): 8e
Changed type of partition 'Linux' to 'Linux LVM'

Command (m for help): p

Disk /dev/sdb: 5368 MB, 5368709120 bytes, 10485760 sectors
Units = sectors of 1 * 512 = 512 bytes
Sector size (logical/physical): 512 bytes / 512 bytes
I/O size (minimum/optimal): 512 bytes / 512 bytes
Disk label type: dos
Disk identifier: 0x271cd89c

   Device Boot      Start         End      Blocks   Id  System
/dev/sdb1            2048    10485759     5241856   8e  Linux LVM

Command (m for help): w
The partition table has been altered!

Calling ioctl() to re-read partition table.
Syncing disks.
After adding the partition, which is named sdb1, we can start using it by creating a physical volume for LVM:
[root@cen ~]# pvcreate /dev/sdb1
  Physical volume "/dev/sdb1" successfully created
After creating the physical volume, we can extend the existing volume group, named vg_sys by adding the physical volume to it.
[root@cen ~]# vgextend vg_sys /dev/sdb1
  Volume group "vg_sys" successfully extended
[root@cen ~]# vgdisplay
  --- Volume group ---
  VG Name               vg_sys
  System ID
  Format                lvm2
  Metadata Areas        2
  Metadata Sequence No  7
  VG Access             read/write
  VG Status             resizable
  MAX LV                0
  Cur LV                5
  Open LV               5
  Max PV                0
  Cur PV                2
  Act PV                2
  VG Size               9.84 GiB
  PE Size               32.00 MiB
  Total PE              315
  Alloc PE / Size       156 / 4.88 GiB
  Free  PE / Size       159 / 4.97 GiB
  VG UUID               pzPaBt-ylaD-olYT-8H5w-jODd-8hTY-bglG3y
After adding the physcial volume /dev/sdb1 to volume group vg_sys, you can see that now our volume group has about 5GB of free space. and cosists of two physical volumes.
Time to, finally, extend the logical volume containing /home and grow the filesystem residing on that volume to the size of it.
[root@cen ~]# lvextend -L+2G /dev/vg_sys/lv_home
  Extending logical volume lv_home to 2.50 GiB
  Logical volume lv_home successfully resized
[root@cen ~]# xfs_growfs /dev/vg_sys/lv_home
meta-data=/dev/mapper/vg_sys-lv_home isize=256    agcount=4, agsize=32768 blks
         =                       sectsz=512   attr=2, projid32bit=1
         =                       crc=0
data     =                       bsize=4096   blocks=131072, imaxpct=25
         =                       sunit=0      swidth=0 blks
naming   =version 2              bsize=4096   ascii-ci=0 ftype=0
log      =internal               bsize=4096   blocks=853, version=2
         =                       sectsz=512   sunit=0 blks, lazy-count=1
realtime =none                   extsz=4096   blocks=0, rtextents=0
data blocks changed from 131072 to 655360
The command to expand the filesystem depends on the type of filesystem on it. If you don’t know which filesystem you’re using, you can find the fs type with command df -T.
Now that we expanded logical volume lv_home and the filesystem on it, we’re back in a more comfortable state with some free space on /home.
[root@cen ~]# df -h
Filesystem                  Size  Used Avail Use% Mounted on
/dev/mapper/vg_sys-lv_root  2.0G  740M  1.3G  37% /
devtmpfs                    994M     0  994M   0% /dev
tmpfs                      1000M     0 1000M   0% /dev/shm
tmpfs                      1000M  8.4M  992M   1% /run
tmpfs                      1000M     0 1000M   0% /sys/fs/cgroup
/dev/mapper/vg_sys-lv_home  2.5G  510M  2.0G  20% /home
/dev/mapper/vg_sys-lv_tmp   509M   26M  483M   6% /tmp
/dev/mapper/vg_sys-lv_var   1.4G  121M  1.3G   9% /var
/dev/sda1                    97M   65M   33M  67% /boot
To use the rest of the space in the volume group vg_sys, let’s give it to another logical volume and expand it:
[jensd@cen ~]$ sudo lvextend -l +100%free /dev/vg_sys/lv_tmp
  Extending logical volume lv_tmp to 3.47 GiB
  Logical volume lv_tmp successfully resized
[jensd@cen ~]$ sudo xfs_growfs /dev/vg_sys/lv_tmp
meta-data=/dev/mapper/vg_sys-lv_tmp isize=256    agcount=4, agsize=32768 blks
         =                       sectsz=512   attr=2, projid32bit=1
         =                       crc=0
data     =                       bsize=4096   blocks=131072, imaxpct=25
         =                       sunit=0      swidth=0 blks
naming   =version 2              bsize=4096   ascii-ci=0 ftype=0
log      =internal               bsize=4096   blocks=853, version=2
         =                       sectsz=512   sunit=0 blks, lazy-count=1
realtime =none                   extsz=4096   blocks=0, rtextents=0
data blocks changed from 131072 to 909312
[jensd@cen ~]$ df -h
Filesystem                  Size  Used Avail Use% Mounted on
/dev/mapper/vg_sys-lv_root  2.0G  740M  1.3G  37% /
devtmpfs                    994M     0  994M   0% /dev
tmpfs                      1000M     0 1000M   0% /dev/shm
tmpfs                      1000M  8.4M  992M   1% /run
tmpfs                      1000M     0 1000M   0% /sys/fs/cgroup
/dev/mapper/vg_sys-lv_home  2.5G  510M  2.0G  20% /home
/dev/mapper/vg_sys-lv_tmp   3.5G   27M  3.5G   1% /tmp
/dev/mapper/vg_sys-lv_var   1.4G  122M  1.3G   9% /var
/dev/sda1                    97M   65M   33M  67% /boot
Option 2: Expanding a current virtual disk and use it
While the previous option works well, it could be interesting to expand a current virtual disk instead of adding a new one. This has some limitations when working with MBR since a partition table can only have a maximum of 4 primary partition.
As with option 1, we ran out of space again in the /home filesystem and there’s no more free space in the volume group (we gave it to /tmp):
[jensd@cen ~]$ df -h
Filesystem                  Size  Used Avail Use% Mounted on
/dev/mapper/vg_sys-lv_root  2.0G  740M  1.3G  37% /
devtmpfs                    994M     0  994M   0% /dev
tmpfs                      1000M     0 1000M   0% /dev/shm
tmpfs                      1000M  8.4M  992M   1% /run
tmpfs                      1000M     0 1000M   0% /sys/fs/cgroup
/dev/mapper/vg_sys-lv_home  2.5G  2.5G   20K 100% /home
/dev/mapper/vg_sys-lv_tmp   3.5G   27M  3.5G   1% /tmp
/dev/mapper/vg_sys-lv_var   1.4G  122M  1.3G   9% /var
/dev/sda1                    97M   65M   33M  67% /boot
Expand an existing virtual disk with the Vsphere client
Similar as to add a new disk by changing the VM’s settings with the VMWare client, we can enlarge the existing first disk.
In the vSphere client, right click on the VM that’s running out of space and click “Edit Settings…”:
Select the first disk (known on the system as /dev/sda):
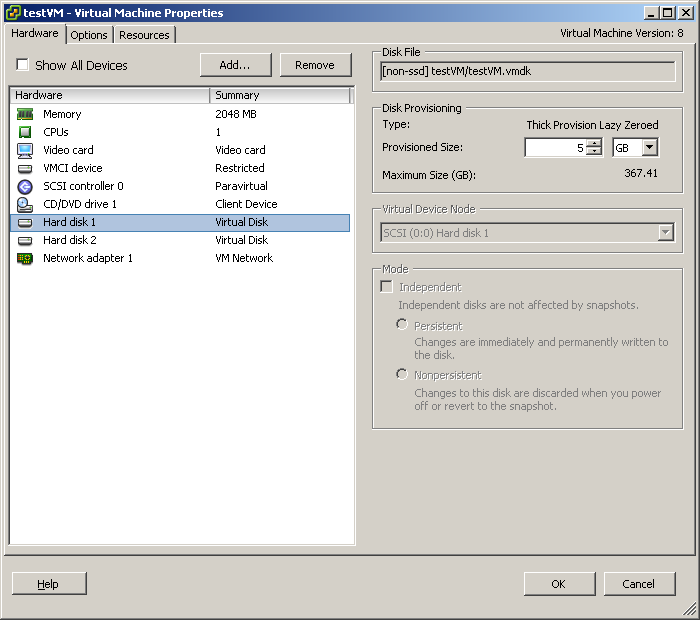
Simply increase the size in the right side of the window:
Click “OK” to execute the changes on the VM.
USE THE NEWLY ADDED space TO EXTEND AN EXISTING VOLUME GROUP
After enlarging the disk with VMWare, the changes aren’t immediatelly seen on the system:
[jensd@cen ~]$ sudo fdisk -l /dev/sda

Disk /dev/sda: 5368 MB, 5368709120 bytes, 10485760 sectors
Units = sectors of 1 * 512 = 512 bytes
Sector size (logical/physical): 512 bytes / 512 bytes
I/O size (minimum/optimal): 512 bytes / 512 bytes
Disk label type: dos
Disk identifier: 0x0009af09

   Device Boot      Start         End      Blocks   Id  System
/dev/sda1   *        2048      206847      102400   83  Linux
/dev/sda2          206848    10485759     5139456   8e  Linux LVM
[jensd@cen ~]$ lsblk
NAME               MAJ:MIN RM  SIZE RO TYPE MOUNTPOINT
fd0                  2:0    1    4K  0 disk
sda                  8:0    0    5G  0 disk
├─sda1               8:1    0  100M  0 part /boot
└─sda2               8:2    0  4.9G  0 part
  ├─vg_sys-lv_swap 253:0    0  512M  0 lvm  [SWAP]
  ├─vg_sys-lv_root 253:1    0    2G  0 lvm  /
  ├─vg_sys-lv_var  253:2    0  1.4G  0 lvm  /var
  ├─vg_sys-lv_home 253:3    0  2.5G  0 lvm  /home
  └─vg_sys-lv_tmp  253:4    0  3.5G  0 lvm  /tmp
sdb                  8:16   0    5G  0 disk
└─sdb1               8:17   0    5G  0 part
  ├─vg_sys-lv_home 253:3    0  2.5G  0 lvm  /home
  └─vg_sys-lv_tmp  253:4    0  3.5G  0 lvm  /tmp
sr0                 11:0    1  570M  0 rom
To refresh the devices, we need to ask the virtual SCSI adapter to rescan and update it’s connected devices:
[root@cen jensd]# ls /sys/class/scsi_device/ | while read scsidev ; do echo 1 > /sys/class/scsi_device/$scsidev/device/rescan ; done
[root@cen jensd]# fdisk -l /dev/sda

Disk /dev/sda: 10.7 GB, 10737418240 bytes, 20971520 sectors
Units = sectors of 1 * 512 = 512 bytes
Sector size (logical/physical): 512 bytes / 512 bytes
I/O size (minimum/optimal): 512 bytes / 512 bytes
Disk label type: dos
Disk identifier: 0x0009af09

   Device Boot      Start         End      Blocks   Id  System
/dev/sda1   *        2048      206847      102400   83  Linux
/dev/sda2          206848    10485759     5139456   8e  Linux LVM
[root@cen jensd]# lsblk
NAME               MAJ:MIN RM  SIZE RO TYPE MOUNTPOINT
fd0                  2:0    1    4K  0 disk
sda                  8:0    0   10G  0 disk
├─sda1               8:1    0  100M  0 part /boot
└─sda2               8:2    0  4.9G  0 part
  ├─vg_sys-lv_swap 253:0    0  512M  0 lvm  [SWAP]
  ├─vg_sys-lv_root 253:1    0    2G  0 lvm  /
  ├─vg_sys-lv_var  253:2    0  1.4G  0 lvm  /var
  ├─vg_sys-lv_home 253:3    0  2.5G  0 lvm  /home
  └─vg_sys-lv_tmp  253:4    0  3.5G  0 lvm  /tmp
sdb                  8:16   0    5G  0 disk
└─sdb1               8:17   0    5G  0 part
  ├─vg_sys-lv_home 253:3    0  2.5G  0 lvm  /home
  └─vg_sys-lv_tmp  253:4    0  3.5G  0 lvm  /tmp
sr0                 11:0    1  570M  0 rom
As you see above, the disk is now seen as a 10GB disk, which is what we want.
Next step in the process is to start using the space that was added to the existing virtual disk /dev/sda. This is very similar as with option 1, we start by creating a new partition that uses the new space:
[jensd@cen ~]$ sudo fdisk /dev/sda
Welcome to fdisk (util-linux 2.23.2).

Changes will remain in memory only, until you decide to write them.
Be careful before using the write command.


Command (m for help): n
Partition type:
   p   primary (2 primary, 0 extended, 2 free)
   e   extended
Select (default p): p
Partition number (3,4, default 3):
First sector (10485760-20971519, default 10485760):
Using default value 10485760
Last sector, +sectors or +size{K,M,G} (10485760-20971519, default 20971519):
Using default value 20971519
Partition 3 of type Linux and of size 5 GiB is set

Command (m for help): t
Partition number (1-3, default 3): 8e
Partition number (1-3, default 3):
Hex code (type L to list all codes): 8e
Changed type of partition 'Linux' to 'Linux LVM'

Command (m for help): p

Disk /dev/sda: 10.7 GB, 10737418240 bytes, 20971520 sectors
Units = sectors of 1 * 512 = 512 bytes
Sector size (logical/physical): 512 bytes / 512 bytes
I/O size (minimum/optimal): 512 bytes / 512 bytes
Disk label type: dos
Disk identifier: 0x0009af09

   Device Boot      Start         End      Blocks   Id  System
/dev/sda1   *        2048      206847      102400   83  Linux
/dev/sda2          206848    10485759     5139456   8e  Linux LVM
/dev/sda3        10485760    20971519     5242880   8e  Linux LVM

Command (m for help): w
The partition table has been altered!

Calling ioctl() to re-read partition table.

WARNING: Re-reading the partition table failed with error 16: Device or resource busy.
The kernel still uses the old table. The new table will be used at
the next reboot or after you run partprobe(8) or kpartx(8)
Syncing disks.
[jensd@cen ~]$ lsblk
NAME               MAJ:MIN RM  SIZE RO TYPE MOUNTPOINT
fd0                  2:0    1    4K  0 disk
sda                  8:0    0   10G  0 disk
├─sda1               8:1    0  100M  0 part /boot
└─sda2               8:2    0  4.9G  0 part
  ├─vg_sys-lv_swap 253:0    0  512M  0 lvm  [SWAP]
  ├─vg_sys-lv_root 253:1    0    2G  0 lvm  /
  ├─vg_sys-lv_var  253:2    0  1.4G  0 lvm  /var
  ├─vg_sys-lv_home 253:3    0  2.5G  0 lvm  /home
  └─vg_sys-lv_tmp  253:4    0  3.5G  0 lvm  /tmp
sdb                  8:16   0    5G  0 disk
└─sdb1               8:17   0    5G  0 part
  ├─vg_sys-lv_home 253:3    0  2.5G  0 lvm  /home
  └─vg_sys-lv_tmp  253:4    0  3.5G  0 lvm  /tmp
sr0                 11:0    1  570M  0 rom
After writing the new partition table, containing the new partition /dev/sda3, we see that it isn’t added to the system since the disk is busy.
Fortunatelly, partx can override this limitation and update the partition table on a disk that is in use. You need to execute the command twice for it to work as expected:
[jensd@cen ~]$ sudo partx -a /dev/sda
partx: /dev/sda: error adding partitions 1-2
[jensd@cen ~]$ sudo partx -a /dev/sda
partx: /dev/sda: error adding partitions 1-3
[jensd@cen ~]$ lsblk
NAME               MAJ:MIN RM  SIZE RO TYPE MOUNTPOINT
fd0                  2:0    1    4K  0 disk
sda                  8:0    0   10G  0 disk
├─sda1               8:1    0  100M  0 part /boot
├─sda2               8:2    0  4.9G  0 part
│ ├─vg_sys-lv_swap 253:0    0  512M  0 lvm  [SWAP]
│ ├─vg_sys-lv_root 253:1    0    2G  0 lvm  /
│ ├─vg_sys-lv_var  253:2    0  1.4G  0 lvm  /var
│ ├─vg_sys-lv_home 253:3    0  2.5G  0 lvm  /home
│ └─vg_sys-lv_tmp  253:4    0  3.5G  0 lvm  /tmp
└─sda3               8:3    0    5G  0 part
sdb                  8:16   0    5G  0 disk
└─sdb1               8:17   0    5G  0 part
  ├─vg_sys-lv_home 253:3    0  2.5G  0 lvm  /home
  └─vg_sys-lv_tmp  253:4    0  3.5G  0 lvm  /tmp
sr0                 11:0    1  570M  0 rom
As you can see, now our system sees /dev/sda3 and we can start using the device to expand our volume group and grow our logical volume with problems:
[jensd@cen ~]$ sudo pvcreate /dev/sda3
  Physical volume "/dev/sda3" successfully created
[jensd@cen ~]$ sudo vgextend vg_sys /dev/sda3
  Volume group "vg_sys" successfully extended
[jensd@cen ~]$ sudo lvextend -L+2G /dev/vg_sys/lv_home
  Extending logical volume lv_home to 4.50 GiB
  Logical volume lv_home successfully resized
[jensd@cen ~]$ sudo xfs_growfs /dev/vg_sys/lv_home
meta-data=/dev/mapper/vg_sys-lv_home isize=256    agcount=20, agsize=32768 blks
         =                       sectsz=512   attr=2, projid32bit=1
         =                       crc=0
data     =                       bsize=4096   blocks=655360, imaxpct=25
         =                       sunit=0      swidth=0 blks
naming   =version 2              bsize=4096   ascii-ci=0 ftype=0
log      =internal               bsize=4096   blocks=853, version=2
         =                       sectsz=512   sunit=0 blks, lazy-count=1
realtime =none                   extsz=4096   blocks=0, rtextents=0
data blocks changed from 655360 to 1179648
[jensd@cen ~]$ df -h /home/
Filesystem                  Size  Used Avail Use% Mounted on
/dev/mapper/vg_sys-lv_home  4.5G  2.5G  2.0G  56% /home
Limits of growing devices
Enlarging a device and creating a new partition is limited if you’re using the MBR partition scheme since this limits every disk to 4 primary partitions. To overcome this limitation, you can use a GPT partition layout or, if not possible, create an extended partition as the last of four possible partitions. In the extended partition we can have a virtual unlimited number of logical partitions.
A more clean solution is to extend existing partitions, which can be done with parted enlarge but this could possible bring down an online files ystem so I wouldn’t advise it for very critical file systems.
Using one of the above methods could possible save you from downtime so use it wisely :)
Very nicely presented.
By the way – it’s not necessary to create a partition – just to pvcreate it…
Don’t parse ‘ls’ output.
All manner of things can go wrong with that and it’s not even the easiest way to do this.
Instead, use this:
https://gist.github.com/TomyLobo/415c95a8f616870109e8cb80204d390f
Btw, your blog software broke the greater-than sign in that particular line as well, which is why I put the fixed code in a Gist, rather than directly into the comment :)
More info on why you shouldn’t parse ls output can be found here:
https://mywiki.wooledge.org/ParsingLs