
Recently, as you could see in previous posts, oVirt got to my attention. oVirt is the upstream project of Red Hat Enterprise Visualization or RHEV. While oVirt it isn’t providing everything that competitor VMWare ESXi does, it comes close and is a very good alternative for smaller or home setups. For a long time, oVirt wasn’t supported on Enterprise Linux 7 (like RHEL 7 or CentOS 7) but since a short time it is. Here you can find how to install oVirt and get started.
VM-extensions
oVirt is using KVM under the hood and as KVM does, it requires your CPU to support VM-extensions. On the x86 platofrom, those are either AMD-V or Intel’s VT-X. In order to check if the installed CPU’s support those extensions, we need to check if the vmx (for VT-X) or svm (for AMD-V) flag exists in the cpuinfo-output:
[jensd@cen ~]$ egrep -c '(vmx|svm)' /proc/cpuinfo
 2
When the output is 0, meaning that neither vmx or svm is found in the flags, it probably means that your CPU doesn’t support those extensions and there is little you can do. When the extensions are listed, be sure to check if they are enabled in the systems BIOS.
Hostname
The oVirt installation will check if it can resolve it’s own hostname into an IP-address so make sure that your host can do so.
If needed, add the hostname to /etc/hosts:
127.0.0.1 localhost localhost.localdomain localhost4 localhost4.localdomain4
::1 localhost localhost.localdomain localhost6 localhost6.localdomain6
192.168.202.101 cen
Install oVirt
oVirt can’t be found in the base CentOS repositories and it requires quite a few more dependencies outside the standard repositories. The easiest is the install the ovirt-release RPM that will configure your system with all required package sources:
[jensd@cen ~]$ sudo yum -y install http://plain.resources.ovirt.org/pub/yum-repo/ovirt-release35.rpm
 ...
 Complete!
Now that the sources are available for the oVirt packages, we can install it:
[jensd@cen ~]$ sudo yum -y install ovirt-engine
 ...
 Complete!
Configure oVirt
Once oVirt is installed, the fastest way to get started is to run engine-setup. This script will ask questions about your environment and configure oVirt depending on your answers.
[jensd@cen ~]$ sudo engine-setup
[ INFO  ] Stage: Initializing
[ INFO  ] Stage: Environment setup
          Configuration files: ['/etc/ovirt-engine-setup.conf.d/10-packaging-jboss.conf', '/etc/ovirt-engine-setup.conf.d/10-packaging.conf']
          Log file: /var/log/ovirt-engine/setup/ovirt-engine-setup-20150330160057-ov9ojr.log
          Version: otopi-1.3.1 (otopi-1.3.1-1.el7)
[ INFO  ] Stage: Environment packages setup
[ INFO  ] Stage: Programs detection
[ INFO  ] Stage: Environment setup
[ INFO  ] Stage: Environment customization

          --== PRODUCT OPTIONS ==--

          Configure Engine on this host (Yes, No) [Yes]:
          Configure WebSocket Proxy on this host (Yes, No) [Yes]:

          --== PACKAGES ==--

[ INFO  ] Checking for product updates...
[ INFO  ] No product updates found

          --== ALL IN ONE CONFIGURATION ==--


          --== NETWORK CONFIGURATION ==--

          Setup can automatically configure the firewall on this system.
          Note: automatic configuration of the firewall may overwrite current settings.
          Do you want Setup to configure the firewall? (Yes, No) [Yes]:
[ INFO  ] firewalld will be configured as firewall manager.
          Host fully qualified DNS name of this server [cen]:
[WARNING] Host name cen has no domain suffix
[WARNING] Failed to resolve cen using DNS, it can be resolved only locally
[WARNING] Host name cen has no domain suffix
[WARNING] Failed to resolve cen using DNS, it can be resolved only locally

          --== DATABASE CONFIGURATION ==--

          Where is the Engine database located? (Local, Remote) [Local]:
          Setup can configure the local postgresql server automatically for the engine to run. This may conflict with existing applications.
          Would you like Setup to automatically configure postgresql and create Engine database, or prefer to perform that manually? (Automatic, Manual) [Automatic]:

          --== OVIRT ENGINE CONFIGURATION ==--

          Engine admin password:
          Confirm engine admin password:
          Application mode (Virt, Gluster, Both) [Both]:

          --== PKI CONFIGURATION ==--

          Organization name for certificate [Test]:

          --== APACHE CONFIGURATION ==--

          Setup can configure the default page of the web server to present the application home page. This may conflict with existing applications.
          Do you wish to set the application as the default page of the web server? (Yes, No) [Yes]:
          Setup can configure apache to use SSL using a certificate issued from the internal CA.
          Do you wish Setup to configure that, or prefer to perform that manually? (Automatic, Manual) [Automatic]:

          --== SYSTEM CONFIGURATION ==--

          Configure an NFS share on this server to be used as an ISO Domain? (Yes, No) [Yes]: no

          --== MISC CONFIGURATION ==--


          --== END OF CONFIGURATION ==--

[ INFO  ] Stage: Setup validation
[WARNING] Less than 16384MB of memory is available

          --== CONFIGURATION PREVIEW ==--

          Application mode                        : both
          Firewall manager                        : firewalld
          Update Firewall                         : True
          Host FQDN                               : cen
          Engine database name                    : engine
          Engine database secured connection      : False
          Engine database host                    : localhost
          Engine database user name               : engine
          Engine database host name validation    : False
          Engine database port                    : 5432
          Engine installation                     : True
          PKI organization                        : Test
          Configure local Engine database         : True
          Set application as default page         : True
          Configure Apache SSL                    : True
          Configure WebSocket Proxy               : True
          Engine Host FQDN                        : cen

          Please confirm installation settings (OK, Cancel) [OK]:
[ INFO  ] Stage: Transaction setup
[ INFO  ] Stopping engine service
[ INFO  ] Stopping ovirt-fence-kdump-listener service
[ INFO  ] Stopping websocket-proxy service
[ INFO  ] Stage: Misc configuration
[ INFO  ] Stage: Package installation
[ INFO  ] Stage: Misc configuration
[ INFO  ] Initializing PostgreSQL
[ INFO  ] Creating PostgreSQL 'engine' database
[ INFO  ] Configuring PostgreSQL
[ INFO  ] Creating/refreshing Engine database schema
[ INFO  ] Creating CA
[ INFO  ] Configuring WebSocket Proxy
[ INFO  ] Generating post install configuration file '/etc/ovirt-engine-setup.conf.d/20-setup-ovirt-post.conf'
[ INFO  ] Stage: Transaction commit
[ INFO  ] Stage: Closing up

          --== SUMMARY ==--

[WARNING] Less than 16384MB of memory is available
          SSH fingerprint: C8:CE:BA:5B:6F:CA:5E:A8:BA:2F:E1:BC:FB:99:30:8F
          Internal CA D6:C7:60:F6:57:5A:1B:1B:2E:E8:9F:71:D3:0B:09:5D:DE:F3:42:9C
          Web access is enabled at:
              http://cen:80/ovirt-engine
              https://cen:443/ovirt-engine
          Please use the user "admin" and password specified in order to login

          --== END OF SUMMARY ==--

[ INFO  ] Starting engine service
[ INFO  ] Restarting httpd
[ INFO  ] Stage: Clean up
          Log file is located at /var/log/ovirt-engine/setup/ovirt-engine-setup-20150330160057-ov9ojr.log
[ INFO  ] Generating answer file '/var/lib/ovirt-engine/setup/answers/20150330160239-setup.conf'
[ INFO  ] Stage: Pre-termination
[ INFO  ] Stage: Termination
[ INFO  ] Execution of setup completed successfully
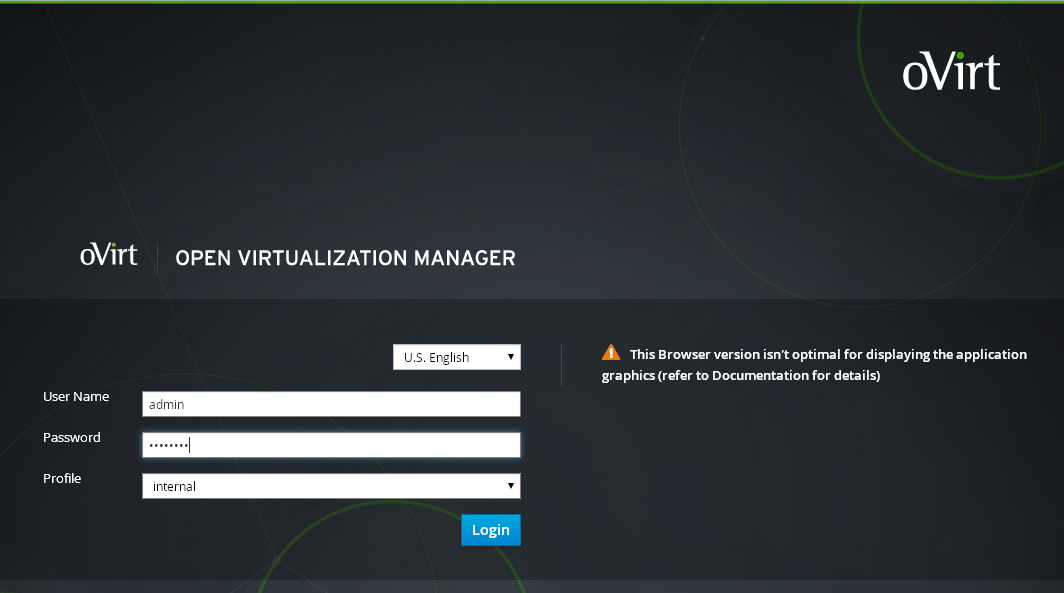
After running engine-setup, oVirt is available via it’s webinterface on the IP or hostname of the oVirt-host:
Navigate with your browser to the IP-address or hostname of the oVirt host. You should be presented with an oVirt page. Click on “Administration Portal” and login with admin and the password which your provided during engine-setup:
The first thing we need to do with the webinterface is to add the host to the default cluster. This can be done by navigating to “System -> Data Centers -> Default -> Clusters -> Default -> Hosts -> New”:
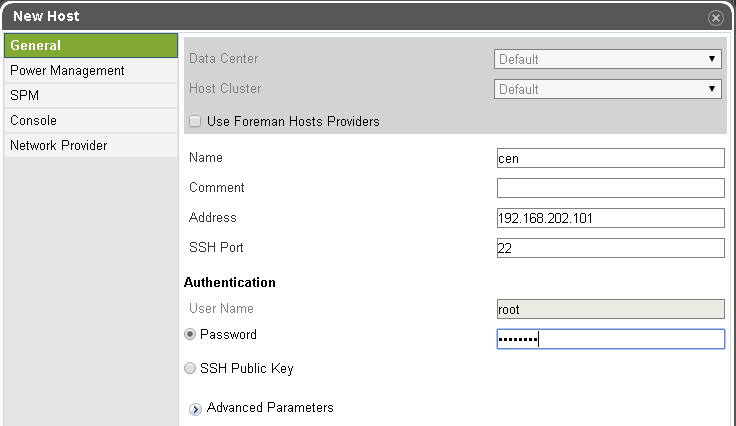
It takes a while for everything to be installed on the host. When the process is finished, the host should change it’s status to “Up”
Prepare NFS shares for oVirt
As you saw in the previous step, I explicitly didn’t configure the ISO domain in order to have my storage using different naming and mount points and to avoid the need to stop oVirt to be able to configure my NFS storage.
oVirt supports a variety of storage types like NFS, Gluster, Local and iSCSI. For a simple node, you would think that the local storage option is a good choice but I noticed it only introduces limitations. When using local storage, the host requires it’s own datacenter and you loose a lot of functionality for multi-host setups and that’s what makes oVirt so powerful. If that limitation isn’t enough, when using local storage, you can only configure one storage location. So if you have, for example an SSD and conventional disks, you have no choice but grouping them together in one logical volume which obviously isn’t a very good idea.
To overcome these limitations, I decided to setup NFS locally. This gives us the flexibility of a shared filesystem and the oVirt support for it without a (big) performance impact.
First I added the actual mountpoints:
[jensd@cen ~]$ sudo mkdir -p /srv/ovirt/{iso,export,sata,ssd}
Then, I added the mountpoints to my /etc/fstab configuration in order to make the mounts persistent:
/dev/mapper/vg_sys-lv_sata /srv/ovirt/sata      ext4    defaults       0 0
/dev/mapper/vg_sys-lv_iso /srv/ovirt/iso        ext4    defaults       0 0
/dev/mapper/vg_sys-lv_export /srv/ovirt/export  ext4    defaults       0 0
/dev/mapper/vg_ssd-lv_ssd /srv/ovirt/ssd        ext4    defaults       0 0
To avoid a reboot, let’s mount the above mountpoints manually:
[jensd@cen ~]$ for i in $(ls -1 /srv/ovirt); do sudo mount /srv/ovirt/$i; done
Now that the mounts that we’ll use for oVirt are available locally, we need to export them over NFS by putting the following in /etc/exports:
/srv/ovirt/iso          cen(rw,sync,no_subtree_check,all_squash,anonuid=36,anongid=36)
/srv/ovirt/sata         cen(rw,sync,no_subtree_check,all_squash,anonuid=36,anongid=36)
/srv/ovirt/ssd          cen(rw,sync,no_subtree_check,all_squash,anonuid=36,anongid=36)
/srv/ovirt/export       cen(rw,sync,no_subtree_check,all_squash,anonuid=36,anongid=36)
After adding the exports, refresh them and check their existence:
[jensd@cen ~]$ sudo vi /etc/exports
[jensd@cen ~]$ sudo exportfs -a
[jensd@cen ~]$ showmount -e
Export list for cen:
/srv/ovirt/export cen
/srv/ovirt/ssd    cen
/srv/ovirt/sata   cen
/srv/ovirt/iso    cen
To give the correct access rights for oVirt, make vdsm owner and kvm group owern of the mountpoints and files:
[jensd@cen ~]$ sudo chown -R vdsm:kvm /srv/ovirt/
[jensd@cen ~]$ sudo chmod -R 770 /srv/ovirt/
Be sure to let NFS start with your host otherwise oVirt won’t be very happy without it’s required storage domains:
[jensd@cen ~]$ sudo systemctl start {nfs-server,nfs-lock,nfs-idmap}
[jensd@cen ~]$ sudo systemctl enable {nfs-server,nfs-lock,nfs-idmap}
ln -s '/usr/lib/systemd/system/nfs-server.service' '/etc/systemd/system/nfs.target.wants/nfs-server.service'
ln -s '/usr/lib/systemd/system/nfs-idmap.service' '/etc/systemd/system/nfs.target.wants/nfs-idmap.service'
Since the default NFS version from CentOS 7 is NFS v4, oVirt can experience problems when trying to mount the ISO or export domain. The message you get when this appears is:
ERROR: mount.nfs: access denied by server while mounting cen:/srv/ovirt/iso
To overcome this error, you need to change the default NFS version for mounting (without specifiyng) to v3. This can be done in /etc/nfsmount.conf:
[ NFSMount_Global_Options ]
# This statically named section defines global mount
# options that can be applied on all NFS mount.
#
# Protocol Version [2,3,4]
# This defines the default protocol version which will
# be used to start the negotiation with the server.
Defaultvers=3
#
# Setting this option makes it mandatory the server supports the
# given version. The mount will fail if the given version is
# not support by the server.
Nfsvers=3
Configure storage domains in oVirt
Now that the NFS-exports are available, we can add them in oVirt. Login to the webinterface and navigate to “System -> Data Centers -> Default -> Storage -> New Domain”:
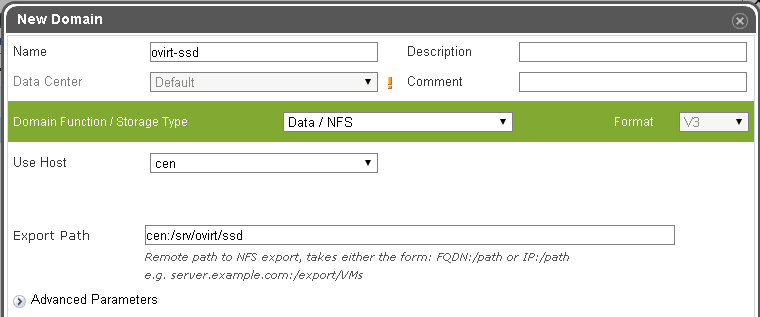
Do the same for the SSD, SATA, ISO and export domain. Don’t forget to change the type of the ISO and export domain to ISO / NFS and Export / NFS respectively.
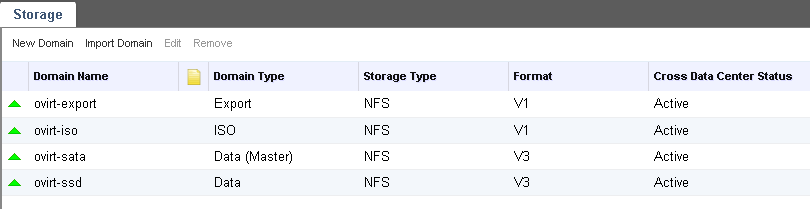
If all goes well, you should end up with something like this:
Manage ISO-files
Unfortunately, you can’t just give a path to an ISO-file in oVirt but you need to import the ISO first into the ISO-domain. The advantage is that, when using multiple oVirt-hosts in a datacenter, the ISO becomes available everywhere.
Importing ISO-files into the ISO-domain needs to be done via the command line. First let’s make sure that we’ve got the correct name of our ISO-domain:
[jensd@cen ~]$ sudo engine-iso-uploader list
Please provide the REST API password for the admin@internal oVirt Engine user (CTRL+D to abort):
ISO Storage Domain Name   | Datacenter                | ISO Domain Status
ovirt-iso                 | Default                   | active
Now, let’s upload a CentOS 7 netinstall ISO:
[jensd@cen ~]$ sudo engine-iso-uploader upload -i ovirt-iso CentOS-7.0-1406-x86_64-NetInstall.iso
Please provide the REST API password for the admin@internal oVirt Engine user (CTRL+D to abort):
Uploading, please wait...
INFO: Start uploading CentOS-7.0-1406-x86_64-NetInstall.iso
INFO: CentOS-7.0-1406-x86_64-NetInstall.iso uploaded successfully
Create and install a new VM
At this point, we’ve got our host configured, a storage domain, an ISO domain, containing a bootable ISO and it’s time to create a new VM in the oVirt environment. Navigate to “System -> Data Centers -> Default -> Clusters -> Default -> VMs -> New VM”.
Fill in the General information about the VM and select the network:

Click on “Show Advanced Options” and go to system to configure the amount of memory and the number of virtual CPUs. To let this VM boot from the ISO-image which we just added to the ISO-domain, go to “Boot Options”, check “Attach CD” and select the ISO from the dropdown:

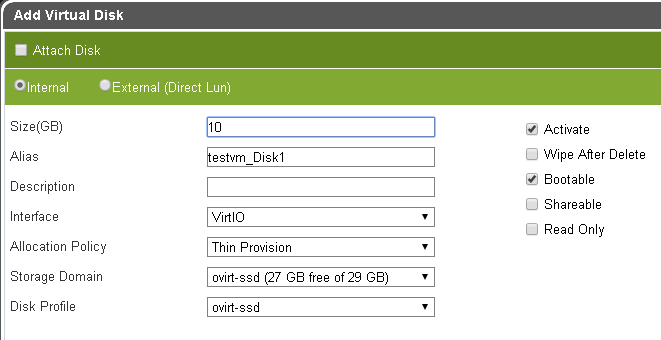
Press OK to add the VM and click on “Configure Virtual Disks” to add a virtual disk to the VM:
Select the host from the list and click on Run (the green arrow pointing upwards) to start the VM.
To access the console, right click on the VM and choose “Console”. On Windows, this requires the virt-viewer to be installed. You can download it here: https://virt-manager.org/download/.
Install the guest agent
After installing the OS on the VM. It’s a good idea to install the package ovirt-guest-agent-common from EPEL. This is similar to the VMWare-tools but for oVirt.
Logfiles
When you’re running into some weird or unclear error messages, which unfortunately sometimes seem to appear, it’s a good idea to check one of these logfiles:
- /var/log/ovirt-engine/engine.log
- /var/log/vdsm/vdsm.log
Hallo there! Thanks for all of your tutorials! But how can one install ovirt + host on the Same machine easily? :/
This tutorial is exactly how to install oVirt on a physical machine and use it to run VM’s
If you want a lightweight KVM front end, take a look at Kimchi – seems to have IBM’s backing as well…
Love the blog, find it very useful – thanks :)
Great tutorial but I did run into a little issue with the install and it took a bit of digging to figure it out.
Although the Network Configuration makes modifications to firewalld during the ‘setup-engine’, when you add your host to oVirt it disables firewalld and reverts to iptables. The process preserves all of the oVirt config except for http & https.
You need to explicitly add the following lines to your /etc/sysconfig/iptables config file and restart the iptables service (systemctl restart iptables).
-A INPUT -p tcp –dport 80 -j ACCEPT
-A INPUT -p tcp –dport 443 -j ACCEPT
Once you have done that everything works fine. It took an entire reinstall of CentOS & reverting back to 6.5 to realize what was happening but I got it working thanks to this tutorial.
Thanks again.
Thanks for this info, I didn’t notice any problems but it could be possible that I’ve disabled the firewall before.
I ran into the same problem installing Ovirt 3.5 on CentOS 7.
Thanks for the tip. I have been able to get into the engine but when i set up a host, the page stop responding there it sets up perl-http***. I should have known to check the firewall since my port scanner showed those as closed.
Thanks for the tip!
dose it matter how I upload the ISO files onto ISO folder?
I mean I plan to install webmin on the server. it has a pretty good upload utility and a file manager. and I do not need to mess with CLI :-)
As far as I know, you’ll still need to use the engine-iso-uploader in order to import the iso into oVirt.
Hello
I have followed your tutorial. All is working fine (including iptables that I manually configured before hand). However, there seems to be a problem with nfs mounts during server shutdown. Namely, they hang for 15-20 minutes before timing-out. I believe, the problem may be associated with oVirt’s default mounting init string. OVirt is using ‘soft’ instead of ‘intr’ param while mounting nfs share and I have not found a way to fix that yet.
Any tips?
Eryk
Hi All
I just came across solution for this problem. Hypervisor must be set to maintenance mode before powering off or rebooting server.
Eryk
Thanks for letting us know the solution. Seems normal for me but I can imagine it isn’t logical for everyone.
hi, I followed your setup religiosity on a fresh centos 7 setup.
all seams to go well until I added , or tried to add, the host to the data center, the process took almost an hour and had to be restarted several times as it was installing huge amount of stuff (?? why I am not sure ?? )
and finally it hung up the whole machine.
upon reboot I had problem with start up and when booted all my network have been hosed. and now I cannot get any where.
I have for NICs in the machines but only 2 (the one designated to be main interfaces are hosed, see below for explanation)
#1. my stable CentOS 7 setup now boots to Emergency mode message and I have to do ” control-D” to continue.
#2 I have 4 NIC in the machine (enp6s0 enp6s1 enp0s8 and enp0s9) with all static IPs x.x.x.2. ,x.x.x.3 x.x.x.4 and x.x.x.5. respectfully.
I had setup 2 bridges virbr0 and virbr1 for IP x.2 and x.3
added 2 hosts to the hosts file as ” x.x.x.2 atlas_man.myhome.lan atlas_man” <– main management interface
"x.x.x.3 atlas_lan.myhome.lan atlas_lan" <– the local lan facing interface. this is the one I was planning to use for VM connections to LAN
other 2 nics are not used at the moment and I was thinking to use at least one of them to bond/nicteaming to the LAN interface.
now I setup virbr0 and virbr1 and moved the IP 2 and 3 to them before installing oVirt. all was working fine and no issues. except you can only resolve the host name locally. my router would not add them to DNS list.
now after installing oVirt and running the engine setup as per your post
the setup went seemingly fine, and I logged in to interface on atlas_man/ovirt-engine and try to add the host.
the add host failed 3 times after running some installs and had to be restarted. the last restart hung on a verification message 9 or 87 and set there overnight. I had to reboot the server to get it back and on reboot I am getting emergency mode screen (rebooted 3 times to make sure it was not a fluke each and every time get the screen)
after control-D boot up, get a multi-path issue error
and can not get in via ip x.2 or x.3 they are hosed and gone.
my virbr0 and virbr1 have been renamed with some strange UUID,(the actual ifcfg- files have been renamed to ifcfg-UUID and the names with in have been changed. all network settings gone from the files)
the files for the actual nics that bridges were using (enp6.0 and enp6.1) are empty, as in totally empty.
as a result no more x.2 or x.3 ips and not able to reach oVirt ui or anyting.
have anyone seeing things like this?
any possible reasons for setup to screw-up this badly?
any suggestions on proper OS setup before ovirt install ?
any possible dependencies? as it looked like the setup was installing a hell-of a lot of things at the ovirt install and engine setup.
Difficult to tell what exactly went wrong but ending op in Emegergency mode doesn’t sound like something that could be caused by the setup. Only thing I can imagine is that you have some mounts in /etc/fstab that require networking or you use storage over the network (FCoE/iSCSI).
It could be a good thing to backup your /etc/sysconfig/network-scripts/ before running the setup. In case something went wrong, you can just replace the files with the original ones and you’ll get your network back.
What I did notice in some setups was that the setup turned on iptables/firewalld, even when explicitly asked to not do that. In such cases, adding the host to the DC took a long time and all kinds of weird behavior was introduced. During this process, keep an eye on iptables and unload it in case it gets started.
Also see this comment given earlier: http://jensd.be/550/linux/install-ovirt-on-centos-7#comment-10136
Yes.. three days of installing -reinstalling and searching.. I came to the conclusion it is some IBM nics are just incompatible.
My test servers were ibm x3350s .. maybe the nics are too old.
I can find no other reason for the numerous erros.
Excelente, muchas gracias por la información. ¿Lo has probado con CEPH?
Saludos.
Hello,
I don;t mean to ask stupid questions, However i can’t find a clear answer. Is oVirt installed on top of a KVM host or does oVirt put KVM on the host during the install process?
Thanks,
Hi,
oVirt installs KVM as a dependency of ovirt-engine and configures it during engine-setup. The post starts with a minimal install of CentOS.
Thank you sir I appreciate it, I should have put that together my bad.
may i ask about ovirt install on network configuration , and it always show the error info
–== NETWORK CONFIGURATION ==–
Host fully qualified DNS name of this server [ovirtHN.JBear.internal]:
[WARNING] Failed to resolve ovirtHN.JBear.internal using DNS, it can be resolved only locally
[ ERROR ] Host name is not valid: The following addreses: 127.0.0.1 can’t be mapped to non loopback devices on this host
and i can`t finish my ovirt system install 。how can i do for this install ,can let me finish the install
“
Hi,
It looks like you’re missing an entry for your own hostname in /etc/hosts.
Try to add a line like the following to /etc/hosts and try again:
127.0.0.1 ovirtHN.JBear.internal
Hi first of all thank you! for the awesome tutorial! I wonder if some one could help me out. I believe i followed this step by step but i’m still having a hard time mounting the NFS shares….
I keep getting stuck here:
~]# for i in $(ls -1 /srv/ovirt); do sudo mount /srv/ovirt/$i; done
mount: special device /dev/mapper/vg_sys-lv_export does not exist
mount: special device /dev/mapper/vg_sys-lv_iso does not exist
mount: special device /dev/mapper/vg_sys-lv_sata does not exist
mount: special device /dev/mapper/vg_ssd-lv_ssd does not exist
And If reboot the system it hangs and I have to delete these entries from /etc/fstab anyone come accross this. What did i miss or doing wrong? Thank you for your help!
Did you create those LVM’s before you’re trying to mount them?
Hello Guys,
This may be a stupid question but does oVirt install KVM during it’s process or do I have to install KVM separately? I didn’t see any links to a KVM install for use with this App.
Thanks,
Pingback: oVirt安装体验(CentOS 7.2) | 码农故事
I have oVirt Engine Version: 3.6.6.2-1.el7.centos installed on a Centos 7 machine.
I cannot get the console to display for me using Firefox firefox-45.1.1.
At first it was downloading a console.vv file for me but then I updated the
ca.crt file for the engine and now it just hangs up.
Centol 7.1 3.10.0-327.18.2.el7.x86_64firefox-45.1.1
Pingback: 云计算之centos7-KVM | angusguo's blog
Pingback: 云计算之centos7-KVM – angusguo's blog
dose it matter how I upload the ISO files onto ISO folder?
I mean I plan to install webmin on the server. it has a pretty good upload utility and a file manager.
Hello there.
Did anyone had error
Failed to execute stage ‘Environment setup’: Cannot connect to Engine database using existing credentials: engine@localhost:5432
I couln’t search nothing about it/