
Recently, I was asked to find a solution or workaround for people using Gmail and are visiting countries where there’s limited or no access to Gmail. I’m not talking about bad internet connection quality but about an explicit (government) block on Gmail or related websites. An example is the block on Gmail by the Chinese Great Firewall. While there is a possibility to avoid the limitation by using a normal proxy or VPN connection, those methods are also actively blocked and monitored. A workaround is to setup your own webmail, as a proxy for Gmail.
While the number of countries that are actually blocking Gmail on purpose is very limited, it still can be quite annoying to not have access to your email while you’re there. Especially when you’re doing business in one of those countries. More information about internet censorship by country can be found here: http://en.wikipedia.org/wiki/Internet_censorship_and_surveillance_by_country
Besides allowing access to Gmail from such countries, there can be other useful reasons to proxy your mail via your own webmail. For example if you want to use another port to access mail or you want to use your own certificates for security on the front end.
For this post, I will use CentOS 7 in combination with Apache, PHP, MySQL and Roundcube to setup our own webmail.
Setup the base LAMP server
Let’s start with setting up the base of our webmail-server and by installing the LAMP-stack (Linux, Apache, MySQL (or MariaDB), PHP) on top of a minimal CentOS 7.
First, let’s install all necessary packages for LAMP:
[jensd@rcmail ~]$ sudo yum -y install httpd php php-xml php-pdo php-mysql mod_ssl mariadb mariadb-server wget
...
Complete!
Configure MariaDB
After installing, we need to start MariaDB and finish the MariaDB installation:
[jensd@rcmail ~]$ sudo systemctl start mariadb
[jensd@rcmail ~]$ mysql_secure_installation
/bin/mysql_secure_installation: line 379: find_mysql_client: command not found

NOTE: RUNNING ALL PARTS OF THIS SCRIPT IS RECOMMENDED FOR ALL MariaDB
      SERVERS IN PRODUCTION USE!  PLEASE READ EACH STEP CAREFULLY!

In order to log into MariaDB to secure it, we'll need the current
password for the root user.  If you've just installed MariaDB, and
you haven't set the root password yet, the password will be blank,
so you should just press enter here.

Enter current password for root (enter for none):
OK, successfully used password, moving on...

Setting the root password ensures that nobody can log into the MariaDB
root user without the proper authorisation.

Set root password? [Y/n] y
New password:
Re-enter new password:
Password updated successfully!
Reloading privilege tables..
 ... Success!


By default, a MariaDB installation has an anonymous user, allowing anyone
to log into MariaDB without having to have a user account created for
them.  This is intended only for testing, and to make the installation
go a bit smoother.  You should remove them before moving into a
production environment.

Remove anonymous users? [Y/n] y
 ... Success!

Normally, root should only be allowed to connect from 'localhost'.  This
ensures that someone cannot guess at the root password from the network.

Disallow root login remotely? [Y/n] y
 ... Success!

By default, MariaDB comes with a database named 'test' that anyone can
access.  This is also intended only for testing, and should be removed
before moving into a production environment.

Remove test database and access to it? [Y/n] y
 - Dropping test database...
 ... Success!
 - Removing privileges on test database...
 ... Success!

Reloading the privilege tables will ensure that all changes made so far
will take effect immediately.

Reload privilege tables now? [Y/n] y
 ... Success!

Cleaning up...

All done!  If you've completed all of the above steps, your MariaDB
installation should now be secure.

Thanks for using MariaDB!
Configure Apache
After getting MariaDB up and running, it’s time to configure Apache. Since we’ll access our emails over the internet, it’s a good idea to setup Apache with SSL. Although this step is theoretically optional, it prevents leaking your data and username/password in plain-text. Especially when you want to avoid government restrictions, you want to mask at least superficially what you’re doing.
To use SSL, we first need to generate a private key and certificate. For this post, I’ll just generate a self-signed certificate but you can use a real or wildcard certificate, from a known CA for a production setup.
Generate a new private key:
[jensd@rcmail ~]$ openssl genrsa -out rcmail_test.key 2048
Generating RSA private key, 2048 bit long modulus
......................................+++
.................+++
e is 65537 (0x10001)
Generate a certificate signing request using the key:
[jensd@rcmail ~]$ openssl req -new -key rcmail_test.key -out rcmail_test.csr
You are about to be asked to enter information that will be incorporated
into your certificate request.
What you are about to enter is what is called a Distinguished Name or a DN.
There are quite a few fields but you can leave some blank
For some fields there will be a default value,
If you enter '.', the field will be left blank.
-----
Country Name (2 letter code) [XX]:BE
State or Province Name (full name) []:
Locality Name (eg, city) [Default City]:
Organization Name (eg, company) [Default Company Ltd]:jensd.be
Organizational Unit Name (eg, section) []:
Common Name (eg, your name or your server's hostname) []:rcmail.test
Email Address []:

Please enter the following 'extra' attributes
to be sent with your certificate request
A challenge password []:
An optional company name []:
Make sure that you fill in relevant information for your setup in the above example.
Sign the CSR and create a self-signed certificate:
[jensd@rcmail ~]$ openssl x509 -req -sha256 -days 4096 -in rcmail_test.csr -signkey rcmail_test.key -out rcmail_test.crt
Signature ok
subject=/C=BE/L=Default City/O=jensd.be/CN=rcmail.test
Getting Private key
After generating the key and certificate, we need to place them in the correct location:
[jensd@rcmail ~]$ sudo cp rcmail_test.crt /etc/pki/tls/certs/
[jensd@rcmail ~]$ sudo cp rcmail_test.key /etc/pki/tls/private/
[jensd@rcmail ~]$ sudo chmod 400 /etc/pki/tls/private/rcmail_test.key
Now we can configure Apache to use them and offer SSL:
Edit the following lines in /etc/httpd/conf.d/ssl.conf:
Listen *:443 https
SSLCertificateFile /etc/pki/tls/certs/rcmail_test.crt
SSLCertificateKeyFile /etc/pki/tls/private/rcmail_test.key
Enable and start Apache:
[jensd@rcmail ~]$ sudo systemctl enable httpd
ln -s '/usr/lib/systemd/system/httpd.service' '/etc/systemd/system/multi-user.target.wants/httpd.service'
[jensd@rcmail ~]$ sudo systemctl start httpd
Open TCP port 443 on the firewall to allow access to our SSL website:
[jensd@rcmail ~]$ sudo firewall-cmd --permanent --add-service=https
success
[jensd@rcmail ~]$ sudo firewall-cmd --reload
success
Test Apache and the SSL-setup by browsing to your webserver (in my example: https://rcmail.test/):

As you can see, you will still get a certificate warning because the certificate isn’t issued by a trusted, public CA. This doesn’t mean that communication between the client and server isn’t encrypted and that’s what we need.
Install and configure Roundcube for webmail
After configuring the prerequisites, it’s time to setup Rouncube for webmail on the server.
Let’s start by downloading Roundcube and to extract it:
[jensd@rcmail ~]$ wget https://downloads.sourceforge.net/project/roundcubemail/roundcubemail/1.1.2/roundcubemail-1.1.2-complete.tar.gz
...
Saving to: ‘roundcubemail-1.1.2-complete.tar.gz’

100%[===============================================>] 4,599,935    765KB/s   in 6.3s

2015-06-08 19:50:58 (711 KB/s) - ‘roundcubemail-1.1.2-complete.tar.gz’ saved [4599935/4599935]

[jensd@rcmail ~]$ tar -xvzf roundcubemail-1.1.2-complete.tar.gz
The extracted files need to end up in the webroot of Apache. This can be directly in the root or in a subfolder. Since the only purpose of this testserver will be Roundcube, I decided to put everything directly in the root:
[jensd@rcmail ~]$ sudo cp -r roundcubemail-1.1.2/* /var/www/html/
[jensd@rcmail ~]$ sudo chown -R apache:apache /var/www/html/
[jensd@rcmail ~]$ sudo restorecon -R /var/www/html/
Roundcube needs write access for the logs and temp directory. By default, this is prohibited by SELinux, so we explicitly need to allow that:
[jensd@rcmail ~]$ sudo chcon -t httpd_sys_rw_content_t /var/www/html/{temp,logs}
Once all files are in place, we need to create a database and user for Roundcube:
[jensd@rcmail ~]$ mysql -u root -p
Enter password:
Welcome to the MariaDB monitor.  Commands end with ; or \g.
Your MariaDB connection id is 10
Server version: 5.5.41-MariaDB MariaDB Server

Copyright (c) 2000, 2014, Oracle, MariaDB Corporation Ab and others.

Type 'help;' or '\h' for help. Type '\c' to clear the current input statement.

MariaDB [(none)]> CREATE DATABASE roundcubemail;
Query OK, 1 row affected (0.00 sec)

MariaDB [(none)]> GRANT ALL PRIVILEGES ON roundcubemail.* TO rmail@localhost IDENTIFIED BY 'secret';
Query OK, 0 rows affected (0.00 sec)

MariaDB [(none)]> FLUSH PRIVILEGES;
Query OK, 0 rows affected (0.01 sec)

MariaDB [(none)]> exit
Bye
After creating the DB and user, let’s populate the database with the initial tables:
[jensd@rcmail ~]$ mysql -u root -p roundcubemail < /var/www/html/SQL/mysql.initial.sql Enter password:
At this moment, you could configure Roundcube by using the wizard. To do so, you would need to point your browser to https://<your hostname or ip>/installer/
Another option is to create the configuration manually, which I will do for this post.
The configuration contains a DES-key for encryption. Let’s first generate a DES-key of 24 characters to use in the configuration:
[jensd@rcmail ~]$ cat /dev/urandom | tr -dc 'a-zA-Z0-9' | fold -w 24 | head -n 1
qVOGPT8R5bGElAqJfdjKwVYZ
If you want to, you can first copy the sample configuration file and edit that, since it’s annotated:
[jensd@rcmail ~]$ sudo cp /var/www/html/config/config.inc.php.sample /var/www/html/config/config.inc.php
Edit the file in /www/html/config/config.inc.php and make sure it contains the following:
<?php
$config = array();
// MySQL:
$config['db_dsnw'] = 'mysql://rmail:secret@localhost/roundcubemail';
// IMAP:
$config['default_host'] = 'ssl://imap.gmail.com';
$rcmail_config['imap_auth_type'] = null;
$config['default_port'] = 993;
// SMTP:
$config['smtp_server'] = 'ssl://smtp.gmail.com';
$rcmail_config['mail_domain'] = 'gmail.com';
$config['smtp_port'] = 465;
$config['smtp_user'] = '%u';
$config['smtp_pass'] = '%p';
// Roundcube:
$config['support_url'] = '';
$config['auto_create_user'] = true;
$config['des_key'] = 'qVOGPT8R5bGElAqJfdjKwVYZ';
$config['username_domain'] = 'gmail.com';
$config['plugins'] = array();
$config['language'] = 'en_US';
The last step before we can start using Roundcube as a Gmail-proxy, is to tell SELinux that Apache is allowed to connect to Gmail on non-standard ports (which we configured in the configuration file for Roundcube):
[jensd@rcmail ~]$ sudo setsebool -P httpd_can_network_connect=1
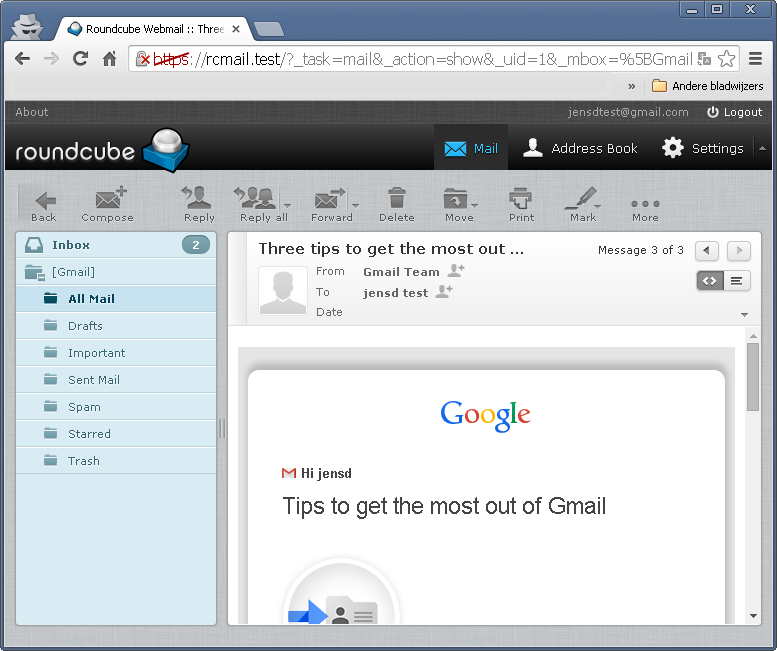
Test your Gmail proxy
At this point, everything should be ready to login to Roundcube and access your Gmail-inbox trough the Roundcube webmail interface.
Connect with your browser to https://<your hostname or ip> (for my example: https://rcmail.test):
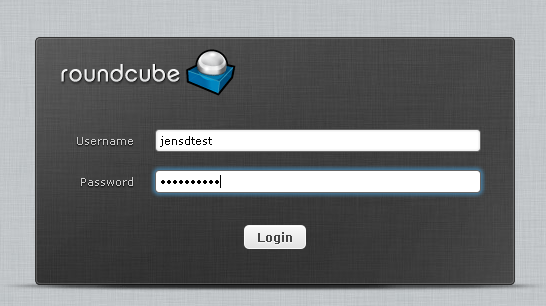
Login with your Gmail-credentials (since we told that the default domain is @gmail.com, there’s no need to enter this information, unless you use a Gmail account for another domain).
If all goes well, you should see your inbox, folder and be able to access your mail:
Troubleshooting
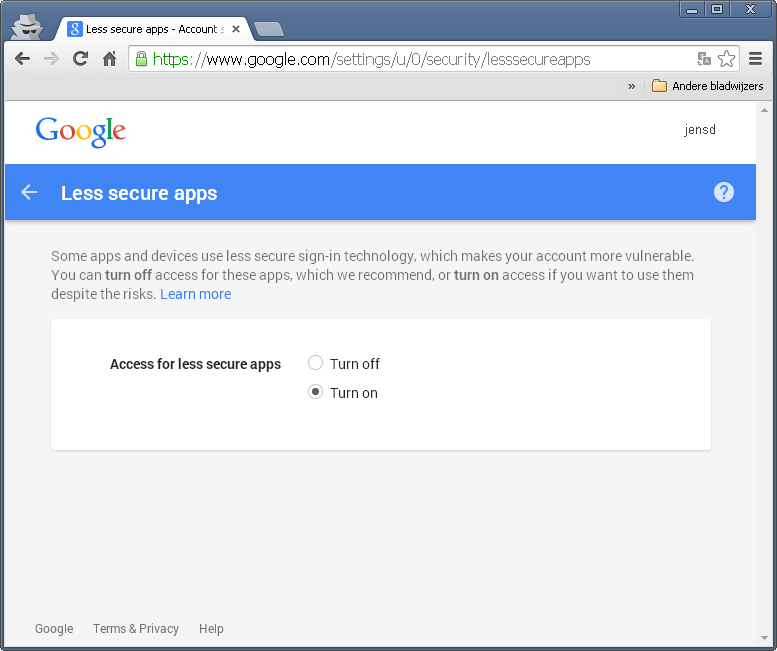
In case you get a message saying: “Login Failed”, you can have a look in /var/www/html/logs/errors. In my case, Google didn’t allow me to connect to my account from within another application.
The message was:
[08-Jun-2015 21:36:02 +0000]: <42ootljk> IMAP Error: Login failed for jxxxx@gmail.com from 192.168.202.1. AUTHENTICATE PLAIN: Please log in via your web browser: https://support.google.com/mail/accounts/answer/78754 (Failure) in /var/www/html/program/lib/Roundcube/rcube_imap.php on line 198 (POST /?_task=login?_task=login&_action=login)
To allow Roundcube to access your mail, point your browser to https://www.google.com/settings/u/1/security/lesssecureapps and allow less secure access:
When I created a new account, I didn’t receive the warning/error so most probably it’s something I caused myself.
thanks, it has been helpful
how about Setup roundcube webmail as a proxy for yandex mail ?.. is that would be the same config.inc.php mentioned above?
I had to clear the Captcha as well as defined on the Google help page in the log.
Can this be updated to show how to support OATH/OATH2 for Gmail. I still think showing this work around is important but how do I change this now that Roundcube support OATH authentication.