
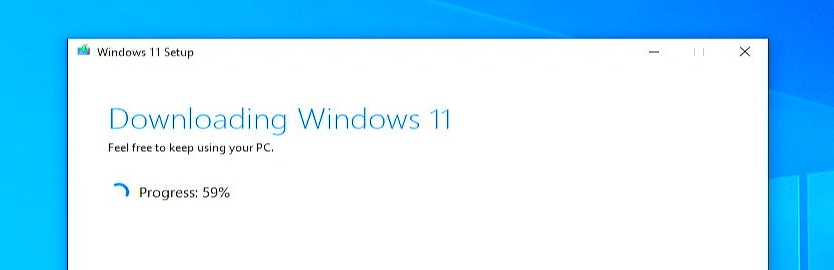
Microsoft released their 2024 update for Windows 11, better known as 24H2. As you probably know, Windows 11 comes with some specific hardware requirements that would prevent you from upgrading or installing Windows 11 on older hardware. In this post I will show you how you can work around these hardware limitations for the most recent 24H2 release. I’ll cover how to perform a clean installation of Windows 11 24H2 on unsupported hardware and also how to upgrade from Windows 10 or an earlier version of Windows 11, like 23H2 or 22H2.
Update for Windows 11 25H2
As Microsoft released their 2025 update of Windows 11 by now, the instructions to upgrade to the latest (25H2) version are different. I documented these in a separate post which you can find over here:
Below you can find the article for 23H2 as reference but keep in mind that some things might no longer work since 25H2 is released.
Introduction
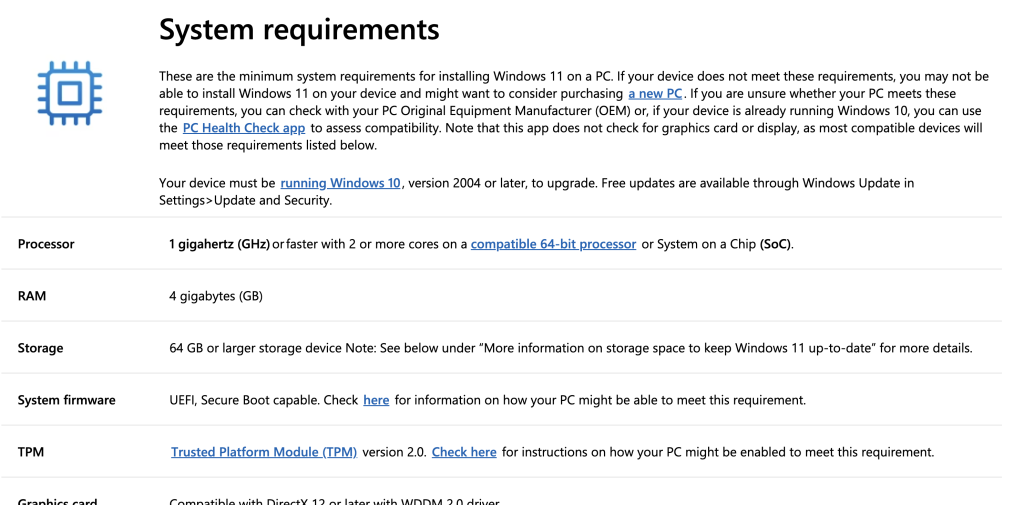
Windows 11 theoretically requires your machine to support secure boot, have a TPM 2.0 module and your CPU to be on the list of compatible models. By working around these hardware checks, it has been possible to run Windows 11 without any issues. Performance is pretty good and similar to Windows 10, Updates are working fine and all in all everything works just as you would expect.
What does require some actions is that with each major update, as was the case last year for 23H2, the year before for 22H2 and now as well with the latest version, 24H2, the methods you can use to skip these hardware checks during installation or while upgrading do change a bit. For each of these in the past, I have been documenting a new workaround in different posts and this one is no difference to that.
Different Scenarios
There are multiple possible scenarios to get Windows 11 24H2 on your unsupported machine, depending on your starting point, I will cover each of these here:
- Scenario 1) Perform a fresh installation of Windows 11 24H2 on your unsupported hardware if you want to start clean or need to install the OS from scratch
- Scenario 2) Upgrade from an earlier version of Windows 11, like 23h2, 22H2 or even older and want upgrade to the 24H2 version.
- Scenario 3) Upgrade from Windows 10 to Windows 11 24H2 on unsupported hardware.
Support for SSE 4.2 and older CPUs
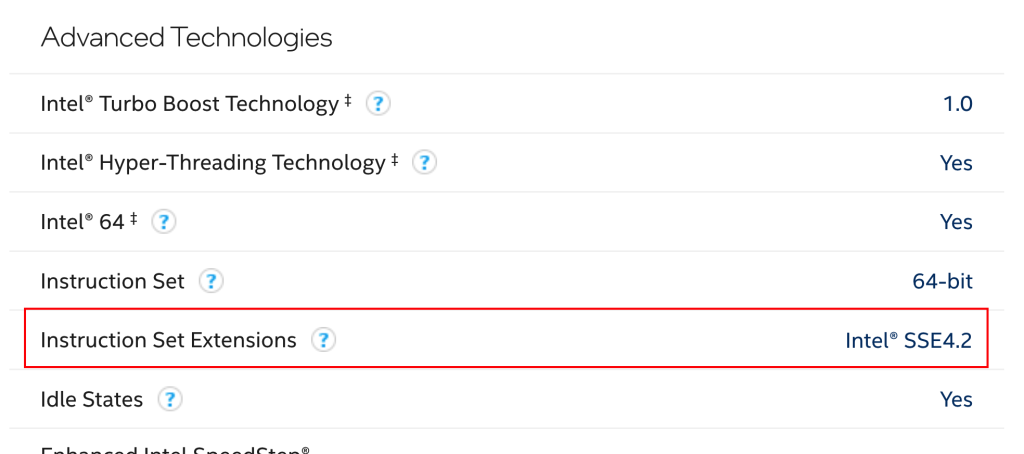
One thing that I do need to mention here, that is really different from 23H2, is that since version 24H2, microsoft started to rely on a specific SSE4.2 CPU instruction called POPCNT

In other words: this is a real hardware limitation, so CPUs that do not have this instruction built-in will not be able to run 24H2. The bad news is that if you would have such a CPU, your system will no longer boot anymore after upgrading.
The good news is that your CPU needs to be over 15 years old for this to be the case. For Intel CPUs for example, anything that is an Intel Core CPU or newer, which was introduced back in 2008 or for AMD about everything that got released after the same year does have support for that instruction. So unless you have a really old CPU, you should be fine.
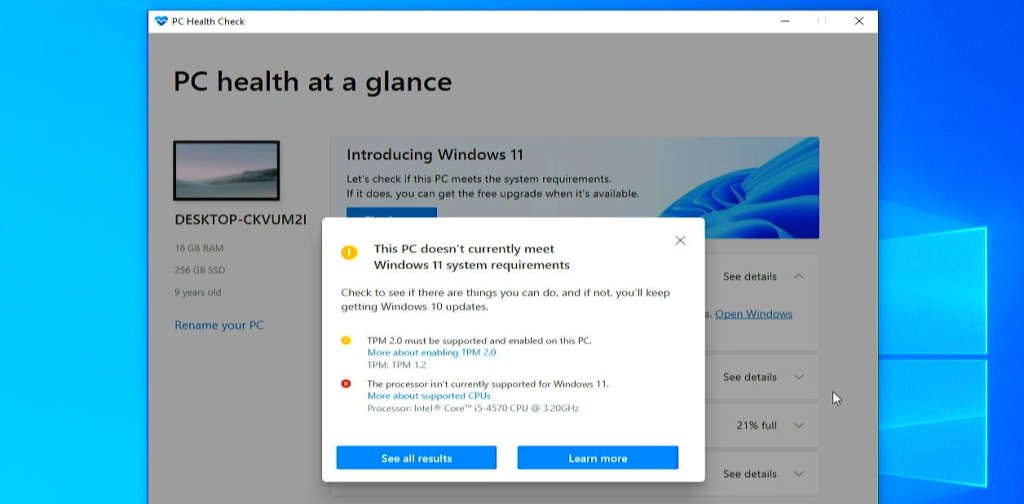
For this post I will be using my Dell OptiPlex 9020, which I also used in the past to test and play around with Windows 11. This machine is about 9 years old now and is equipped with a 4th generation Intel Core i5 CPU, does not have secure boot enabled and does not support the TPM 2.0 requirement. In other words, without any workarounds, we would not be able to install Windows 11 on here:
Scenario 1) Perform a fresh installation of Windows 11 24H2 on unsupported hardware
To do a clean/fresh installation, you will need a USB drive of at least 8GB and as a first step in the process we will prepare that one to make it a bootable Windows 11 installer. You can prepare this USB drive on any other Windows machine, it doesn’t have to be the one where you will install windows and that machine does not need to be yet on Windows 11 either.
Youtube video
If you are interested, I also created a YouTube video for this scenario:
If you prefer classic text, you can just follow the rest of this post:
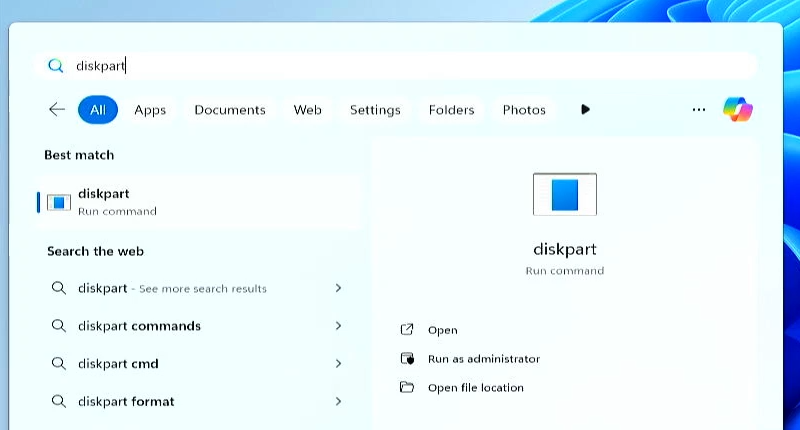
Step 1) Clean the USB drive
Let’s start by doing a quick cleanup of the USB drive first. Although this step is optional, it could prevent some problems with leftovers settings or partitions on it. To do so, After inserting the drive in your PC, start Diskpart by pressing the start key, type diskpart and press enter:
Once Diskpart is started, type the command “list disk” and find your USB drive. By using the size column it should be relatively easy to identify which one that is. In my case the USB drive is disk 1
Then type “select disk” and the number of your USB drive in the list.
And finally we can clean-up everything by typing the “clean” command followed by pressing enter:
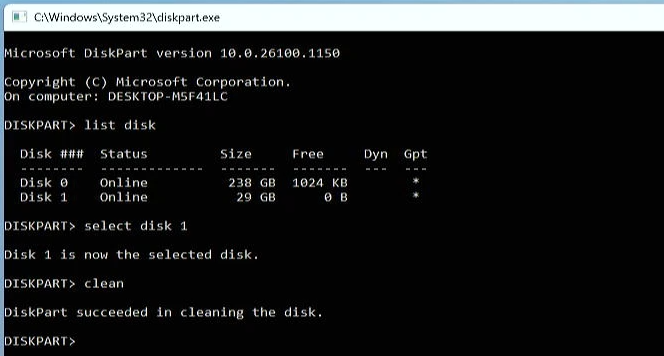
Everything has been completely removed from that USB drive now, so we can close diskpart.
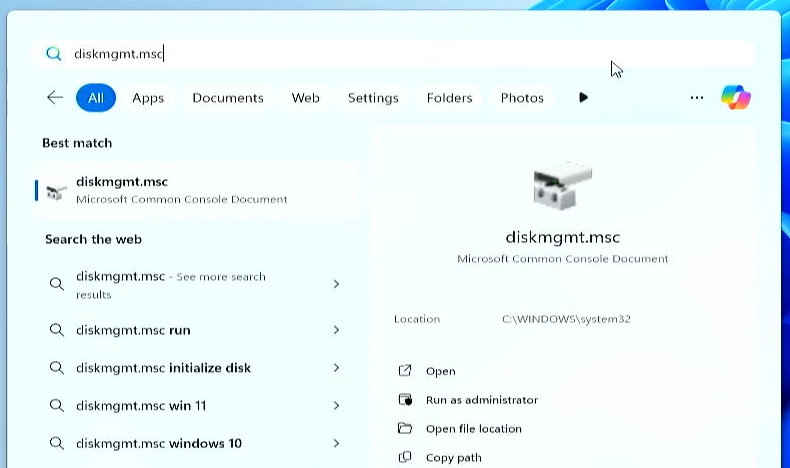
We now need to re-initialize the drive before we can use it to create installation media. We will do this using Disk Management which we can start by pressing start, typing diskmgmt.msc and pressing enter:
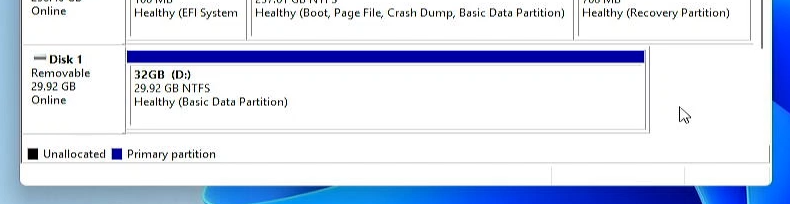
In Disk Management we see that same disk 1, which is our USB Drive. Right click on it and choose “New simple volume”:

Click through the wizard that comes up. Leave it to use all space, let the wizard assign a drive letter and give the drive a volume label which you can recognize, then finish the rest of the wizard. After a bit of patience this should create a volume and format it as we instructed:
That was a bit of extra work but at least we now have a well-prepared USB drive and we are ready to get the Windows 11 24H2 installation files on it.
Step 2) Create bootable Windows 11 24H2 installer USB drive
To create the bootable USB drive, the easiest way is to use the Media Creation tool. You can download it from the Download Windows 11 website: https://www.microsoft.com/en-us/software-download/windows11
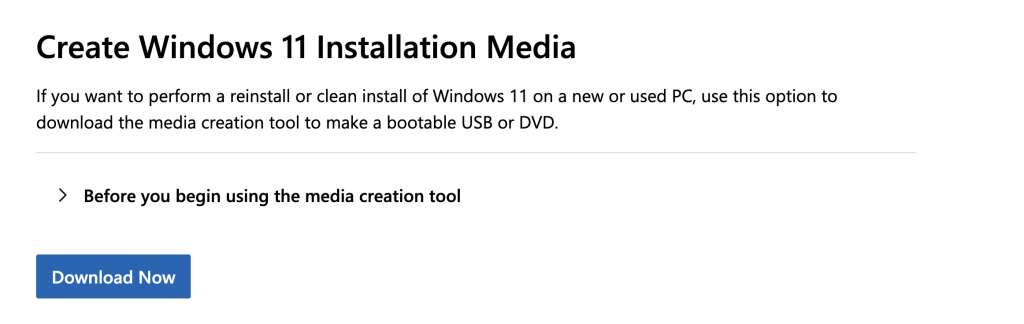
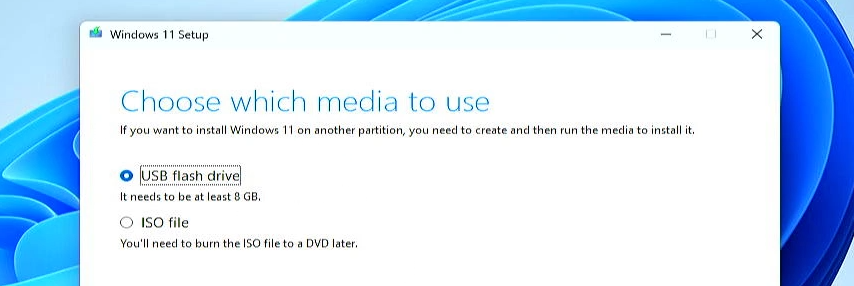
Once the tool is downloaded, start it from where you downloaded. After accepting the license terms, you can choose a different language if desired. Then click next and choose for “USB Flash drive”:
In the next step select the drive with the volume label that represents your USB drive and click Next once more and wait patiently for the required files to be downloaded and copied to the drive:
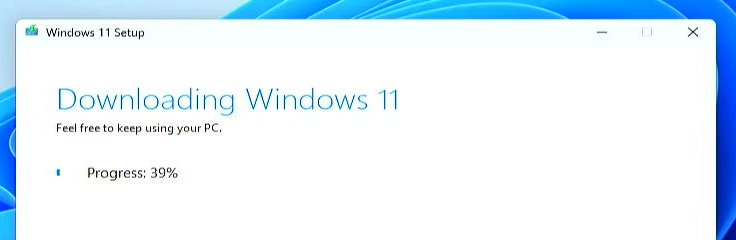
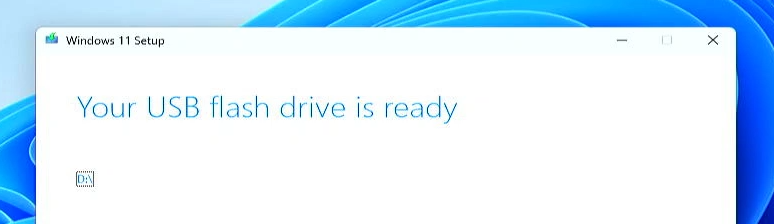
This can take some time, mainly depending on your download speed and write speed of that drive. After some patience, your USB drive is now fully prepared and can be used to boot from and perform a clean installation.
As mentioned, this USB drive can be used or re-used for different machines as well, not only the one you created this drive on.
Step 3) Perform a clean installation of Windows 11 24H2
After preparing the drive, it can be obviously be used to perofm a clean installation. To do so, insert the USB drive in the machine where you want to perform the installation and then let the system boot from it by using the boot menu.
On my Dell machine this can be done by pressing F12 multiple times immediately after powering up the PC. For other brands and models, the key to use for this might be different, Next to F12, Escape or F10 are pretty common as well:
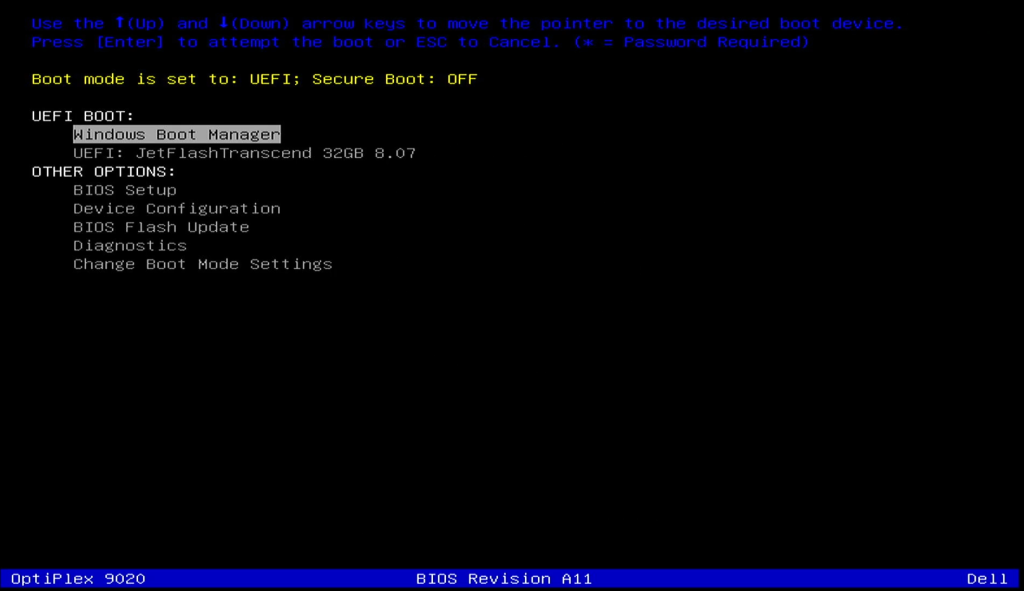
In the boot menu, we get another confirmation that secure boot is off so in theory it shouldn’t be possible to install Windows 11 on here. The USB drive is selected as the device to boot from, so after pressing enter this will launch the Windows 11 installer from there.
I also recommend, at least if you don’t want to be forced to use a Microsoft account to login to your machine, to disconnect it from the internet before proceeding. This is not a requirement to bypass the unsupported hardware though.
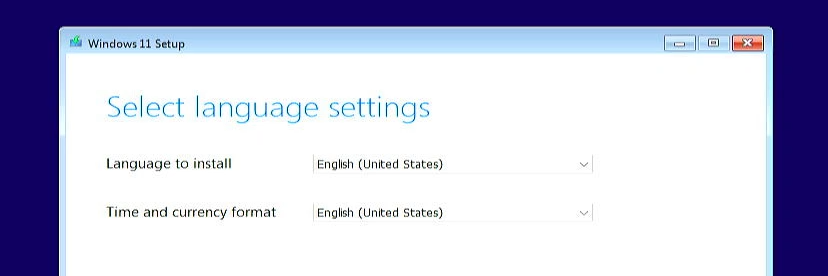
After a bit of patience you should get to see the new user interface of the installer. Not sure yet if I find this an improvement but it is what it is. Click next here after selecting your language, time and currency format:
In the next screen, select the correct keyboard layout and continue to the following screen:
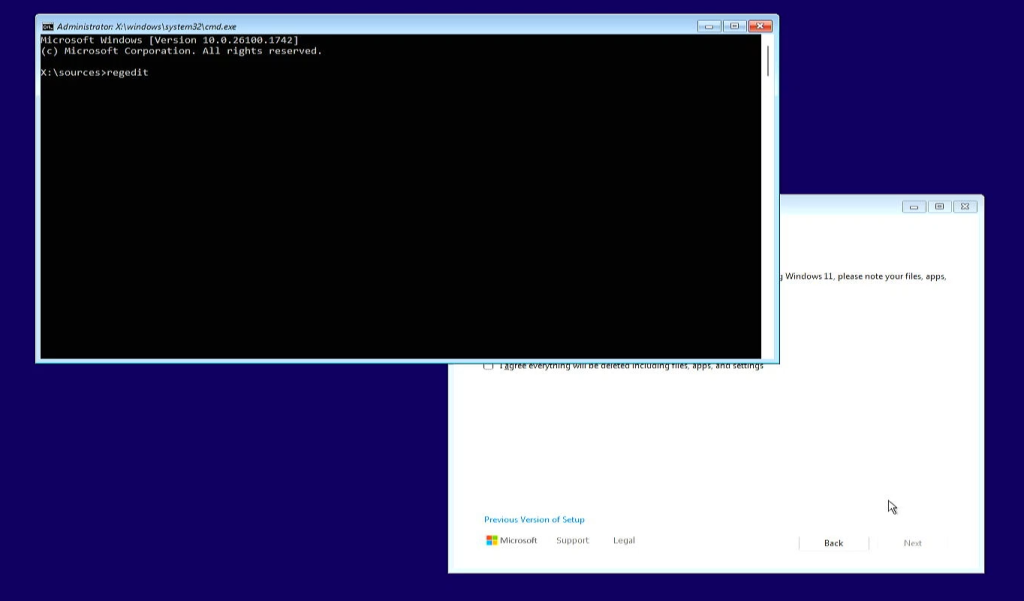
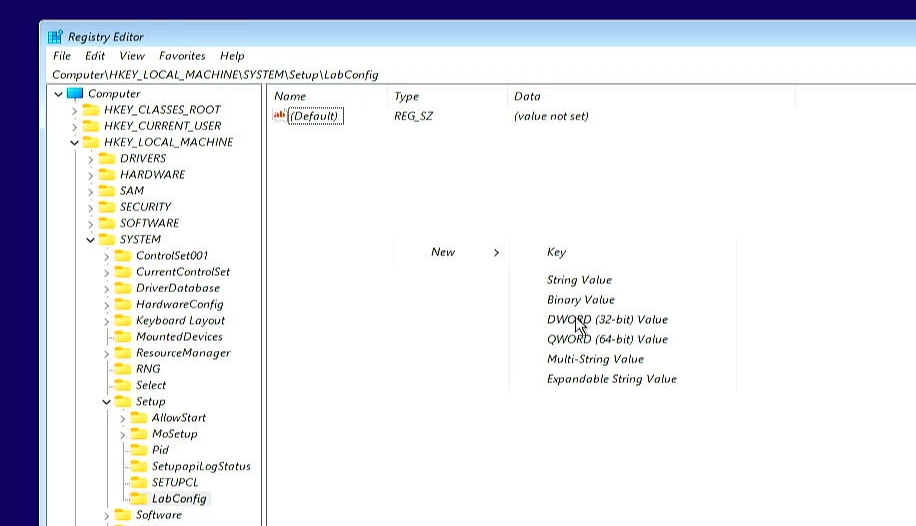
At this screen, before continuing here, we need to add a few registry keys to work around the hardware requirements. That can be done by pressing Shift + F10 while at this screen. This should bring up a command prompt. In the command prompt, start the registry editor by typing regedit and pressing enter:
In the registry editor, navigate to HKEY_LOCAL_MACHINE/System/Setup. Then on the Setup folder, right click and choose New > Key and give it the name LabConfig:
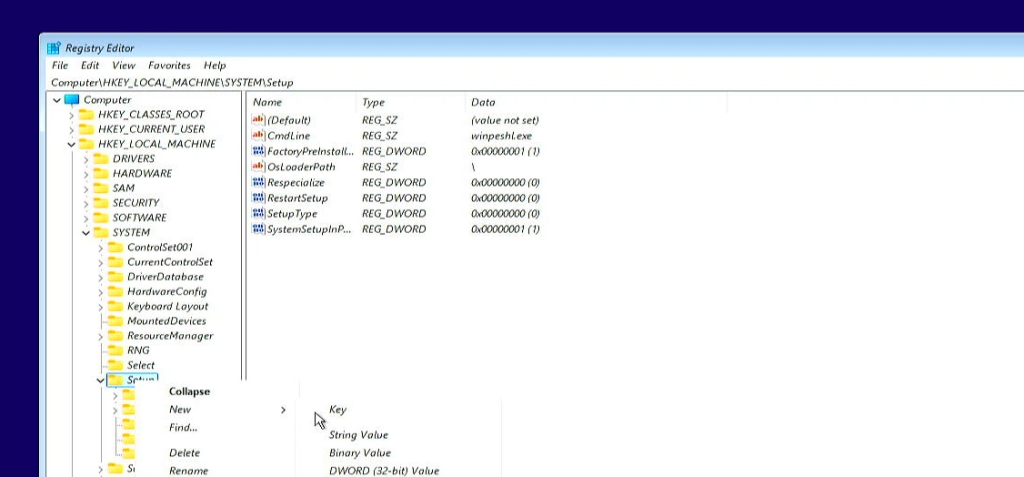
In LabConfig, right click and choose New > DWORD (32-bit):
Give the DWORD the name “BypassTPMCheck”. Repeat the process and choose again New > DWORD (32-bit) and this time give the name “BypassSecureBootCheck”. Then double-click on each of the variables and set the value to 1 in order to enable them:
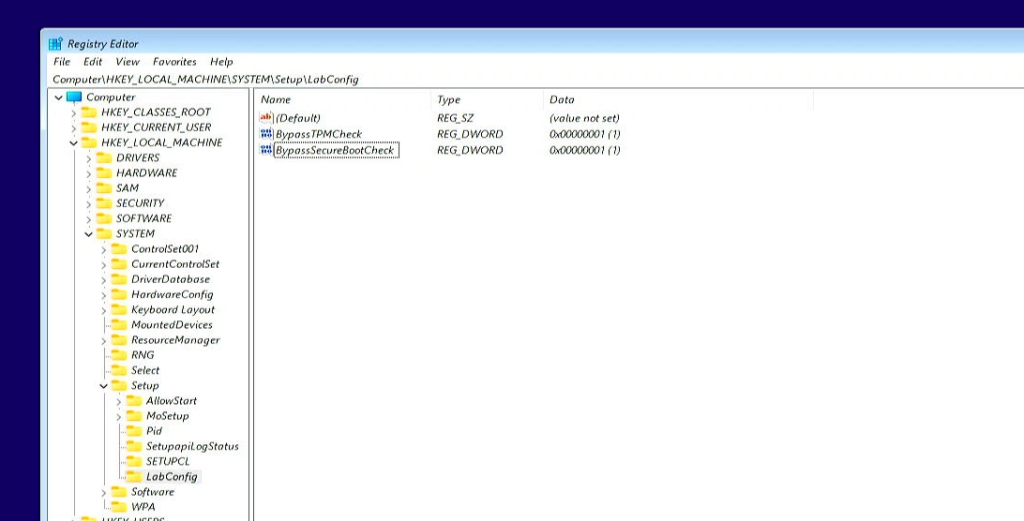
This is how it should look like, make sure you did this in the right location and don’t forget to set the value to 1. If you got this right, we can close the registry editor and exit the command prompt.
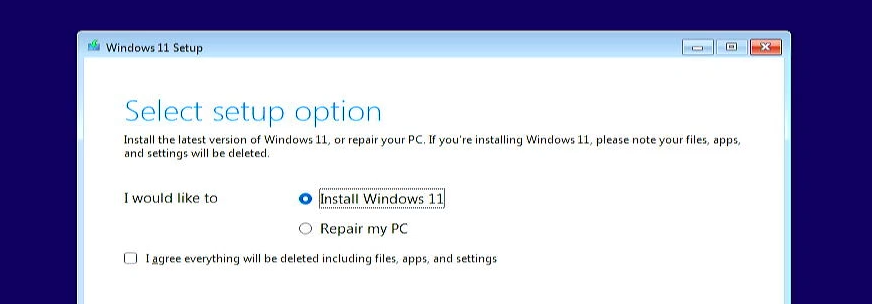
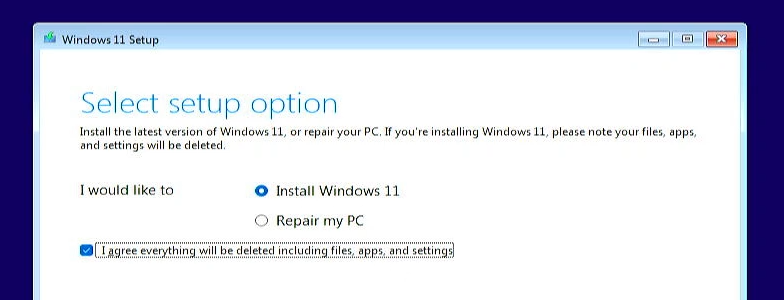
Back at the select setup option screen, select “I agree everything will be deleted including files, apps and settings”, then click next:
Enter your product key if it wasn’t automatically detected or click “I don’t have a product key”, then select the version to install. As my machine has been properly activated with Windows Home before I chose for that edition here:
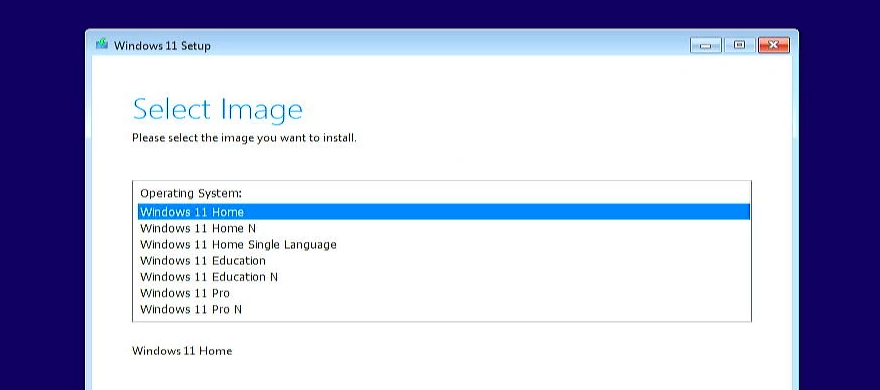
Just for clarity, this method will work equally fine if you want to install Windows 11 Home or Professional, depending on which activation key you have available.
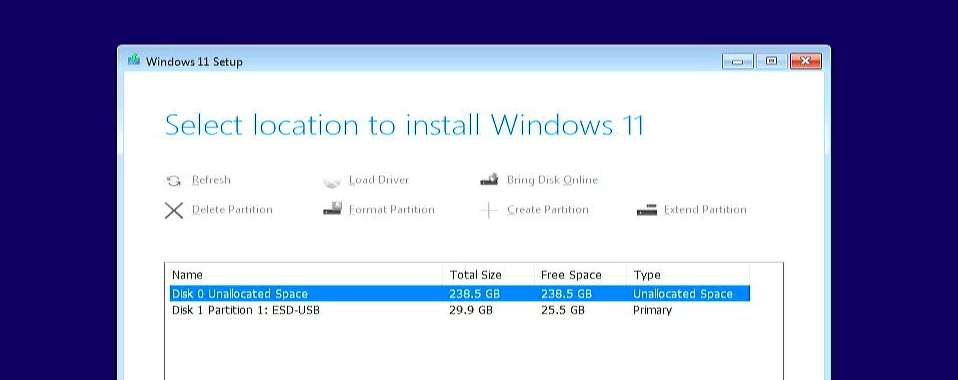
In the next screen: “Select location to install Windows 11”, we need to select where to install Windows 11. This looks completely different and a bit more modern from the old version we had in 23H2 and earlier. I deleted all old/existing partitions one by one and then selected the unallocated space and clicked Next:
After the last confirmation, just click install and wait for Windows 11 24H2 to be installed on the drive you selected:

If all goes well, you should eventually end up at this initial setup dialog, asking you to select your country or region. If you have your PC connected to the internet and you are ok to use a Microsoft account, you can just continue here:

If on the other hand you prefer to use a local account instead or have a machine which is not connected to the internet, you need to through an extra step. Otherwise you cannot continue without internet or that account. To do so, we need to open a command prompt in the same way as we did before, by pressing Shift F10 on the keyboard. In the command prompt, type OOBE\BYPASSNRO and press enter:
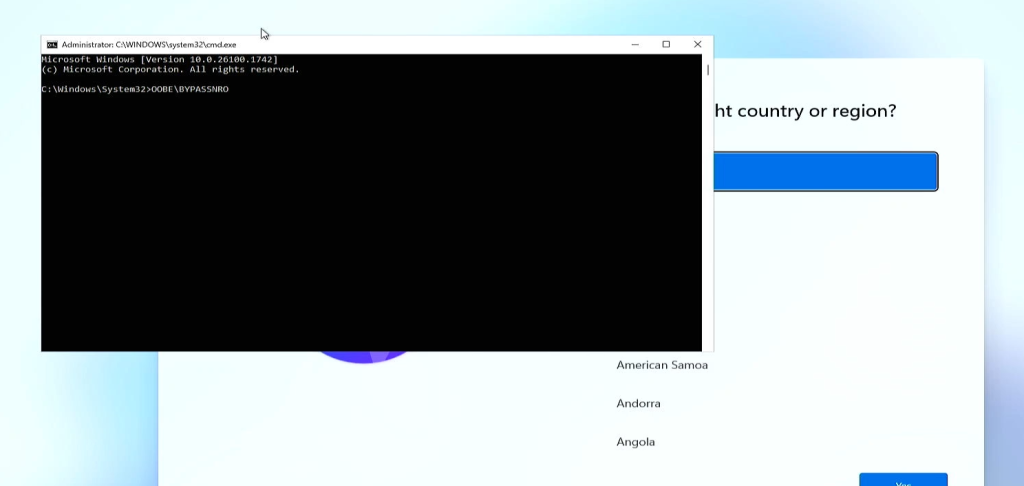
This will trigger a quick reboot and bring up the same wizard but in the next steps you will be able to skip the requirement to be connected to the internet.
Now go through the wizard. Start by selecting the country, and keyboard layout and then we get to the screen where we can connect to a network or, thanks to that command we entered earlier, can skip that requirement:

In the next steps, enter your username or log in to a Microsoft account if you are connected and choose some of the privacy settings. After another bit of waiting, you should finally end up at our fresh Windows 11 24H2 desktop on unsupported hardware:
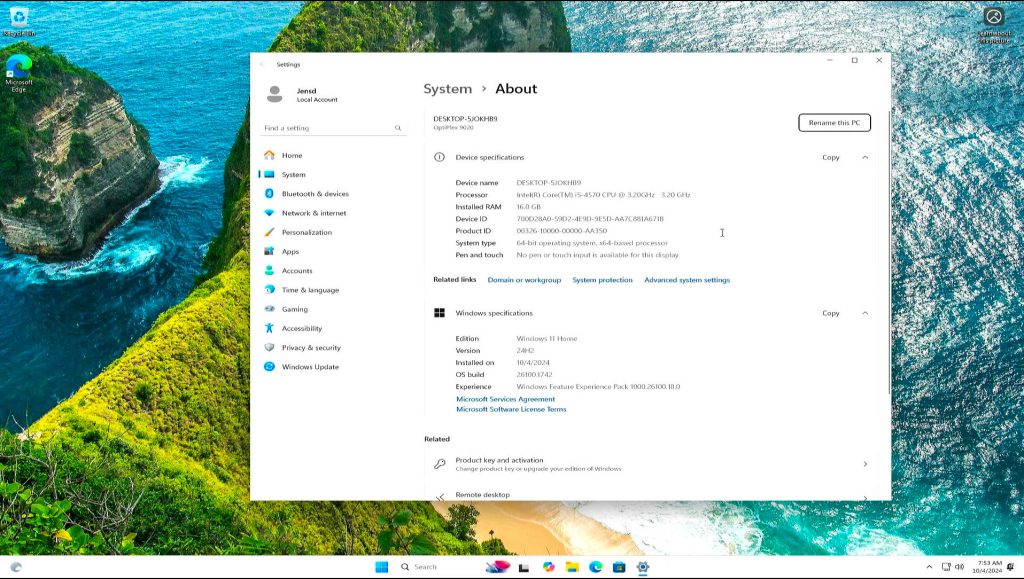
Looks like the installation is a success and we’re running 24H2 successfully on unsupported hardware. After checking, the system also got activated with the digital key as used earlier.
Scenario 2) and 3) Upgrade from Windows 10 or an earlier version of Windows 11, like 23h2, 22H2 or older, on unsupported hardware
For scenario 2) and 3) I will show you how you can upgrade from an older version of Windows, Windows 10 or a previous version of Windows 11 already installed on unsupported hardware.
YouTube videos
As for the fresh installation, I have also created separate videos on the upgrade process from both Windows 10:
And from Windows 11:
If you prefer classic text, you can just follow the rest of this post:
Method to used to upgrade
For 24H2, different from the earlier versions, we will use the same method for both Windows 10 or an earlier version of Windows 11. In short we need to download the ISO with the installation files from Microsoft’s website and then run setup.exe with a specific argument which will bypass the hardware checks.
To start we need to get that Windows 11 ISO from Microsoft’s. So let’s open your browser and navigate to the download windows 11 website: https://www.microsoft.com/en-us/software-download/windows11. That website has several download options available but I recommend to use the Media Creation tool:
The reason is that this tool will automatically detect the language of your original installation and download the same version. If there would be a mismatch, even if the display language is seemingly fine, you could end up in the situation where you can’t upgrade and keep your files.
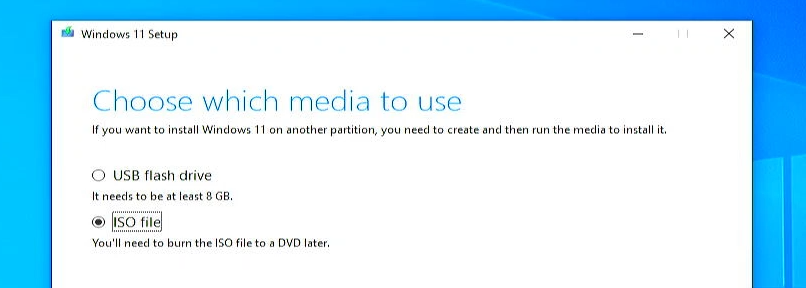
Once the tool is downloaded, start it from where you downloaded it. After accepting the license terms, leave the “Use recommended options for this PC” checked as it is. Then choose to download just the ISO file:
After clicking next, choose where the tool should put the file and continue to let the Media Creation Tool download the required files and create the ISO:
Once it is ready, navigate to the folder which you selected as destination earlier and mount the ISO file. This can be done by right clicking on the file and choosing mount:
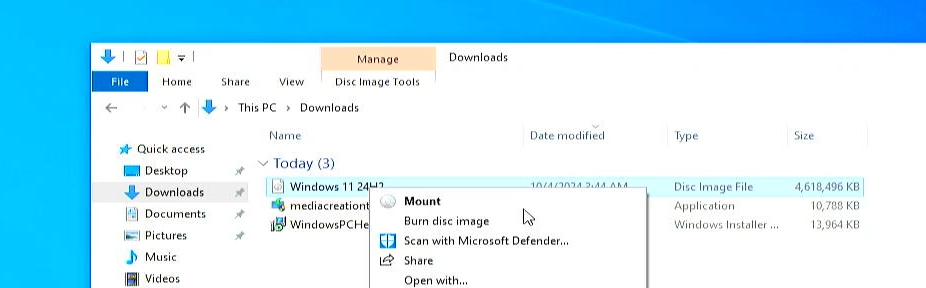
So far these steps are exactly the same for both upgrading from Windows 10 as from earlier versions of Windows 11.
After mounting the ISO, you should end up with a new drive letter on your machine. This is like a virtual DVD drive which has the necessary installation files in it.
Now to work around the hardware checks, we need to launch the setup program with that special argument. This is a method that was working for earlier versions before as well as the alternative options, like removing the contents from a file called appraiserres.dll or puhsing a specific update package are no longer working.
In order to continue with the upgrade now, we need to start a command prompt, so press start, type CMD and press enter:
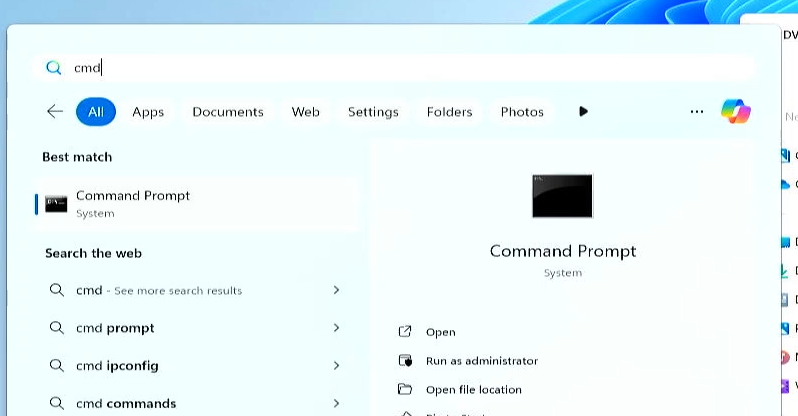
In the command prompt, we need to switch to that mounted ISO’s drive letter. In my case that was drive letter D:, so I need to type D:and press enter. Obviously if you have a different letter, that is what you will need to use. By using the dir command, we can verify that we have the correct drive letter as we can see the same files as on that mounted ISO over here:
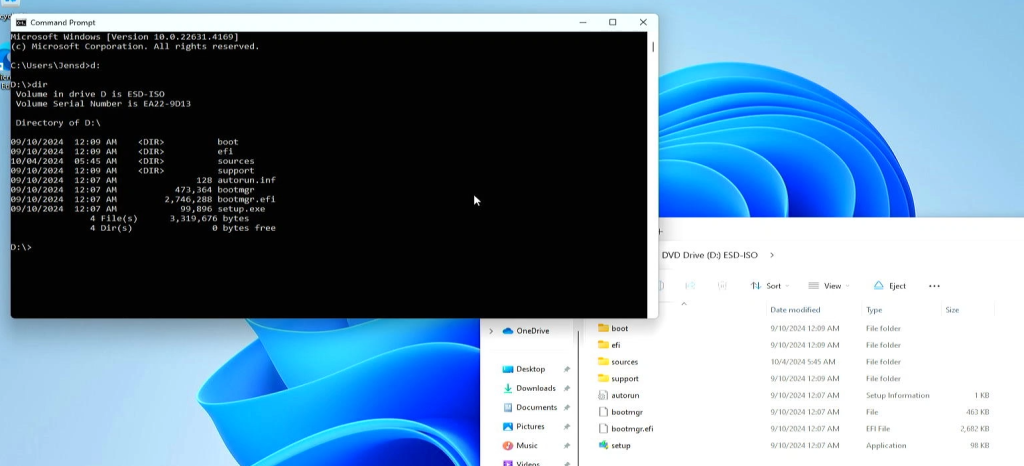
Next we will need to start setup.exe with the argument /product server. So type “setup /product server” and press enter:
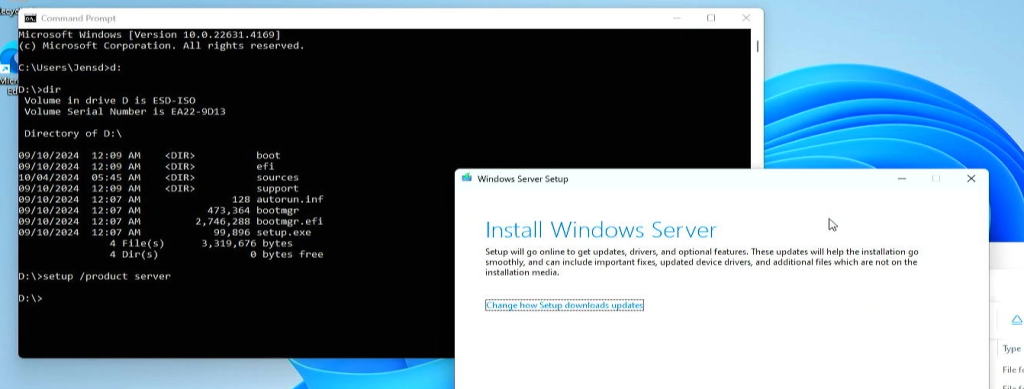
This will launch the in-place upgrade and as you can see it mentions here that it will install Windows Server. Don’t worry about that as it will just upgrade the currently installed windows edition, which is Home in my case but this will bypass the hardware checks.
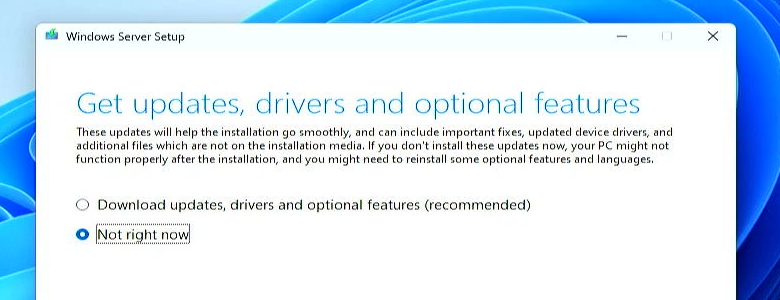
On that same first screen make sure to click “Change how setup downloads updates” and then select “Not right now”:
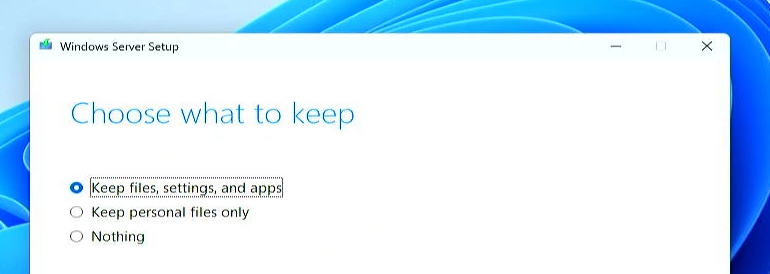
Click next, accept the license terms and choose keep files, settings and apps to keep everything and upgrade the currently installed Windows 10 or Windows 11 operating system to Windows 11 24H2:
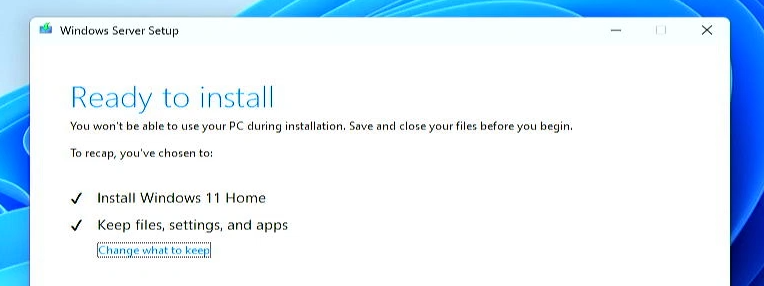
In the last step, you get a confirmation that we will just upgrade to Windows 10 or 11 Home in case you would be worried about that mention of Windows Server:
Then click Install to begin the process and wait for your OS to get upgraded to windows 11. Obviously this can take some time but in my case this took between 15-20 minutes, which I think is pretty fast seeing the old hardware I have:

If all goes well, you should eventually end up to your desktop, but this time you should be on Windows 11 24H2:

That’s it, your Windows 10 or 11 23H2 installation should now have been upgraded.
Known Issues with 24H2
Currently there seem to be 3 known issues after installing or upgrading to 24H2. These are not specific to unsupported hardware as they also appear on supported machines:
- The command “sfc /scannow” will always report that there are integrity issues. It will report these as fixed after running the tool but running it again shows the same issues.
- The mouse cursor can flicker/disappear with Chromium-based applications
- There is an undeletable Windows Update Cleanup-cache of 8,63GB
All of these have been reported and Microsoft is working on a solution as we speak.
Thank you Jens for valuable hints!
I found one thypo:
So type “setup /product sever”
should be
So type “setup /product server”
Best regards…
Good catch, corrected it in the meanwhile. Thanks for letting me know.
Update went very smoothly. Thank you!
awesome post, helps to navigate thru the unknown.
Thank you for this article. On my 2015 Asus i7 laptop, a fist attempt to upgrade from Windows 11 23H2 failed with a 0xC1900101 error message. However, after a clean restart, the process successfully completed. More information can be found on https://support.microsoft.com/en-us/windows/get-help-with-windows-upgrade-and-installation-errors-ea144c24-513d-a60e-40df-31ff78b3158a.
After the upgrade, Windows 11 24H2 reported a vulnerability in driver ASMMap64.sys. This is an Asus-specific error related to the Asus ATK drivers that control the Hotkeys, TouchPad,Ambient Light Sensor, Keyboard Light, and On-Screen Display. Since the ATK package is non essential, I uninstalled it and the error was no longer reported.
Hi Jens,
Thanks for the instructions, 24H2 update from 23H2 went smoothly.
However, I noted that Onedrive synchronisation doesn’t work correctly on 24H2, no issues with that while on 23H2.
I have a paid Office 365 subscription with 1TB cloud storage (840GB in use).
Microsoft will do it’s job here I hope…
Kind regards,
Jan Claeys – Zingem (B)
HI Jens,
I tried following your instructions on upgrading to 24h2 from 23h2 using the ISO method.
After restarting the screen stuck at the windows logo screen for than 6-7 hours.
I had to manually reboot again but got message the installation failed, didn’t note the exact message I got..
After that it went into roll back and windows desktop came up with my old 23h2 version.
In the setup window the below error number and message was displayed.
“Oxc19OO1O1-OX4OO17
The installation failed in the second BOOT phase with an error during BOOT operation”
Please guide on how I can resolve this and do the upgrade again.
Appreciate your help and guidance in advance.
Hi Jens,
Great post, thank you! I’m interested in trying option 3 on my MacBook Air, where I’m currently running Windows 10 with bootcamp. I have one question: after upgrading to Windows 11 24H2 using the /product server trick, will I still be able to receive updates from Microsoft using Windows Update? In other words, does Windows Update perform the system compatibility check?
Nice to meet you, Jensd.
Thanks for the great article.
I’m Konya-, commenting from Japan.
Please let me suggest one method.
However, it is only for upgrading.
It is a method to use software called Rufas (free software).
All you need is Rufas, 23H2 ISO, 24H2 ISO, and a USB memory stick of 8GB or more.
You can download the 23H2 ISO from the UUP dump.
To do this, use Rufas to write the ISO to the USB memory stick, extract the contents of the ISO, and use the 23H2 setup to upgrade 24H2.
Using Rufas allows you to remove restrictions such as TPM2.0.
Create a folder on the desktop and copy the data created on the USB memory stick.
The 23H2 name is 24H2New.
The 24H2 name is 24H2old.
Delete install.esd (or install.wim) from the sources folder in the 24H2New folder.
Copy install.wim from the sources folder in the 24H2old folder to the sources folder in the 24H2New folder.
24H2New is the upgrade data for old computers.
However, this only applies to computers with first-generation i3 or later CPUs.
Caution: Do not run this on CPUs prior to first generation.
If this fails, the software may not be reconfigured when restoring Windows.
Copy 24H2New folder to the target desktop and run setup.exe to upgrade to 24H2.
I’ve only confirmed this on Intel CPUs
You can also upgrade from Windows 10 64bit or Windows 11 22H2&23H2.
Does not apply to 32bit Windows.
Thank you for allowing me to use your valuable space.
Also, this comment uses Google Translate.
I apologize if there are any translation errors.
I wish you all happiness.
Thank you, Jens, for your detailed and clear how-to.
I just upgraded successfully my unsupported Lenovo T440 with i5-4200U cpu from Windows 11 23H2 to 24H2, keeping all personal apps and files in place. The upgrade was quite slow on this cpu, like 45 minute, but finished successfully. Thanks again!
“Oxc19OO1O1-OX4OO17
The installation failed in the second BOOT phase with an error during BOOT operation”
Can you assist with the above error which I keep getting. Tried to do the installation twice and both times had the same error message.
Appreciate your help and guidance in anticipation.
Thank You
mounten staat niet in mijn uitklap menu, hoe kan ik dit oplossen
Hi Jens,
I too have an Optiplex 9020 and successfully updated it to Windows 11 22H2 from Windows 10 22H2. I am now trying to update to Windows 11 24H2 that I thought would be trivial but I am getting the error message:
“0xc1900101-0x40017
The installation failed in the second BOOT phase with an error during BOOT operation”
I originally installed using this registry key: HKEY_LOCAL_MACHINE\SYSTEM\Setup\MoSetupAllowUpgradesWithUnsupportedTPMOrCPU
I get the above error with and without /Product Server. My research indicates the issue may be caused by a corrupted ISO file, incompatible devices, outdated CPU drivers, antivirus interference, and some unknown glitches but if it runs 22H2 it should be fine with 24H2. I am really puzzled and could use your help.
An update. I was successfully able to upgrade my Windows 11 22H2 to Windows 23H2. Since that ISO was taken down by Microsoft, I had to download it the Media Creation Tool from github (https://github.com/AveYo/MediaCreationTool.bat/blob/main/MediaCreationTool.bat). The installation ran perfectly. Now that I am at 23H2, I will wait a bit to see if Windows Update will deliver 24H2.
I couldn’t wait for Windows Update so I tried to upgrade my 23H2 to 24H2 using the ISO and failed two times. Same as before. Without updates it failed with error on safe boot mode. With updates it failed on with error on second boot phase. Any thoughts????
I was finally able to update to 24H2. Microsoft made 24H2 must have tightened up drivers that did not meet Memory Integrity standards. Although you can turn it off in Windows Security, the file PXHLPA64.sys (part of an old Roxio Creator) was keeping the system from booting. Uninstalling Roxio Creator did not completely remove this CD/DVD filter from the DVD drives. To do that I had to remove a registry entry detailed here (https://answers.microsoft.com/en-us/windows/forum/all/core-isolation-memory-integrity/50e9c061-80fb-4011-bc7a-6a7c36603aa5).
Hi,
I’ve tried your guide and many others however i’m stuck on 23h2.
I ran that command “setup /product server”, which then shows the prompt to run the setup. I click yes, then it does nothing. One time I was able to briefly see a small window opening and closing with the Windows logo but that’s it…
How can I proceed to update 23H2 to 24H2?
Hello,
A great article
However the process stopped .
mounted ISO is F:
in the powershell/admin ,after running the command setup /product server, I get the message
” The setup command can only be used inside a describe block ”
the operation stopped
Sugestion to proceed ?
Same to me, this via cmd worked for me:
1. Copy ISO local
2. Right click ISO and “open” with Explorer
3. Change in Explorer to new mounted ISO DVD (you see setup.exe)
4. Click in adress bar and type “cmd”
5. In cmd run “setup /product server”
I searched for a solution and found that if you want to upgrade Windows 11 to the latest version on unsupported hardware, you can do it using Rufus. Download the latest Win11 25h2 image from the MS website, take a USB flash drive, run Rufus. While creating the bootable USB flash drive, it will ask you if you want to use additional options, such as installing Win11 on unsupported hardware. Select what you need and create the USB flash drive. Then copy the contents of the USB flash drive to the machine you want to upgrade and run setup.exe. The installation will start, and within an hour, you’ll be enjoying the new version of Win11 on unsupported hardware.