
Zabbix is a monitoring tool which is widely used in all kinds of environments. Zabbix is very flexible, information can be retrieved using HTTP/SNMP or by installing a Zabbix agent on the machines to monitor, and allows a lot of customisation. Unfortunately this also means that the learning curve can be rather high. This post will go a little deeper into the installation process and the first steps in Zabbix.
Zabbix can be installed from most standard repositories in a variety of Linux distributions. For this post, I’m using CentOS 7 and I decided to use the official Zabbix repository to ensure that we’re using the latest version of Zabbix. Zabbix requires a database backend and for this post, I will use MariaDB (a fork of MySQL).
This post has been completely reviewed and updated where needed on 08/2017 to make sure everything is still working and is correct.
Add the Zabbix repository and install the packages
The first step is to enable the Zabbix official repository by creating a file in /etc/yum.repos.d:
[jensd@zab ~]$ sudo rpm -ivh http://repo.zabbix.com/zabbix/3.2/rhel/7/x86_64/zabbix-release-3.2-1.el7.noarch.rpm
Retrieving http://repo.zabbix.com/zabbix/3.2/rhel/7/x86_64/zabbix-release-3.2-1.el7.noarch.rpm
warning: /var/tmp/rpm-tmp.hhZ7PB: Header V4 RSA/SHA512 Signature, key ID a14fe591: NOKEY
Preparing...                          ################################# [100%]
Updating / installing...
   1:zabbix-release-3.2-1.el7         ################################# [100%]
The packages in the standard CentOS repositories have the version number in their name. (zabbix22 for version 2.2) so they will not conflict with the packages from the repository which we added.
To be sure, we can check if we really are installing the latest version:
[jensd@zab ~]$ sudo yum install yum-utils -y
...
Complete!
[jensd@zab ~]$ repoquery -qi zabbix-server-mysql
Name        : zabbix-server-mysql
Version     : 3.2.7
Release     : 1.el7
Architecture: x86_64
Size        : 4180813
Packager    : None
Group       : Applications/Internet
URL         : http://www.zabbix.com/
Repository  : Zabbix
Summary     : Zabbix server for MySQL or MariaDB database
Source      : zabbix-3.2.7-1.el7.src.rpm
Description :
Zabbix server with MySQL or MariaDB database support.
As you can see, the packages for Zabbix are for version 3.2.7 and it will be taken from the repository which we just added, named Zabbix.
Besides the Zabbix-repository, you will also need the EPEL repository for some dependencies. If you haven’t done so, add that repo too:
[jensd@zab ~]$ sudo yum install epel-release -y
...
Complete !
Now that we are sure that Yum has access to the correct packages, let’s install what is necessary:
[jensd@zab ~]$ sudo yum -y install zabbix-server-mysql zabbix-agent zabbix-web-mysql mysql mariadb-server httpd php
...
Complete !
Configure the database
After installing the packages, we need to initialise MariaDB and set the root password. Don’t get confused with all the references to MySQL in the commands below. MariaDB is a fork of MySQL and clearly branding wasn’t very high on the priority list :)
[jensd@zab ~]$ sudo systemctl start mariadb
[jesnd@zab ~]$ mysql_secure_installation
/usr/bin/mysql_secure_installation: line 379: find_mysql_client: command not found

NOTE: RUNNING ALL PARTS OF THIS SCRIPT IS RECOMMENDED FOR ALL MariaDB
      SERVERS IN PRODUCTION USE!  PLEASE READ EACH STEP CAREFULLY!

In order to log into MariaDB to secure it, we'll need the current
password for the root user.  If you've just installed MariaDB, and
you haven't set the root password yet, the password will be blank,
so you should just press enter here.

Enter current password for root (enter for none):
OK, successfully used password, moving on...

Setting the root password ensures that nobody can log into the MariaDB
root user without the proper authorisation.

Set root password? [Y/n] y
New password:
Re-enter new password:
Password updated successfully!
Reloading privilege tables..
 ... Success!


By default, a MariaDB installation has an anonymous user, allowing anyone
to log into MariaDB without having to have a user account created for
them.  This is intended only for testing, and to make the installation
go a bit smoother.  You should remove them before moving into a
production environment.

Remove anonymous users? [Y/n] y
 ... Success!

Normally, root should only be allowed to connect from 'localhost'.  This
ensures that someone cannot guess at the root password from the network.

Disallow root login remotely? [Y/n] y
 ... Success!

By default, MariaDB comes with a database named 'test' that anyone can
access.  This is also intended only for testing, and should be removed
before moving into a production environment.

Remove test database and access to it? [Y/n] y
 - Dropping test database...
 ... Success!
 - Removing privileges on test database...
 ... Success!

Reloading the privilege tables will ensure that all changes made so far
will take effect immediately.

Reload privilege tables now? [Y/n] y
 ... Success!

Cleaning up...

All done!  If you've completed all of the above steps, your MariaDB
installation should now be secure.

Thanks for using MariaDB!
Now that MariaDB is running and initialised, we can add a database for Zabbix, named zabbix, and create a user that has access to that DB. Use the root-password which you changed in the previous step when asked for a password and replace secretpassword with your own password for the zabbix database user.
[jensd@zab ~]$ mysql -u root -p
Enter password:
Welcome to the MariaDB monitor.  Commands end with ; or \g.
Your MariaDB connection id is 10
Server version: 5.5.52-MariaDB MariaDB Server

Copyright (c) 2000, 2016, Oracle, MariaDB Corporation Ab and others.

Type 'help;' or '\h' for help. Type '\c' to clear the current input statement.

MariaDB [(none)]> create database zabbix;
Query OK, 1 row affected (0.00 sec)

MariaDB [(none)]> grant all privileges on zabbix.* to zabbix@localhost identified by 'secretpassword';
Query OK, 0 rows affected (0.00 sec)

MariaDB [(none)]> flush privileges;
Query OK, 0 rows affected (0.00 sec)

MariaDB [(none)]> exit
Bye
Now that the database and user are ready, it’s time to create the database schema for Zabbix in the DB which we just added. The schema is delivered with Zabbix in /usr/share/doc/zabbix-server-mysql-<version>/create.sql.gz. (If you would install the packages from the standard repositories, the schema can be found in /usr/share/zabbix-mysql/.)
[jensd@zab ~]$ zcat /usr/share/doc/zabbix-server-mysql-3.2.7/create.sql.gz | mysql -u zabbix -p zabbix
Enter password:
Be aware that, for this post, I’m leaving the rest of the MariaDB configuration at it’s default. For a production environment you really need some tuning in MariaDB to optimise the database system. To do so, I recommend using Zabbix for a while and then use https://github.com/major/MySQLTuner-perl on a regular basis to tune the database parameters. This approach is very straightforward and delivers very good results with a minimal effort.
Configure the webserver
At this point, our database is ready so the next step is to configure the webserver (Apache) and PHP.
The default parameters of PHP need some tuning for Zabbix:
[jensd@zab ~]$ sudo sed -i 's/^max_execution_time.*/max_execution_time=600/' /etc/php.ini
[jensd@zab ~]$ sudo sed -i 's/^max_input_time.*/max_input_time=600/' /etc/php.ini
[jensd@zab ~]$ sudo sed -i 's/^memory_limit.*/memory_limit=256M/' /etc/php.ini
[jensd@zab ~]$ sudo sed -i 's/^post_max_size.*/post_max_size=32M/' /etc/php.ini
[jensd@zab ~]$ sudo sed -i 's/^upload_max_filesize.*/upload_max_filesize=16M/' /etc/php.ini
[jensd@zab ~]$ sudo sed -i "s/^\;date.timezone.*/date.timezone=\'Europe\/Brussels\'/" /etc/php.ini
The above commands just replace lines in /etc/php.ini by a line with the correct value. You can also edit the file by hand if you would like to.
Next up is Apache. The Yum-installation, created a file for Apache in /etc/httpd/conf.d/zabbix.conf. Edit this file to look similar to this:
#
# Zabbix monitoring system php web frontend
#

Alias /zabbix /usr/share/zabbix

<Directory "/usr/share/zabbix">
    Options FollowSymLinks
    AllowOverride None
    Require all granted
</Directory>

<Directory "/usr/share/zabbix/conf">
    Require all denied
</Directory>

<Directory "/usr/share/zabbix/include">
    Require all denied
</Directory>
Configure Zabbix parameters:
Next in the list, is the Zabbix configuration file for the server. It needs to know the password which we set for the zabbix database user earlier. Replace secretpassword with your own password which you set for the zabbix database user:
[jensd@zab ~]$ sudo sed -i 's/^# DBPassword=.*/DBPassword=secretpassword/' /etc/zabbix/zabbix_server.conf
In order to avoid some warnings like: “Less than 25% free in the configuration cache” or “Zabbix icmp pinger processes more than 75% busy”, set some more parameters in the file:
[jensd@zab ~]$ sudo sed -i 's/^# CacheSize=.*/CacheSize=32M/' /etc/zabbix/zabbix_server.conf
[jensd@zab ~]$ sudo sed -i 's/^# StartPingers=.*/StartPingers=5/' /etc/zabbix/zabbix_server.conf
Security considerations
Before we can really use Zabbix, we need to open up the firewall to allow access to the Apache webserver and the webinterface of Zabbix. I’m assuming that outgoing traffic is allowed, otherwise you also need to open up UDP 161 for SNMP and TCP 10050 for the Zabbix agent.
With firewalld:
[jensd@zab ~]$ sudo firewall-cmd --zone=public --add-port=80/tcp --permanent
success
[jensd@zab ~]$ sudo firewall-cmd --reload
success
With iptables:
[jensd@zab ~]$ sudo iptables -I INPUT -p tcp -m state --state NEW -m tcp --dport 80 -j ACCEPT
When using SELinux, we need to allow Apache to communicate with Zabbix:
[jensd@zab ~]$ sudo setsebool -P httpd_can_connect_zabbix=1
Start and initialize Zabbix
At this point, most of the configuration should be completed. The only thing that is left is to start the services related to Zabbix and finish the configuration by using the webinterface:
Start the services:
[jensd@zab ~]$ sudo systemctl start zabbix-agent
[jensd@zab ~]$ sudo systemctl start zabbix-server
[jensd@zab ~]$ sudo systemctl start httpd
At the time of writing, there was an issue with starting the Zabbix components in combination with SELinux on CentOS 7. This is being fixed but if you experience the following error:
[jensd@zab ~]$ tail -3 /var/log/zabbix/zabbix_agentd.log
  3381:20170801:132248.952 using configuration file: /etc/zabbix/zabbix_agentd.conf
  3381:20170801:132248.952 cannot set resource limit: [13] Permission denied
  3381:20170801:132248.952 cannot disable core dump, exiting...
[jensd@zab ~]$ tail -3 /var/log/zabbix/zabbix_server.log
  3717:20170801:132744.710 using configuration file: /etc/zabbix/zabbix_server.conf
  3717:20170801:132744.710 cannot set resource limit: [13] Permission denied
  3717:20170801:132744.710 cannot disable core dump, exiting..
The fix is as follows (more information on: https://support.zabbix.com/browse/ZBX-10542):
[jensd@zab ~]$ sudo yum install -y policycoreutils-python
...
Complete!
[jensd@zab ~]$ sudo cat /var/log/audit/audit.log | grep zabbix_agentd | grep denied | tail -1 | audit2allow -M zabbix_agent_resourcelimit
******************** IMPORTANT ***********************
To make this policy package active, execute:

semodule -i zabbix_agent_resourcelimit.pp

[jensd@zab ~]$ sudo semodule -i zabbix_agent_resourcelimit.pp
[jensd@zab ~]$ sudo systemctl start zabbix-agent
[jensd@zab ~]$ sudo cat /var/log/audit/audit.log | grep zabbix_server | grep denied | tail -1 | audit2allow -M zabbix_server_resourcelimit
******************** IMPORTANT ***********************
To make this policy package active, execute:

semodule -i zabbix_server_resourcelimit.pp

[jensd@zab ~]$ sudo semodule -i zabbix_server_resourcelimit.pp
[jensd@zab ~]$ sudo systemctl start zabbix-server
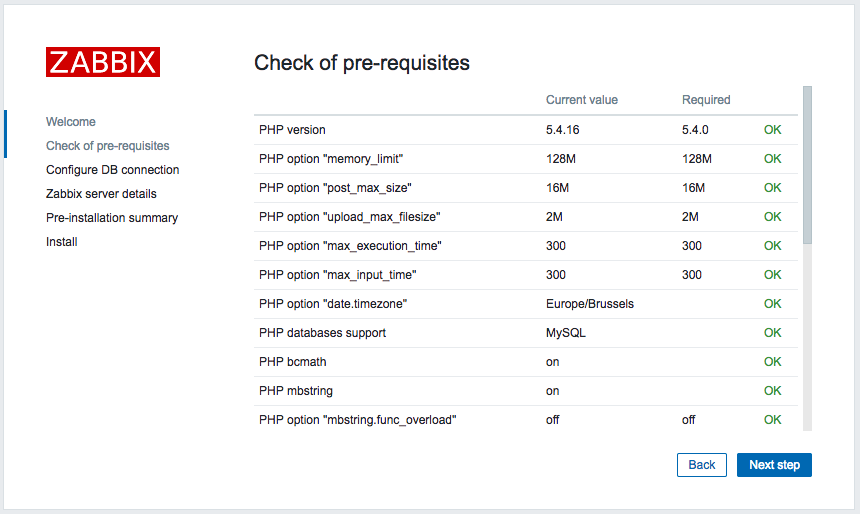
After starting the services, browse to the following URL: http://<ip or hostname>/zabbix (for example: http://192.168.202.101/zabbix). If all goes well, you should see something like this:

Click next and check if everything is marked with OK:
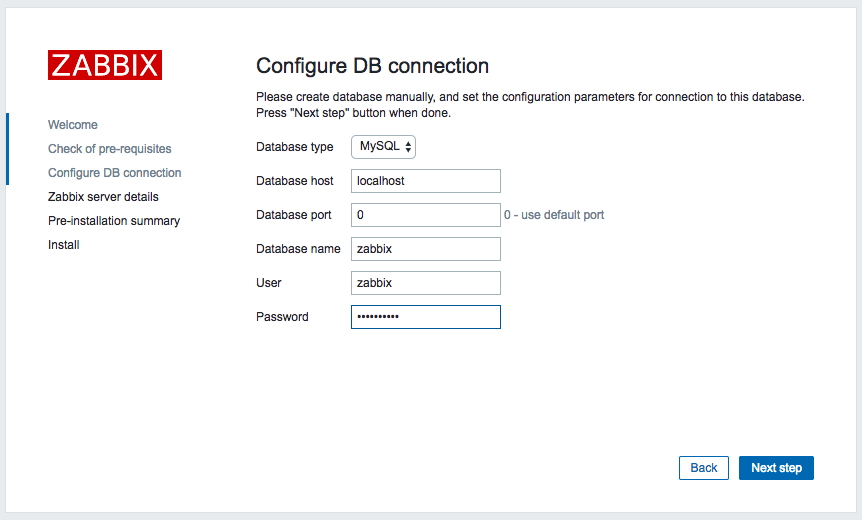
In the next step, enter the details about the MariaDB user which we created (named zabbix and password secretpassword):
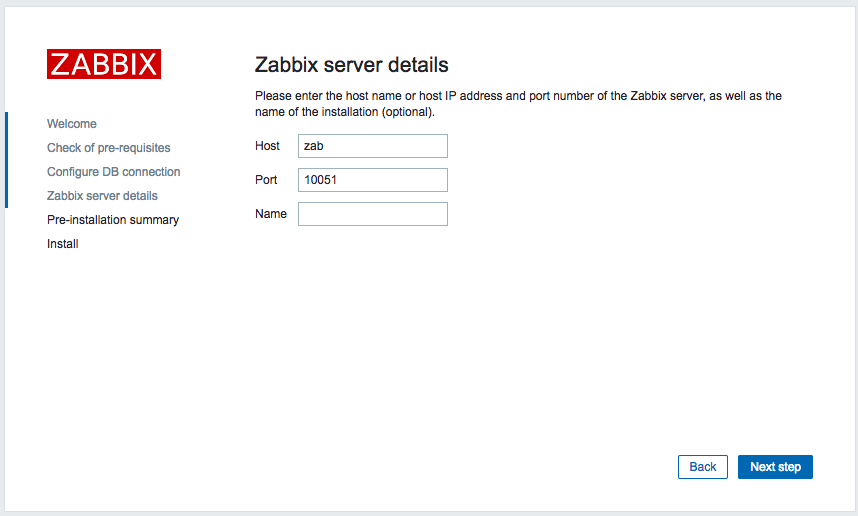
Continue to the next step and provide the desired hostname and instance name:
Go through the pre-installation summary and click next to end the installation:
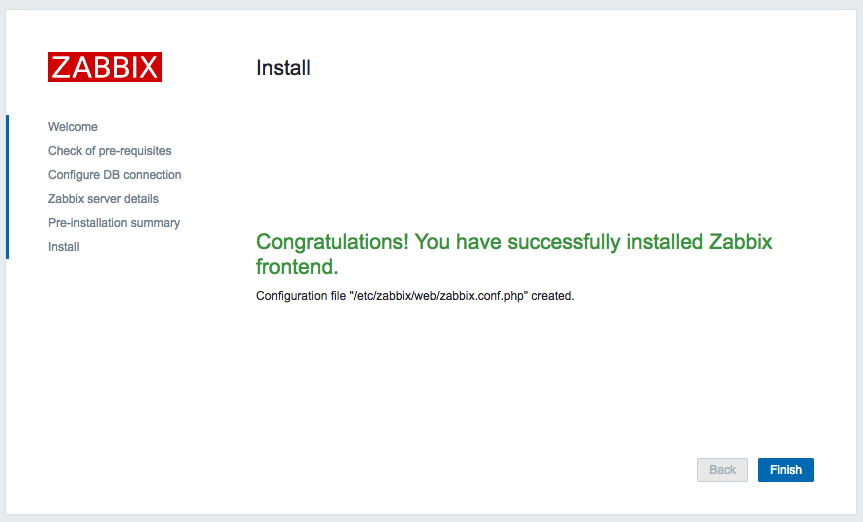
After clicking finish, you should see the login screen to your new Zabbix installation:
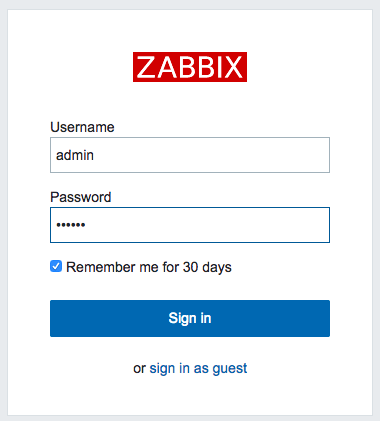
The default username is admin and the default password for that user is zabbix.
At this point the Zabbix server is ready to use.
Basic actions for hosts to monitor:
Now that we have our Zabbix server up and running, we need to have something to monitor. For several types of hosts, there is an agent available. The agent is listening for requests on TCP port 10050 so make sure that this port is open from the Zabbix server to the host to monitor
Install the Zabbix agent on Linux:
Unfortunately, the Zabbix-agent that is part of the base repositories is quite old (version 2.2) and you need to add the Zabbix repositories to the hosts where you would like to install the Zabbix agent.
First add the repositories:
[jensd@node ~]$ sudo rpm -ivh http://repo.zabbix.com/zabbix/3.2/rhel/7/x86_64/zabbix-release-3.2-1.el7.noarch.rpm
Retrieving http://repo.zabbix.com/zabbix/3.2/rhel/7/x86_64/zabbix-release-3.2-1.el7.noarch.rpm
warning: /var/tmp/rpm-tmp.hhZ7PB: Header V4 RSA/SHA512 Signature, key ID a14fe591: NOKEY
Preparing...                          ################################# [100%]
Updating / installing...
   1:zabbix-release-3.2-1.el7         ################################# [100%]
Next, install the agent:
[jensd@node ~]$ sudo yum install zabbix-agent -y
...
Complete!
After the installation, set the hostname of the Zabbix-server in /etc/zabbix/zabbix_agentd.conf to match your configuration. Replace 192.168.202.101 by the IP or hostname of your Zabbix-server:
[jensd@node ~]$ sudo sed -i 's/^Server=127.0.0.1/Server=192.168.202.101/g' /etc/zabbix/zabbix_agentd.conf
To disable the active checks, clear the value of the ServerActive parameter:
[jensd@node01 ~]$ sudo sed -i 's/^ServerActive=127.0.0.1/ServerActive=/g' /etc/zabbix/zabbix_agentd.conf
Enable the service and make it persistent:
[jensd@node01 ~]$ sudo systemctl start zabbix-agent
[jensd@node01 ~]$ sudo systemctl enable zabbix-agent
ln -s '/usr/lib/systemd/system/zabbix-agent.service' '/etc/systemd/system/multi-user.target.wants/zabbix-agent.service'
In case you’re having issues starting the Zabbix agent service, related to permissions for setting the resource limits, please refer to the provide fix above in the installation section for the Zabbix server (last part).
Install the Zabbix agent on Windows
To install the Zabbix agent on a Windows machine, you can find pre-compiled agents for most of the (popular) platforms on the Zabbix website: https://www.zabbix.com/download
The Zabbix 3.2 agent for Windows can be downloaded here: https://www.zabbix.com/downloads/3.2.0/zabbix_agents_3.2.0.win.zip
You can simply extract the archive and edit the following line in the file conf/zabbix_agentd.win.conf:
Server=<zabbix-server-hostname>
Replace it with the hostname or IP of your Zabbix server.
After changing zabbix_agentd.win.conf, you can run the following commands (or use them to create a batch file) to install the Zabbix agent as a service:
C:\zabbix_agents_3.2.0.win>cd bin\win64

C:\zabbix_agents_3.2.0.win\bin\win64>zabbix_agentd.e
xe --config ../../conf/zabbix_agentd.win.conf --install
zabbix_agentd.exe [5912]: service [Zabbix Agent] installed successfully
zabbix_agentd.exe [5912]: event source [Zabbix Agent] installed successfully

C:\zabbix_agents_3.2.0.win\bin\win64>net start "Zabb
ix Agent"
The Zabbix Agent service is starting.
The Zabbix Agent service was started successfully.
Enable snmp on Linux
Besides using the Zabbix agent, you can also monitor hosts using SNMP. SNMP isn’t always as fast and flexible as the agent but does the job. Also SNMP can be used for devices that can’t have an agent installed (like a switch):
Install the net-snmp package:
[jensd@node ~]$ sudo yum install net-snmp
...
Complete !
Create the snmpd.conf file in /etc/snmpd/snmpd.conf:
com2senm snmpuser default       public
group   snmpgroup v1          snmpuser
group   snmpgroup v2c          snmpuser
view    roview          included        .1
view    roview          included        system.sysContact
view    roview          included        system.sysName
view    roview          included        system.sysLocation
view    roview          included        interfaces.ifTable.ifEntry.ifAdminStatus
view    roview          included        at.atTable.atEntry.atPhysAddress
view    roview          included        at.atTable.atEntry.atNetAddress
view    roview          included        ip.ipForwarding
view    roview          included        ip.ipDefaultTTL
view    roview          included        ip.ipRouteTable.ipRouteEntry.ipRouteDest
view    roview          included        ip.ipRouteTable.ipRouteEntry.ipRouteIfIndex
view    roview          included        ip.ipRouteTable.ipRouteEntry.ipRouteMetric1
view    roview          included        ip.ipRouteTable.ipRouteEntry.ipRouteMetric2
view    roview          included        ip.ipRouteTable.ipRouteEntry.ipRouteMetric3
view    roview          included        ip.ipRouteTable.ipRouteEntry.ipRouteMetric4
view    roview          included        ip.ipRouteTable.ipRouteEntry.ipRouteType
view    roview          included        ip.ipRouteTable.ipRouteEntry.ipRouteAge
view    roview          included        ip.ipRouteTable.ipRouteEntry.ipRouteMask
view    roview          included        ip.ipRouteTable.ipRouteEntry.ipRouteMetric5
view    roview          included        ip.ipNetToMediaTable.ipNetToMediaEntry.ipNetToMediaIfIndex
view    roview          included        ip.ipNetToMediaTable.ipNetToMediaEntry.ipNetToMediaPhysAddress
view    roview          included        ip.ipNetToMediaTable.ipNetToMediaEntry.ipNetToMediaNetAddress
view    roview          included        ip.ipNetToMediaTable.ipNetToMediaEntry.ipNetToMediaType
view    roview          included        tcp.tcpConnTable.tcpConnEntry.tcpConnState
view    roview          included        egp.egpNeighTable.egpNeighEntry.egpNeighEventTrigger
view    roview          included        snmp.snmpEnableAuthenTraps
access  snmpgroup ""      any       noauth    exact  roview none none
syslocation Datacenter (edit /etc/snmp/snmpd.conf)
syscontact  Root <root@localhost> (configure /etc/snmp/snmp.local.conf)
dontLogTCPWrappersConnects yes
includeAllDisks 10%
The community string is set as public in the above file, change it to something else if you prefer to.
After configuring, start and enable the service:
[jensd@node ~]$ sudo systemctl start snmpd
[jensd@node ~]$ sudo systemctl enable snmpd
Add a host in Zabbix
After installing SNMP or a Zabbix agent on your systems, you can add them in Zabbix as follows:
Log on to the web interface by browsing to http://<ip or hostname>/zabbix (for example: http://192.168.202.101/zabbix) and log in.
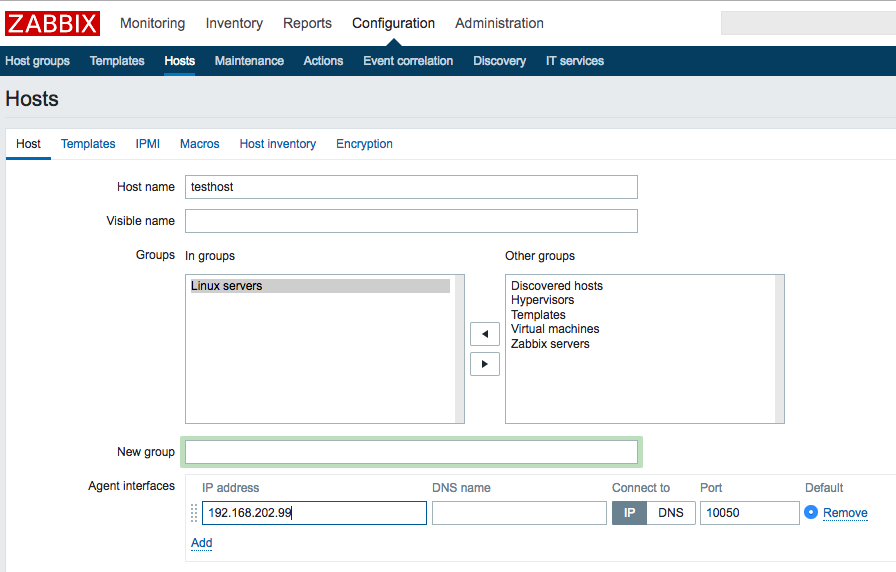
Go to Configuration – Hosts and click on “Create host”:

In the next screen, enter a host name, add the host to a group by selecting it on the right side and clicking <<.
When the host has the agent installed, enter the DNS-name or IP for the host in the Agent interfaces. For SNMP, remove the Agent interface and add an SNMP interface containing the same information.
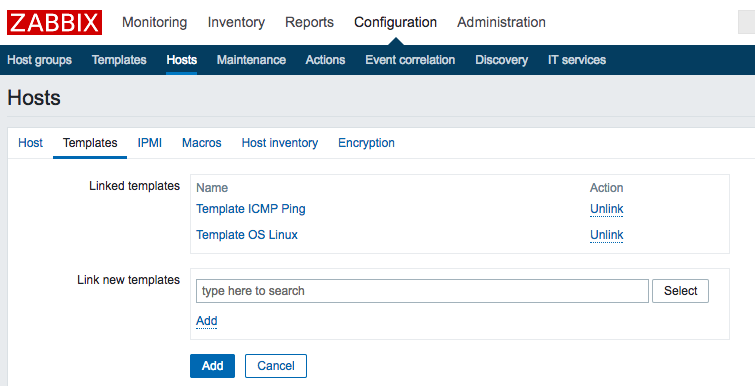
On the templates tab, add ICMP ping and a template that matches the host (for example “Template OS Linux” for a Linux host with a Zabbix agent or “Template SNMP OS Linux” for a Linux host with SNMP).
When using SNMP, you need to enter the community string which you have chose (public in my example above) on the Macros tab:
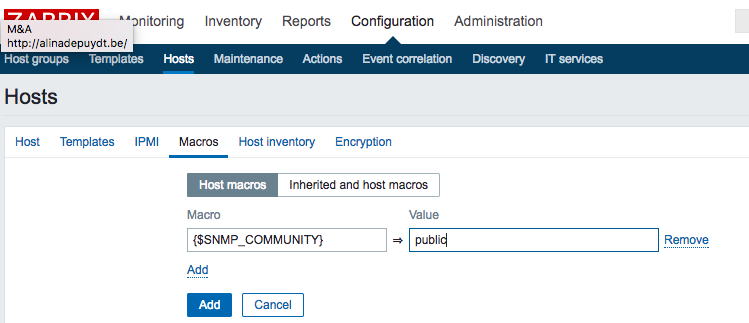
Finally click Add and the host should be monitored. Don’t panic if you don’t see information immediately give Zabbix some time to discover all items that are relevant for the host.
This should be all it takes to get started with Zabbix. Take some time to explore Zabbix’ functionality and experiment to discover all features.
Hello,
Dependencies are not downloadable…
[jensd@zab ~]$ sudo yum -y install zabbix-server-mysql zabbix-agent zabbix-web-mysql mysql mysql-server httpd php
.
Error: Package: zabbix-server-mysql-2.4.3-1.el7.x86_64 (Zabbix)
Requires: libiksemel.so.3()(64bit)
Error: Package: zabbix-server-2.4.3-1.el7.x86_64 (Zabbix)
Requires: iksemel
Error: Package: zabbix-server-2.4.3-1.el7.x86_64 (Zabbix)
Requires: fping >= 3
Those packages should be in EPEL, I forgot to mention that you need to add that repository too. I changed my post to include this.
Thanks for pointing this out.
An excellent and comprehensive post. Zabbix installs come with so many nuances and you covered them all. Great walkthrough!
hello,
command not run,
[root@localhost~]# sudo systemctl start mariadb
failed to issue method call: Unit mariadb.service failed to load; no such file or directory.
Did you succesfully install the mysql-server or mariadb packages?
You can check that with: [jensd@cen ~]$ rpm -qa|grep mariadb
Had the same problem, fixed this with :
yum update -y
yum install mariadb-server
Very great tutorial !!! Thank you
Hi,
Thanks for pointing this out, no idea why it worked correctly at the time of writing the post. I edited this.
Hi, you tutorial is great!
i follow step by step your tutorial but when i try to run zabbix in mozilla to my local server http://192.168.1.8/zabbix or http://localhost/zabbix we recive a error message
The requested URL /zabbix was not found on this server.
i don’t have any problem in the install process.
Can you help me?
Thanks you very much
Greeting from Chile.
Hi,
Are you sure that the webserver is running? Try a netstat -tlpn and look for port 80, check the output of systemctl status httpd or check the contents of /var/log/httpd/.
If the webserver is running, check if the file /etc/httpd/conf.d/zabbix.conf exists and that it isn’t a security-related problem (like SELinux or permissions on directories listed in /etc/httpd/conf.d/zabbix.conf).
You could try to temporary disable SELinux with setenforce 0
set the /etc/httpd/conf.d/zabbix.conf
from Alias /zabbix
to Alias zabbix
Best guide for fedora-21 with zabbix-2.2.8. Up and running now on 2nd attempt after wrestling with lesser guides.
Much thanks for a comprehensive zabbix installation tutorial.
I have done zabbix installation, but I got error Zabbix server is not running: The information display may not be current.
This is probably related to SELinux. Did you run sudo setsebool -P httpd_can_connect_zabbix=1 ? Can you try to (temporarily) turn of SELinux and try again?
Thanks for the great tech note. It worked like a sharm.
The install went without issue. However using Zabbix 2.4.4, I receive the following error when starting the Zabbix Server for the first time:
Process: 14313 ExecStart=/usr/sbin/zabbix_server -c $CONFFILE (code=killed, signal=SEGV)
CGroup: /system.slice/zabbix-server.service
└─14316 /usr/sbin/zabbix_server -c /etc/zabbix/zabbix_server.conf
I have created a second virtual machine and run the install a second time and received the same result so at least what I am doing is consistent.
Thanks for the help.
Steve
I install zabbix but I receive the following error:
[root@srv-nms02 /]# systemctl start zabbix-server
Job for zabbix-server.service failed. See ‘systemctl status zabbix-server.service’ and ‘j
ournalctl -xn’ for details.
[root@srv-nms02 /]# systemctl status zabbix-server.service
zabbix-server.service – Zabbix Server
Loaded: loaded (/usr/lib/systemd/system/zabbix-server.service; disabled)
Active: failed (Result: start-limit) since Tue 2015-04-07 00:54:14 CEST; 6s ago
Process: 13940 ExecStart=/usr/sbin/zabbix_server -c $CONFFILE (code=killed, signal=SEGV
)
Apr 07 00:54:14 srv-nms02 systemd[1]: Failed to start Zabbix Server.
Apr 07 00:54:14 srv-nms02 systemd[1]: Unit zabbix-server.service entered failed state.
Apr 07 00:54:14 srv-nms02 systemd[1]: zabbix-server.service holdoff time over, sche…rt.
Apr 07 00:54:14 srv-nms02 systemd[1]: Stopping Zabbix Server…
Apr 07 00:54:14 srv-nms02 systemd[1]: Starting Zabbix Server…
Apr 07 00:54:14 srv-nms02 systemd[1]: zabbix-server.service start request repeated …rt.
Apr 07 00:54:14 srv-nms02 systemd[1]: Failed to start Zabbix Server.
Apr 07 00:54:14 srv-nms02 systemd[1]: Unit zabbix-server.service entered failed state.
Hint: Some lines were ellipsized, use -l to show in full.
[root@srv-nms02 /]# journalctl -xn
— Logs begin at Thu 2015-04-02 12:49:28 CEST, end at Tue 2015-04-07 00:55:16 CEST. —
Apr 07 00:55:16 srv-nms02 systemd[1]: zabbix-server.service: control process exited, code
Apr 07 00:55:16 srv-nms02 systemd[1]: Failed to start Zabbix Server.
— Subject: Unit zabbix-server.service has failed
— Defined-By: systemd
— Support: http://lists.freedesktop.org/mailman/listinfo/systemd-devel
—
— Unit zabbix-server.service has failed.
—
— The result is failed.
Apr 07 00:55:16 srv-nms02 systemd[1]: Unit zabbix-server.service entered failed state.
Apr 07 00:55:16 srv-nms02 kernel: zabbix_server[13998]: segfault at 18 ip 00007ff445c9bc0
Apr 07 00:55:16 srv-nms02 systemd[1]: zabbix-server.service holdoff time over, scheduling
Apr 07 00:55:16 srv-nms02 systemd[1]: Stopping Zabbix Server…
— Subject: Unit zabbix-server.service has begun shutting down
— Defined-By: systemd
— Support: http://lists.freedesktop.org/mailman/listinfo/systemd-devel
—
— Unit zabbix-server.service has begun shutting down.
Apr 07 00:55:16 srv-nms02 systemd[1]: Starting Zabbix Server…
— Subject: Unit zabbix-server.service has begun with start-up
— Defined-By: systemd
— Support: http://lists.freedesktop.org/mailman/listinfo/systemd-devel
—
— Unit zabbix-server.service has begun starting up.
Apr 07 00:55:16 srv-nms02 systemd[1]: zabbix-server.service start request repeated too qu
Apr 07 00:55:16 srv-nms02 systemd[1]: Failed to start Zabbix Server.
— Subject: Unit zabbix-server.service has failed
— Defined-By: systemd
— Support: http://lists.freedesktop.org/mailman/listinfo/systemd-devel
—
— Unit zabbix-server.service has failed.
—
— The result is failed.
Apr 07 00:55:16 srv-nms02 systemd[1]: Unit zabbix-server.service entered failed
can you hel me?
Thx
Coud you check the contents of /var/log/zabbix/zabbix_server.log?
CentOS 7 VS zabbix-2.4.4-1.el7.
Revert.
#> yum downgrade gnutls-3.1.18-10.el7_0.x86_64.rpm
The problem is gnutls.
I used gnutls-3.1.18-10.el7_0.x86_64.rpm version and working properly.
[root@srv-nms02 /]# systemctl status zabbix-server.service
zabbix-server.service – Zabbix Server
Loaded: loaded (/usr/lib/systemd/system/zabbix-server.service; disabled)
Active: active (running) since Wed 2015-04-08 09:47:20 CEST; 2min 6s ago
Process: 7496 ExecStart=/usr/sbin/zabbix_server -c $CONFFILE (code=exited, status=0/SUCCESS)
Main PID: 7498 (zabbix_server)
I tried to downgrade the gnutls and I get error saying “no package gnutls-3.1.18-10.el7_0.x86_64.rpm available”…. please help on how to get this correct package downloaded so I can start Zabbix server on centOS 7. Thanks.
I too struggled with the CentOS 7 install and gnutls. Here’s what I had to do:
1. Get the CentOS 7 DVD or Everything iso and mount it in /media/CentOS. Make
sure you can list the contents.
2. Create a .repo file in /etc/yum.repos.d. Call it something like local.repo. It should
contain the following:
[LocalRepo]
name=Local Repository
baseurl=file:///media/CentOS
enabled=1
gpgcheck=1
gpgkey=file:///etc/pki/rpm-gpg/RPM-GPG-KEY-CentOS-7
3. As sudo, do: yum downgrade gnutls and it should respond with something like:
Resolving Dependencies
–> Running transaction check
—> Package gnutls.x86_64 0:3.1.18-10.el7_0 will be a downgrade
—> Package gnutls.x86_64 0:3.3.8-12.el7 will be erased
…
4. Disable the local repo by setting enabled=0 in your local.repo from #2 above.
After a lot of googling and head scratching, this worked for me. Hope it helps
someone else.
Good luck.
Oops! I forgot. Put this in /etc/yum.conf:
exclude=gnutls
If you dont (I didn’t:-0), gnutls will be upgraded to the non-usable one.
By the way Jens, this is probably one of the most helpful posts I’ve seen to date. Thank you for sharing.
Hello I tried following your step by step installation for zabix.
I am stuck here :
[root@src-install-01 ~]# sudo yum -y install zabbix-server-mysql zabbix-web-mysql mysql mariadb-server httpd php
Error: Package: zabbix-web-2.4.5-1.el7.noarch (zabbix)
Requires: php >= 5.3
Error: Package: zabbix-web-2.4.5-1.el7.noarch (zabbix)
Requires: php-gd
Error: Package: zabbix-web-mysql-2.4.5-1.el7.noarch (zabbix)
Requires: php-mysql
Error: Package: zabbix-web-2.4.5-1.el7.noarch (zabbix)
Requires: php-mbstring
Error: Package: zabbix-web-2.4.5-1.el7.noarch (zabbix)
Requires: php-xml
Error: Package: zabbix-web-2.4.5-1.el7.noarch (zabbix)
Requires: dejavu-sans-fonts
Error: Package: zabbix-web-2.4.5-1.el7.noarch (zabbix)
Requires: php-bcmath
Please help.
Hi, these missing packages are part of the standard CentOS 7 Base and update repositories so my guess is that something’s wrong with your repo configuration.
You could try to verify the files in /etc/yum.repos.d or do a yum clean all to be sure.
cat > /etc/yum.repos.d/zabbix.repo <<!EOF
[Zabbix]
name=Zabbix
baseurl=http://repo.zabbix.com/zabbix/2.4/rhel/7/x86_64/
gpgcheck=1
gpgkey=http://repo.zabbix.com/zabbix-official-repo.key
EOF
now it is “/usr/share/doc/zabbix-server-mysql-2.4.5/create/”,use * is ok:
/usr/share/doc/zabbix-server-mysql-*/create/
This depends of the version of Zabbix that gets installed. I can’t update this post for every new version :)
I’ve tried using CentOS 7.0 DVD but those files seem to have been updated too. I finally downloaded them from PBONE:
http://rpm.pbone.net/index.php3/stat/4/idpl/27966545/dir/centos_7/com/gnutls-3.1.18-10.el7_0.x86_64.rpm.html
http://rpm.pbone.net/index.php3/stat/4/idpl/27937206/dir/scientific_linux_7/com/gnutls-dane-3.1.18-10.el7_0.x86_64.rpm.html
http://rpm.pbone.net/index.php3/stat/4/idpl/27937209/dir/scientific_linux_other/com/gnutls-utils-3.1.18-10.el7_0.x86_64.rpm.html
Regards,
Hi,
Using all the incredible information in this post I have been able to install and configure Zabbix 2.4.5 on CentOS 7.0. Thanks everyone. I tried CentOS 7.0 as I too was having trouble with gnutls and couldn’t resolve it and for now want to get up and running with Zabbix to trail and learn Zabbix.
However, when I restart my server Mariadb, Zabbix-Server, and Httpd don’t seem to have automatically started. If I go to terminal and enter the start commands listed in this post I can then connect to Zabbix. I struggle a bit with Linux. Could someone point me in the right direction to have these services automatically start after a server reboot. I don’t think I missed anything in the post as I have now been through it many times to get this far.
Any help would be appreciated,
Many thanks
John
Hi,
You can enable the services (start on boot) as follows:
[jensd@zab ~]$ sudo systemctl enable zabbix-agent
[jensd@zab ~]$ sudo systemctl enable zabbix-server
[jensd@zab ~]$ sudo systemctl enable httpd
I forgot to mention this in my post.
centos 7 use zabbix-server-pgsql is ok. would you please write a document about zabbix with postgresql backend on centos7.thanks
Hi,
I know that Zabbix works fine with PostgreSQL too. It’s not a big difference from the setup in this post but I don’t plan to especially write it.
i followed all step, it doesn’t work fine for me.
i used centOS server, on the server i have created three folder on var/www
name.folder.com , name2.folder.com , name3.folder.com
i wanted to create zabbix inside the name3.folder.com
so i created zabbix folder inside name3.folder.com, which mean when access name3.folder.com/zabbix will point open up the zabbix interface.
please advice me how to do it..
Appreciate that if you could guild me.
You’ll have to adjust your Apache config in /etc/httpd/ to add an alias for name3.folder.com/zabbix. You’ll need to point it to the same directory as in “/etc/httpd/conf.d/zabbix.conf” (/usr/share/zabbix)
i followed all the step except SELinux. It doesn’t work for me.
should i enable SELinux or anyway to solve this?
Looking forward to get the answer soon..
Thank you
Either you need to execute the steps listed in the post to allow certain SELinux restrictions or disable SELinux completely.
Thanks for the guide, comprehensive & well planned.
for zabbix-server does not start” problem if you cannot downgrade gnutls package try upgrading trousers package , find the newer one related to your distribution from rpmfind website and update it with rpm -Uvh package it solved my problem.
Thanks!
Job for zabbix-server.service failed. See ‘systemctl status zabbix-server.service’ and ‘journalctl -xn’ for details.
i need help with this
This was very helpful. Thank you!
Quick question. when I restart the CentOS machine Zabbix doesn’t automatically load. Even after I give it the commands to start the Zabbix server I still cannot connect. Could it be that I need to start MariaDB?
I think I forgot to mention this in my post but you should enable the following services to start at boot:
$ systemctl enable httpd
$ systemctl enable zabbix-server
$ systemctl enable zabbix-agent
$ systemctl enable mariadb
Just wanted to say thanks for a fantastic article that really saved me a whole bunch of time!!!
Great work, thank you.
Wow, thanks for that!! I had installed it before on Centos 6.5 and the first time was a real pain. Wanted to try on 7 and found this post. Worked like a charm
Great job.. Its working fine
very thanks
great job!
Thanks. this post helped me a lot.
Great Post
Dear all,
How are you all? I am facing a problem during configuration of zabbix 3.0 in my rhel7.2
I have configured all the steps of zabbix 3.0 but when i tried to start the zabbix-server there is an error message shown that is
“Job for zabbix-server.service failed because the control process exited with error code. See “systemctl status zabbix-server.service” and “journalctl -xe” for details.”
systemctl status zabbix-server -l
● zabbix-server.service – Zabbix Server
Loaded: loaded (/usr/lib/systemd/system/zabbix-server.service; enabled; vendor preset: disabled)
Active: activating (auto-restart) (Result: exit-code) since Sun 2016-04-17 20:18:03 BDT; 909ms ago
Process: 17817 ExecStart=/usr/sbin/zabbix_server -c $CONFFILE (code=exited, status=127)
Apr 17 20:18:03 rhel7 systemd[1]: Failed to start Zabbix Server.
Apr 17 20:18:03 rhel7 systemd[1]: Unit zabbix-server.service entered failed state.
Apr 17 20:18:03 rhel7 systemd[1]: zabbix-server.service failed
can anyone help me to find out the problem,thnx in advance
Hi,
I have included the fix for this issue in the post.
Here’s a summary:
[jensd@zab ~]$ sudo yum install -y policycoreutils-python
…
Complete!
[jensd@zab ~]$ sudo cat /var/log/audit/audit.log | grep zabbix_agentd | grep denied | tail -1 | audit2allow -M zabbix_agent_resourcelimit
******************** IMPORTANT ***********************
To make this policy package active, execute:
semodule -i zabbix_agent_resourcelimit.pp
[jensd@zab ~]$ sudo semodule -i zabbix_agent_resourcelimit.pp
[jensd@zab ~]$ sudo systemctl start zabbix-agent
[jensd@zab ~]$ sudo cat /var/log/audit/audit.log | grep zabbix_server | grep denied | tail -1 | audit2allow -M zabbix_server_resourcelimit
******************** IMPORTANT ***********************
To make this policy package active, execute:
semodule -i zabbix_server_resourcelimit.pp
[jensd@zab ~]$ sudo semodule -i zabbix_server_resourcelimit.pp
[jensd@zab ~]$ sudo systemctl start zabbix-server
Hi All,
Please review the below error when installing mysql and advice.
[root@xxxxxx home]# yum -y install zabbix-server-mysql zabbix-agent zabbix-web-mysql mysql mariadb-server httpd php
Loaded plugins: langpacks, product-id, rhnplugin, search-
: disabled-repos, subscription-manager
This system is receiving updates from RHN Classic or Red Hat Satellite.
BI_AMBARI-2.2.0 | 2.9 kB 00:00
IOP-4.2 | 2.9 kB 00:00
IOP-UTILS-1.2 | 2.9 kB 00:00
elasticsearch-5.x | 1.3 kB 00:00
epel/x86_64/metalink | 6.6 kB 00:00
kibana-5.x | 1.3 kB 00:00
logstash-5.x | 1.3 kB 00:00
rhel-x86_64-server-7 | 1.5 kB 00:00
Resolving Dependencies
–> Running transaction check
—> Package httpd.x86_64 0:2.4.6-40.el7_2.4 will be updated
–> Processing Dependency: httpd = 2.4.6-40.el7_2.4 for package: httpd-devel-2.4.6-40.el7_2.4.x86_64
–> Processing Dependency: httpd = 2.4.6-40.el7_2.4 for package: 1:mod_ssl-2.4.6-40.el7_2.4.x86_64
—> Package httpd.x86_64 0:2.4.6-67.el7_4.2 will be an update
–> Processing Dependency: httpd-tools = 2.4.6-67.el7_4.2 for package: httpd-2.4.6-67.el7_4.2.x86_64
—> Package mariadb.x86_64 1:5.5.56-2.el7 will be installed
–> Processing Dependency: mariadb-libs(x86-64) = 1:5.5.56-2.el7 for package: 1:mariadb-5.5.56-2.el7.x86_64
—> Package mariadb-server.x86_64 1:5.5.56-2.el7 will be installed
–> Processing Dependency: perl-DBD-MySQL for package: 1:mariadb-server-5.5.56-2.el7.x86_64
—> Package php.x86_64 0:5.4.16-42.el7 will be installed
–> Processing Dependency: php-cli(x86-64) = 5.4.16-42.el7 for package: php-5.4.16-42.el7.x86_64
–> Processing Dependency: php-common(x86-64) = 5.4.16-42.el7 for package: php-5.4.16-42.el7.x86_64
—> Package zabbix-agent.x86_64 0:3.0.10-1.el7 will be installed
—> Package zabbix-server-mysql.x86_64 0:3.0.10-1.el7 will be installed
–> Processing Dependency: fping for package: zabbix-server-mysql-3.0.10-1.el7.x86_64
–> Processing Dependency: libiksemel.so.3()(64bit) for package: zabbix-server-mysql-3.0.10-1.el7.x86_64
–> Processing Dependency: libOpenIPMIposix.so.0()(64bit) for package: zabbix-server-mysql-3.0.10-1.el7.x86_64
–> Processing Dependency: libOpenIPMI.so.0()(64bit) for package: zabbix-server-mysql-3.0.10-1.el7.x86_64
—> Package zabbix-web-mysql.noarch 0:3.0.10-1.el7 will be installed
–> Processing Dependency: zabbix-web = 3.0.10-1.el7 for package: zabbix-web-mysql-3.0.10-1.el7.noarch
–> Processing Dependency: php-mysql for package: zabbix-web-mysql-3.0.10-1.el7.noarch
–> Running transaction check
—> Package OpenIPMI-libs.x86_64 0:2.0.19-15.el7 will be installed
–> Processing Dependency: OpenIPMI-modalias = 2.0.19-15.el7 for package: OpenIPMI-libs-2.0.19-15.el7.x86_64
—> Package fping.x86_64 0:3.10-4.el7 will be installed
—> Package httpd-devel.x86_64 0:2.4.6-40.el7_2.4 will be updated
—> Package httpd-devel.x86_64 0:2.4.6-67.el7_4.2 will be an update
—> Package httpd-tools.x86_64 0:2.4.6-40.el7_2.4 will be updated
—> Package httpd-tools.x86_64 0:2.4.6-67.el7_4.2 will be an update
—> Package iksemel.x86_64 0:1.4-6.el7 will be installed
—> Package mariadb-libs.x86_64 1:5.5.50-1.el7_2 will be updated
–> Processing Dependency: mariadb-libs(x86-64) = 1:5.5.50-1.el7_2 for package: 1:mariadb-devel-5.5.50-1.el7_2.x86_64
—> Package mariadb-libs.x86_64 1:5.5.56-2.el7 will be an update
—> Package mod_ssl.x86_64 1:2.4.6-40.el7_2.4 will be updated
—> Package mod_ssl.x86_64 1:2.4.6-67.el7_4.2 will be an update
–> Processing Dependency: libcrypto.so.10(OPENSSL_1.0.2)(64bit) for package: 1:mod_ssl-2.4.6-67.el7_4.2.x86_64
—> Package perl-DBD-MySQL.x86_64 0:4.023-5.el7 will be installed
—> Package php-cli.x86_64 0:5.4.16-42.el7 will be installed
—> Package php-common.x86_64 0:5.4.16-42.el7 will be installed
–> Processing Dependency: libzip.so.2()(64bit) for package: php-common-5.4.16-42.el7.x86_64
—> Package php-mysql.x86_64 0:5.4.16-42.el7 will be installed
–> Processing Dependency: php-pdo(x86-64) = 5.4.16-42.el7 for package: php-mysql-5.4.16-42.el7.x86_64
—> Package zabbix-web.noarch 0:3.0.10-1.el7 will be installed
–> Processing Dependency: php-gd for package: zabbix-web-3.0.10-1.el7.noarch
–> Processing Dependency: php-mbstring for package: zabbix-web-3.0.10-1.el7.noarch
–> Processing Dependency: php-bcmath for package: zabbix-web-3.0.10-1.el7.noarch
–> Processing Dependency: php-ldap for package: zabbix-web-3.0.10-1.el7.noarch
–> Processing Dependency: php-xml for package: zabbix-web-3.0.10-1.el7.noarch
–> Running transaction check
—> Package OpenIPMI-modalias.x86_64 0:2.0.19-15.el7 will be installed
—> Package libzip.x86_64 0:0.10.1-8.el7 will be installed
—> Package mariadb-devel.x86_64 1:5.5.50-1.el7_2 will be updated
—> Package mariadb-devel.x86_64 1:5.5.56-2.el7 will be an update
—> Package openssl-libs.x86_64 1:1.0.1e-51.el7_2.5 will be updated
–> Processing Dependency: openssl-libs(x86-64) = 1:1.0.1e-51.el7_2.5 for package: 1:openssl-1.0.1e-51.el7_2.5.x86_64
–> Processing Dependency: openssl-libs(x86-64) = 1:1.0.1e-51.el7_2.5 for package: 1:openssl-devel-1.0.1e-51.el7_2.5.x86_64
—> Package openssl-libs.x86_64 1:1.0.2k-8.el7 will be an update
—> Package php-gd.x86_64 0:5.4.16-42.el7 will be installed
–> Processing Dependency: libt1.so.5()(64bit) for package: php-gd-5.4.16-42.el7.x86_64
—> Package php-ldap.x86_64 0:5.4.16-42.el7 will be installed
—> Package php-pdo.x86_64 0:5.4.16-42.el7 will be installed
—> Package php-xml.x86_64 0:5.4.16-42.el7 will be installed
—> Package zabbix-web.noarch 0:3.0.10-1.el7 will be installed
–> Processing Dependency: php-mbstring for package: zabbix-web-3.0.10-1.el7.noarch
–> Processing Dependency: php-bcmath for package: zabbix-web-3.0.10-1.el7.noarch
–> Running transaction check
—> Package openssl.x86_64 1:1.0.1e-51.el7_2.5 will be updated
—> Package openssl.x86_64 1:1.0.2k-8.el7 will be an update
—> Package openssl-devel.x86_64 1:1.0.1e-51.el7_2.5 will be updated
—> Package openssl-devel.x86_64 1:1.0.2k-8.el7 will be an update
—> Package t1lib.x86_64 0:5.1.2-14.el7 will be installed
—> Package zabbix-web.noarch 0:3.0.10-1.el7 will be installed
–> Processing Dependency: php-mbstring for package: zabbix-web-3.0.10-1.el7.noarch
–> Processing Dependency: php-bcmath for package: zabbix-web-3.0.10-1.el7.noarch
–> Finished Dependency Resolution
Error: Package: zabbix-web-3.0.10-1.el7.noarch (zabbix)
Requires: php-mbstring
Error: Package: zabbix-web-3.0.10-1.el7.noarch (zabbix)
Requires: php-bcmath
You could try using –skip-broken to work around the problem
You could try running: rpm -Va –nofiles –nodigest
Pingback: Zabbix richtig unter CentOS 7 installieren
my error like this can help solved this thanks
warning: zabbix-agent-3.0.10-1.el7.x86_64.rpm: Header V4 DSA/SHA1 Signature, key ID 79ea5ed4: NOKEY
error: Failed dependencies:
libc.so.6(GLIBC_2.14)(64bit) is needed by zabbix-agent-3.0.10-1.el7.x86_64
libc.so.6(GLIBC_2.17)(64bit) is needed by zabbix-agent-3.0.10-1.el7.x86_64
systemd is needed by zabbix-agent-3.0.10-1.el7.x86_64
[root@crawler-papp1 tmp]# rpm -uvh zabbix-agent-3.0.10-1.el7.x86_64.rpm
-uvh: unknown option
[root@crawler-papp1 tmp]# rpm -Uvh zabbix-agent-3.0.10-1.el7.x86_64.rpm
warning: zabbix-agent-3.0.10-1.el7.x86_64.rpm: Header V4 DSA/SHA1 Signature, key ID 79ea5ed4: NOKEY
error: Failed dependencies:
libc.so.6(GLIBC_2.14)(64bit) is needed by zabbix-agent-3.0.10-1.el7.x86_64
libc.so.6(GLIBC_2.17)(64bit) is needed by zabbix-agent-3.0.10-1.el7.x86_64
systemd is needed by zabbix-agent-3.0.10-1.el7.x86_64
Sir I am trying to install this ZABBIX on RHEL 7.2
libiksemel.so.3()(64bit)
libcrypto.so.10(open ssl_1.0.2)(64bit)
php_composer(fedora/autoloader)
can you help me out ,because these rpm are not available anywhere sir.