
Besides using NAT for accessing the internet with multiple machines using a single IP address, there are many other uses of NAT. One of them is to forward all traffic that is sent to a certain TCP port to another host. In practice, this technique can be used to test a service on a new host without adjusting anything on the client. The users or the clients do not need to be pointed to a new machine in order to test it. When the test would be unsuccessful, removing the NAT-rule is all it takes to switch back.
This article is an updated version of my previous post which describes the same using iptables. Since most major distributions switched to nftables instead, I decided to rewrite this completely. Debian has nftables since Debian 10 (Buster) and CentOS and RHEL since version 8. Ubuntu also very recently, since 20.10 (Groovy Gorilla), moved to nftables.
Youtube Video
If you are interested, I also created a YouTube video from this blogpost. If you prefer classic text, you can just follow the rest of this article:
Theoretical explanation
The above scenario is better known as port forwarding and it allows you to forward an incoming packet to another destination. That destination can be another port, IP-address or a combination of both.
Regular situation:
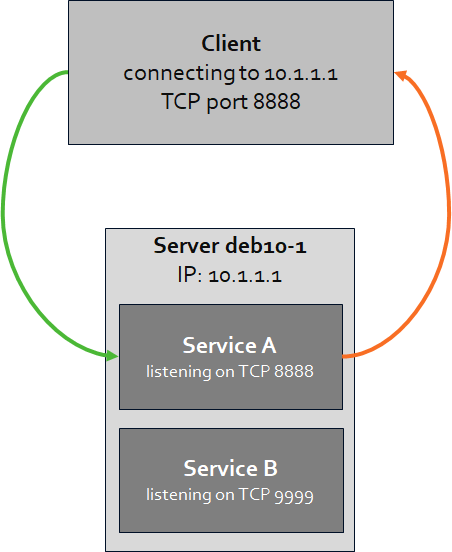
In a regular situation, when a client connects to a certain IP (10.1.1.1, owned by server deb10-1) to a certain port (TCP 8888), it will reach the service A listening on that same IP and port. That service will then reply to the incoming packet and the response flows back in the reverse way.
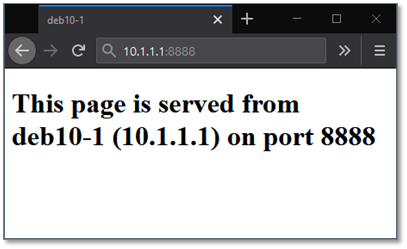
The result of this situation, if we use a browser contacting a listening webservice on 10.1.1.1, port 8888, would be as follows on the client. The page displayed is served by service A.
Situation with NAT/port forwarding:
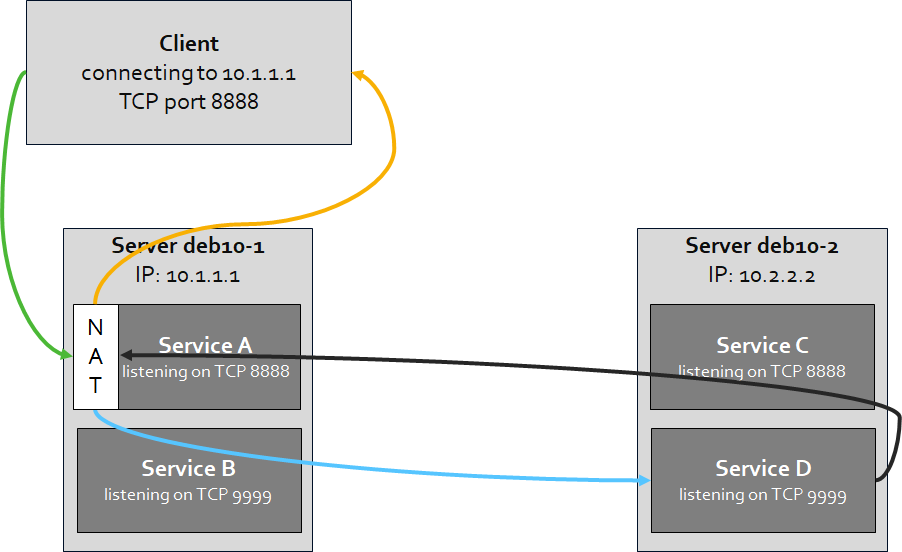
In the situation where we apply a port forward with NAT, we will forward the traffic to another service or server without the need to change anything on the client. For example, instead of having service A on deb10-1 to reply, we will let service D on deb10-2 reply. When the destination (10.1.1.1) receives incoming traffic on TCP port 8888, it will route/forward that traffic to deb10-2 (10.2.2.2) on TCP port 9999 instead. As a result, service D sends a reply back and the NAT-configuration on deb10-1 makes sure that the reply ends back properly with the client.
The result of this situation, if we use a browser contacting a listening webservice on 10.1.1.1, port 8888, would be as follows on the client. The page displayed is served by service D.

In this situation there is no direct communication between deb10-2 and the client and there is also no need to have service A still active. There isn’t even a need for the client to be able to reach host 10.2.2.2 from a network perspective.
To completely understand this process, we need to take a deeper look into how nftables works. When a packet passes through nftables , it passes a set of chains. Decisions made by those chains are called rules and that’s basically how you configure nftables.
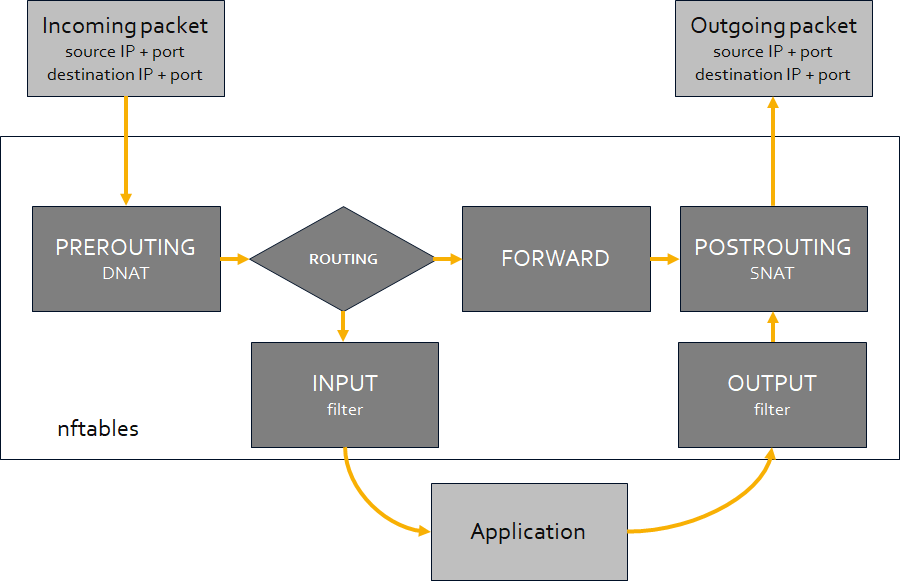
For this setup to work, we need to add prerouting and postrouting rules to nftables. The first one, prerouting, will make sure that the packet gets routed to the other host/port (ip: 10.2.2.2, port 9999). The second, postrouting, will make sure that the source address of the packet is no longer the original one but the one of the machine who performed the NAT. So, the return packet from deb10-2 (10.2.2.2) will be sent back to the client via the host which performed NAT (10.1.1.1).
Preparation
Most commands can be used on CentOS, RHEL, Ubuntu and Debian in exactly the same way. If there are some differences, I mention them (so if nothing special is mentioned, the commands are interchangeable).
Firewalld and UFW (Uncomplicated Firewall)
Both Debian/Ubuntu and CentOS/RHEL come with a tool that manages the configuration of nftables in a simpler, more friendly way. For CentOS/RHEL, since version 7, that is firewalld and Debian and Ubuntu have UFW. Although these tools do what they are made for, I’m not a big fan of them as, to my idea, they can easily confuse you and only get in the way as soon as you want something more “special”.
Since they are simply a frontend for the real firewall module, iptables or nftables, you can disable the tool and manage nftables directly.
For CentOS or RHEL:
[jensd@cen8 ~]$ sudo systemctl stop firewalld
[jensd@cen8 ~]$ sudo systemctl disable firewalld
Removed /etc/systemd/system/multi-user.target.wants/firewalld.service.
Removed /etc/systemd/system/dbus-org.fedoraproject.FirewallD1.service.
[jensd@cen8 ~]$ sudo systemctl mask --now firewalld
Created symlink /etc/systemd/system/firewalld.service → /dev/null.
[jensd@cen8 ~]$ sudo systemctl enable nftables
Created symlink /etc/systemd/system/multi-user.target.wants/nftables.service → /usr/lib/systemd/system/nftables.service.
For Debian and Ubuntu:
jensd@deb10:~$ sudo ufw disable
Firewall stopped and disabled on system startup
jensd@deb10:~$ sudo systemctl disable ufw
Synchronizing state of ufw.service with SysV service script with /lib/systemd/systemd-sysv-install.
Executing: /lib/systemd/systemd-sysv-install disable ufw
Removed /etc/systemd/system/multi-user.target.wants/ufw.service.
jensd@deb10:~$ sudo systemctl mask --now ufw
Created symlink /etc/systemd/system/ufw.service → /dev/null.
jensd@deb10:~$ sudo apt install nftables
Reading package lists... Done
...
Processing triggers for libc-bin (2.28-10) ...
jensd@deb10:~$ sudo systemctl enable nftables
Created symlink /etc/systemd/system/sysinit.target.wants/nftables.service → /lib/systemd/system/nftables.service.
IP forwarding
NAT uses IP forwarding and by default it’s not enabled in the kernel parameters. First we need to check if IP forwarding is enabled and if it’s not, we need to enable it.
To check if IP forwarding is enabled:
CentOS or RHEL:
[jensd@cen8 ~]$ sysctl net.ipv4.ip_forward
net.ipv4.ip_forward = 0
Debian or Ubuntu:
jensd@deb10:~$ sudo sysctl net.ipv4.ip_forward
net.ipv4.ip_forward = 0
The above outputs shows that IP forwarding is not enabled.
To enable IP forwarding persistently (survives a reboot) and activate it immediately:
CentOS or RHEL:
[jensd@cen8 ~]$ echo "net.ipv4.ip_forward = 1"|sudo tee /etc/sysctl.d/99-ipforward.conf
net.ipv4.ip_forward = 1
[jensd@cen8 ~]$ sudo sysctl -p /etc/sysctl.d/99-ipforward.conf
net.ipv4.ip_forward = 1
Debian or Ubuntu:
jensd@deb10:~$ sudo sed -i 's/#net.ipv4.ip_forward=1/net.ipv4.ip_forward=1/g' /etc/sysctl.conf
jensd@deb10-2:~$ sudo sysctl -p
net.ipv4.ip_forward = 1
nftables
The next thing to do is to check if nftables is running on the system. Nftables is running as a kernel module so it can’t be seen as one of the normal processes.
[jensd@cen8 ~]$ lsmod | grep nf
nft_masq               16384  1
nft_nat                16384  1
nf_tables_set          49152  1
nft_ct                 20480  0
nft_chain_nat          16384  10
nf_nat                 45056  3 nft_nat,nft_masq,nft_chain_nat
nf_conntrack          172032  4 nf_nat,nft_ct,nft_nat,nft_masq
nf_defrag_ipv6         20480  1 nf_conntrack
nf_defrag_ipv4         16384  1 nf_conntrack
nf_tables             167936  11 nft_ct,nft_nat,nft_masq,nft_chain_nat,nf_tables_set
nfnetlink              16384  2 nf_tables,ip_set
libcrc32c              16384  3 nf_conntrack,nf_nat,xfs
Now that we are sure that nftables is active on the system, we can check which rules are active:
[jensd@cen8 ~]$ sudo nft list ruleset
table ip filter {
        chain INPUT {
                type filter hook input priority filter; policy accept;
        }
        chain FORWARD {
                type filter hook forward priority filter; policy accept;
        }
        chain OUTPUT {
                type filter hook output priority filter; policy accept;
        }
...
In case you already have some rules configured, it’s a good idea (in a testing environment) to flush the current rules. This also happens when restarting the system and the rules are reloaded from /etc/sysconfig/nftables.conf (CentOS/RHEL) or /etc/nftables.conf (Debian).
jensd@deb10:~$ sudo nft flush ruleset
Configure and enable port forwarding
Now that we are sure that our system is properly prepared, we are ready to configure a port forward. As an example, I will use the same as explained in the beginning of the article. So on host deb10-1 (10.1.1.1), I will take incoming traffic on port 8888 to host deb10-2 (10.2.2.2) on port 9999.
First, I will check the situation before doing the port forward from a separate machine (the client). With cURL, I’m requesting the webpage returned by contacting 10.1.1.1 on port 8888:
[jensd@client ~]$ curl http://10.1.1.1:8888
<!DOCTYPE html PUBLIC "-//W3C//DTD XHTML 1.0 Transitional//EN" "http://www.w3.org/TR/xhtml1/DTD/xhtml1-transitional.dtd">
<html xmlns="http://www.w3.org/1999/xhtml">
  <head>
    <title>deb10-1</title>
  </head>
  <body>
        <h1>This page is served from deb10-1 (10.1.1.1) on port 8888</h1>
  </body>
</html>
As you can see, this returns a page hosted by the webserver on deb10-1, port 8888. Which we can double-check by looking at the log of the webserver:
jensd@deb10-1:~$ sudo tail -1 /var/log/apache2/access.log
10.1.1.3 - - [13/Jan/2021:10:04:25 +0100] "GET / HTTP/1.1" 200 561 "-" "curl/7.61.1"
Now, to forward port 8888 on deb10-1 (10.1.1.1) to deb10-2 (10.2.2.2) port 9999, we need to do the following steps. Unlike iptables, nftables doesn’t have the tables predefined so we need to do this explicitly.
- Add the nat table to nftables
- Add and configure the postrouting and prerouting chains to the nat table
- Add the prerouting rule, which forwards the traffic to 10.2.2.2
- Add the postrouting rule, which takes care of the return path
jensd@deb10-1:~$ sudo nft add table nat
jensd@deb10-1:~$ sudo nft 'add chain nat postrouting { type nat hook postrouting priority 100 ; }'
jensd@deb10-1:~$ sudo nft 'add chain nat prerouting { type nat hook prerouting priority -100; }'
jensd@deb10-1:~$ sudo nft 'add rule nat prerouting ip daddr 10.1.1.1 tcp dport { 8888 } dnat 10.2.2.2:9999'
jensd@deb10-1:~$ sudo nft add rule nat postrouting masquerade
jensd@deb10-1:~$ sudo nft list ruleset
table ip nat {
        chain postrouting {
                type nat hook postrouting priority 100; policy accept;
                masquerade
        }

        chain prerouting {
                type nat hook prerouting priority -100; policy accept;
                ip daddr 10.1.1.1 tcp dport { 8888 } dnat to 10.2.2.2:9999
        }
}
The 4th command: “add rule nat prerouting ip daddr 10.1.1.1 tcp dport { 8888 } dnat 10.2.2.2:9999” configured the port forward and it’s pretty self-explanatory. We’ll take all traffic coming in on IP 10.1.1.1 with a destination TCP port 8888 and DNAT it to IP 10.2.2.2 on TCP port 9999.
You can play around with the command if you like and add/remove restrictions. For example to have all incoming traffic, regardless of the IP that was used as destination forwarded to the same port 8888, you can use: “add rule nat prerouting tcp dport { 8888 } dnat 10.2.2.2”
Now, to test if the NAT-rules are working, I will repeat the initial test with cURL:
[jensd@client ~]$ curl http://10.1.1.1:8888
<!DOCTYPE html PUBLIC "-//W3C//DTD XHTML 1.0 Transitional//EN" "http://www.w3.org/TR/xhtml1/DTD/xhtml1-transitional.dtd">
<html xmlns="http://www.w3.org/1999/xhtml">
  <head>
    <title>deb10-2</title>
  </head>
  <body>
        <h1>This page is served from deb10-2 (10.2.2.2) on port 9999</h1>
  </body>
</html>
We got a different result, and the response is a webpage retuned by 10.2.2.2 instead. To make sure, when looking at the log of the webserver running at deb10-1, we see no additional entry (same timestamp as the original request before NAT):
jensd@deb10-1:~$ sudo tail -1 /var/log/apache2/access.log
10.1.1.99 - - [13/Jan/2021:10:04:25 +0100] "GET / HTTP/1.1" 200 561 "-" "curl/7.61.1"
When looking at the log on deb10-2 (running on 10.2.2.2) instead, we do see a new entry:
jensd@deb10-2:~$ sudo tail -1 /var/log/apache2/access.log
10.2.2.1 - - [13/Jan/2021:10:18:49 +0100] "GET / HTTP/1.1" 200 561 "-" "curl/7.61.1"
Interestingly, we see that the request came from 10.2.2.1, which is an IP owned by deb10-1 so as explained before, there was no direct traffic between our client and the webserver to which we redirected the request.
That’s all it takes to accomplish this type of forwarding. To my idea this is very underrated as it’s a great way to (temporarily) test new/updated services without any impact on client(s). It’s often easier to change a few rules on the server rather than updating 10-100-1000 clients to perform a test. And to roll-back, you can simply remove the rule again.
Delete/edit rules
In case you want to remove a single rule, or you made a mistake and want to change a rule, you can use the following method. First list the rules with their handles in the nat table:
jensd@deb10-1:~$ sudo nft -a list table nat
table ip nat { # handle 6
        chain postrouting { # handle 1
                type nat hook postrouting priority 100; policy accept;
                masquerade # handle 5
        }

        chain prerouting { # handle 2
                type nat hook prerouting priority -100; policy accept;
                ip daddr 10.1.1.1 tcp dport { 8888 } dnat to 10.2.2.2:9999 # handle 4
        }
}
Then simply remove the rule by referencing it by the handle displayed in the above output:
jensd@deb10-1:~$ sudo nft delete rule nat prerouting handle 4
This will delete the rule: ip daddr 10.1.1.1 tcp dport { 8888 } dnat to 10.2.2.2:9999
Make the rules persistent (survive a reboot)
The above commands made the changes to the rules in nftables immediately but will not survive a reboot. When the nftables systemd-service starts, it flushes any existing rules and loads them from /etc/sysconfig/nftables.conf (CentOS/RHEL) or /etc/nftables.conf (Debian).
So to make the rules persistent, we simply need to write the current active rules to this configuration file:
For CentOS or RHEL:
[jensd@cen8 ~]$ sudo cp /etc/sysconfig/nftables.conf /etc/sysconfig/nftables.backup
[jensd@cen8-3 ~]$ sudo  nft list ruleset | sudo tee /etc/sysconfig/nftables.conf
table ip filter {
        chain INPUT {
                type filter hook input priority filter; policy accept;
        }

        chain FORWARD {
                type filter hook forward priority filter; policy accept;
        }
...
For Debian and Ubuntu:
jensd@deb10-1:~$ sudo cp /etc/nftables.conf /etc/nftables.backup
jensd@deb10-1:~$ sudo  nft list ruleset | sudo tee /etc/nftables.conf
table ip nat {
        chain postrouting {
                type nat hook postrouting priority 100; policy accept;
                masquerade
        }

        chain prerouting {
                type nat hook prerouting priority -100; policy accept;
                ip daddr 10.1.1.1 tcp dport { 8888 } dnat to 10.2.2.2:9999
        }
}
Make sure that the systemd-service “nftables” is enabled as this service file will load the config from the saved configuration file and activate it upon starting the system:
[jensd@cen8 ~]$ sudo systemctl enable nftables
Created symlink /etc/systemd/system/multi-user.target.wants/nftables.service → /usr/lib/systemd/system/nftables.service.
Pingback: Forward a TCP port to another IP or port using NAT with Iptables | Jensd's I/O buffer
Thanks, thanks and thanks again!
Thanks for the feedback. Always nice to see :)
Beste Jens,
I’ve followed your guide and I’ve noticed very few glitches:
– “Now that we are sure that Iptables is active on the system” should be “Now that we are sure that nftables is active on the system”
– In my case (Raspbian Buster) ‘lsmod | grep nf’ return no results. I had to reboot the system. Maybe it’s nice to add few lines on what to do in case nftables is not running after installation
– ‘port 888’ should be ‘port 8888′
General note to other readers: this approach is of course working also to redirect remote Modbus TCP: just change the key nat rule to ”add rule nat prerouting tcp dport { 8888 } dnat :502’.
My use case is a VPN which includes my laptop and several RPis (CLI only) deployed in the field with several modbus sensors in the remote LAN.
Heel erg bedankt!
Alex
Hi Alex,
Thanks a lot for reporting these mistakes. I’ve corrected them in the article.
Regarding your issues with Raspbian, this seems to be covered in https://github.com/raspberrypi/linux/issues/2177 as I think (had a quick look only) it is specific to Raspbian. A minimal install of Buster should come with nftables enabled and loaded by default, hence why I didn’t cover this.
Thanks for sharing your use case as well. I’ve used this in the past for a similar situation to make multiple devices with a webinterface (fixed port number) directly available through a public IP.
I am using Ubuntu 21.04 and followed all the instructions, with the only result that internet didn’t work anymore.
After ‘nft flush ruleset’ the internet worked again.
It is because you have flushed all your firewall rules. make sure to enable masquerading it to other devices (e.g. LAN1 -> WAN interface (and beyond)).
This article saved my bacon. OG sys-admin here that was struggling with iptables on Ubuntu 20.
The article got me up and working and was just what the doctor ordered! Thank you so much for taking the time to document each step.
thanks for the article. It’s very useful.
cheers
Is there something special to NAT port 22 ?
It’s all right for other ports. And I switched the sshd to another port to make it free…
Nothing special, it’s a regular TCP port. It might be that your ISP is blocking traffic on 22 though, as a security measure.
Can we do this.?
x.x.x.x: 22 (sshd) forwarding y.y.y.y:21 (not listen before forwarding) but y.y.y.y:22 is listening also sshd
y.y.y.y:21 accessing by client
if yes than any solution.. already used iptables and nftables.. no success.
Thank you for this article!
Good job, solved my confusion. Thank you. ^_^
Pingback: Understanding lxdbr0 to Make LXD Containers Visible on Host Network – Technical Scratchpad
HI Jensd
I am using debian bullseye and have an old setting using iptables instead. here is my scenario.
i have a server with 2 nics. enp3s0(WAN) with ip add 10.0.0.10/24 gw 10.0.0.2 dns 8.8.8.8
enp5s0 (LAN) ip add 192.168.0.254/24. i want to configure the above so that NAT pushes internet access to LAN. How do i configure this to work.
I am working with a VPS in the cloud with WireGuard tunneled to a home lab router/firewall.
Behind the home lab router/firewall there is a VM Host with multiple VMs along with laptop, desktop, smart phone etc..
How can I public expose the VMs to the internet using the public IP addresses associated with the VPS without bypassing the firewall rules on the router? I would like the tunnel terminated on the router and not the actual VMs.
Furthermore I would like the laptop, desktop, smart phone, etc… to by pass the tunnel when accessing the internet.
hello, is any way to add a counter to the dnat statement?
i mean something like this:
sudo nft add rule nat prerouting tcp dport { 15580 } dnat 10.35.2.1:190 counter comment Conex_VPN.
when i try it does not recognize the counter.
i need a counter to verify every match.
how do you add the http server , I mean how it can return this:
“This page is served from deb10-2 (10.2.2.2) on port 9999”