
For quite a long time now, Apple supports running Windows on your x86-based MacBook. The supported method is to use BootCamp Assistant. Although this does work in a lot of cases, there might be reasons to manually install Windows on your MacBook. For example if you want to get completely rid of macOS. Other reasons could be dropped support for older MacBooks, the ability to use a custom/modified Windows installation or if you want to install on an external drive. This post explains how to install Windows on a 2019/2020 MacBook (Air) equiped with a T2 security chip without using BootCamp Assistant.
As Apple released the M1 ARM-based CPU and related Mac lineup, the 2019/2020 models might be the last ones to support running Windows. Using BootCamp Assistant does work in a lot of cases, nevertheless, it’s good to have the ability to do a full installation without depending on it.
Youtube Video
If you are interested, I also created a YouTube video from this blogpost. If you prefer classic text, you can just follow the rest of this article:
Required hardware
To install Windows natively, without using BootCamp assistant, is challenging in some areas. The Windows installer and base installation does not have drivers for a lot of the hardware components in the MacBook, including the keyboard, trackpad and wireless. Hence why the following is required:
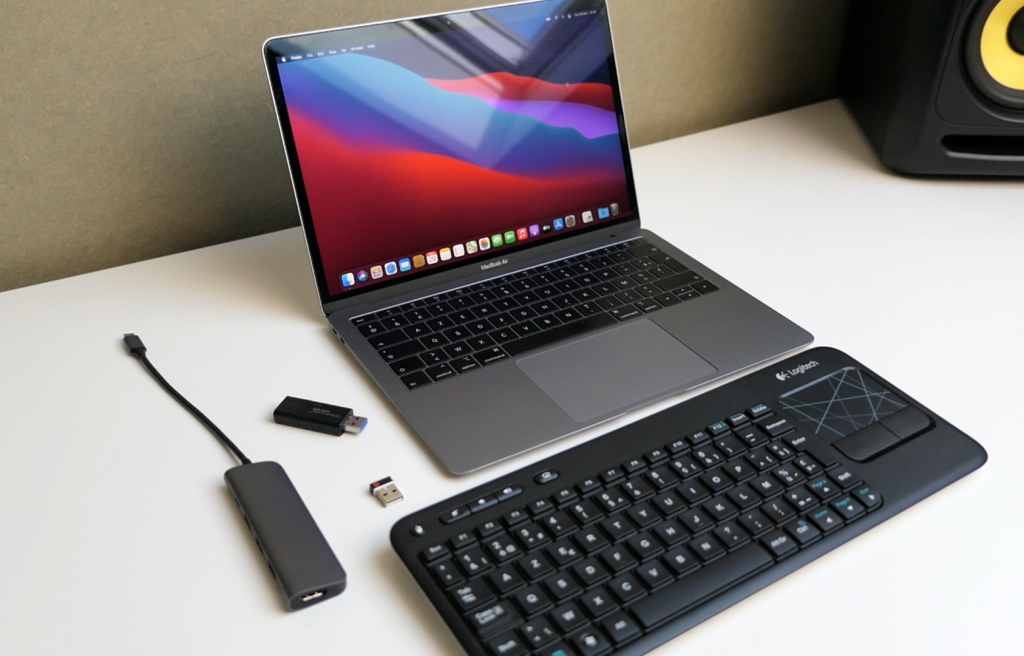
- External keyboard and mouse
- Ability to connect the keyboard and mouse (so most likely a USB-C to USB-A adapter)
- USB-drive (16GB or more is recommended) that can be connected to USB-C or with a compatible adapter (see further)
- Additional PC running Windows (or a VM) to prepare the installation
The screenshots in this post are based of a MacBook Air with a fresh installation of macOS 11, better known as Big Sur.
High Level process
As the procedure is quite long, let’s first list the tasks we need to go through in order to successfully complete this. As this helps to understand the bigger picture following the below steps:
- Get the Model Identifier for your MacBook
- Prepare a bootable USB drive with Windows installation and required drivers
- Disable secure boot on the MacBook
- Repartition the SSD on the MacBook to reserve a place to install Windows
Here you can choose to use the whole SSD for Windows or to have dual boot with macOS - Boot from the USB-drive, load the driver for the SSD and run through the installer
- Install the base required drivers for minimal functionality
- Run Windows update and install mandatory and optional updates to load the rest of the drivers
Additionally, at the end of the article, I will also mention how to dual boot between Windows and macOS and how to properly clean up the Windows installation if desired.
Prepare and install Windows
Step 1) Get the Model Identifier for your MacBook
In order to make sure we download the right set of drivers for Windows, suited for your MacBook model, we first need to get it’s identifier. We will use that in the next step.
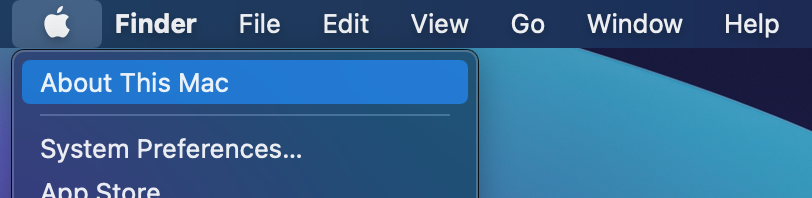
To do so, in macOS, navigate to the apple icon in the left top corner and click on “About this Mac”:
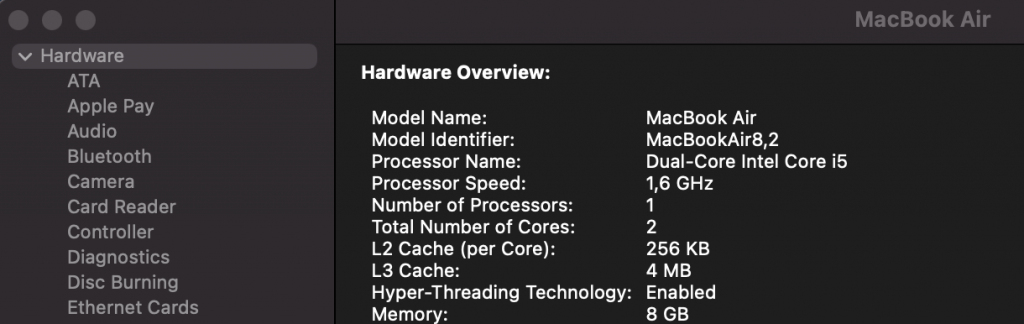
In the next dialog, click “System Report” and you will find your Model Identifier, in my case: MacBookAir8,2. Just keep this handy for step 2.
Step 2) Prepare a bootable USB drive
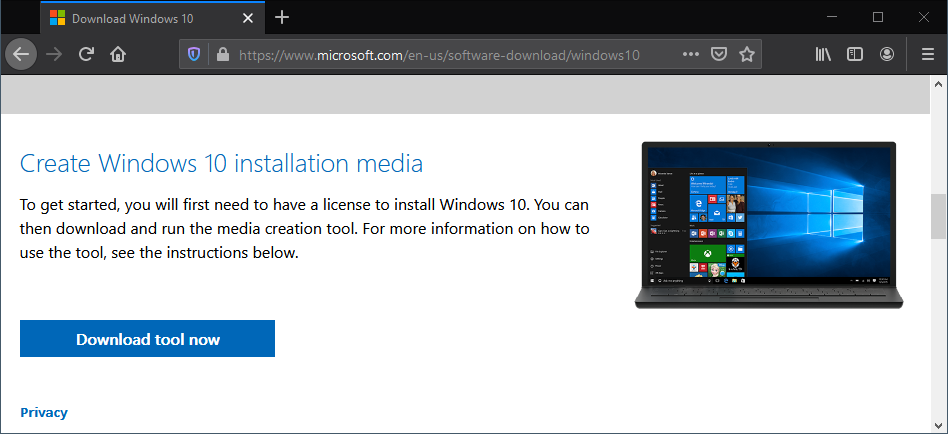
To launch the Windows 10 installation, we need to create a bootable USB drive containing the installation files. Next to that, as mentioned, we need it to contain the required drivers to get through the installation and get us connected to the internet so we can get the additional, missing, drivers.
First part is no different than any other bootable USB drive with a Windows installer and the easiest method is to use the Windows Media Creation tool. You can simply download it from Microsoft’s website: https://www.microsoft.com/en-us/software-download/windows10
After downloading the tool, you can launch it and click through the steps to create a standard USB-drive for installing Windows:
Once this part is done, we need to get the drivers for our MacBook and copy them to the USB drive as well. Again, there are several methods to accomplish this but I found the easiest to use a tool called Brigadier. This tool has been developed mainly for use on Apple hardware that no longer (properly) supports Bootcamp.
Brigadier makes use of 7Zip internally in order to extract the drivers once downloaded. Although the GitHub page mentions that Brigadier will automatically install 7zip, this did’t seem to work as expected and caused an error: “SSL23_GET_SERVER_HELLO:tlsv1 alert protocol version”. To prevent this error, it’s better to first download and install 7zip manually from https://www.7-zip.org/download.html
Once 7Zip is installed, we can download Brigadier from the author’s GitHub page: https://github.com/timsutton/brigadier/releases and run it in a command prompt as follows:
C:\Users\jensd\Downloads>brigadier.exe --model MacBookAir8,2
Using Mac model: MacBookAir8,2.

Model supported in package distribution file at http://swcdn.apple.com/content/downloads/52/10/061-26579-A_7RJL96VW4I/z662ygc05hfe7cukb3itfbc8i1j7boxu95/061-26579.English.dist.

Distribution 061-26579 supports the following models: MacBookAir8,2.
...
Done.
As you can see, you need to pass the exact Model Identifier on the command line to start Brigadier. Keep in mind that this is case sensitive!
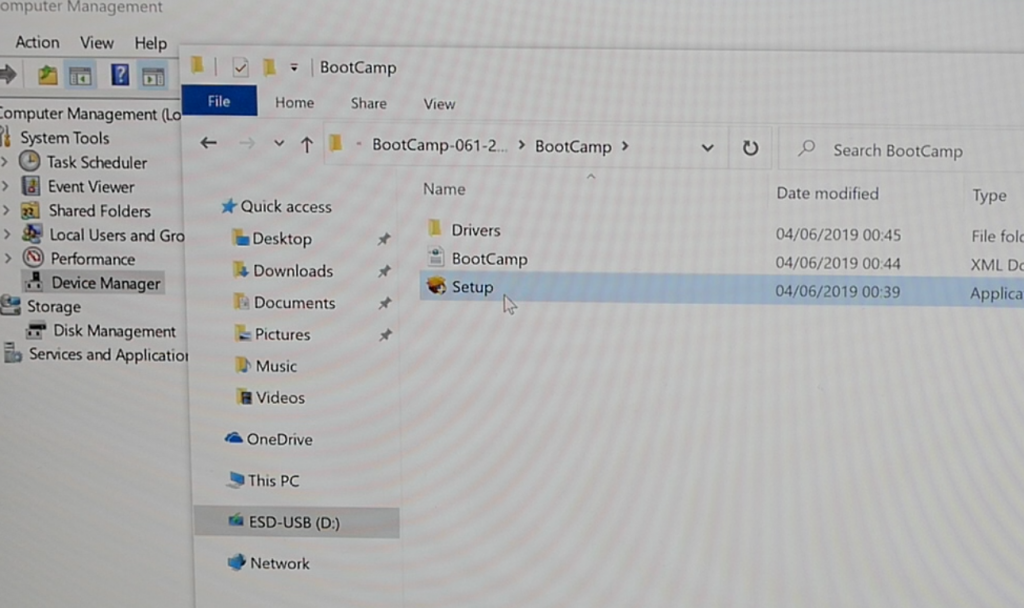
As a result, if all went well, you should now get a new folder, called BootCamp-xxx in the directory from where you launched Brigadier:

These are all the required drivers to complete the installation, including the BootCamp tool for Windows. To have them handy at installation time, copy them to the USB drive which you used with the Windows Media Creation Tool earlier.
Step 3) Disable secure boot
Since 2018, Apple is equipping their devices with a T2 security chip. This chip has a broad feature set related to security. It allows, for example, to save encryption keys or the signatures for the touch ID sensor in a secure way. One of those features is to protect the boot process by only allowing Apple-signed operating systems.
In order for us to install a copy of Windows, we first need to disable part of this security and explicitly tell the T2 chip to allow starting other, non Apple-signed, operating systems. Also by default, booting from external media, like a USB drive, is not supported.
To change the boot-related security features in the T2 chip, you can boot your MacBook in recovery mode. To do so, turn on or reboot your laptop and hold down command + r at the same time:
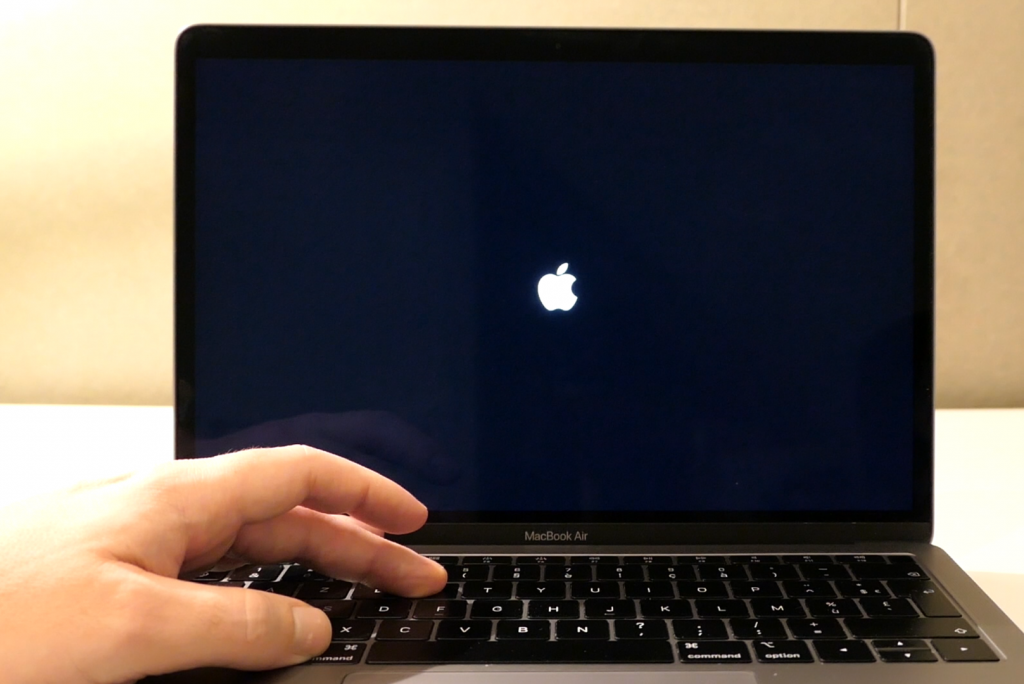
Wait until you see the Apple logo and progress bar, then release the keys. After some time you should end up in recovery.
From here, you can navigate to Utilities > Startup Security Utility in the top menu bar:
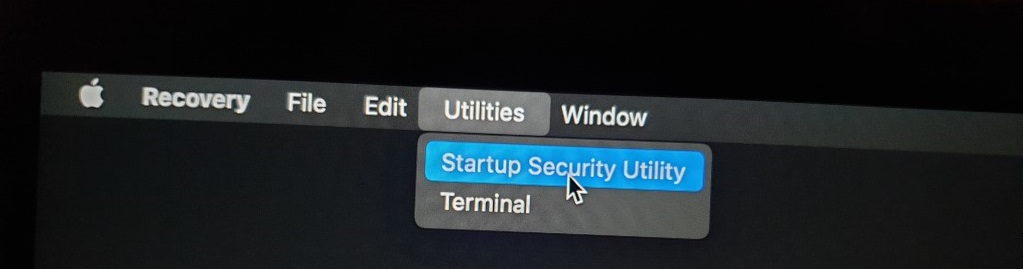
After authenticating with your administrator password, under Secure Boot, change the setting to No Security. Under external boot, change allow booting from external media. After closing the window, the changes are immediately applied:

Here, you could perform a reboot, back to macOS but we need to be in recovery as well for the next step, so better to stay…
Step 4) Repartition the SSD/disk
A default macOS installation, since macOS High Sierra, will partition the whole disk or SSD as an APFS container. In the container, it is possible to have different volumes used by macOS. In order to have space to install Windows, we have two options at this point:
- Option 1) Windows only: Erase the whole APFS container and create one big partition for Windows.
This will remove the ability to use macOS but will give all space available to Windows. - Option 2) Dual boot: Resize the APFS container and partition the freed up space for Windows.
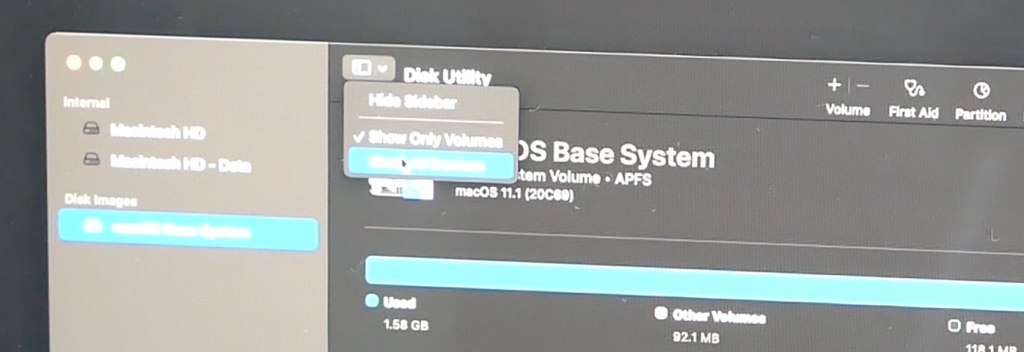
In case you are not yet in recovery due to the previous step, first boot into recovery mode (see step 3). From recovery mode, choose to open Disk Utility and change to view all device instead of just the volumes:
For option 1) Windows only, on the left side, select the SSD in your system and choose erase on the right side of the screen:
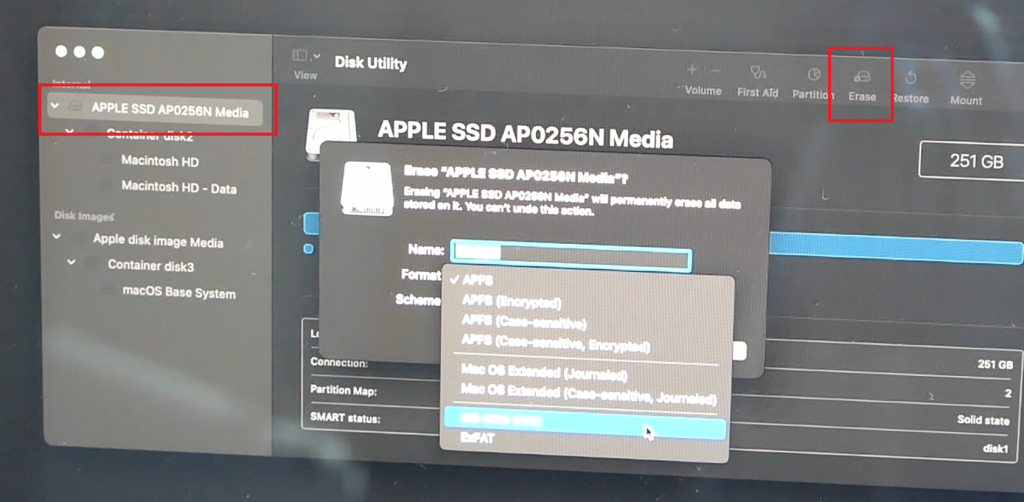
In the next screen, set the type to MS-DOS (FAT) and click apply. Be aware that this will completely erase all data from the disk and the system will no longer boot unless you re-install an OS (like we will do with Windows in the rest of this post or by re-installing macOS).
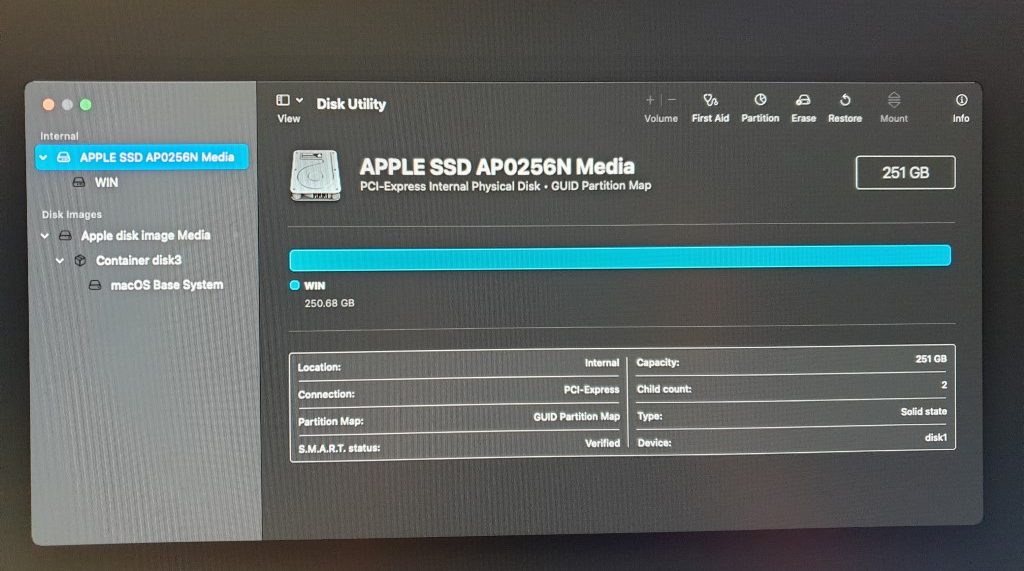
The results looks as follows:
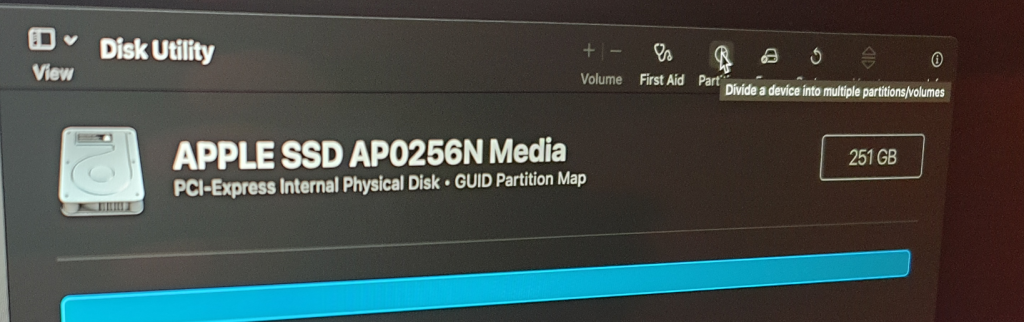
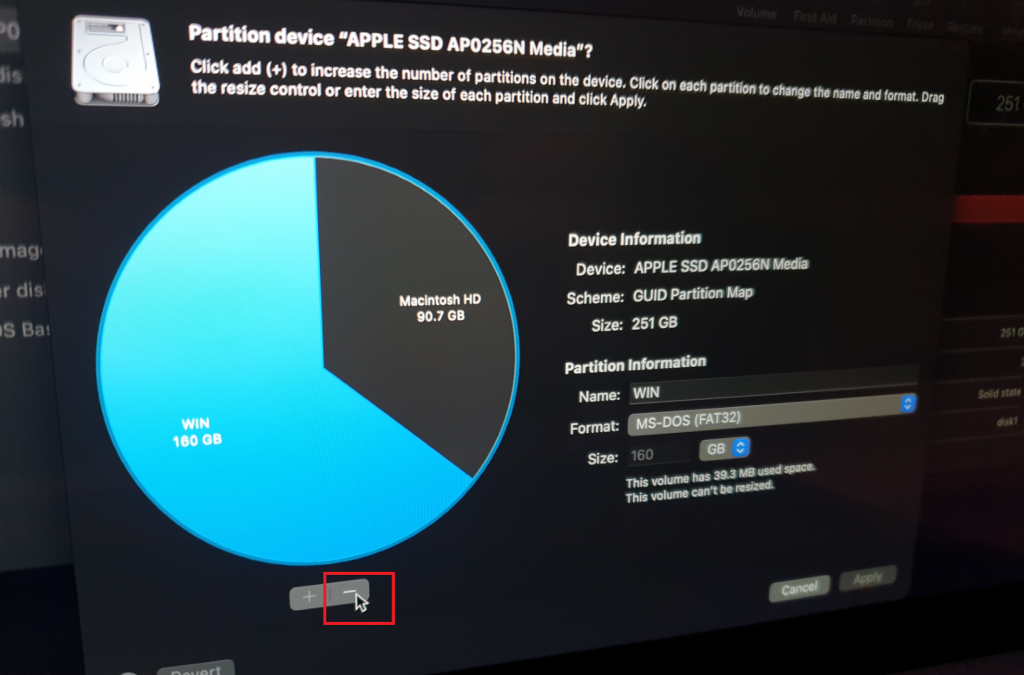
For option 2) Dual boot, click on the Macintosh HD on the left side and choose Partition.
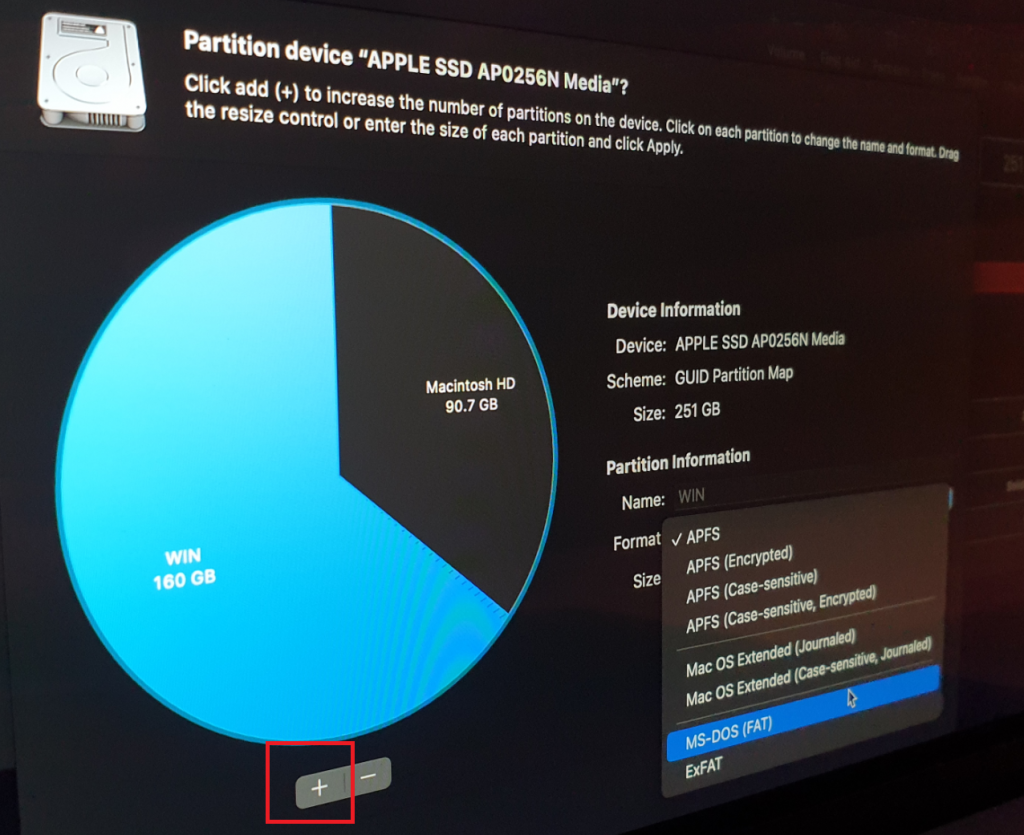
Here you can see that the whole disk is in use by APFS. We can simply add another volume by clicking the + icon below the pie chart, Next, change the type to MS-DOS (FAT) and set the size as desired. Disk Utility will automatically change the size of the APFS container if there is enough free space available. Give a label which you will remember and to apply the changes, simply click apply and choose to continue.
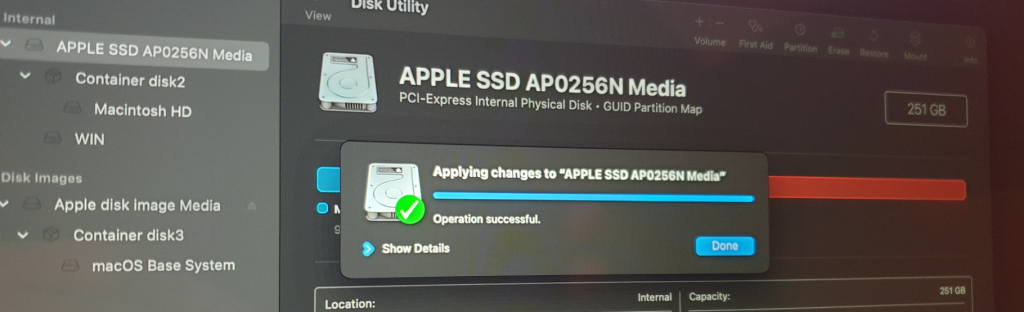
I did notice that using Big Sur, the actions described above will always fail in Disk Utility with an error: Operation failed… It looks like there is a bug/defect in Disk Utility:

In case this happens, you can see that instead of creating a new FAT partition, Disk Utility created another APFS container. You can simply select the SSD again and click on partition once more. Change the type to MS-DOS (FAT) and click Apply. In all cases where I’ve seen this, the problem got resolved and I managed to get a smaller APFS container and desired FAT partition:
Step 5) Boot the installer
At this point all preparation is done: we have the USB drive prepared, disabled secure boot and have reserved space on the SSD for Windows. In this step, we need to start the Windows installation by booting up the system from the USB drive.
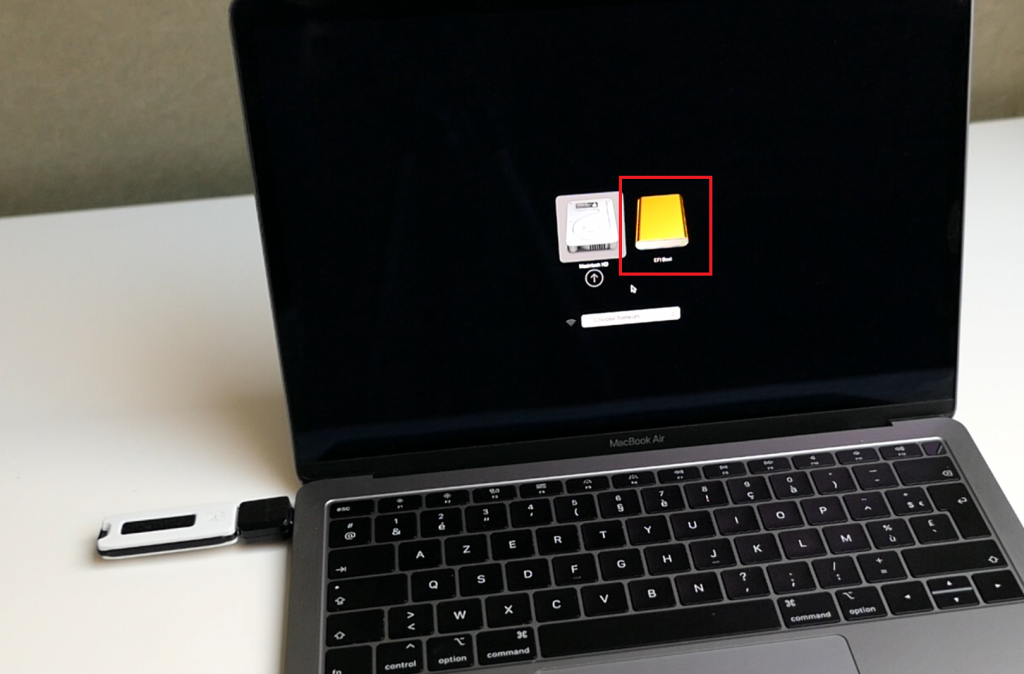
We can restart or start the MacBook by holding down the Option key. This should bring us into the boot loader. Here you should see “Macintosh HD”. which contains the macOS installation.
Now is the moment to connect the prepared USB drive to your system. If all goes well, you should see a new entry appear here: EFI-boot:
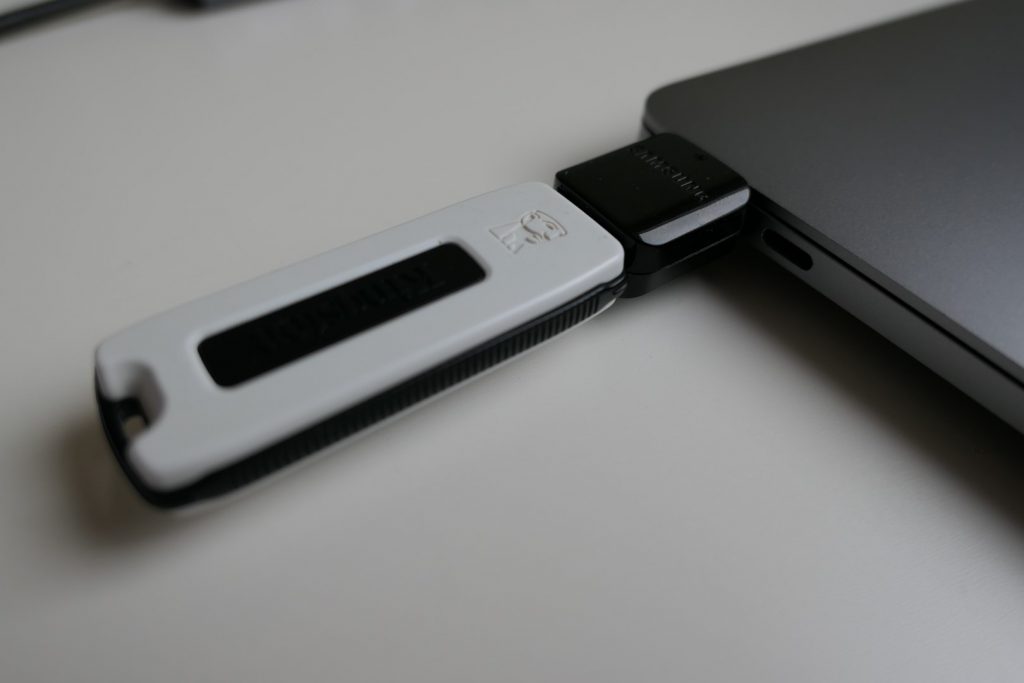
Unfortunately, to make things more complicated, I noticed that when using a USB-C dock with multiple USB-A ports I never managed to get the EFI-boot entry to show up. When I used a single port USB-C to USB-A adapter, all worked fine:
Select the EFI-boot entry and push enter. You will see that the Windows installer starts as you would see on any other system.
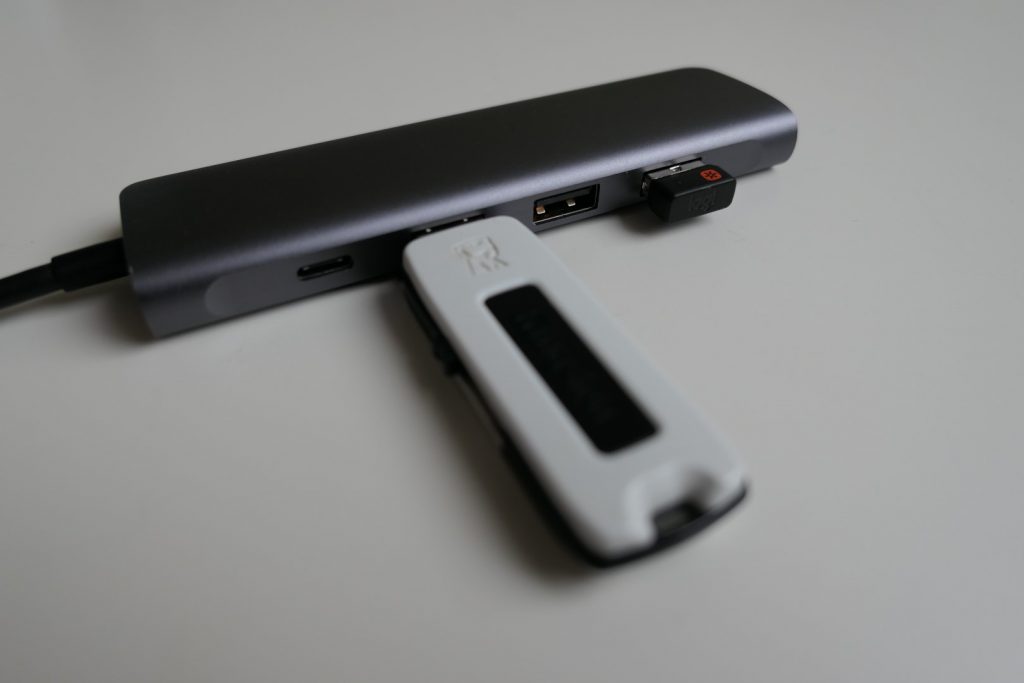
Once the installer started, you need to connect the external keyboard and mouse to your MacBook as there is no possibility to navigate otherwise since the internal keyboard and trackpad are not working. If you do not have place to use the second USB-C port, as I had, you can safely move the USB drive now to another USB-C dock, together with the keyboard/mouse connector(s):
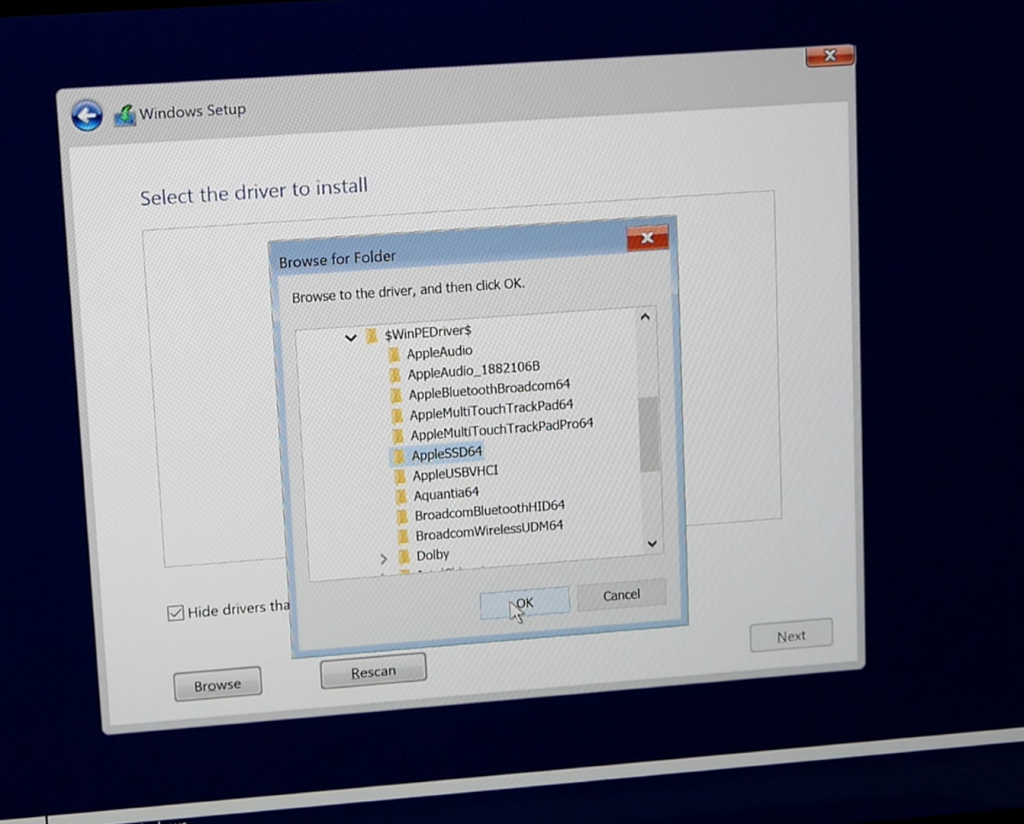
From here, continue through the first steps of the installation until the point where you need to select the partition to use for the Windows installation. As the Windows installer does not have drivers for the internal SSD, it doesn’t show any partitions/volumes:
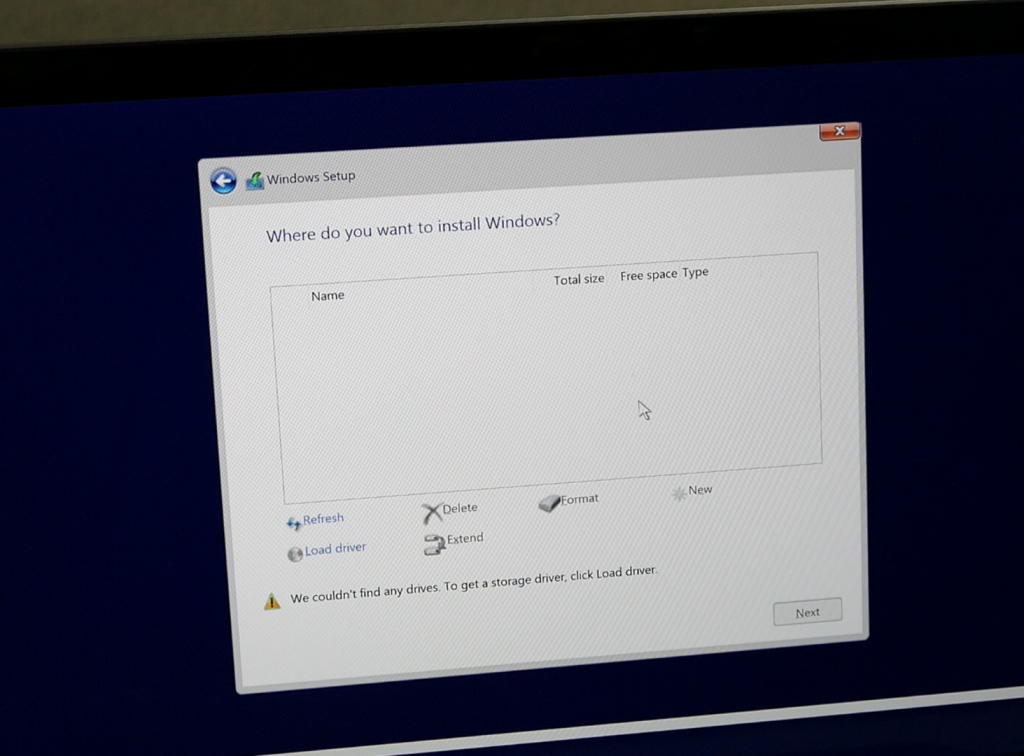
Click on the “Load Driver” option and Browse to the earlier, in step 1, copied drivers which we downloaded and copied to the USB drive. Navigate to the directory BootCamp-X\$WinPEDriver$\AppleSSD64\ :
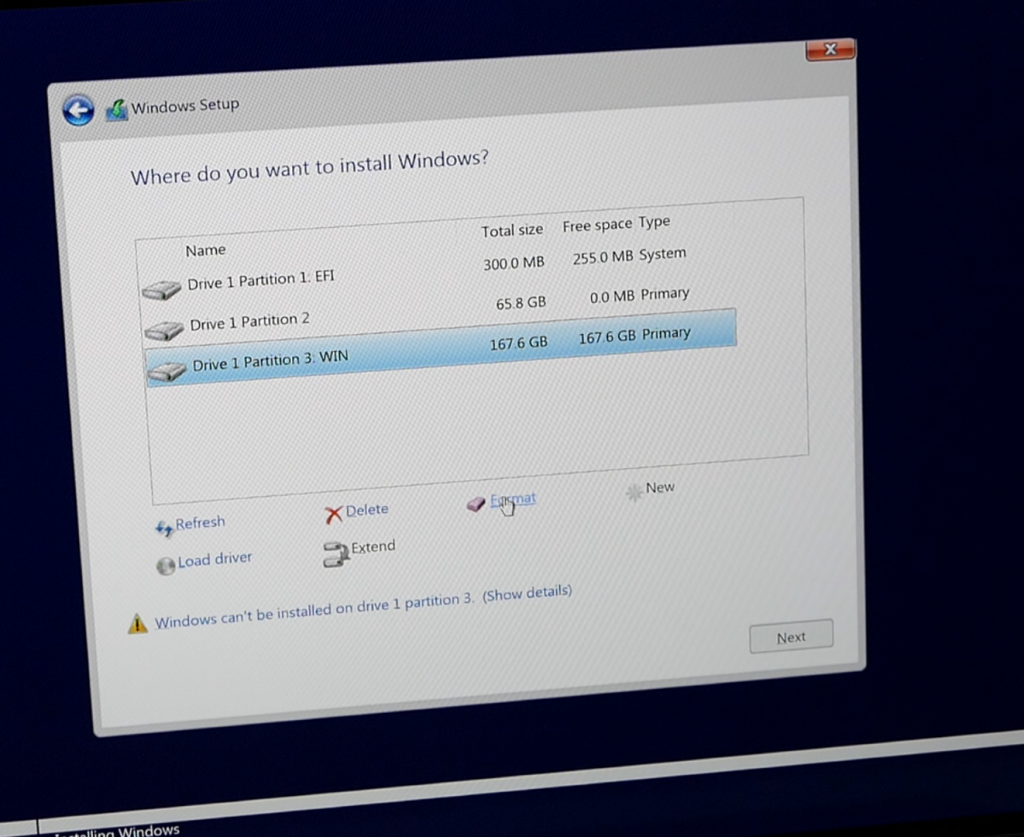
When you return to the “Where do you want to install Windows?”, you should now see the partition which we created in step 4. Make sure, in case you want dual boot, that you select the right partition by choosing the partition with the label you set before. Before we can continue, we need to format the partition with NTFS, to do so, choose the “Format” option, then click Next:
The rest of the installation should continue without too much hassle although I noticed that you definitely need some patience :)
If all goes well, after some time, you should be presented with some additional questions regarding your preferences and the ability to create a user, etc. Once you managed to get through that, you will end up at the Windows desktop.
Step 6) Minimal driver installation
Although we managed to get a working Windows desktop in the previous step, you will quickly notice that a lot of things are not working. Among them would be the internal keyboard, trackpad and wifi. Not really a usable or portable laptop at this moment…
If you prefer to really not use any Boot Camp components at all you could choose to only install the driver for the wireless network card here and skip to the next step to install the rest of the drivers using Windows Update. I just assume you ended up here because you wanted more flexibility or something else was not working, so I’ll go for the easier option and we’ll install the Boot Camp package which was part of the download with Brigadier in step one.
In Windows, navigate to the USB drive and to the Boot Camp folder. Run the setup.exe and click through the installation steps. After a reboot, you will notice that the display looks better, as the video driver got installed, and more importantly, the driver for the wifi network card:
Step 7) Install the rest of the drivers
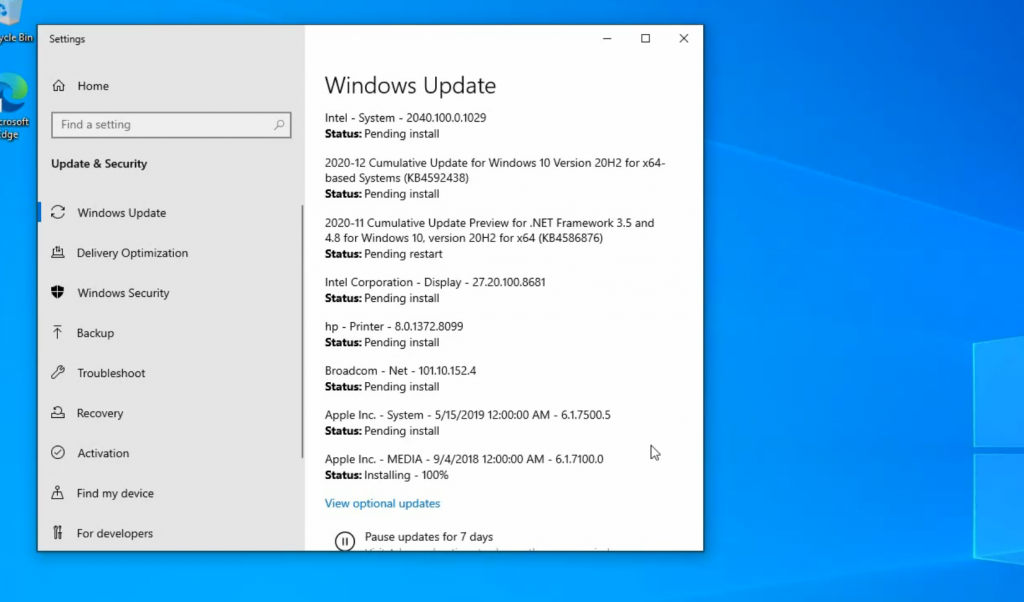
As we have a working network card now, we can connect to the internet and continue the process by going through the available Windows updates. Click start and type “Check for Updates” and click on the entry in the menu. In Windows Update, click Check for updates:
After checking, a list of updates will automatically be installed and you will asked to perform a reboot once completed:
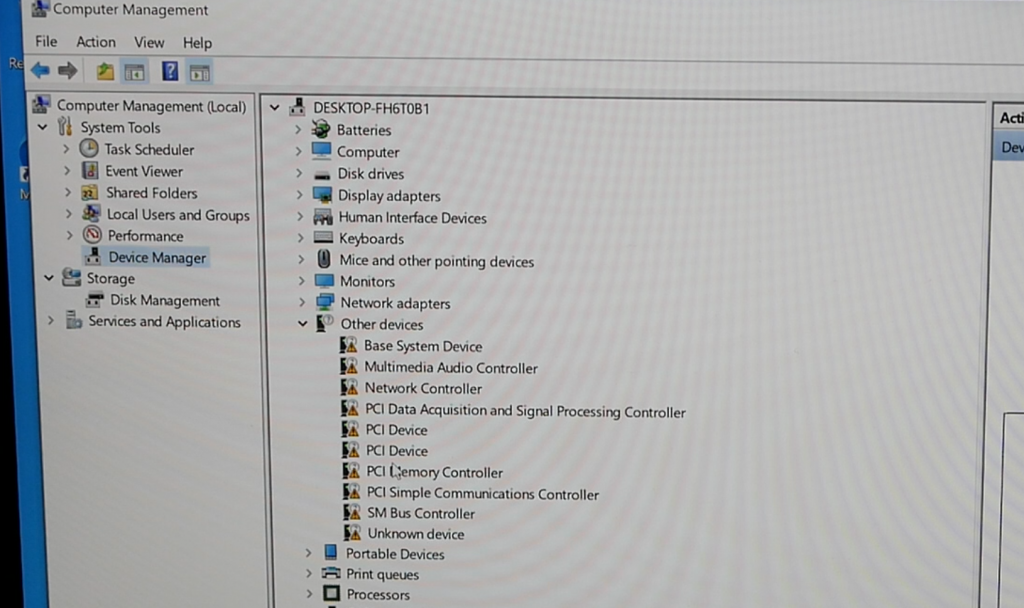
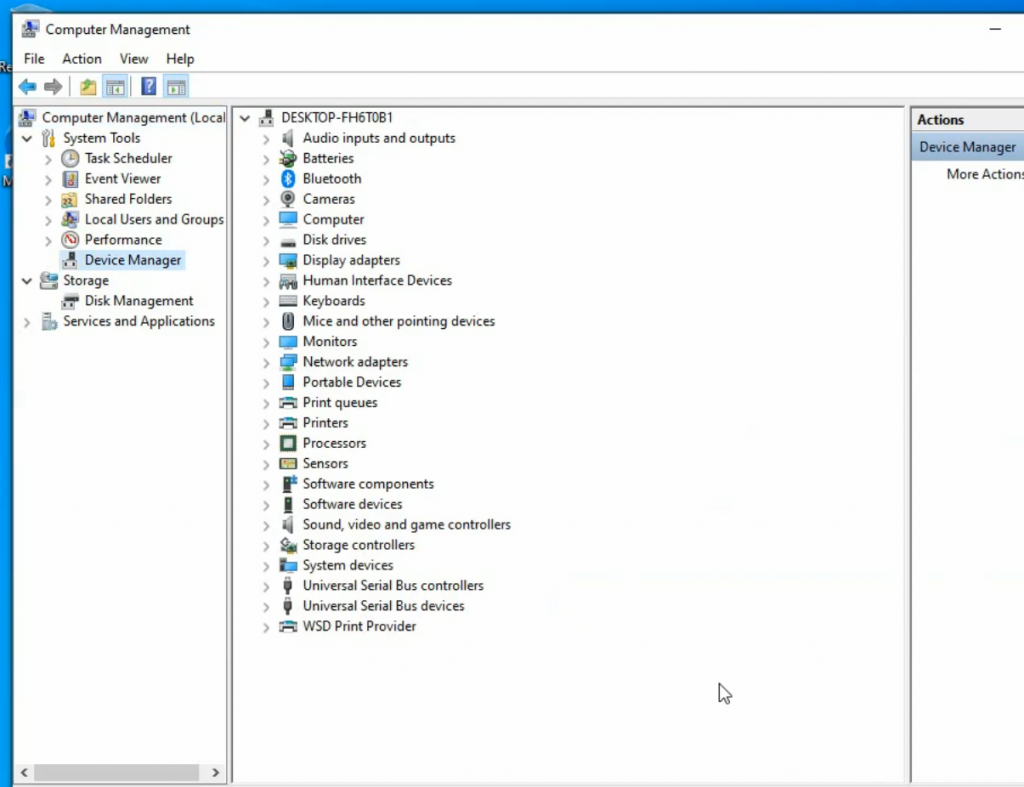
Some of the updates contain part of the remaining drivers. After going through the above Windows update process, you will notice that most of the missing drivers got installed by having a look at Device Manager:
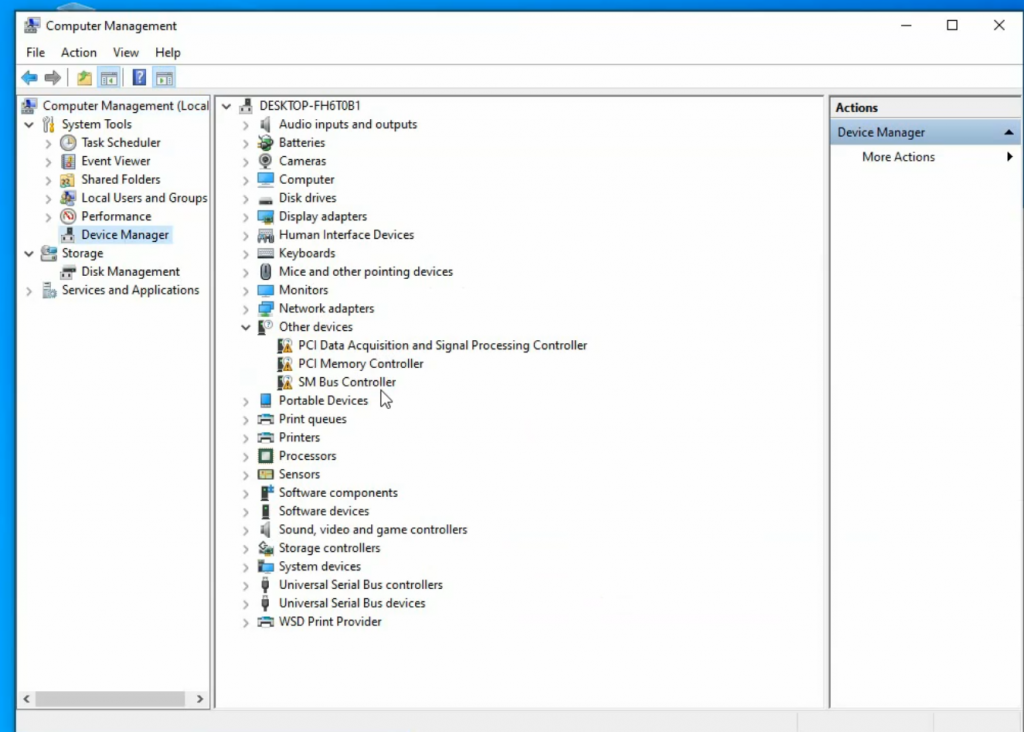
Although this is better, there are still a few devices listed as unknown or missing a driver. From what I experienced, installing the optional updates fixes this. You can do by repeating the Windows Update process, but to choose to install the optional updates:
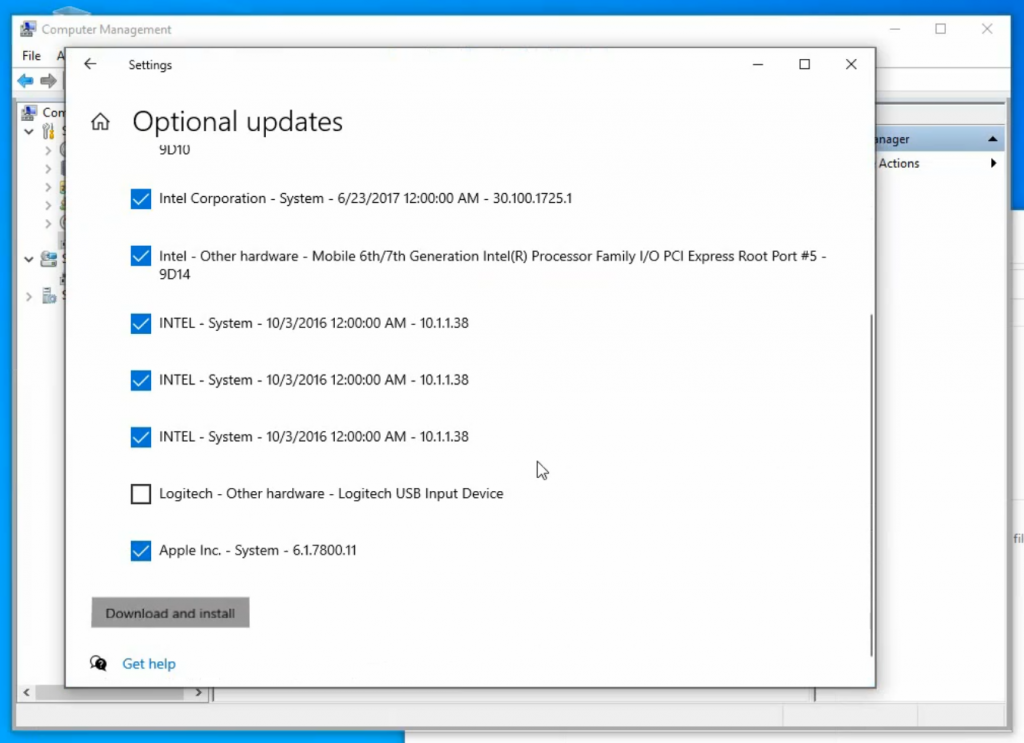
After going through this process and performing the requested reboot, you will see that all drivers got installed and everything is working, including function keys for brightness, volume, etc…
The result is a fully working Windows 10 installation on your MacBook. After using this installation for a few days, I noticed that everything is working just fine. Battery life seems similar as in macOS and performance is as well. The only component that is not functional is the fingerprint scanner (Touch ID) as the data for it is also stored in the T2-chip, for which Apple does not release any drivers/documentation on the internals.
Switch between Windows and macOS
As you might have noticed, since the Windows installer started the installation, several reboots were performed and the MacBook now, by default, starts in Windows.
In order select the desired OS, macOS or Windows, to boot there are two options.
Option 1) Restart or start the MacBook while holding the option key. This is the same method which we used to boot the installer on the USB drive. Only now, after installing Windows, the boot loader should show you two options: Macintosh HD and Windows/Bootcamp. Simply select the desired option in the menu.
Option 2) Use startup disk from either Windows or macOS.
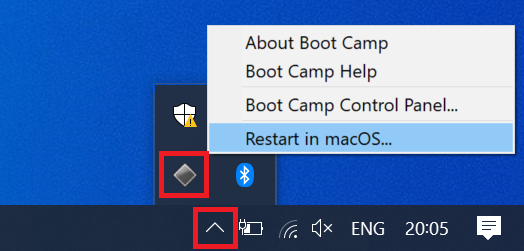
From Windows to macOS, the option is part of the Boot Camp tools which we installed once we got Windows up and running. In the notification area, click the Boot Camp icon and choose Restart in macOS to reboot to macOS:
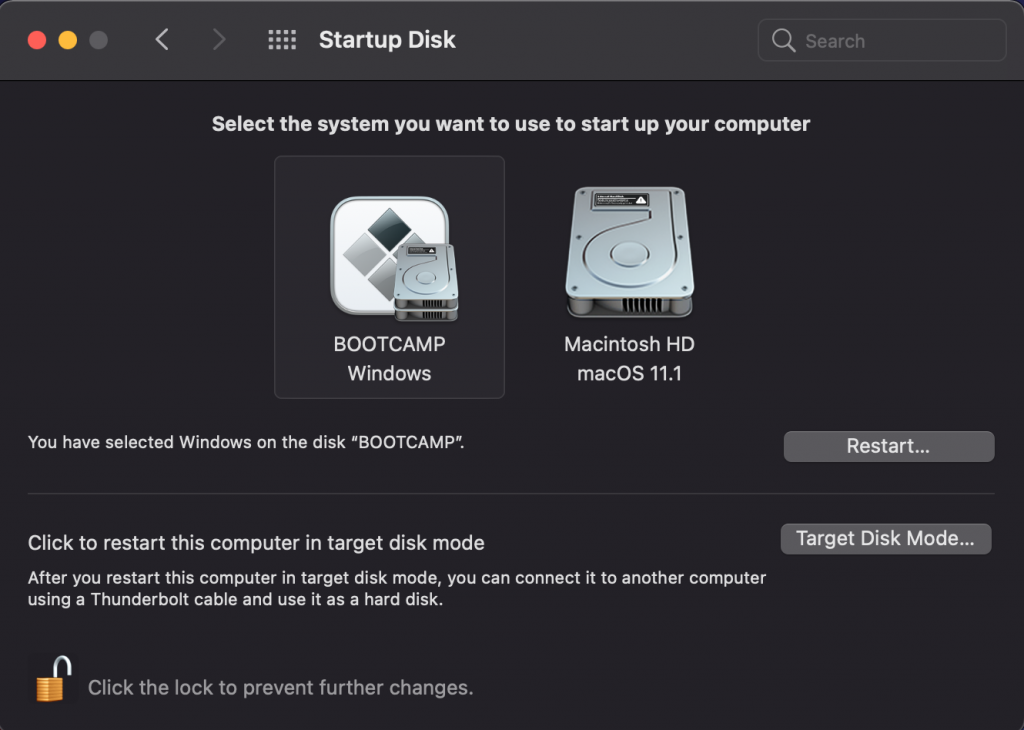
From macOS to Windows, launch Startup Disk, click the lock to enable changes and select the Windows/Bootcamp disk to reboot to Windows:
Remove Windows and cleanup
In case the native Windows installation on your MacBook isn’t what you want anymore. You can go back to a macOS-only setup as follows:
When you chose option 1, to remove macOS completely by deleting the APFS container and replace it with a partition for Windows, you will need to re-install macOS using a bootable installation USB drive. You can create one from the installer app using a different Mac.
When you chose option 2, to have the dual boot option, you need to remove the Windows partition and give back the space to the APFS container for use on macOS. After that, to get things nice and clean, you also need to delete the Windows-related files in the EFI partition. Otherwise there will still be a non-working boot entry remaining.
To clean up the partition:
Reboot your device in recovery, as instructed at the beginning of step 2. Start Disk Utility and choose to view all devices.
Select the SSD in the left menu, click partition and simply remove the partition you created for Windows earlier. Disk Utility will reclaim the space for the macOS APFS container and volumes automatically after clicking apply and confirming”
To clean up the EFI-entry:
If you have selected macOS as the default OS to boot, using the Startup Disk tool, you might not even notice that there is an unused entry in the EFI boot partition. Nevertheless it’s a good practice to clean up this entry.
To do so, in macOS, we first need to make sure we identify the EFI partition properly. By default it is /dev/disk0s1 but the best is to verify this first.
Open terminal and type: diskutil list
users-MacBook-Air:~ user$ diskutil list
/dev/disk0 (internal, physical):
#: TYPE NAME SIZE IDENTIFIER
0: GUID_partition_scheme *251.0 GB disk0
1: EFI EFI 314.6 MB disk0s1
2: Apple_APFS Container disk1 70.7 GB disk0s2
3: Microsoft Basic Data BOOTCAMP 180.0 GB disk0s3
/dev/disk1 (synthesized):
#: TYPE NAME SIZE IDENTIFIER
0: APFS Container Scheme - +70.7 GB disk1
Physical Store disk0s2
1: APFS Volume Macintosh HD - Data 5.5 GB disk1s1
2: APFS Volume Preboot 295.1 MB disk1s2
3: APFS Volume Recovery 613.6 MB disk1s3
4: APFS Volume VM 20.5 KB disk1s4
5: APFS Volume Macintosh HD 15.0 GB disk1s5
6: APFS Snapshot com.apple.os.update-... 15.0 GB disk1s5s1As you can see in the output, the EFI partition is on disk0, volume 1, so /dev/disk0s1 is what we need to use in the next step.
Again in terminal, create a directory where we will mount the EFI partition:
users-MacBook-Air:~ user$ sudo mkdir /Volumes/efiNext, mount the EFI partition, which we identified above, in that location:
users-MacBook-Air:~ user$ sudo mount -t msdos /dev/disk0s1 /Volumes/efi
Executing: /usr/bin/kmutil load -p /System/Library/Extensions/msdosfs.kext
Finally, we can navigate to the directory where we mounted EFI and delete the entries which Windows created. Those are Boot and Microsoft:
users-MacBook-Air:~ user$ cd /Volumes/efi/EFI/
users-MacBook-Air:EFI user$ ls -al
total 40
drwxrwxrwx  1 user  staff  4096 Dec 29 15:30 .
drwxrwxrwx@ 1 user  staff  4096 Dec 29 15:29 ..
drwxrwxrwx  1 user  staff  4096 Dec 28 17:15 APPLE
drwxrwxrwx  1 user  staff  4096 Dec 29 14:54 Boot
drwxrwxrwx  1 user  staff  4096 Dec 29 14:50 Microsoft
users-MacBook-Air:EFI user$ rm -rf Boot
users-MacBook-Air:EFI user$ rm -rf Microsoft
After these two steps, your MacBook should be back with only the macOS installation and with all the space available for it.
thank you, it’s very useful tutorial, now i can install windows 10 on my mac 2020
Hi man! Great Tutorials!! Do You think it’s possible to Install Win10 also on older Macbook Pro? Exactly Mid 2010 ( 7,1 )? Thanks for Your answer.
Hi, first of all thank you for the good work.
I have an 2019 i5 MBA with 128gb ssd so i installed windows 10 on whole ssd without any problem. But my windows crushed and then i ve decided to reinstall mac os to my MBA, but even i tried to erase the disk so many times on utility there is an error code says something like” disk could not be opened :(69879)” . Now i can’t reinstall windows because i dont have the AppleSSD64 driver for windows10 also. What shoul i do now? I would be so glad if you could guide me. Thanks a lot.
Thank you so much for having built and sharing such a well documented and “easy to follow” tutorial. It is one of the very best tutorials. Could this tutorial also be used for installing Windows 11 on my 2020 iMac 27” Retina 5K?
Works in as good as the same way. You will need to work around the hardware checks of Windows 11 though. More details can be found here: https://jensd.be/1472/windows/install-windows-11-on-unsupported-hardware (look at method 2)
Hi Jens. Awesome. Thanks for this excellent instruction!
I have been always been on windows but I‘m going to buy an early 2015 macbook Air for writing solely because of the keyboard and haptic. Because you made this guide for the 2019/2020 model, does your guide work for the early 2015 model (macbook air) as well? I have no experience with apple whatsoever, so please excuse my total lack of apple knowledge. Thanks in advance, Markus
Hi! Thanks for this tutorial!
However, i encountered an error when loading the window. it says “a media driver your computer needs is missing” just after i click on (install now)
Hi Jens, thank you for the great instruction on your web and Youtube. Is there a way to install either Windows 10 or 11 on Mac M1 machine? Thanks
Natively it is not possible (yet). But have a look at this post: https://jensd.be/1533/windows/windows-11-arm-on-m1-based-macs-with-utm
Hi! Thanks for this very detailed tutorial!
However I experienced an issue in opening Brigadier via Command Prompt. It says “Couldn’t find a Boot Camp ESD for the model MacBookAir10,1 in the given software update catalog.”
Do you have any other way of downloading Mac Drivers? Appreciate your advice. Thank you!
That’s because a MacBookAir10,1 is an M1-based Macbook. There is no BootCamp package for that machine nor is it (unfortunately) possible to install Windows natively on it (yet).
Love your article and video, I am trying to do this on my MacPro7,1 (2019 Mac Pro) and when I boot the from the USB I get the blue Window logo but never any spinning dots and then after a while the screen goes blank and after a while the monitors turn off. I’ve left it for 20 minutes and no change. I have to hold down the power to turn off.
Is there a driver issue with the video card? maybe brigadier doesn’t get all the different video drivers a Mac Pro 2019 could have?
Any help would be appreciated.
For MacBookPro8,1 create the Win10 boot disk with the software linked.
1. There is no need for 7zip, the brigadier archive is just standard zip file. Right click to properties and set Administrator for all users.
2. Extract it to the download folder and run CMD
3. Type “CD downloads” press enter
4. Then type “brigadier.exe –model MacBookPro8,1” press enter
5. Copy paste the bootcamp folder brigadier created in downloads to your USB boot disk.
6. Don’t connect the boot disk on the Mac, power up and hold down COMMAND, OPTION, SHIFT, R. (THIS WAS THE ONLY WAY I COULD BOOT TO DISK UTLITY.)
7. Format the Primary/internal disk drive to FAT32 GUID map. Name it anything, it’s going to get a new name anyway. Shut down and connect boot disk.
8. Power up Mac holding down Option and select the Win10 boot disk.
9. The rest is pretty much like installing Win10 on any machine, some drivers from bootcamp install. I had to connect ethernet and then the rest followed.
There was no need to connect external mouse or keyboard for any of these steps.
Brigadier froze at 9% the first time, I had to give it Admin rights.
I hope this is right, I just finished mine. I don’t think I forgot anything.
Great work
superbe