
As is fairly known, an Apple Mac Pro 4,1, also know as the Early 2009 model, is nearly identical to a Mac Pro 5,1, known as a Mid-2010 model. For a long time now it has been possible to flash the firmware or bootROM of a 4,1 to that of the 5,1. Unfortunately it has become harder and harder in 2024 to go through this process due to offline resources and outdates processes. In this article I will cover a workaround and explain step by step what to do in order to flash your Mac Pro 4,1 to a 5,1 today.
YouTube Video
If you are interested, I also created a YouTube video from this blogpost. If you prefer classic text, you can just follow the rest of this article:
Introduction
There are quite some advantages in flashing an Apple Mac Pro 4,1 with the firmware of a Mac Pro 5,1. It enables native support for newer macOS versions, up to Mojave instead of El Capitan, adds additional features like booting from NVMe and probably the most important: it enables support for 6-core CPUs and 1333Mhz DDR3 memory. This opens the door to a whole next level of upgrades and it is one of the reasons why this machine became and still is popular.
The process to flash or upgrade the firmware has been pretty straightforward. Back in 2011, user MacEFIRom posted a simple tool called “Mac Pro 2009-2010 Firmware Tool” on the netkas.org forum which made it very easy to upgrade a 4,1 to 5,1 firmware or go back to the original 4,1 firmware. This tool has been working for a long time and never let me down till now…
Unfortunately the netkas.org forum has been long gone and the tool seems unmaintained for an even longer time. As the tool requires internet access to download certain data I assume some of the online resources have moved or there are issues with TLS/SSL connectivity due to outdated certificates or increased security requirements. As a result, at least in my recent attempts, although it looks like everything is working, I do not longer manage to flash a 4,1 system with 5,1 firmware.
The problem
What I normally do when I want to flash a 4,1 system to a 5,1 is to go through the following steps:
- Perform a clean install of macOS El Capitan (the latest supported macOS version for a 4,1)
- Disable SIP (System Integrity Protection) by booting in recovery mode
- Download the 5,1 firmware from Apple’s website (MacProEFIUpdate.dmg)
- Download/copy the Mac Pro 2009-2010 Firmware Tool
- Open the downloaded MacProEFIUpdate.dmg to mount it
- Run the Mac Pro 2009-2010 Firmware Tool which would use the mounted .dmg
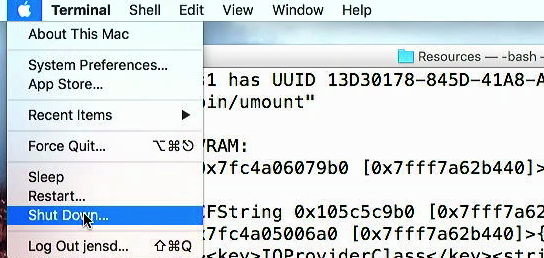
- Do the actual firmware flash by shutting down the machine then holding the power button until the power LED flashes and you hear a long tone
- Wait for the CD/DVD drive to open and the progress bar on the screen completes
- After this, the machine should reboot and the firmware is flashed to 5,1.
This has always been working but what I saw recently when I tried to go through these steps is that everything looked as if it worked and there were no error messages when running the tool. But when trying to apply the actual update by holding down the power button, the power LED was flashing and I did hear the tone but instead of seeing a progress bar, macOS started to boot as normal and the firmware did not get updated.
To try and overcome this issue, I did an extensive search, lots of reading and tried all of the following to no avail:
- Used different memory (as I suspected a bad/wonky module)
- Replaced the CR2032 battery (as this apparently is a known cause of this issue)
- Tried to do a clean install of OS X Mavericks and run the tool
- Tried to do a clean install of OS X Yosemite and run the tool
- Tried to do a clean install of OS X El Capitan on an Apple HD instead of SSD (as some posts mention that this could cause a similar issue)
- Tried to rename the dmg-file to EFI2010.dmg (as some people recommended)
- Tried different (patched) versions of the Mac Pro 2009-2010 Firmware Tool
None of the above seemed to help and everything resulted in the same behavior each time when trying to flash the firmware.
Eventually, after some more reading and digging through the archived netkas.org forum, I found the following post from a user called verveguy with only a single post on the forum:
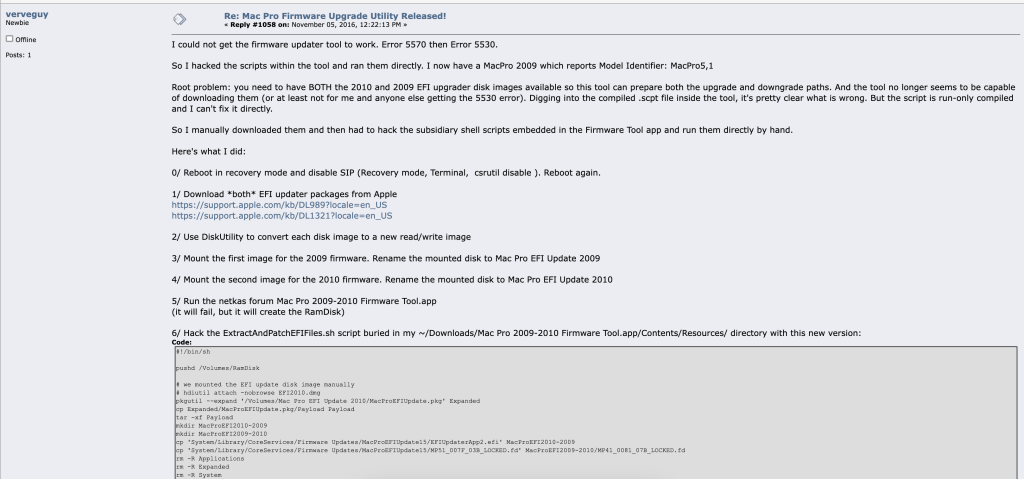
The theory here is that the Mac Pro 2009-2010 Firmware Tool needs both the “old” 4,1 firmware and the “new” 5,1 firmware for the upgrade, not only the new file. Those files are supposed to get downloaded from Apple’s website except when you, like I always did, have the 5,1 firmware mounted with that MacProEFIUpdate.dmg file. In that case it would not download the new firmware but I suspect it still needs the old one and that is probably where it goes wrong.
This gets a bit more confirmed by the error message: “This program requires Internet access. Please connect your Mac to the internet and try again.” when trying to run the tool without internet connectivity, even with a 5,1 firmware supplied as mounted dmg.
I also noticed that when trying to run the tool using no open MacProEFIUpdate.dmg, it would fail with “The program has encountered an error: 5570”:
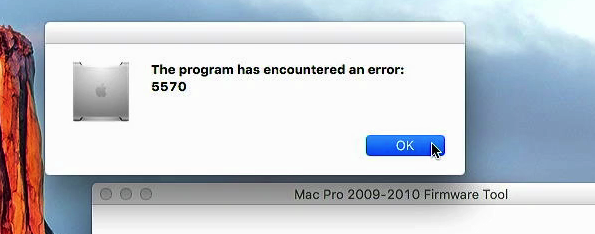
This means that when I do not supply the new 5,1 firmware, the tool is not able to download it either, hence adding to my suspicion that downloading the required old 4,1 firmware most likely also fails.
The solution
As we saw above, the issue seems to be that the Mac Pro 2009-2010 Firmware Tool is no longer able to download the required firmware files from the internet. Unfortunately there is no easy way to change the URLs or download method and it is only possible to let the tool use a mounted MacProEFIUpdate dmg for the new 5,1 firmware, not for the old one.
To work around this, largely with the help of that post I mentioned from verveguy on the netkas.org forum, we can go use the following steps instead:
- Make sure you have SIP (System Integrity Protection) disabled if you are on El Capitan
- Run the Mac Pro 2009-2010 Firmware Tool without any mounted firmware and let it fail with the 5570 error. After this the required Ramdisk and file structure is still created.
- Manually download the latest 4,1 and 5,1 firmware from Apple’s website
- Change the downloaded dmg files with the firmware into read/write mode using Disk Utility
- Mount both the firmware files and change their name to 2009 and 2010
- Replace ExtractAndPatchEFIFiles.sh in Mac Pro 2009-2010 Firmware Tool.app/Contents/Resources/ with an updated version
- Manually execute the modified ExtractAndPatchEFIFiles.sh
- Finish the preparation by manually executing UpgradeEFI2009-2010.sh
- Shut down the system and proceed with the firmware upgrade procedure as before
- Confirm that you have successfully upgraded your 4,1 to a 5,1
Now that we know the steps from a high level and understand the process, let me go into each in detail.
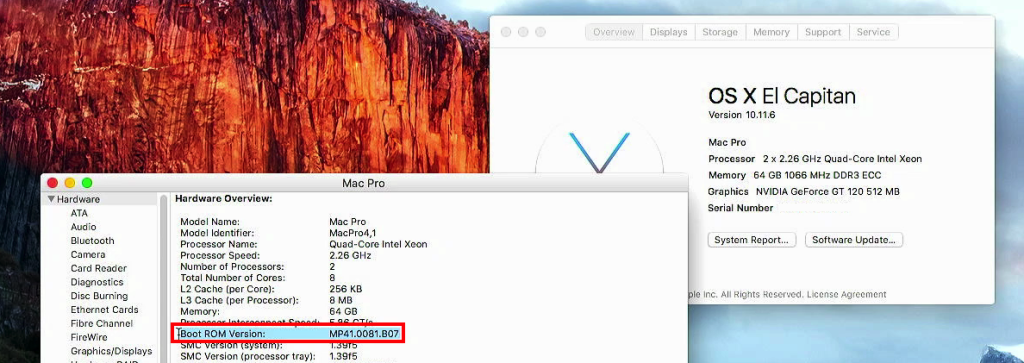
The starting point for this whole process is my Mac Pro 4,1 which is on bootROM version MP41.0081.B07. I did test this with a Mac that was on MP41.0081.B08 as well.
1) Disable SIP
If you try to go through this procedure from OS X El Capitan or 10.11.6, which is the latest officially supported macOS version on a 4,1, you will need to disable SIP or System Integrity Protection as this would prevent you from changing system file.
To do so, simply reboot or boot the machine while holding Cmd + R on the keyboard.

If all goes well, this should bring you in Recovery mode and you will see a screen as follows. Here you need to open a terminal by navigating to Utilities > Terminal on the top bar:
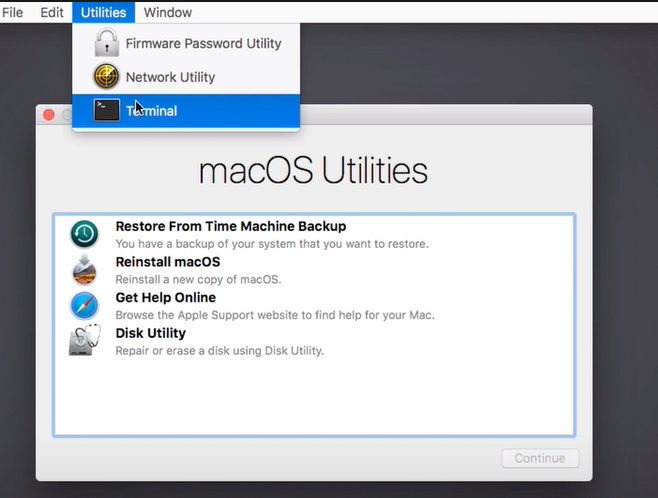
In the terminal, type: “csrutil disable” and press enter:
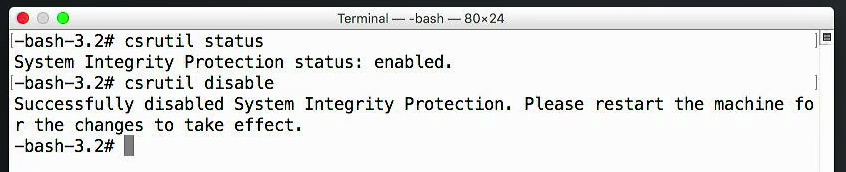
As instructed, restart the machine by navigating to the Apple icon (left-top) and clicking Restart.
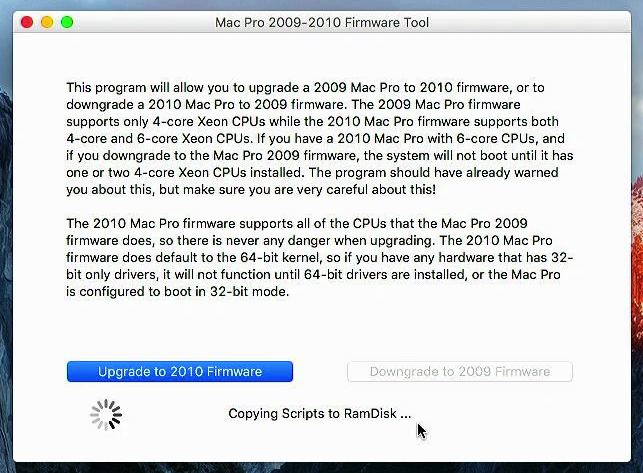
2) Run the Mac Pro 2009-2010 Firmware Tool to create the Ramdisk
You can download the tool from here if you can’t find it elsewhere.
As extensively explained above, running the firmware tool without any mounted firmware will end up with the 5570 error but that’s fine for what we want. Even though the tool can’t completely do its work, a lot of the preparation which we need has been done in the mounted Ramdisk:
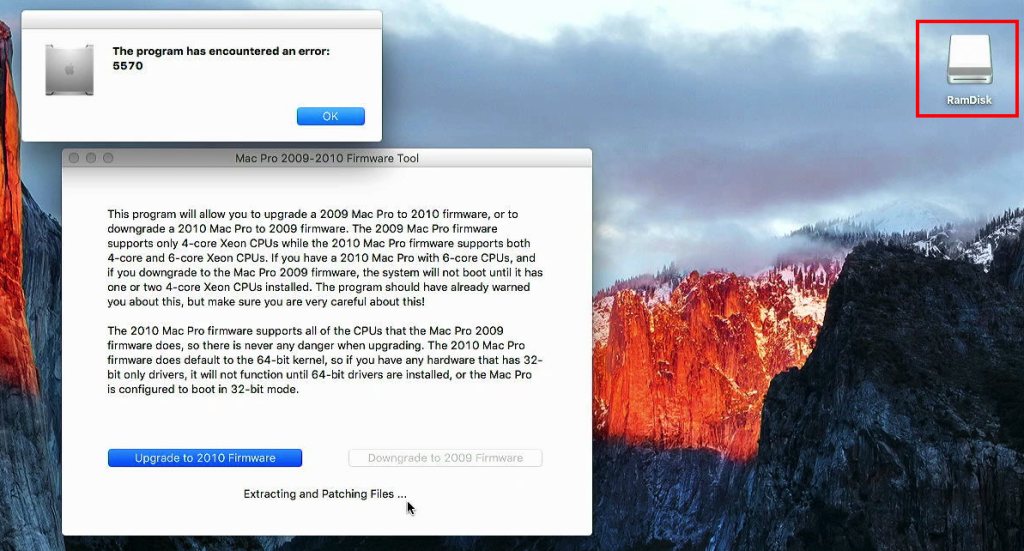
Once the tool failed with the above error, just click on Ok and it will close. After that, the RamDisk volume will stay mounted.
3) Manually download the latest 4,1 and 5,1 firmware file
In this step, we just need to download the firmware files from Apple’s website.
The 4,1 firmware we need can be downloaded from here: https://support.apple.com/en-us/106656 save the file and name it FW14.dmg.
The 5,1 firmware we need can be downloaded from here: https://support.apple.com/en-us/106455 save this as well and name it FW15.dmg.

It’s important to rename the files correctly to not mix up the files as both files will be downloaded with the same original name: MacProEFIUpdate.dmg
In case the above original links would not work, I did put a copy on my blog as well: FW14.dmg and FW15.dmg.
4) Change the downloaded dmg files into read/write mode using Disk Utility
Now that we have the required firmware, we will need to mount both files with a different name simultaneously. To make sure we can change the name to something meaningful, it is better to convert the compressed dmg files to read/write.
To do so, start by opening Disk Utility and choose Images > Convert… from the top menu:

Select the downloaded file, starting with FW14.dmg:
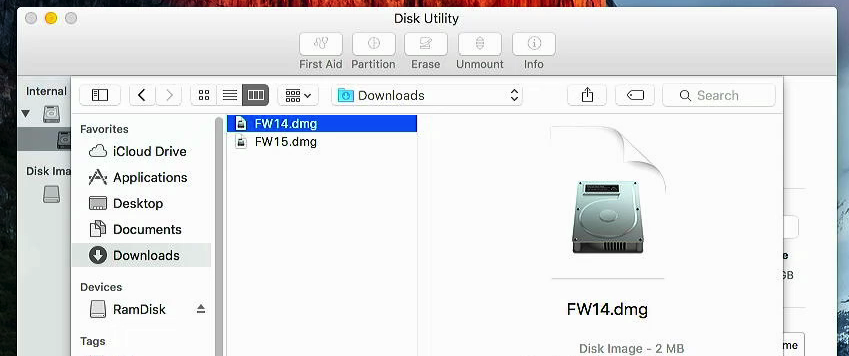
In the next dialog, enter FW14rw in the Save As: field, make sure the file will end in your Downloads folder and set the Image Format to read/write:
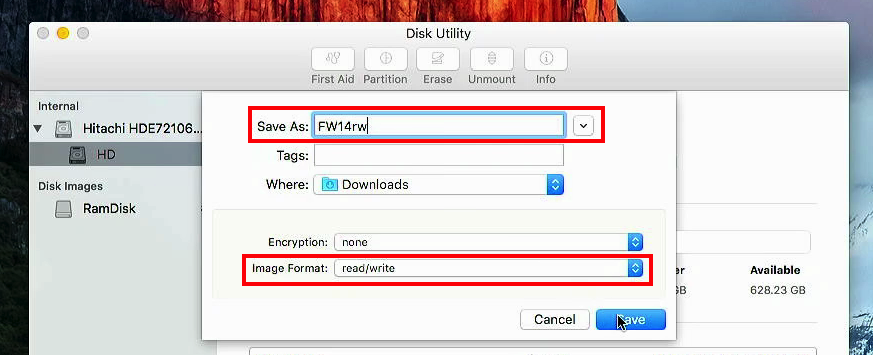
Repeat the same for the FW15.dmg file. If all goes well, you should now get the following. You can use the file sizes listed below here to make sure you have the correct names:

5) Mount the firmware files and change their name
The goal here is to mount both files, one by one and change the name of the mountpoint. We could do this using terminal but the easiest is to use Finder.
Simply double-click on the FW14rw.dmg file to mount it. Then change the name from “Mac Pro EFI Update” to “Mac Pro EFI Update 2009” and repeat the same for FW15rw.dmg but this time name it “Mac Pro EFI Update 2010”:
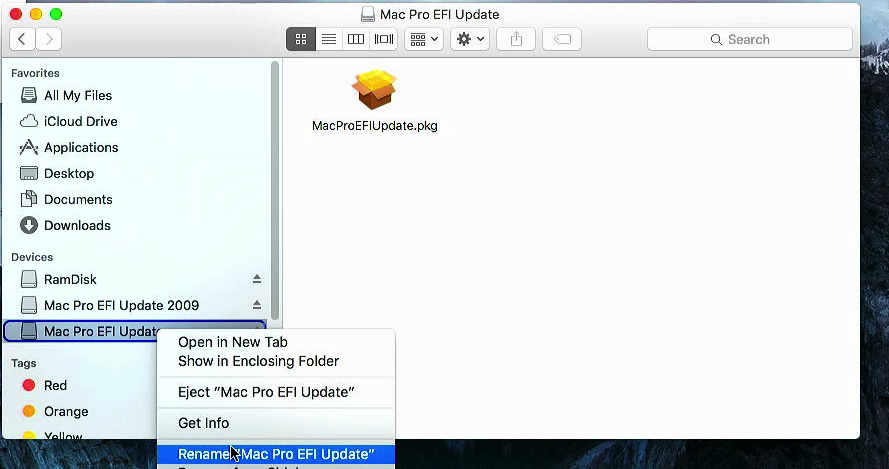
If all goes well, you should now get the RamDisk and two volumes. One with the firmware for the 4,1, renamed by adding 2009 and the other for the 5,1 with 2010 in the name:

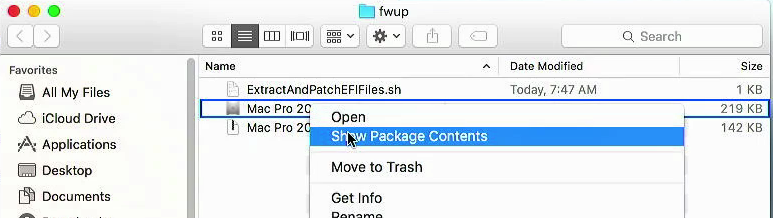
6) Modify/patch ExtractAndPatchEFIFiles.sh in the Mac Pro 2009-2010 Firmware Tool.app
In this step, we need to replace or change a script in the Mac Pro 2009-2010 Firmware Tool.app to make it use the two mounted firmware files instead.
You can download the modified version from here or use the following source code:
#!/bin/sh
pushd /Volumes/RamDisk

# Extract/copy 5.1 FW
pkgutil --expand '/Volumes/Mac Pro EFI Update 2010/MacProEFIUpdate.pkg' Expanded
cp Expanded/MacProEFIUpdate.pkg/Payload Payload
tar -xf Payload
mkdir -p MacProEFI2010-2009
mkdir -p MacProEFI2009-2010
cp 'System/Library/CoreServices/Firmware Updates/MacProEFIUpdate15/EFIUpdaterApp2.efi' MacProEFI2010-2009
cp 'System/Library/CoreServices/Firmware Updates/MacProEFIUpdate15/MP51_007F_03B_LOCKED.fd' MacProEFI2009-2010/MP41_0081_07B_LOCKED.fd
rm -R Applications
rm -R Expanded
rm -R System
rm Payload
hdiutil detach '/Volumes/Mac Pro EFI Update 2010/'

# Extract/copy 4.1 FW
pkgutil --expand '/Volumes/Mac Pro EFI Update 2009/MacProEFIUpdate.pkg' Expanded
cp Expanded/MacProEFIUpdate.pkg/Payload Payload
tar -xf Payload
cp 'Applications/Utilities/Mac Pro EFI Firmware Update.app/Contents/Resources/EfiUpdaterApp2.efi' MacProEFI2009-2010
cp 'Applications/Utilities/Mac Pro EFI Firmware Update.app/Contents/Resources/MP41_0081_07B_LOCKED.fd' MacProEFI2010-2009/MP51_007F_03B_LOCKED.fd
rm -R Applications
rm -R Expanded
rm -R System
rm Payload
hdiutil detach '/Volumes/Mac Pro EFI Update 2009/'

popd

patch /Volumes/RamDisk/MacProEFI2009-2010/EfiUpdaterApp2.efi EfiUpdater2009.patch
patch /Volumes/RamDisk/MacProEFI2010-2009/EfiUpdaterApp2.efi EfiUpdater2010.patch
This goal of this script is to extract the mounted 2009 and 2010 firmware files to the Ramdisk volume and to patch them.
We could theoretically run this script from another location but it makes things more complicated to get the paths correct. So the easiest is to either change the file or replace it in Mac Pro 2009-2010 Firmware Tool.app/Contents/Resources/.
In Finder, right click on the Mac Pro 2009-2010 Firmware Tool.app and choose for “Show Package Contents”:
Then drag the modified downloaded file to the .app folder Contents/Resources:
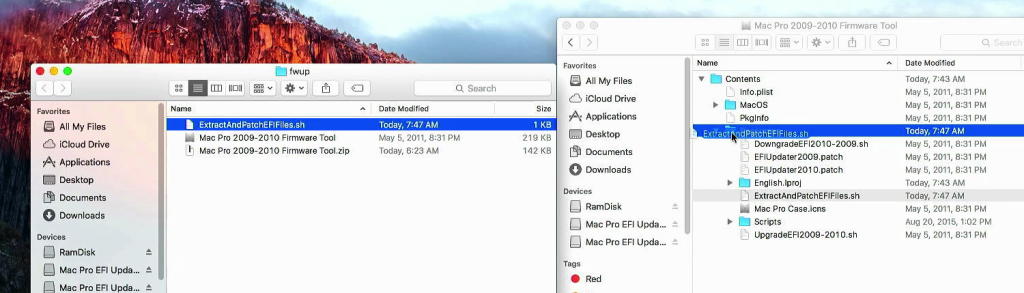
and choose to replace the file with the new version:

Alternatively you can also edit Mac Pro 2009-2010 Firmware Tool.app/Contents/Resources/ExtractAndPatchEFIFiles.sh and replace the contents with the source provided above.
Multiple people reported that replacing the file in the folder, instead of editing the existing file, could lead to a “Permission denied” issue when trying to execute it in the next step. Most likely after replacing the file you need to re-add the execute permissions, so I added this command (chmod +x ExtractAndPatchEFIFiles.sh) to the next step which should fix this.
7) Manually execute the modified ExtractAndPatchEFIFiles.sh
We’re almost finished now and most of the preparation has been done. At this stage we need to run the modified script so it can copy the data from the mounted firmware files to the Ramdisk and patch it.
To run the script, navigate to Mac Pro 2009-2010 Firmware Tool.app/Contents/Resources/ in terminal and run ./ExtractAndPatchEFIFiles.sh
For example, if the tool is in your downloads folder:
jensds-Mac-Pro:~ jensd$ cd Downloads
jensds-Mac-Pro:~ Downloads$ cd Mac\ Pro\ 2009-2010\ Firmware\ Tool.app/Contents/Resources/
jensds-Mac-Pro:~ Resources$ chmod +x ExtractAndPatchEFIFiles.sh
jensds-Mac-Pro:~ Resources$ ./ExtractAndPatchEFIFiles.sh
The output you have should look like this:
8) Manually execute UpgradeEFI2009-2010.sh
The last step of the preparation is to put the patched firmware files in the right location on your system and “bless” them so they get used when doing the firmware upgrade boot (by holding the power button).
When running the firmware tool, a script called UpgradeEFI2009-2010.sh is used to do that. Similarly, there is also a script called DowngradeEFI2010-2009.sh which would restore the 4,1 firmware after an upgrade.
To execute this script, as in the previous step, use a terminal to navigate to Mac Pro 2009-2010 Firmware Tool.app/Contents/Resources/ again and this time run sudo ./UpgradeEFI2009-2010.sh
For example, if the tool is in your downloads folder:
jensds-Mac-Pro:~ jensd$ cd Downloads
jensds-Mac-Pro:~ Downloads$ cd Mac\ Pro\ 2009-2010\ Firmware\ Tool.app/Contents/Resources/
jensds-Mac-Pro:~ Resources$ sudo ./UpgradeEFI2009-2010.sh
The output doesn’t look very meaningful but looks something like this:
After this step your Mac Pro 4,1 is fully prepared for the firmware upgrade. This would be as if we were able to complete the Mac Pro 2009-2010 Firmware Tool without issues.
9) Shut down the system and proceed with the firmware upgrade procedure as before
At this point, as mentioned above, the steps we did prepared the system for the firmware upgrade and to complete it we can just follow the instructions you would get in the firmware tool:
So next we just need to shut down our machine first:
Then hold the power button until you see a flashing power LED and hear a long tone, followed by the regular boot chime. If all goes well, you should get a progress bar (thicker than the normal boot progress bar) and the CD/DVD drive will open:

After this completes, the CD/DVD drive will close again and the system should boot back into OS X.
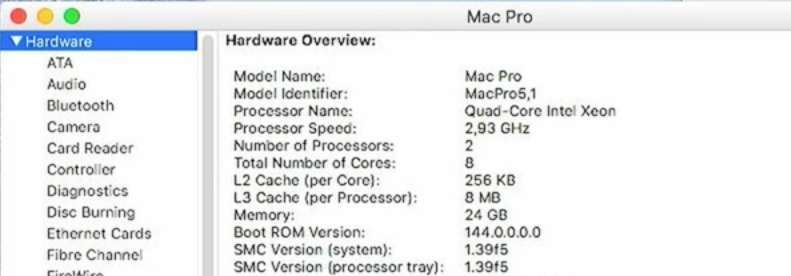
10) Confirm that you have successfully upgraded your 4,1 to a 5,1
If you managed so far, have a look at System Report from About this Mac to check if the firmware update was successful:
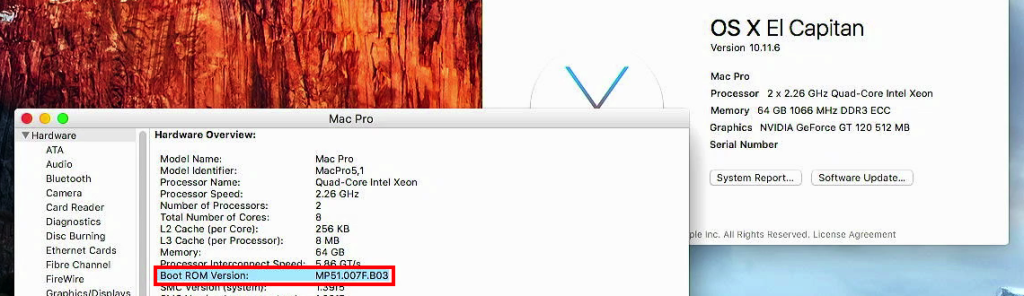
In my case, as you can see, the firmware upgrade was a success.
What else can you try?
In case the above procedure fails or didn’t work for you, there are a few more things to keep in mind or that are worth checking:
- Use an (original) EFI supported videocard that shows a boot screen
- Make sure you are on the latest 4,1 firmware version MP41.0081.B07 or MP41.0081.B08 before trying to upgrade to the 5,1 version. If you are not, run MacProEFIUpdate.pkg that is inside the download FW14.dmg which will first update your current bootROM version to MP41.0081.B07
- Also see the list of things I tried before I discovered what I covered in this post
BootROM version upgrade to 144.0.0.0.0
Once you have flashed your 4,1 with the firmware of the 5,1, you will end up with BootROM version MP51.007F.B03. This is the first and oldest version for a 5,1 as we can see on https://forums.macrumors.com/threads/macpro5-1-bootrom-thread-144-0-0-0-0.2132317/:

Ideally you would like to upgrade all the way up to the latest available version: 144.0.0.0.0 The process to do this is quite long as well but in short it consists of the following steps:
Step 1) Upgrade to macOS High Sierra from OS X El Capitan
Once you are on 5,1 firmware on El Capitan you can upgrade to macOS High Sierra. When running the installer, you will get similar instructions as with the firmware patcher tool (to hold down the power button until the LED flashes and you hear a long tone):
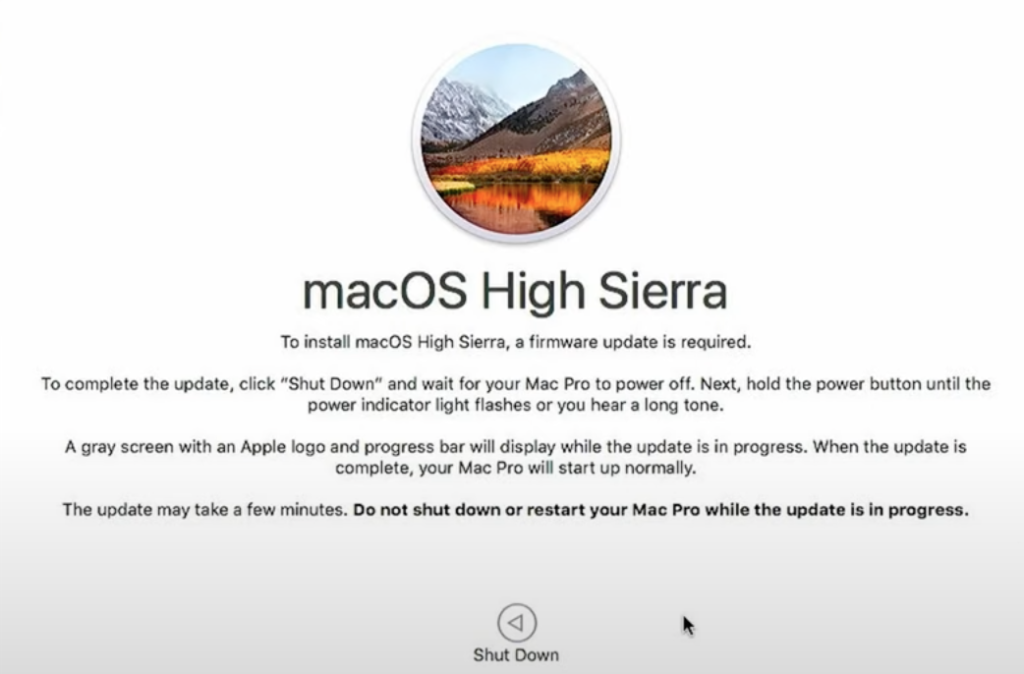
After going through this, your BootROM version will be MP51.0086.B00. Then complete the rest of the upgrade to macOS High Sierra.
Step 2) Start the macOS Mojave installer with a Metal-supported GPU
Next, to move to 144.0.0.0, we need to run the Mojave installer from High Sierra. This requires a GPU with Metal-support, like a RX 560, RX 580 or AMD Radeon HD7950.
Once you have a GPU with Metal-support, start the Mojave installer and follow the same instructions once again:
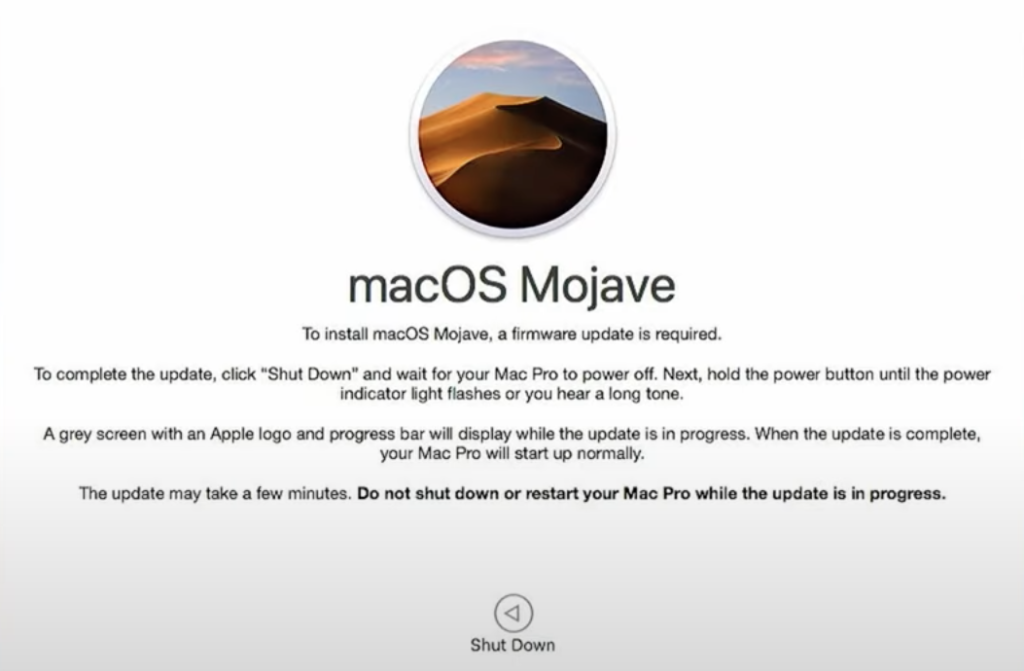
After completing that step this time, you will end up with the desired firmware version: 144.0.0.0.0:
I covered this with a lot more detail in a Youtube video if you plan to go through this as well:
Disclaimer
Although a lot of people, including myself multiple times, have successfully upgraded the firmware in a 4,1 to 5,1 and have been using those systems for many years without problems now, recent messages from select people, for example on the MacRumors forums, are advising against this firmware upgrade method. According to those messages, the firmware tool would create a hybrid 4,1/5,1 firmware which ultimately could lead to a bricked/corrupted BootROM. So far I have not experienced any sign of this and looking a dumps of several BootROMs after converting many years ago, I don’t see any issues. The alternative they offer is to reconstruct a dump of the BootROM correctly for 5,1 firmware. I’m not 100% sure if this is a real risk and what makes me sceptical is that these people are not sharing how to do this but instead offer to do this as a paid service.
Nevertheless, I want to be complete and inform you of this recent update I came across so you can make your own decision.
Nice work!
But seems to overcharge some users with less experience. A manual bootrom reconstruction is always better choice, because of corrupted parts inside the bootrom after the crossflash. This doesn’t need the steps and works even with a non-Metal card like GT120.
If anyone needs a direct upgrade to latest 144.0.0.0.0 bootrom or any older version, “Jensd” may give them my mailing contact. Yes, it is for free.
Can’t upgrade firmware tried all remedies stated here and followed precise instruction on Jensd”” video&text. I’m stuck after these commands:
jensds-Mac-Pro:~ jensd$ cd Downloads
jensds-Mac-Pro:~ Downloads$ cd Mac\ Pro\ 2009-2010\ Firmware\ Tool.app/Contents/Resources/
jensds-Mac-Pro:~ Resources$ chmod +x ExtractAndPatchEFIFiles.sh
jensds-Mac-Pro:~ Resources$ ./ExtractAndPatchEFIFiles.sh
are properly executed in terminal, terminal response is: files not found.
Tried both in El Captain & High Sierra and edited that file in the Tool did not replaced it.
All files and tool are present on the Desktop and ram disc together with 2 drivers for old and new firmware from Apple.
Any help will be greatly appreciated, specially direct upgrade if possible.
Thanks
Regards,
Michael
Very cool @Jensd!
As you noted, a serious issue with the whole firmware fixing thing on MacRumours is the hoarding of information as some other person posted on YouTube recently. An option to pay for the service is actually not a big deal by itself but the refusal to share is really terrible.
Based on this, I would strongly discourage taking up the option to refer people to the poster above that offers to do things “for free” as this is a poisoned chalice option that seeks to perpetuate the status quo of not wanting to share information.
As far as I know, the fellow that charges for the task is pretty open to sharing information when all is said and done. This is a million times better than any “free” option that hoards information. Suh, at the end of the day, is not free at all.
If any one finds the steps step out too daunting, please take the paid option as this, strange as it may sound, serves the community better in the long run.
Found this tutorial yesterday on MacRumors to rebuild bootrom: https://forums.macrumors.com/threads/guide-how-to-rebuild-update-mac-pro-4-1-5-1-bootrom-with-template-files.2437082/
I can’t judge if that really works. Looks not easy and too risky for the bulk, but maybe people with modding or programming skills might get some peek inside how it is done.
Bonjour, many thanks for this tool. Everything is ok for me until 13:52 where i receive this message “pro-de-mac-mac:Resources macmac$ ./ExtractAndPatchEFIFiles.sh -bash: ./ExtractAndPatchEFIFiles.sh: Permission denied” . I ‘ve tried to change “Share and permissions” to “Read and write” for all users in nearly all files and directory of “Mac Pro 2009-2010 Firmware Tool” but it doesn’t works anymore. Any idea to help me ? thanks (from France;))
Same as SUCHET above, I have tried this 3 times and also keep getting the “Permission denied” response in Terminal. I have VERY carefully followed each step, particularly Disable SIP (and confirmed it being off) as well as the the Read&Write changes. Any advice?
Last login: Sat Sep 21 12:31:01 on ttys000
john-nolls-mac-pro-2:~ johnnoll$ cd Desktop/fwup/
john-nolls-mac-pro-2:fwup johnnoll$ cd Mac\ Pro\ 2009-2010\ Firmware\ Tool.app/Contents/Resources/
john-nolls-mac-pro-2:Resources johnnoll$ ls
DowngradeEFI2010-2009.sh ExtractAndPatchEFIFiles.sh
EFIUpdater2009.patch Mac Pro Case.icns
EFIUpdater2010.patch Scripts
English.lproj UpgradeEFI2009-2010.sh
john-nolls-mac-pro-2:Resources johnnoll$ ./ExtractAndPatchEFIFiles.sh
-bash: ./ExtractAndPatchEFIFiles.sh: Permission denied
john-nolls-mac-pro-2:Resources johnnoll$
Should also mention that my 4,1 boot ROM version is MP41.0081.B07
What type of user are you logged in with? This will required an admin user, not a standard user.
Some other things you could try as:
– change the permissions of the file with: “chmod +x ExtractAndPatchEFIFiles.sh”
– run the command with sudo in front of it: “sudo ./ExtractAndPatchEFIFiles.sh”
– before executing the script, switch to root using the command “sudo su”.
Hopefully this helps.
“Jensd” is it posible to forward my email address to H.P. as it seams that he has got a direct upgrade to latest 144.0.0.0.0 bootrom? Thanks
I have also tried using two different GPU’s:
NVIDIA GeForce GT 120 (original to this Mac Pro)
NVIDIA Quadro K500 (recently installed to be ready for Mojave)
Both are currently installed in the machine. Does that create an issue? I just plug the monitor connector into one or the other when trying to implement this upgrade.
I get the same Terminal message “Permission denied” regardless of which GPU was used.
I’ve tried this entire process about 10 times trying to adjust other potential conflicts (just logical guesswork on my part as I
am not experienced with this type of thing). I tired with VPN on or off. No change. I tried with Ethernet connection and with WIFI connection. I also tried changing Privacy Preferences by adding Terminal.app to “Allow the apps below to control your computer” No change.
Curious about the need for internet connection for this process to work. Is there data being exchanged with Apple? Permissions or authorizations being implemented?
Thanks for any suggestions!
hi i keep getting the same issues is there a way around it ./ExtractAndPatchEFIFiles.sh: Permission denied”
What type of user are you logged in with? This will required an admin user, not a standard user.
Some other things you could try as:
– change the permissions of the file with: “chmod +x ExtractAndPatchEFIFiles.sh”
– run the command with sudo in front of it: “sudo ./ExtractAndPatchEFIFiles.sh”
– before executing the script, switch to root using the command “sudo su”.
Hopefully this helps.
Is this method working or everyone is having the same problem described above??
Very nice work. Perfectly explained. I was almost thinking this upgrade is impossible until i find Your description. Thank You very very much.
Just one thing. I experienced difficulties after i created a new ExtractAndPatchEFIFiles.sh. The Terminal did not allowed to run it (permission denied). Its important to take the old file an modify the content and not to create new one.
Peter
Glad to hear that it worked for you. Thanks for the feedback.
Looks like the people in the above comments had the same or similar issue with ExtractAndPatchEFIFiles.sh. It’s important to change the contents of the existing file and not create a new one as it would reset the permissions. I will edit this in the article.
Thanks for the suggestion Peter Pomocnik, I was finally able to get it to work. And much appreciation to jensd for putting in all the work to present this information in such a concise and thorough manner. I was able to work my MacPro through all the steps and am now successfully running Mojave. Very happy and appreciative.
Nice to hear and thanks for updating here. So you also managed now with editing the file and not replacing it, correct? I’ve already updated this in the article above but the more confirmation, the better :)
Sorry for the delay.
Yes, updating the file instead of replacing was evidently the solution in my case as well.
Hi John,
Would you be so kind as to share the steps you take to update the file please.
Much Appreciated
Hi Jensd,
I have tried everything suggested for two days now but I always end up at the point with Permission Denied. I noticed that Peter Pomocnik recommends to modify the content of the old file but I’m not sure of the steps to take to complete the modification of the old file.
I have tried a few things in this area but I have not had any success.
Any further help will be very much appreciated.
You basically open the existing file from: Mac Pro 2009-2010 Firmware Tool.app/Contents/Resources/ExtractAndPatchEFIFiles.sh with a text-editor and replace the contents with the one I share here. Then just save the file and continue with the rest of the steps.
Thanks ever so much.
I will try this and see if it works for me.
Hi Jensd,
It worked.
I can’t thank you enough for all your hard work with this.
I thought it couldn’t be done.
You are the best. Thanks again.
Hi how are you i try make udeate logic bord 4.1 to 5.1 firmware but not charging after i do all steps
If i bay logic board flashing 4.1 to 5.1 firmware from ebay website working?
I have 2 computer I want ugrade
Maximum
I bay 2
Mac Pro 2009 4,1 Delidded Upgrade Kit to 12-Core 3.46GHz Xeon X5690 CPU SLBVX
I bay 2
128GB (8x16GB) PC3-8500R DDR3 ECC Reg Memory for Apple Mac Pro 2009 4,1
I bay 2
Sapphire Pulse RX580 8GB Mac Pro EFI boot screen Metal 4K native Mojave Monterey
If have any solutions or advice?
Before doing these upgrades, at least for the CPU, you will first need to be able to successfully upgrade the firmware to 5,1. If you leave the firmware on 4,1, the system will not boot with those new CPUs.
If these are dual CPU systems, you will need 4 CPUs to upgrade them. And in terms of memory it’s better to upgrade to 96GB per system as 4 modules comes with a performance penalty since the CPUs can use triple channel.
I already have Mojave on my Mac. I can follow you up til step 6. I can’t figure out how to extract the updated files so i can update the files in the firmware tool. Can you HELP??
Jensd! Thanks for the great work! If it weren’t for your help it would have been really bad!
Hi Jensd,
This process worked flawlessly once I figured out what was crashing my MacPro4,1 (it was the OG GT120 GPU). I have 4 of these MP4,1 towers to upgrade and have been at this process for months with no success until today.
Question: I’m building a gaming tower for my son, dual booting Windows 10 on this one. I picked up an 8GB RX580 GDDR5 GPU online. I have the 6-pin to 8-pin dongle for power and before I try to see if it works, it not flashed for Mac. Should it work with 5,1 and El Capitan 10.11.6 or do I need to upgrade to High Sierra or Mohave first? And with the new 5,1 FW installed, should Software Update download it automatically or will I need to create USB Installers for each one? And do you happen to have links to get the latest versions of those OS’s? Lastly – do I need to do anything with the GPU before installing it…leave the GT120 installed as well or should it work out of the box with 10.11, 10.12, etc.? Also…will the FW & OS upgrades also give me the Apple Bootloader screen at startup for dual boot?
Thank you in advance…this was supposed to be his Xmas gift, but already a day late :(
Any help is appreciated! (you can also email me instructions if easier)
Hello,
RX580 is supported from High Sierra up, runs without drivers/acceleration under El Capitan. GT120 has no metal support, so you’re stuck on High Sierra and firmware MP51.0089.B00.
With usb install media, you won’t be able to update the firmware. And no, even the latest firmware 144.0.0.0.0. for Mac Pro 5.1 can’t activate bootscreen ability, this is only due to an unsupported firmware mod.
Conclusio: A rebuilding w/ firmware mod will be the easiest way and save some steps and time. Several members from MR forum are able to do the rebuilding for free or donation.
Hello – so I successfully upgraded to 5,1 but my GPU is some Chinese knockoff Showkings RX580 8GB GDDR5 I got on Amazon for $70. I upgraded to Mojave 10.13.6, but now I’m being told I need to go back to El Capitan, which I did, install GT120 card back and downgrade firmware to 4,1 and use OCLP to patch the OS so the new GOU works. However, even now back to El Capitan, the Downgrade file option doesn’t work with usual instructions above.
I opened FW tool, downgrade option was only thing available, got the 5570 error, ram disk created, went through all other steps but instead of sudo ./UpgradeEFI2009-2010.sh, used the DowngradeEFI2010-2009.sh file. Got same results following steps from terminal but every time I shutdown and do the FW update, the screen pops up after low tone and immediately disappears and boots into macOS.
What else is needed to successfully downgrade FW back to 4,1?
Great work, worked perfectly!!!
when i type in the command /ExtractAndPatchEFIFiles.sh it says file not found and it also says permission not granted before running the chmod +x ExtractAndPatchEFIFiles.sh command
any assistance please
Hello everyone. I have tried to disable SIP for hours. Holding CMD+R, CMD+OPTION+R and rebooting holding power down to get recovery options don’t work. I cannot find a solution as they are all the same. I can’t get past step one. Embarrassing. Does anyone have a solution for a 2009 Mac Pro?
Boot from install media, instead of installing select “utilities” and then “terminal”, type the commads to disable SIP, thats it.
Does anyone know if this can be done while running opencore and non-native OS? Or do I need to go back to El Capitan for this to work? Thanks in advance.
After tinkering around for a bit, I’ll answer my own question. Yes, you need to go back to El Capitan. And it worked! I now have a 5,1 machine. Thank you so much for the work that went into this.
ALSO, yesterday the downloads worked from the apple site. Today, they do not and just redirect you to other useless apple sites. I think I just personally witnessed the very day that Apple shut the lights off on these machines altogether. Please do not ever stop hosting that firmware for future users!
After a few hours of pain, it finally worked, why didn’t it work ?
i had a pci USB card and apparently they don’t like it one bit
Hello.
First of alll I would like to thank you and congratulate you for being so descriptive and analytical for the procedure.
Although I carefully followed each step in the tutorial, when I pressed the power button to start updating firmware and released it immediately after the long chime, screen momentarily showed that it would start the process but in what appeared to be less than a second computer rebooted again and followed normal startup process. Hence, no change in firmware version which remains MP41.0081.B04
This is a mac pro 4.1 with 2×2.26 Xeon cpus, 4*4 GB DDR3 ram, 256 GB SSD and a Radeon 5770. I bought it second hand and oddly enough when I first fired it up it was running OS High Sirerra 10.13.6 although it is not supposed to go beyond El Capitan.
To start the process I formatted disk and installed El Capitan so as to completely comply with requirements for the procedure.
I would appreciate your assistance, thank you in advance,
Remove all unneeded hardware, especially pci-cards, except the Radeon card.
There was a fibre channel card and also a video capture card installed but I took everything out before I attempted the upgrade. There is nothing else in there besides the 5770
Maybe something went wrong when creating the ramdisk.
Sorry, no more ideas, better ask someone who can rebuild your bootrom, before many try outs and spending more time.
Look the link above to MacRumors community.
Thanks H. P.
Since the machine is running a Mac OS version it was not supposed to and no OCLP is installed, I guess someone had modified the original bootrom in the first place and this is why I cannot get the procedure to work…
Follow the directions and it works. I took me a couple hours to do.
Worked Perfectly. Many Thanks!
I have followed all the steps and I am getting an error. All the files are in the download directory. I am running a standard 4.1 machine with no additional components and the boot rom version is MP41.0081.B07.
The roadblock is this: I enter the data into the terminal as in step 7. All the lines of script go in perfectly until the last line which is ./ExtractAndPatchEFIFiles.sh
The response I get is: -bash: ./ExtractAndPatchEFIFiles.sh: /bin/sh^M: bad interpreter: No such file or directory.
The file is in the download/contents/resources folder as per the instructions.
Any help would be appreciated.
Thanks.
Respect! I ran into the issue you described using the Firmware Upgrade tool. I followed your tutorial and was able to unbrickify my Mac Pro 4,1. Thank you for saving me so much time!
Thank-you so much, brilliant job. I too got stuck on the file not found in step 7 but rather than copy pasting your command cd Mac\ Pro\ 2009-2010\ Firmware\ Tool.app/Contents/Resources/ I typed cd the a space and dragged and dropped the folder into terminal from the finder. Maybe it’s because my system was set to French language. Anyhow I couldn’t be happier just two more 4,1s to do.Thanks again.
Hey everyone,
As explained thoroughly in the video, it really seems like a daunting task at first.
I used to build Hackintosh PCs myself — though it’s been about five years since the last time — and I can tell you, even back then it was pretty intense.
What’s explained here requires the same kind of patience and precision.
This past week, I upgraded two Mac Pro 4,1 machines to 5,1 firmware, and honestly, it took a little getting used to.
On the first Mac Pro, I spent hours troubleshooting, even though I was following Jends’ steps literally one by one. But eventually — it worked!
My biggest mistake?
I opened the ExtractAndPatchEFIFiles.sh script straight from YouTube, but all I got was the raw text of the script.
I copied it from Google Chrome and pasted it into Windows Notepad, then saved it as ExtractAndPatchEFIFiles.sh.
What I didn’t realize was that Notepad doesn’t create a proper .sh file this way.
Because of that, I wasted hours trying to figure out why it wasn’t working.
Later, I used Microsoft Edge to download the file again and saved it properly, and that version worked perfectly.
However, I hit another snag: my Mac Pro was running macOS El Capitan set to Dutch. That caused some problems too.
Once I switched the system language to English, I was finally able to follow Jends’ instructions without any issues and successfully flashed both Mac Pros from 4,1 to 5,1.
So for anyone who’s feeling like giving up, here are two important tips:
Make absolutely sure you have a properly working ExtractAndPatchEFIFiles.sh file.
Set your macOS system language to English before starting.
Here are the exact Terminal commands from Jends that you can copy and paste:
bash
# Step 1
cd Desktop/fwup/
# Step 2
cd Mac\ pro\ 2009-2010\ Firmware\ Tool.app/Contents/Resources/
# Step 3
ls
# Step 4
./ExtractAndPatchEFIFiles.sh
# Step 5
sudo ./UpgradeEFI2009-2010.sh
# Step 6
(enter your password when prompted)
Good luck to everyone!
And seriously — if you take it slow and follow the steps carefully, you can definitely get it done.
Dear Jensd,
I just realized that I misspelled your name in my previous message.
My apologies for that.
I also want to sincerely thank you for making it possible to upgrade these old “dinosaurs” through your method.
Thanks to your work, they can still be given a new lease on life!
Hello! I also posted this message on your YouTube guide.
I am smoothly getting to the point of executing the UpgradeEFI2009-2010.sh file, but then get the following in terminal;
Mac-Pro:Resources Nicholas$ sudo ./UpgradeEFI2009-2010.sh
rm: /System/Library/CoreServices/Firmware Updates/MacProEFIUpdate15: No such file or directory
mkdir: /System/Library/CoreServices/Firmware Updates/MacProEFIUpdate15: Operation not permitted
cp: /System/Library/CoreServices/Firmware Updates/MacProEFIUpdate15: Operation not permitted
cp: /System/Library/CoreServices/Firmware Updates/MacProEFIUpdate15: Operation not permitted
EFI found at IODeviceTree:/efi
Failed to stat firmware file, /System/Library/CoreServices/Firmware Updates/MacProEFIUpdate15/EfiUpdaterApp2.efi: 2
Error while writing firmware updater for EFI
Any help would be appreciated! :)
It looks to me as though the script is searching in the system files for files that aren’t there when I navigate there myself.
To be clear, I’m doing this on High Sierra which is what this 2nd hand Mac Pro came with. I’ve attempted to downgrade to El Capitan but that has been an issue in itself so I’m reattempting a clean run of your guide.
Hello Jens,
thanks for the great post. I have a special problem and maybe you have an idea.
My Mac Pro 4.1 does not boot any OS anymore. So I can not use the GUI version of the tools. I got stuck with ChatGPT to resolve the issue via EFI Boot, since the “MacProEFIUpdateTool.efi” program needed is nowhere downloadable anymore.
Do you have the tool somewhere or any other suggestions? It seems my Mac Pro is bricked…
Thanks in Advance and best regards from Germany,
Rob
Hi Jensd,
Great job, thank you very much.
I just had to solve the permision issue with a simple chmod +x.
Can you please explain to me the difference between the MP51.0086.B00 and the 144.0.0.0.0?
I’m asking beacuse I don’t have a Metal compatible GPU and I just wish to install a linux server so I could be fine with the MP51.0086.B00.
Thanks
Has anyone succeeded upgrading a 4,1 that has the B08 firmwire? I know Jensd wrote that he worked this process out on a machine with F/W B07 and *tested* it on one with B08
[continuing this question after my dog jumped up and hit ‘post’ prematurely!]
I just wanted to verify that *tested* it with B08 meant it *works* with B08. I’m due to look at a B08 machine in a few days that I might buy if this process works with that firmware. Thanks and great job with this blog and the YT video.
Yaaay! Worked for me first time. I had the 4,1 firmware ending in B08 but have followed the guide through to get a 5,1 with firmware MP51.0089.B00 (not MP51.0086.B00 in my case). Awaiting an X580 to progress to Mojave.
Thanks you so much for the clear instructions and hard work putting this all together.
Something changed in 2024 and the instructions from TheHouseOfMoth stopped working (maybe certificates are outdated). I haven’t tried the instructions from this post, but this worked for me (very simple, read the .sh file for instuctions): https://github.com/netantz/mp41to51
Hi,
I never managed to upgrade a macpro 4.1, with your solution It worked. Many thanks! I have a macpro 5.1.
Now I would like to install high sierra and as explained it requires a firmware update.
Same problem as before I try your solution: when I power on the macpro with button pressed for several seconds, I can see the power led flashing and hear a beep but after that nothing occurs, it starts with mac os x (el capitan here).
Is there another way to upgrade the 5.1 firmware to the latest?
As described, ask the guy from MacRumors who wrote the topic about the reconstruction.
He helped me also with the GOP and charges nothing.
Procédure effectuée sans problème (en novembre 2025) depuis Yosemite.
L’étape 1 (désactivation du SIP) n’est pas nécessaire car absente de yosemite.
L’étape 2 n’affiche pas exactement la même erreur que 5570.
Sinon tout le reste est identique.
Un grand merci
Hey,
Thank you for the great work!!
I´m not able to perform steps 7 and 8. The Terminal shows:” No suche file or directory” when I try to extract the file and the MacProEFI2009-2010 folder in RamDisk remains empty. Can somebody help?
Thank you very much!!
Hi, not sure if anyone has had this problem or not. I am sure it is something I am doing wrong but I can not figure out what it is. I get all the way through to thje last step and it failes. I have included the terminal out put. Any help would be appreciated Pick up 4,1 to play wiith and wanted to flash it to a 5,1 but have been unable to do it.
Thanks
Steve
M”cs-M”c-Pro:Resources m”cpro$ ./Extr”ctAndP”tchEFIFiles.sh
/Volumes/R”mDisk ~/downlo”ds/M”c Pro 2009-2010 Firmw”re Tool.”pp/
Contents/Resources
“disk3” unmounted.
“disk3” ejected.
“disk2” unmounted.
“disk2” ejected.
~/downlo”ds/M”c Pro 2009-2010 Firmw”re Tool.”pp/Contents/Resources
p”tching file /Volumes/R”mDisk/M”cProEFI2009-2010/EfiUpd”terApp2.efi
p”tching file /Volumes/R”mDisk/M”cProEFI2010-2009/EfiUpd”terApp2.efi
M”cs-M”c-Pro:Resources m”cpro$ ./Upgr”deEFI2009-2010.sh
override rw-r–r– root/wheel restricted for /System/Libr”ry/CoreServices/
Firmw”re Upd”tes/M”cProEFIUpd”te15/EfiUpd”terApp2.efi?
override rw-r–r– root/wheel restricted for /System/Libr”ry/CoreServices/
Firmw”re Upd”tes/M”cProEFIUpd”te15/MP41_0081_07B_LOCKED.fd?
override rwxr-xr-x root/wheel restricted for /System/Libr”ry/CoreServices/
Firmw”re Upd”tes/M”cProEFIUpd”te15?
mkdir: /System/Libr”ry/CoreServices/Firmw”re Upd”tes/M”cProEFIUpd”te15: File
exists
cp: /System/Libr”ry/CoreServices/Firmw”re Upd”tes/M”cProEFIUpd”te15/
EfiUpd”terApp2.efi: Permission denied
cp: /System/Libr”ry/CoreServices/Firmw”re Upd”tes/M”cProEFIUpd”te15/
MP41_0081_07B_LOCKED.fd: Permission denied
EFI found “t IODeviceTree:/efi
Will need to copy 4337664 bytes to EFI system p”rtition
GPT detected
No “uxili”ry booter p”rtition required
System p”rtition found
Preferred system p”rtition found: disk0s1
Returning booter inform”tion diction”ry:
{type = mut”ble dict, count =
3,
entries =>
0 : {contents = “System
P”rtitions”} = (
disk0s1
)
1 : {contents = “D”t” P”rtitions”} =
(
disk0s2
)
2 : {contents = “Auxili”ry
P”rtitions”} = (
)
}
Substituting ESP disk0s1
C”n’t cre”te mountpoint /Volumes/bless.LzOz
Mounting “t /Volumes/bless.LzOz
Executing “/sbin/mount”
mount: re”lp”th /Volumes/bless.LzOz: No such file or directory
Returned 256
/sbin/mount returned non-0 exit st”tus
F”iled to determine “uxili”ry p”rtition mountpoint for disk0s1
Error while writing firmw”re upd”ter for EFI
M”cs-M”c-Pro:Resources m”cpro$
Hola, tengo el mismo error, pudiste solucionarlo, llegue hasta el final y sale el error de escritura.
Hi, I’m having the same error. Were you able to fix it? I got to the end and got the typing error.
Hi hier ist der Nemesis,
ich wollte nur sagen: Fabelhaft, Super, Mega!!!!! Mein MacPro ist jetzt ein 3,06Ghz 96GB RAM – MONSTER!!!!! Dank deiner Anleitung machst du MacPro besitzer glücklich.
Danke
Followed the instructions,even swapped HardDrives (the both had ElCapitan)
Last login: Sat Feb 28 17:19:29 on ttys000
macs-Mac-Pro-2:~ mac$ cd Desktop/fwup/
macs-Mac-Pro-2:fwup mac$ cd Mac\ Pro\ 2009-2010\ Firmware\ Tool.app/Contents/Resources/
macs-Mac-Pro-2:Resources mac$ ls
DowngradeEFI2010-2009.sh EFIUpdater2010.patch ExtractAndPatchEFIFiles.sh Scripts
EFIUpdater2009.patch English.lproj Mac Pro Case.icns UpgradeEFI2009-2010.sh
macs-Mac-Pro-2:Resources mac$ ./ExtractAndPatchEFIFiles.sh
./ExtractAndPatchEFIFiles.sh: line 1: {rtf1ansiansicpg1252cocoartf1404cocoasubrtf470: command not found
./ExtractAndPatchEFIFiles.sh: line 2: syntax error near unexpected token `}’
./ExtractAndPatchEFIFiles.sh: line 2: `{\fonttbl\f0\fmodern\fcharset0 Courier;}’
macs-Mac-Pro-2:Resources mac$
I have no clue….
macs-Mac-Pro-2:Resources mac$ sudo ./UpgradeEFI2009-2010.sh
WARNING: Improper use of the sudo command could lead to data loss
or the deletion of important system files. Please double-check your
typing when using sudo. Type “man sudo” for more information.
To proceed, enter your password, or type Ctrl-C to abort.
Password:
rm: /System/Library/CoreServices/Firmware Updates/MacProEFIUpdate15: No such file or directory
cp: /Volumes/RamDisk/MacProEFI2009-2010/EfiUpdaterApp2.efi: No such file or directory
cp: /Volumes/RamDisk/MacProEFI2009-2010/MP41_0081_07B_LOCKED.fd: No such file or directory
EFI found at IODeviceTree:/efi
Failed to stat firmware file, /System/Library/CoreServices/Firmware Updates/MacProEFIUpdate15/EfiUpdaterApp2.efi: 2
Error while writing firmware updater for EFI
macs-Mac-Pro-2:Resources mac$
I’m still getting error code 5570 after following the tutorial. Anyone can help me?
Bravo
After long days of searching a valid method to update I found your job and complete explanation and it has perfectly worked !
Thank you for the quality of the plan not so hard to execute. I’ve done it in 2026
This still works in April 2026! Thanks!
I follow all the steps correctly, but when I get to step 8, which is the last one, I get this message.
I would appreciate any help. I have a Mac Pro 4.1 with a GT120 graphics card, the Capinta software, all original Apple components, and no other cards or anything unusual.
I can’t get it to work.
Substituting ESP disk0s1
C”n’t cre”te mountpoint /Volumes/bless.LzOz
Mounting “t /Volumes/bless.LzOz
Executing “/sbin/mount”
mount: re”lp”th /Volumes/bless.LzOz: No such file or directory
Returned 256
/sbin/mount returned non-0 exit st”tus
F”iled to determine “uxili”ry p”rtition mountpoint for disk0s1
Error while writing firmw”re upd”ter for EFI
M”cs-M”c-Pro:Resources m”cpro$
VERY IMPORTANT!! READ!!
I couldn’t install it with the GT120 graphics card.
I was able to install it without any problems using the graphics card from my Mac Pro 3.1, the ATI Radeon HD 2600 XT.
ROOM B08
This worked perfectly, thank you very much !!