
Running macOS in a virtual machine is pretty straightforward when doing this on a Mac that is running macOS already as it is easy to get your hands on the installation files. When you want to do this on a x86-based Windows machine it gets a bit more complicated but that is exactly what I will cover in this post. Using a virtual machine with macOS allows you to experiment and play around with different versions of macOS itself without the need for real Apple hardware. It also allows you to have an environment to troubleshoot and diagnose issues with real Mac hardware when you no longer have a working macOS-based machine available.
YouTube Video
If you are interested, I also created a YouTube video from this blogpost. If you prefer classic text, you can just follow the rest of this article:
Introduction
In my previous two posts, I already covered running macOS Sonoma in a virtual machine. This was for devices that had the host system already on macOS, both Intel-based and Apple Silicon-based. In case you don’t have real Mac hardware available, or you do have but it no longer wants to boot into macOS properly, you can instead run macOS in a virtual machine on top of a Windows-based PC.
There are several ways to get to a working macOS VM on top of Windows. In most cases VirtualBox or VMware Workstation (which is now free for personal use) are used as the hypervisor. So I gave both a try but found VMware workstation to be a lot easier and more stable once you go with newer macOS versions.
My goal here was to not use any pre-made macOS installation media that requires another macOS machine but instead to go through the full procedure without the need for a real Mac or counting on a pre-made image made by someone else. The downside of this is that the process is quite a bit longer and requires more data to be downloaded. The good thing is that it has no further dependencies and should work for newer releases as well.
I will go through the steps in this article on a Dell OptiPlex 7060. It is equipped with a Core i7 8700T and 16GB of memory. This should be more than sufficient and lower specs should work fine as well.
Since macOS 11, Big Sur, Apple changed the format in which they distribute the recovery and installation images. With that new format it became a lot harder to extract the required data and create bootable media from Windows, at least without the need for paid tools. Hence I’m going for an intermediate VM with macOS Catalina which we will then upgrade to Sonoma.
Overview of the steps to go through
- Download a macOS Catalina recovery image
- Convert the recovery image to a VMDK-file
- Install VMware Workstation
- Modify VMware Workstation to run macOS
- Create a VM and Install macOS Catalina
- Download the installer and upgrade from Catalina to macOS Sonoma
- Install VMware tools on the Sonoma VM
- Change VM resolution
- Share files between your Windows PC and macOS VM
Part 1) Create macOS Catalina VM
As mentioned above, the first part of the process is to get a working macOS Catalina virtual machine. We will use that one as the base to upgrade from the Sonoma.
Step 1) Download a macOS Catalina recovery image
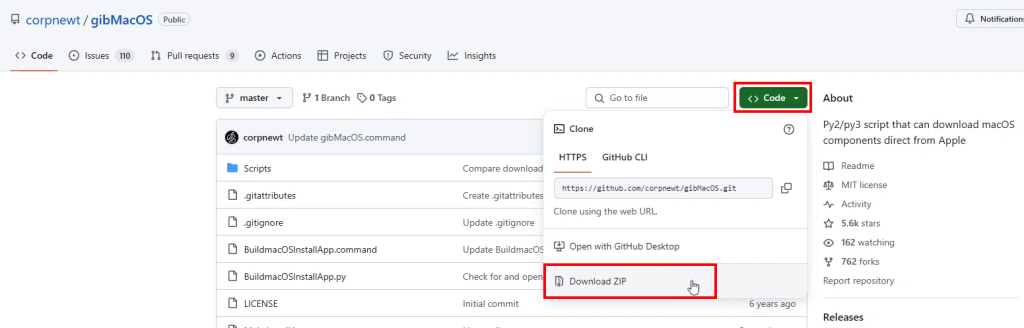
First we need to get our hands on a recovery image of Catalina. For that we will make use of a script called gibMacOS: https://github.com/corpnewt/gibMacOS. This script allows you to easily download software packages directly from Apple.
After navigating to the Github page, just download the whole repository by clicking on Code > Download ZIP:
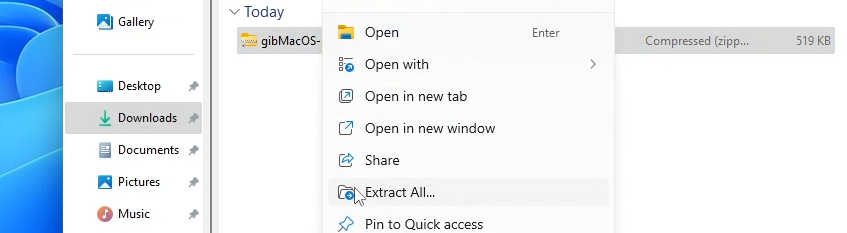
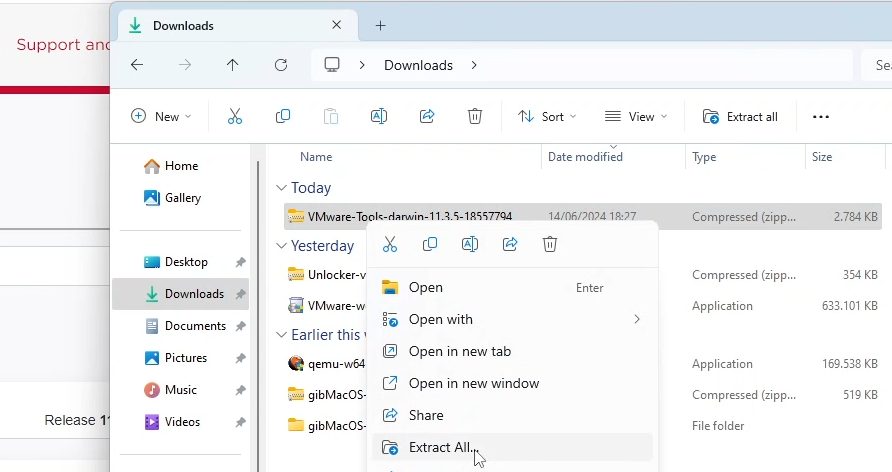
Once downloaded, navigate to your Downloads folder, right click the zip-file and choose Extract All…
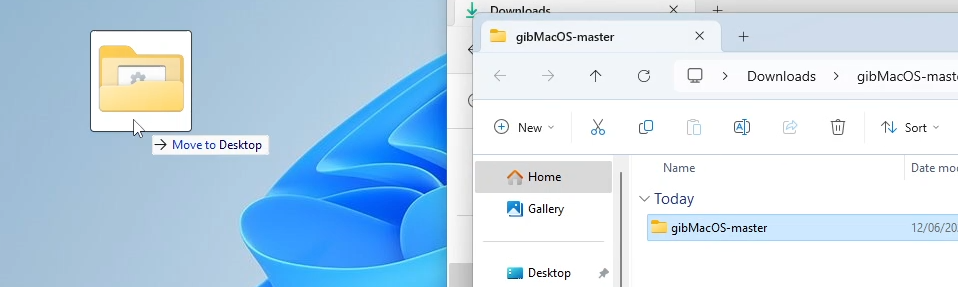
For convenience, I will also move the extracted folder: gibMacOS-master to the Desktop. This will make it a bit easier to create the commands later but it’s not required if you know what you are doing:
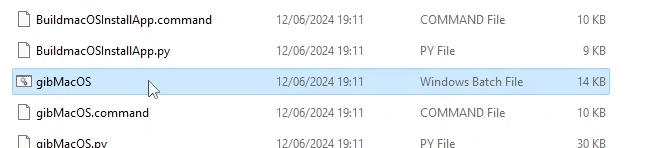
At this point, we can open the gibMacOS-master folder on the desktop and run gibMacOS.bat from there:
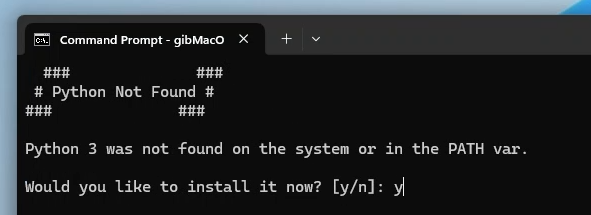
This will start gibMacOS but the script will first check if you have Python 3 installed on your system. If it is not, when asked, type “y” to install Python 3 on your system:
This will download and install Python 3 completely automatically and eventually the script will download the latest catalog from the Apple servers and present you with a list of available releases:
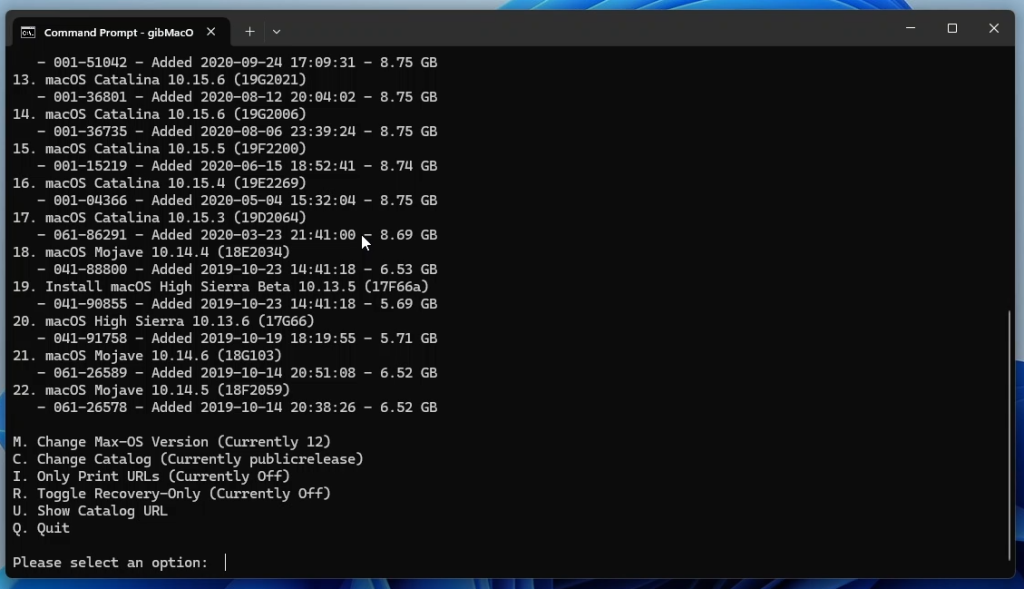
We just need to choose a number from this list that suits our needs. As mentioned, we need macOS Catalina so just search for the latest version of Catalina in the list. In my case, and this most likely won’t change anymore, this was 10.15.7 (19H15):
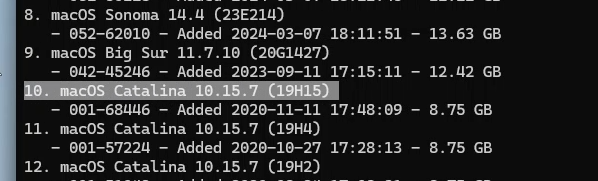
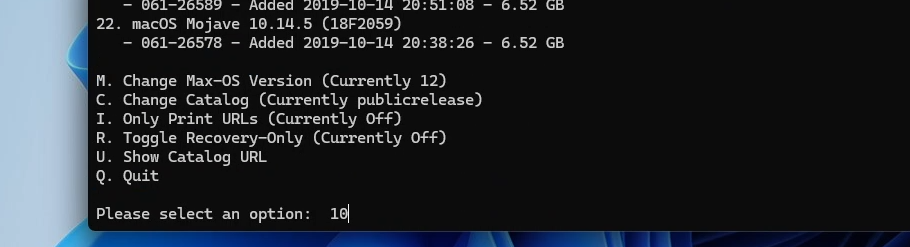
So in order to download that item, we simply need to enter the number the matching number (10) and press enter.
This will start to download the required files from Apple’s servers. We only need a single file: BaseSystem.dmg, for the next step so if you have limited data or simply do not want to wait, you can skip all other files by pressing Ctrl + C when they are downloading. For example with the file InstallESDDmg.pkg, which is several gigabytes in size and we do not need.
If all went well, you should end up with something like this. As you can see, I skipped InstallESDDmg.pkg and RecoveryHDMetaDmg.pkg since we don’t need these:
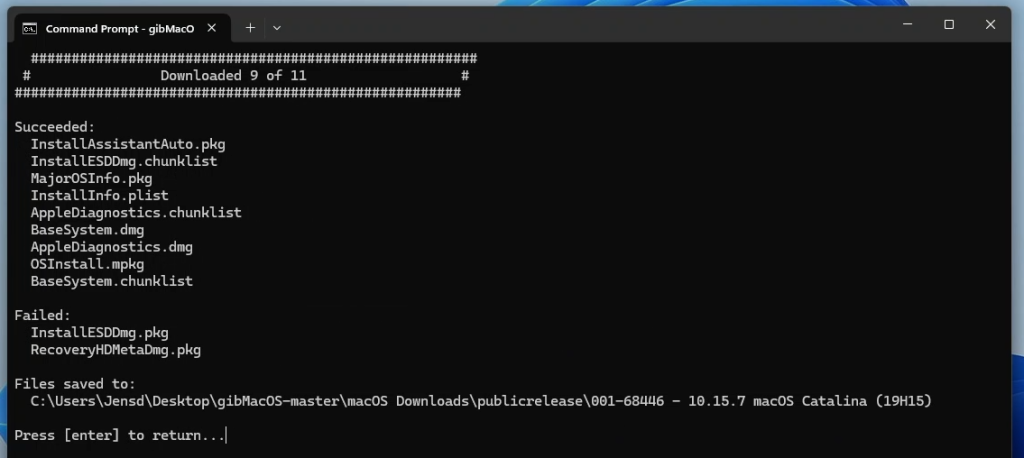
The downloaded files are now saved in a subdirectory (macOS Downloads) of that gibMacOS-master folder on the desktop as you can see:
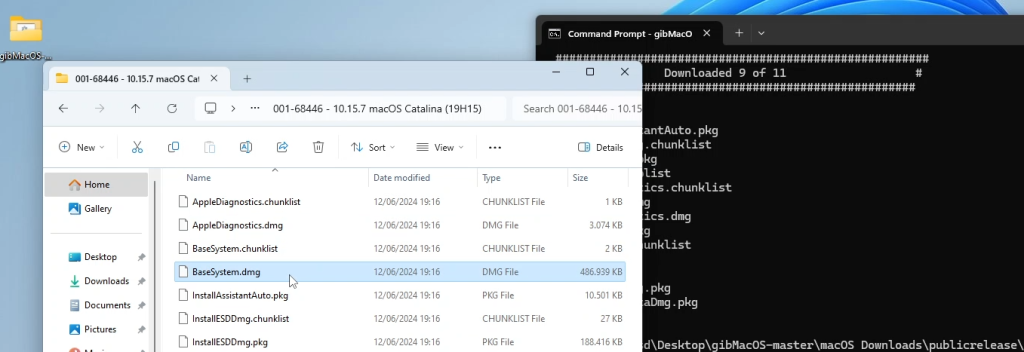
The file we need here, as mentioned, is BaseSystem.dmg. For convenience I will rename this file to Catalina-BaseSystem.dmg and also move this one to the desktop:

Time to move to the next step now where we will convert the format of this image to a VMDK-file, which can be used in a virtual machine.
Step 2) Convert the recovery image to a VMDK-file
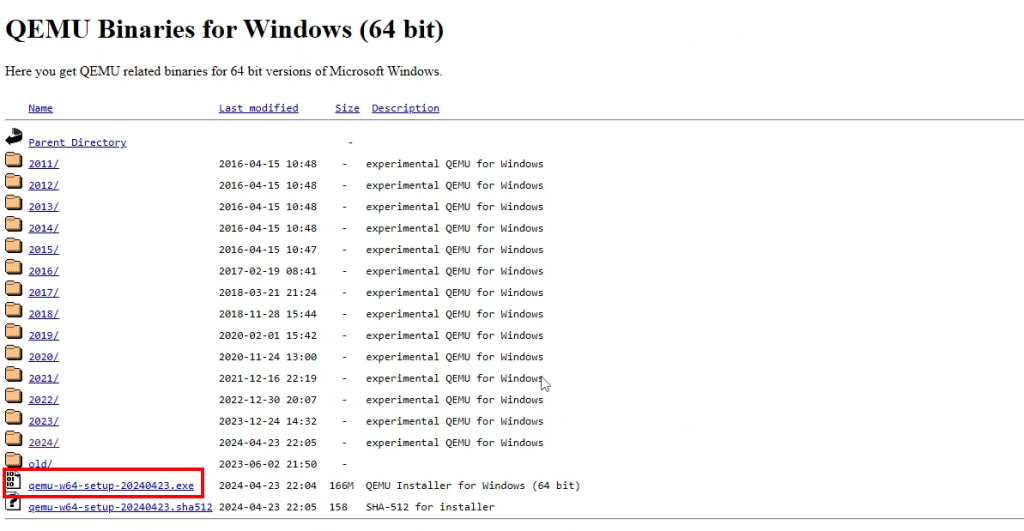
The downloaded dmg-file cannot be used directly on a virtual machine to boot into macOS recovery. To make it usable, we need to convert it to a disk format that the VM will understand. We can do that using the QEMU tools for Windows.
First download and install the QEMU tools for Windows from: https://qemu.weilnetz.de/w64/. On this link, choose the latest version (in my case qemu-w64-setup-20240423.exe):
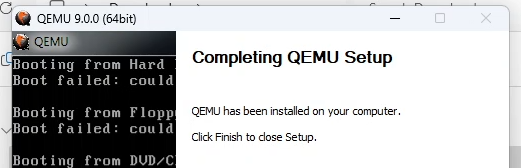
Once downloaded, run through the installer:
Now that QEMU is installed we need to open a command prompt and navigate to the desktop (or other location where you put the Catalina BaseSystem.dmg file). Then enter the full path to the qemu-img tool with the following arguments:
C:\Users\Jensd>cd Desktop
C:\Users\Jensd\Desktop>"c:\Program Files\qemu\qemu-img.exe" convert -O vmdk -o compat6 Catalina-BaseSystem.dmg catalina-installer.vmdk
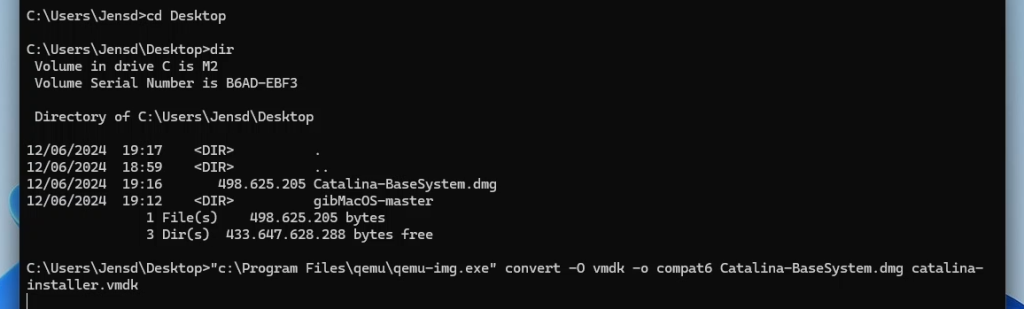
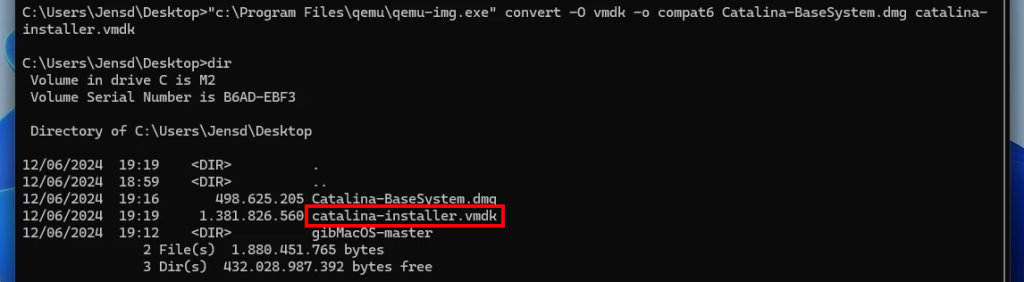
This command will call the qemu-img tool and ask it to covert the Catalina-BaseSystem.dmg file on our desktop to a VMDK-file called catalina-installer.vmdk
If all goes well, you should now end up with that catalina-installer.vmdk file on your desktop:
Step 3) Install VMware Workstation
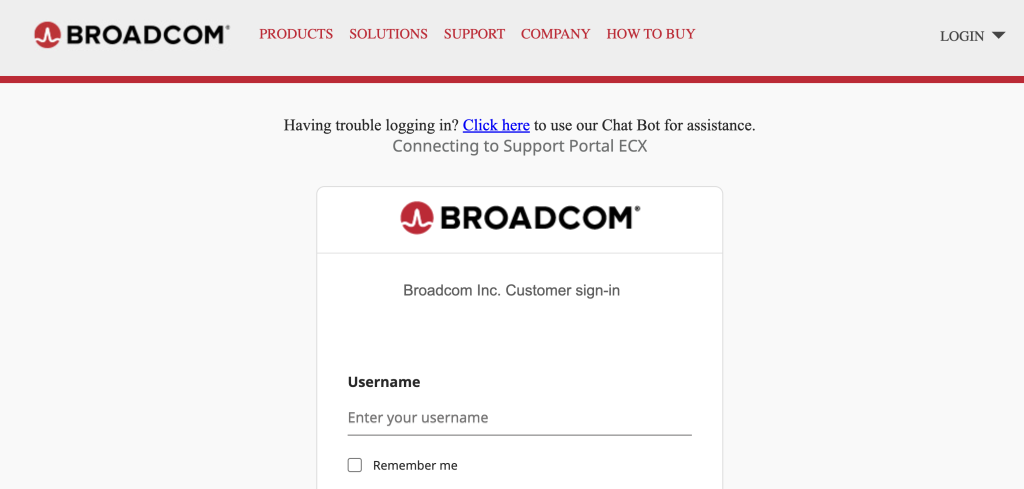
Now that we have the installation media available that can be used by a virtual machine, we need to download and install VMware Workstation from Broadcom, which recently acquired VMware. You can do this from the following link: https://support.broadcom.com/group/ecx/productdownloads?subfamily=VMware+Workstation+Pro
Get a Broadcom account
Before you are able to proceed to the download, you need to login with a Broadcom account:
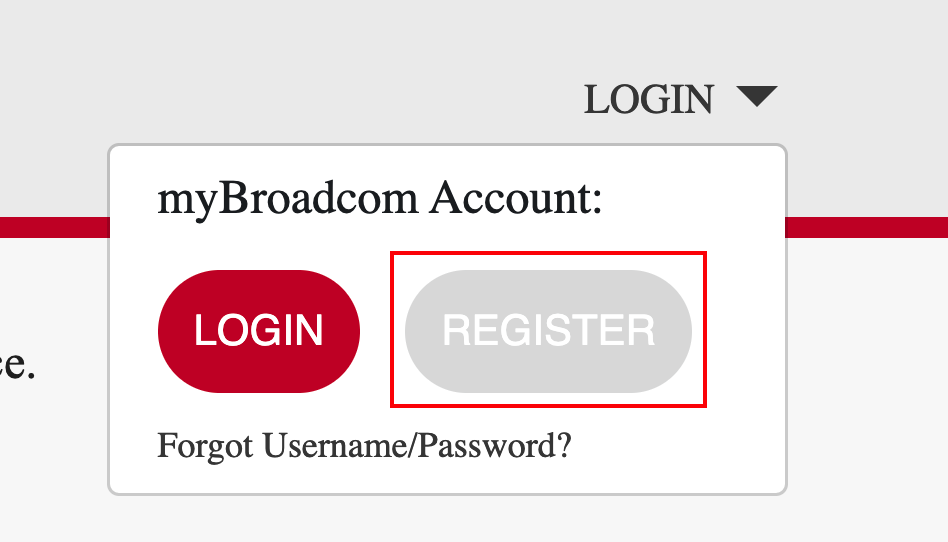
If you do not have a Broadcom account yet, you need to create one before you are able to download anything here. If you have one already, you can proceed to the next part (Download VMware Worstation) and login. To register instead, click on the login button top right and click on Register:
Go through the steps here by first entering the code sent to your email-address, followed by your details. If all goes well, you should end up as follows:

Download VMware Workstation
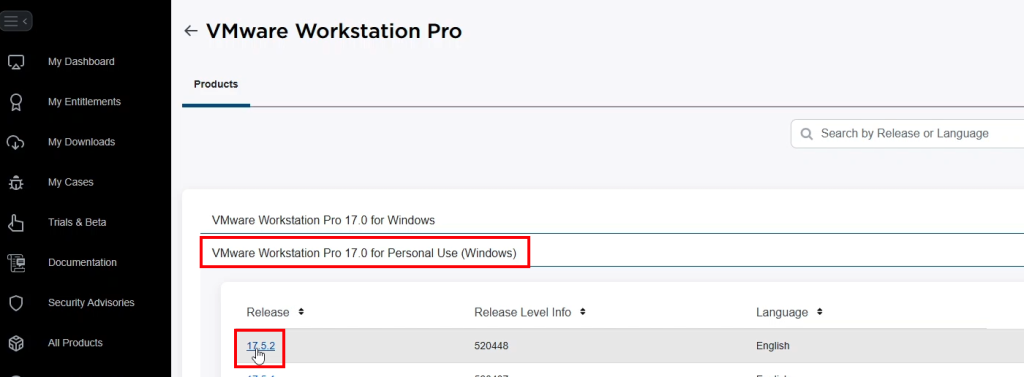
Once you have an account and successfully registered, re-click the link which I provided above: https://support.broadcom.com/group/ecx/productdownloads?subfamily=VMware+Workstation+Pro and log in when asked. In the selection, choose for “VMware Workstation Pro 17.0 for Personal Use (Windows) and click on the latest release that is available:
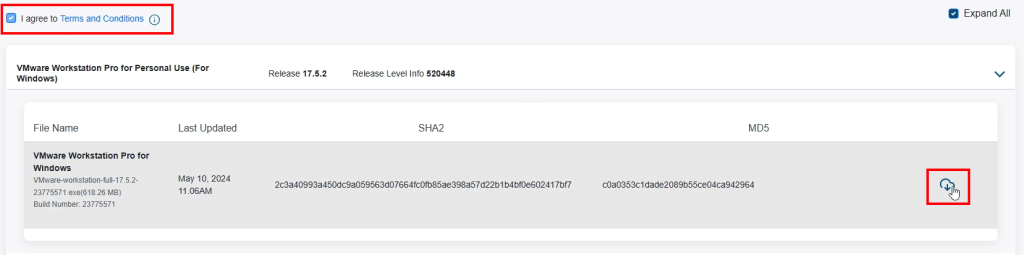
On the next page, first agree to the terms and conditions, then click the download button right from the software in the list:
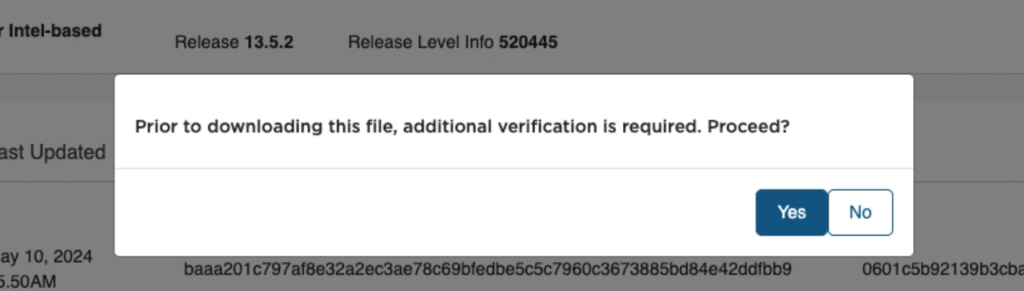
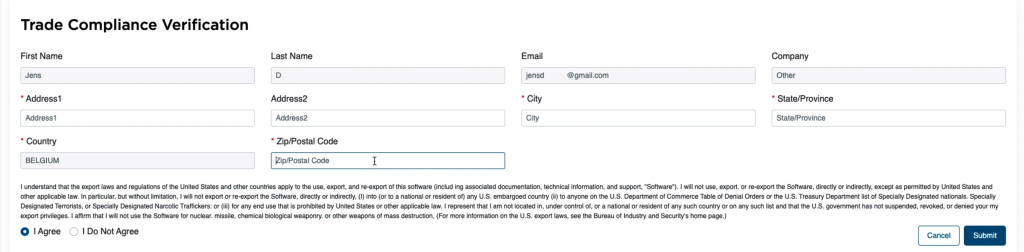
Unfortunately it could be that this requires providing some additional personal details as mentioned:
Complete the form and click submit at the bottom of that page:
Finally, you will be above to click the cloud button right from the software in the list and start the download:

Install VMware Workstation
Once the file is downloaded, simply double-click on the installer and run through the setup:
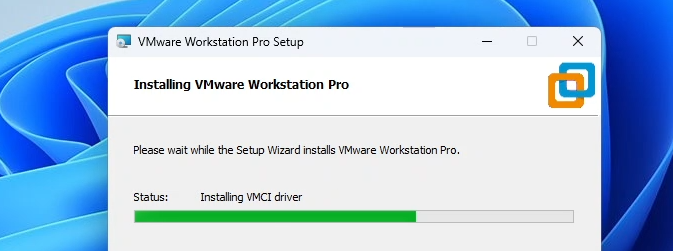
At the end of the installer, just click Finish and move to the next step
Step 4) Modify VMware Workstation to run macOS
As Apple does not allow running macOS on non-Apple hardware, VMware Workstation has some built-in soft restrictions that would prevent you from doing so. While technically the tool is perfectly able to run macOS in a virtual machine. So before we can get our macOS Catalina VM up and running, we will first need to remove these restrictions. To do so we will use another script/tool: https://github.com/paolo-projects/auto-unlocker that can remove the restrictions with a single click.
Navigate to the link provided above and go to the latest release on the right side of the Github page:
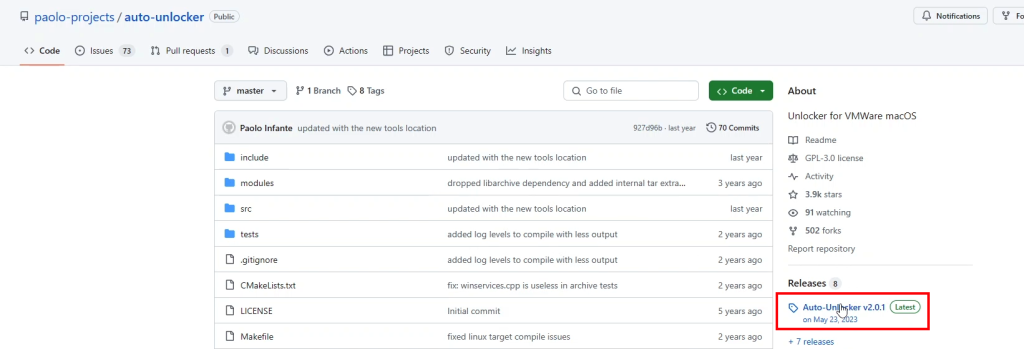
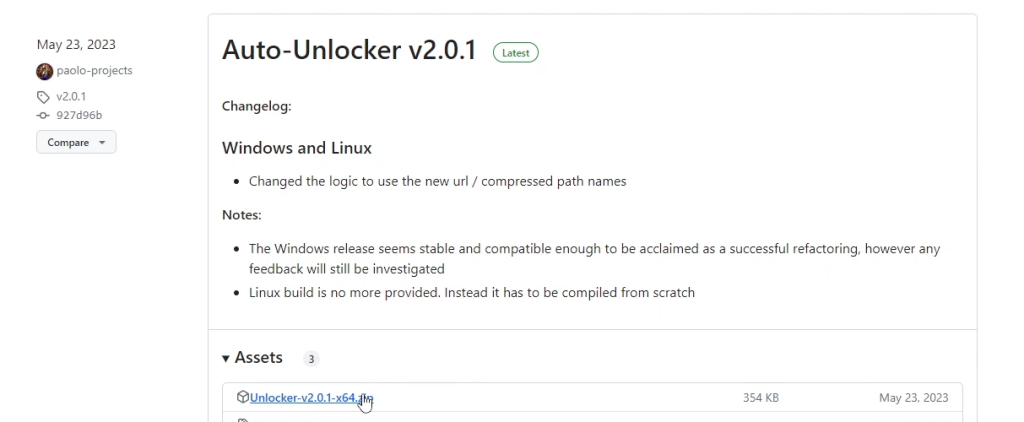
Then download that release (in my case Unloccker-v2.0.1-x64.zip):
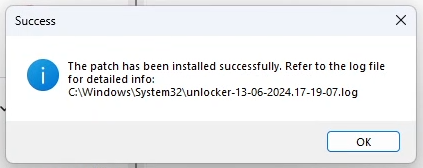
Once downloaded, go to your Downloads folder, open the downloaded zip file, run the Unlocker executable from there and click on Patch:
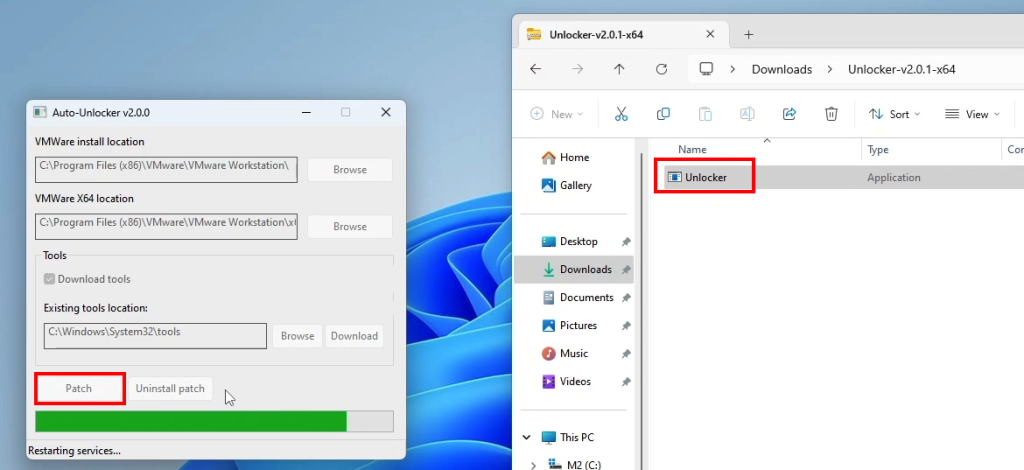
If all goes well, you should something like this:
Now we are ready to create our first macOS VM in VMware Workstation.
Step 5) Create a VM and Install macOS Catalina
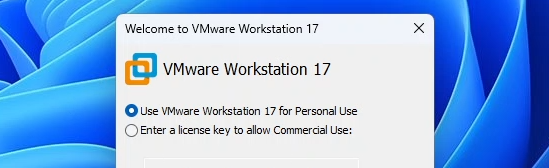
Finally we create our first virtual machine for macOS. Let’s start VMware Workstation for the first time. When asked, select “Use VMware Workstation 17 for Personal Use” and click Continue:
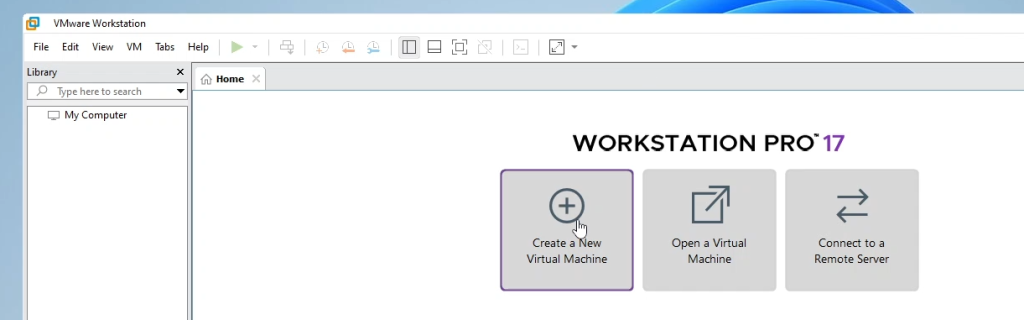
In VMware workstation, click on Create a New Virtual Machine:
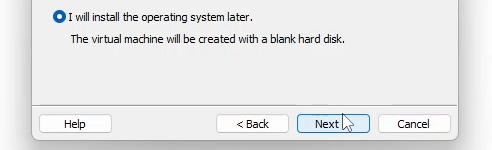
Choose for Typical (recommended) in the first step and choose to install the operating system later:
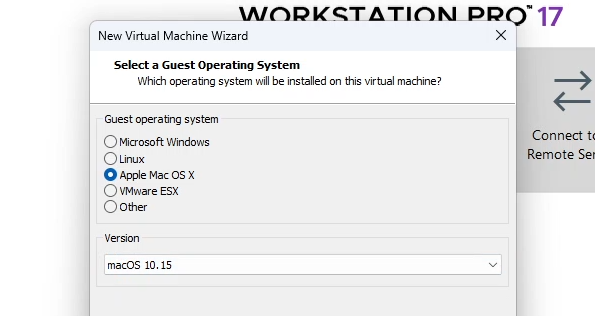
When choosing the guest operating system, select Apple Mac OS X and set the version to macOS 10.15, which matches with the Catalina recovery image which we downloaded earlier:
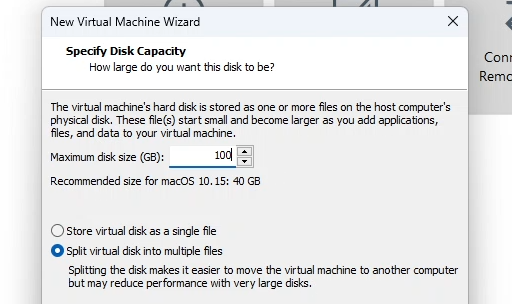
Give the VM a name (I chose for macOS) and optionally change the location of the VM. For the disk capacity, increase the size to 100GB:
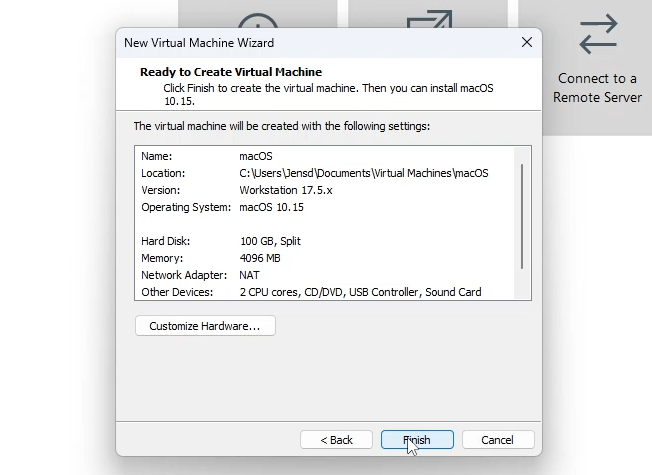
In the Ready to Create Virtual Machine step, simply click Finish:
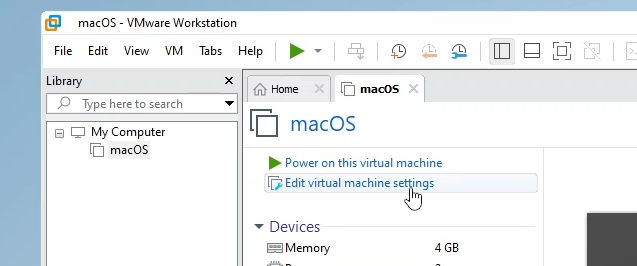
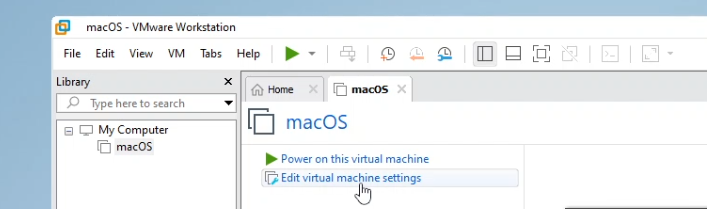
Once the VM is created, click on “Edit virtual machine settings” as we will increase some of the resources available to the VM and link that catalina-installer.vmdk file to the virtual machine:
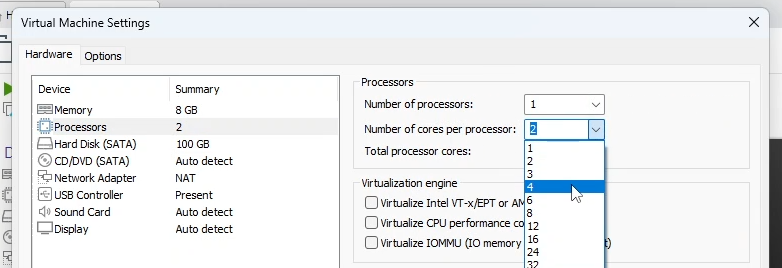
In here, let’s first increase the memory to 8 GB and the CPU core count to 4. The values here depend a bit on how much resources you have on your host machine:
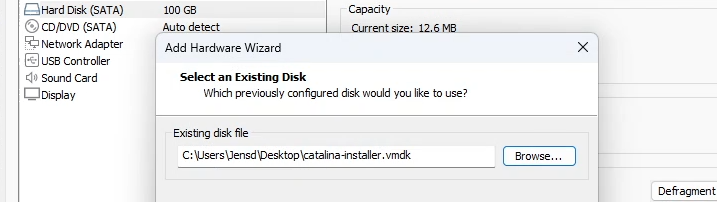
Now, as mentioned above, we need to link the catalina-installer.vmdk file to this VM which we created in step 2. This will be the virtual drive from which we will run recovery to install Catalina on the other virtual drive the first time we’re booting the VM.
Click on Add on the bottom of the dialog and choose for Hard Disk:

Leave the Disk Type as SATA, click Next, choose to “Use an existing virtual disk” and in the next step navigate to the catalina-installer.vmdk file which was the result of step 2:
Click Finish and choose “Keep Existing Format” in case VMware Workstation asks you if you want to convert this virtual disk.
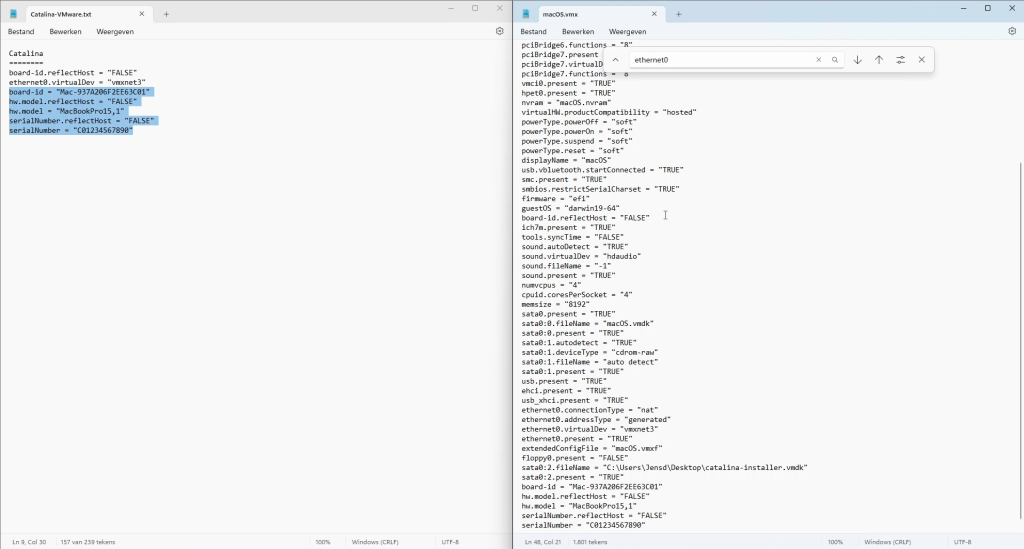
Our VM if almost ready now. But there are a few tweaks which we still need to do by editing the configuration file or VMX-file of the VM. You can find the path to this file in the Virtual Machine Details on the bottom of the window:
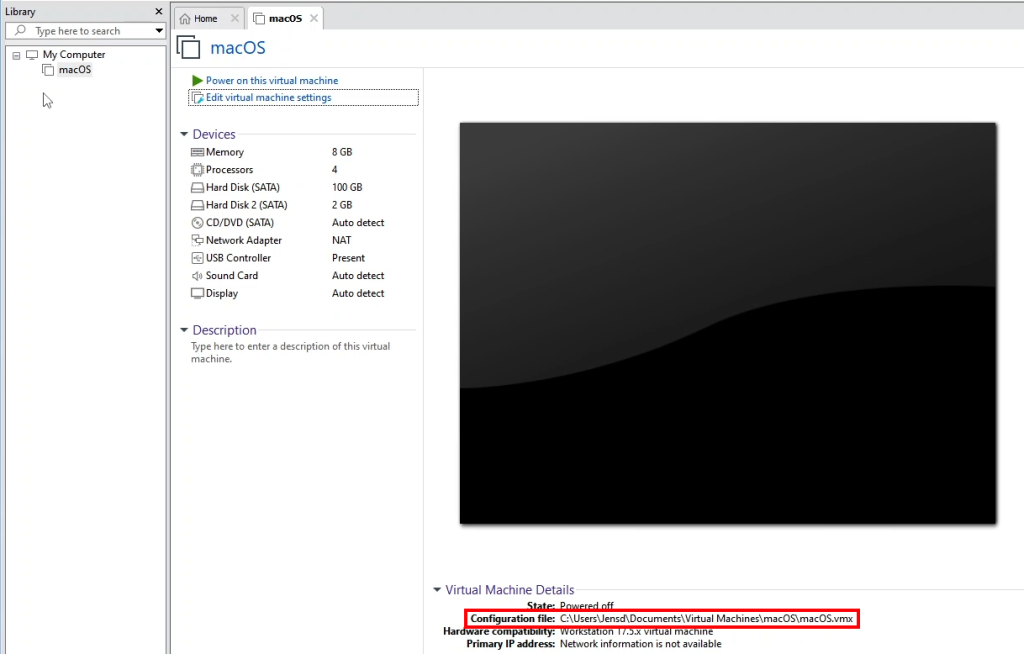
To navigate to the directory we can right click on the VM’s name in the left menu and choose for “Open VM directory”:
In the opened directory, find the VMX-file (Type VMware virtual machine configuration), right click on it and open it with notepad:

In the file, the following needs to be changed:
board-id.reflectHost = "FALSE"
ethernet0.virtualDev = "vmxnet3"
At the end of the file, also add these lines:
board-id = "Mac-937A206F2EE63C01"
hw.model.reflectHost = "FALSE"
hw.model = "MacBookPro15,1"
serialNumber.reflectHost = "FALSE"
serialNumber = "C01234567890"
This will expose the virtual machine as if it would be a MacBookPro 15,1. You can play around with these values if desired, just make sure that the board-id and hardware model matches. More info can be found here: https://mrmacintosh.com/list-of-mac-boardid-deviceid-model-identifiers-machine-models/.
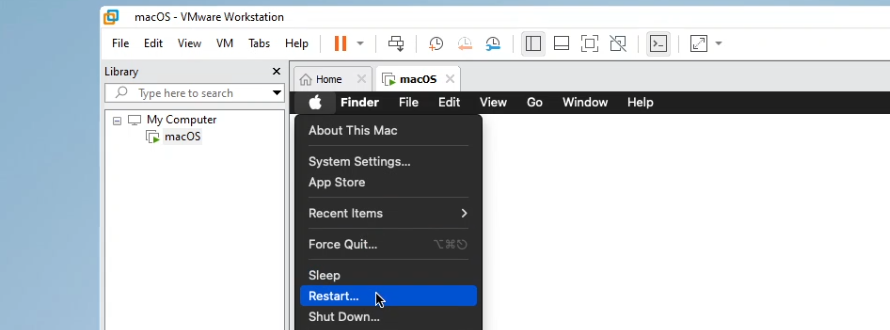
Once you made all the required changes, save the file and close it. Then we finally can start the virtual machine which we just created by clicking on “Power on this virtual machine”:
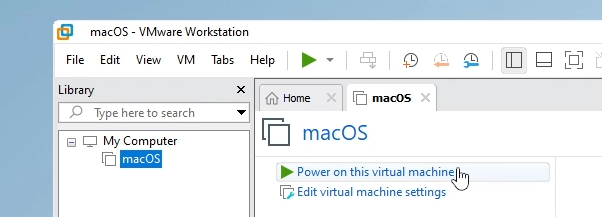
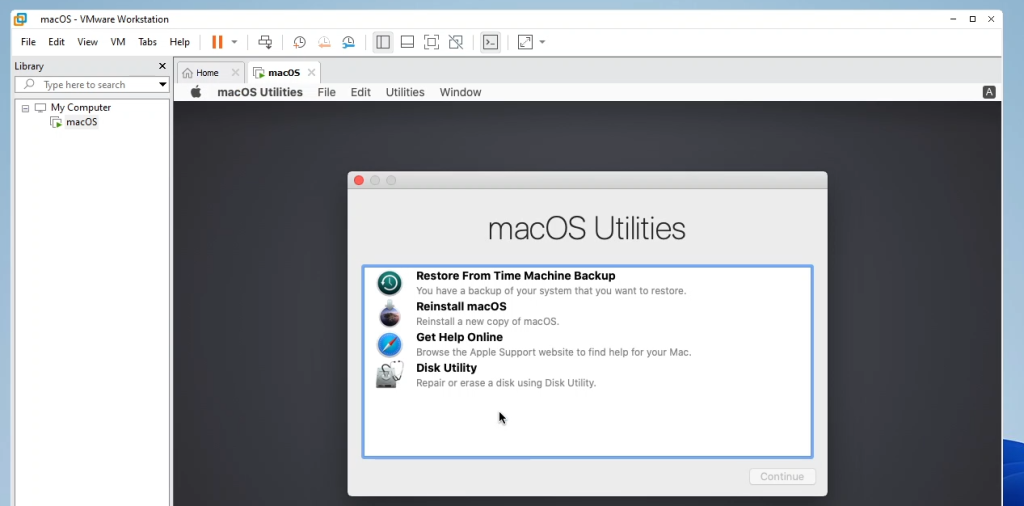
This will boot up the virtual machine for the first time. If all goes well, you should see an Apple logo with a progress bar and eventually the VM will end up in macOS recovery for Catalina:
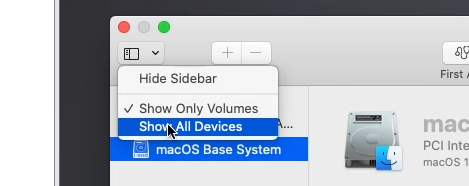
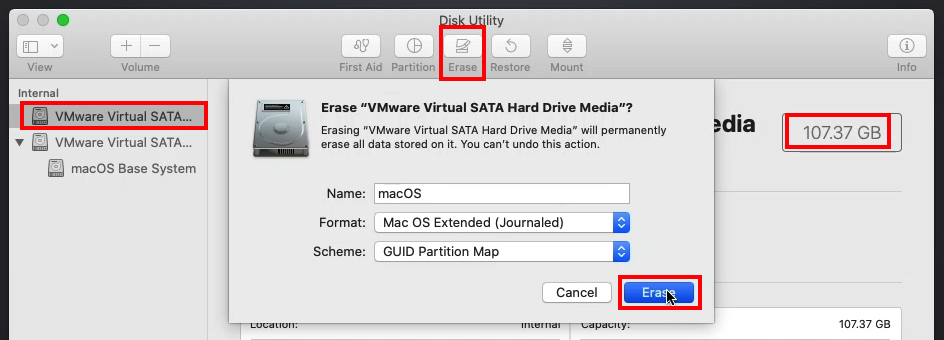
From here on this will behave exactly the same as it would on real hardware. The first thing we will need to do is format that virtual disk of 100GB which we added during VM creation. So start by going to Disk Utility first. In Disk Utility, make sure to Show All Devices in the menu on the left:
You will now see two virtual drives on the left side. The first one represents that 100 GB virtual drive which is where we want macOS Catalina installed on and the second one is the catalina-installer.vmdk from which we booted now and want to left unchanged.
Select the first drive in the list, double-check it is roughly 100GB in size, choose Erase on top of the window. Give the disk a name and leave the Format and Scheme as in the screenshot. Then click Erase to format that new virtual disk:
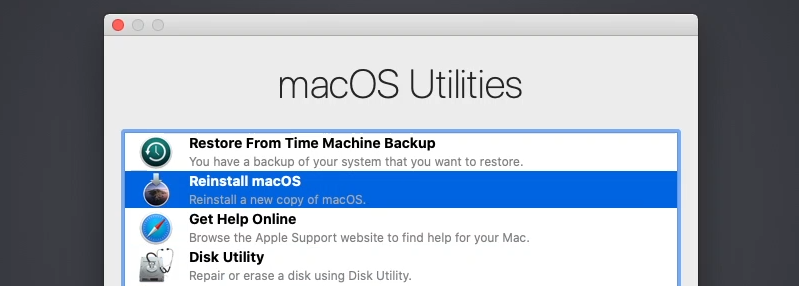
Once the process is complete, close Disk Utility and continue with the “Reinstall macOS” option from the main menu in recovery:
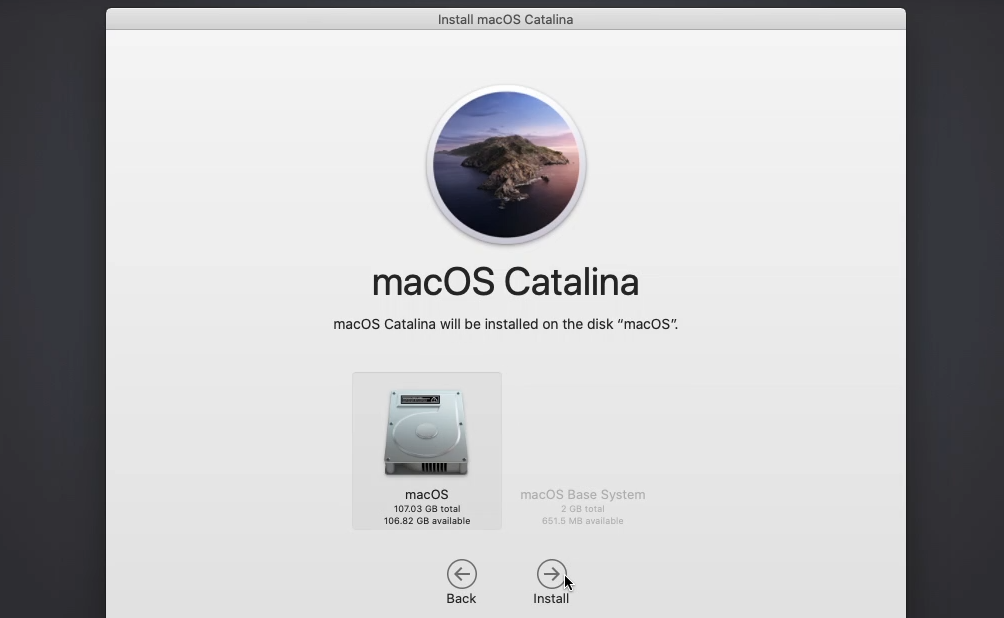
Click Continue, accept the license terms, select the virtual disk which we just initialized in Disk Utility and click Install:
From here you can grab a cup of coffee and wait for some time as this will download and install all necessary files for macOS Catalina on the newly formatted virtual disk. In my case this took roughly 30 minutes in total.
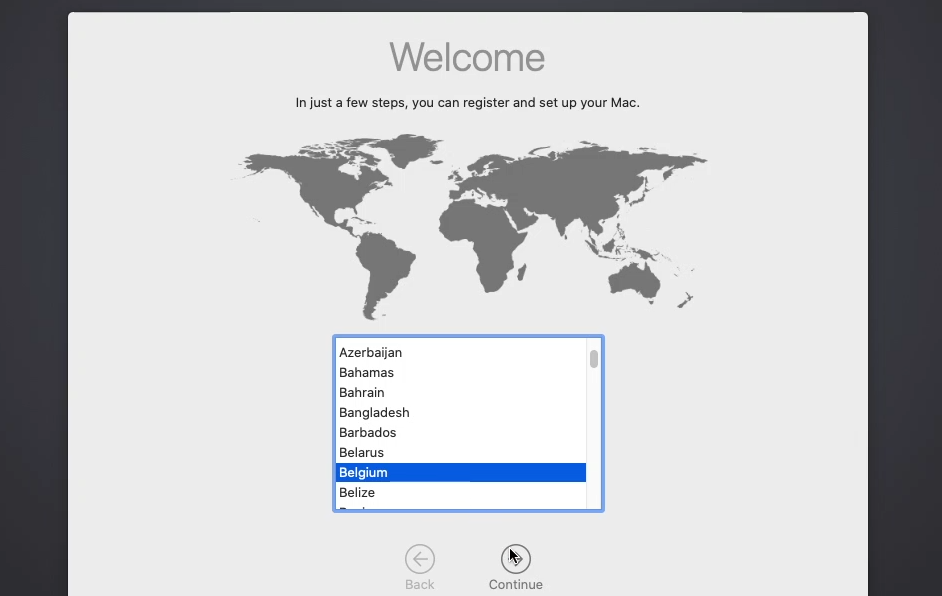
If all goes well here, you will be presented with the Welcome wizard. Again, this would be exactly the same as on physical hardware:
Just click through these steps , create a user account and the options you would like to enable or disable. Eventually you should get to see your newly created macOS instance running Catalina:

As you can see here in about this Mac, because those changes we made to the .vmx file of the VM, macOS thinks it is running on a MacBook Pro.
You can use this VM as any other macOS instance running Catalina and if your goal is just to play around with macOS or need macOS to run some specific software or tools, you can go ahead and stop here. The goal for this post though is to run the latest version of macOS: Sonoma. So we will continue with the next step and upgrade this instance to Sonoma instead.
Part 2) Upgrade to macOS Sonoma
In the next part we will use macOS Catalina to get the required files to upgrade to Sonoma and we’ll do some additional changes that make working with macOS in a VM more comfortable.
Step 6) Download the installer and upgrade from Catalina to macOS Sonoma
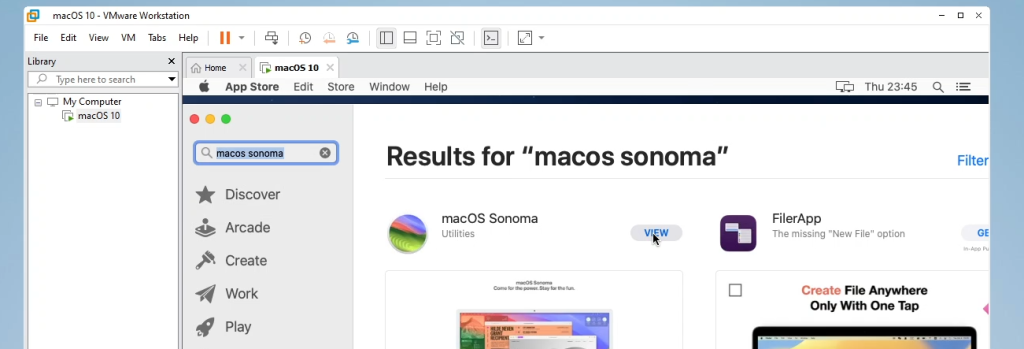
Since we now have a working macOS instance, as mentioned in the beginning, since Apple changed the way they distribute their OS packages for newer versions, we are now able to use this instance to download the installer for Sonoma. The easiest way to get the installer is through the App Store so let’s launch that:

After starting the App Store, search for “macos sonoma” here and click on View:
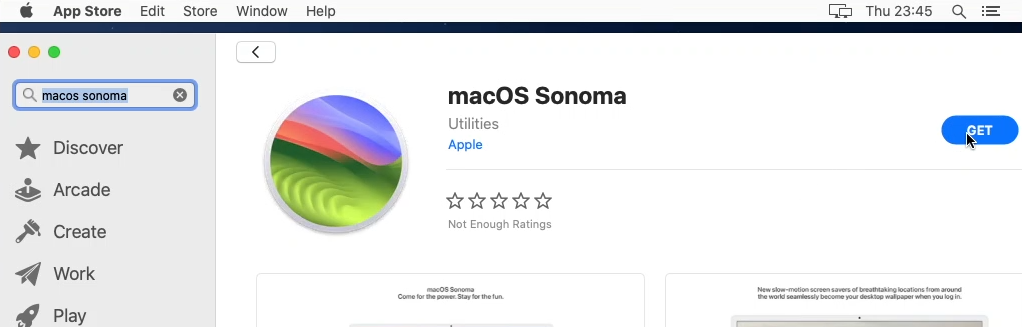
Then download the installer by clicking Get on the next page:
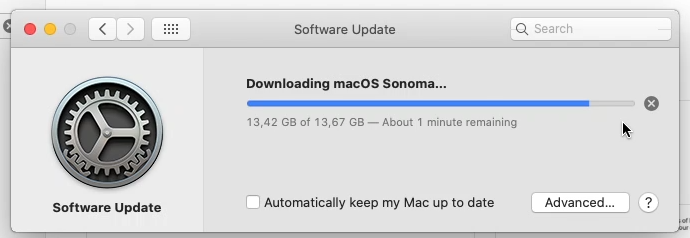
Confirm that you want to start the download and once more you will have to be patient as the Catalina VM now will need to download and extract about 14GB of data. For me this took about 30 minutes again:
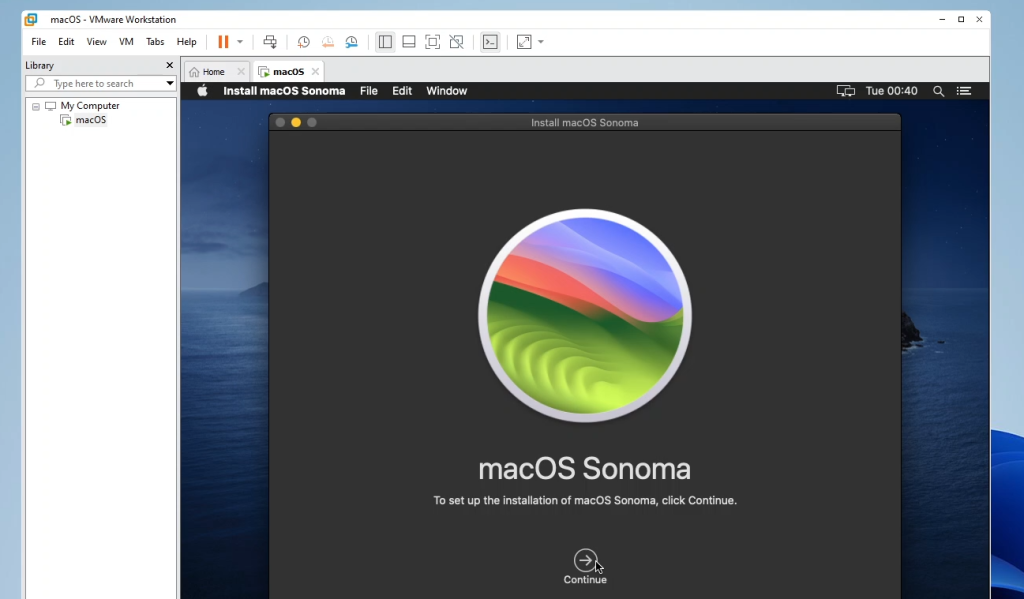
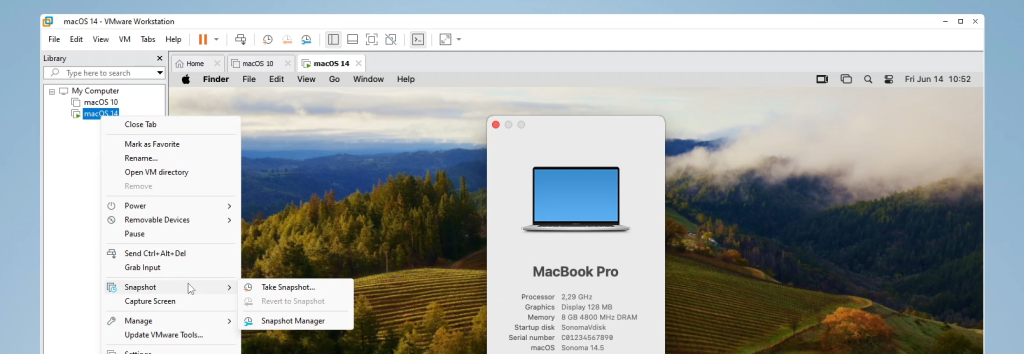
Once the download is complete and the files got extracted, the installer for macOS Sonoma will automatically start on our Catalina VM. At this point you can choose to clone the VM or take a snapshot in case something would go wrong with the upgrade.
Once you are ready to upgrade, click continue on the installer:
From here you can grab your second cup of coffee as this again takes quite some time. For me this took around 35 minutes on the hardware that I have.
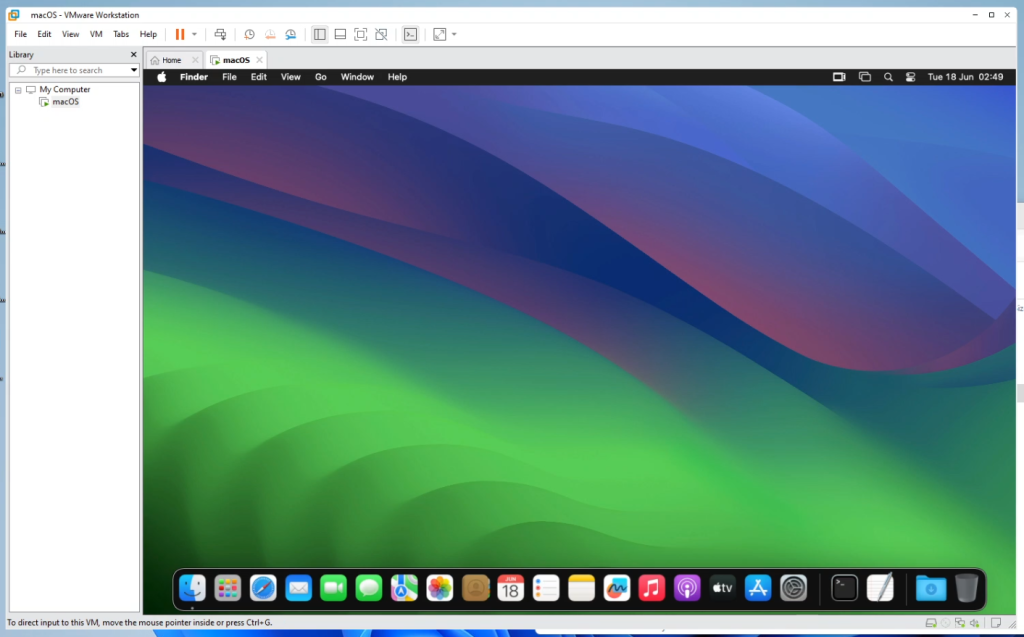
If all goes well here, you eventually should get to login again and see your macOS instance upgraded to macOS Sonoma:
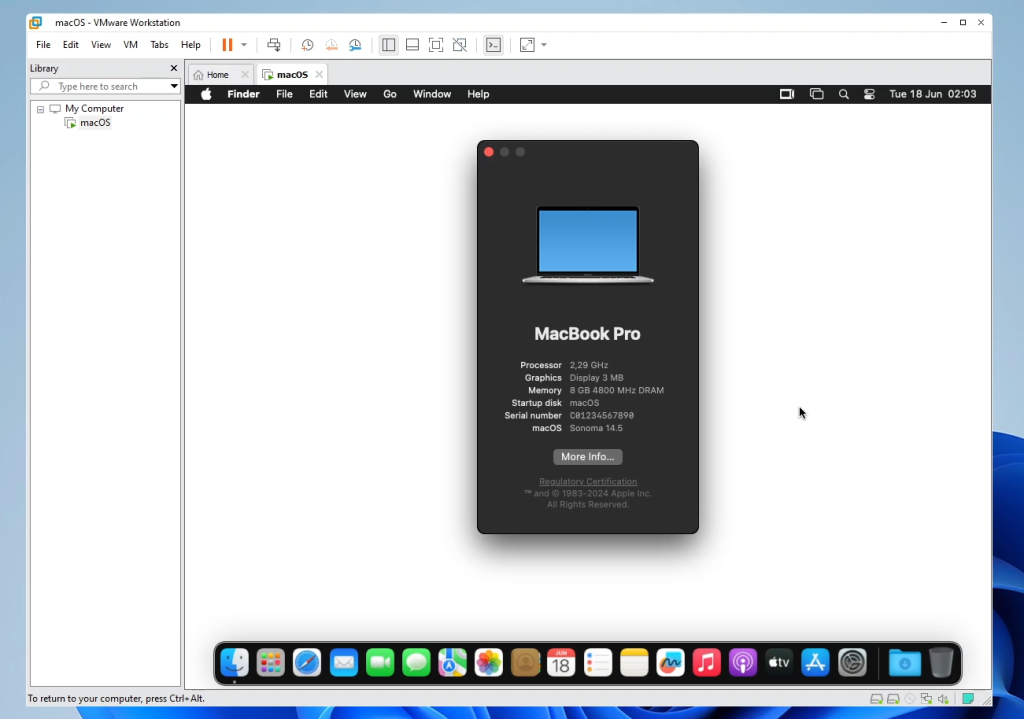
At this point the virtual machine can be used as if it would be a real Mac. But to make things a bit better, let’s go through a few more steps to improve the experience.
Step 7) Install VMware tools on the Sonoma VM
As you probably will notice quite quickly, the VM’s resolution is limited to 1024×768. And although that’s not completely unusable, we can improve that by installing the VMware tools for macOS on this VM. As a bonus this will also improve performance and enable some additional features like shared folders between the Windows host and macOS Sonoma guest VM.
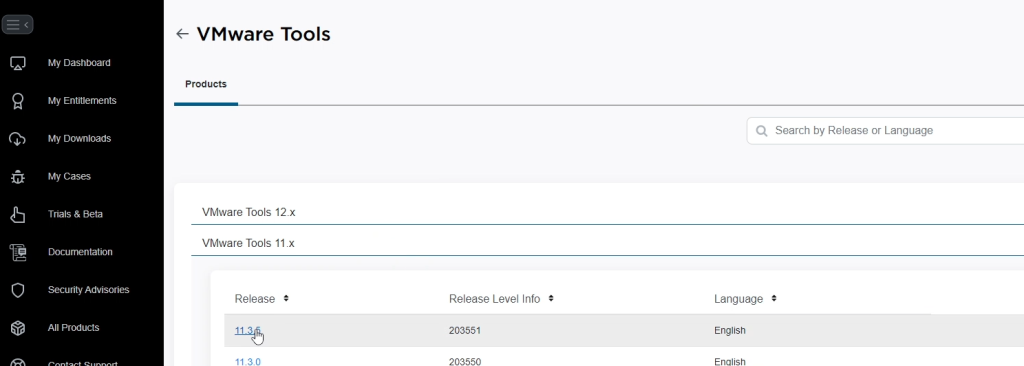
Since we forced VMware Workstation to support macOS, using Auto-Unlocker, it is no longer able to automatically download the VMware tools for macOS. Instead we will manually need to download the ISO file from the Broadcom download site.
Use your browser (on your host) to navigate to: https://support.broadcom.com/group/ecx/productdownloads?subfamily=VMware%20Tools. If requested, log in again using the Broadcom account you created earlier at the beginning of the article.
On the download page for VMware Tools, choose for VMware Tools 11.x (as there are no macOS downloads for version 12.x at the time of writing) and choose the latest version available:
On the next page, agree to the terms and conditions and download the VMware Tools packages for macOS in zip format:
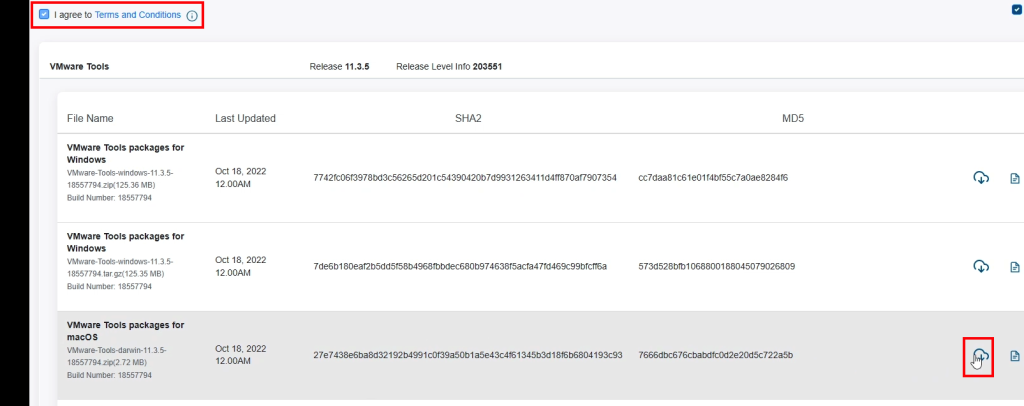
Once downloaded, go to your Downloads folder, right click on the downloaded file and choose “Extract All…”:
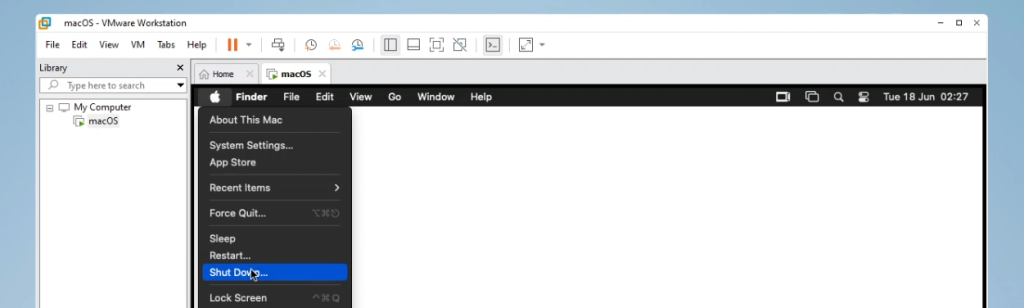
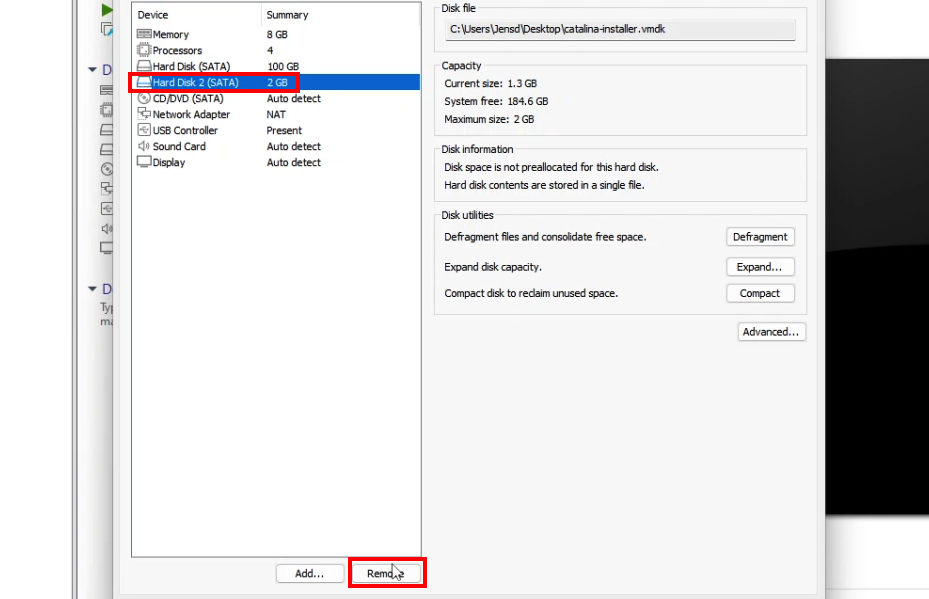
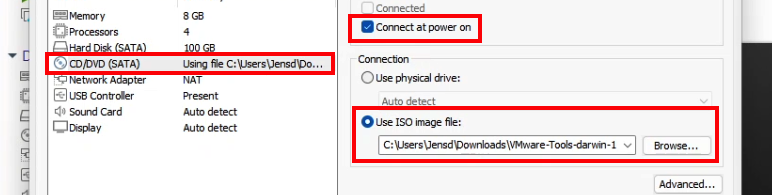
Now that we have the ISO file with the tools, we will need to mount it to the Sonoma VM but lets first unlink that catalina-installer.vmdk as well. In order to do that, we need to shut down the VM first:
Once it has completely shut down, go again to “Edit virtual machine settings”:
First we will remove the catalina-installer.vmdk file from this virtual machine as we no longer need it. You can re-use it to create other virtual machine in the future if you like. So select this virtual hard drive in the list, double-check that is is the correct file and size and click remove:
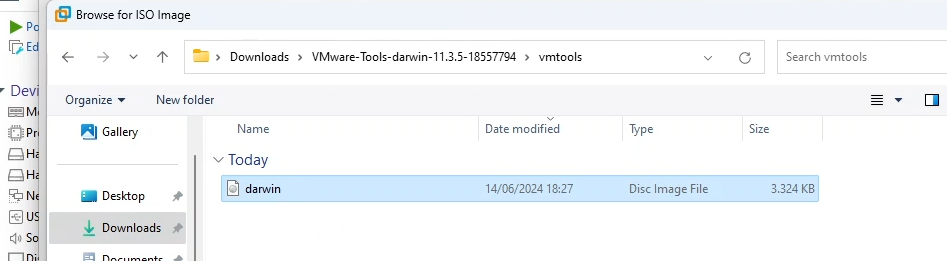
After that, we can map the virtual CD/DVD drive to the ISO-file (darwin.iso) with the VMware Tools. So go to the CD/DVD Drive, choose “Use ISO image file” and Browse to the downloaded darwin.iso file and make sure that the “Connect at power on” checkbox is checked:
Make sure you navigate to your downloads folder and select the darwin.iso file which we extracted from the downloaded zip file earlier:
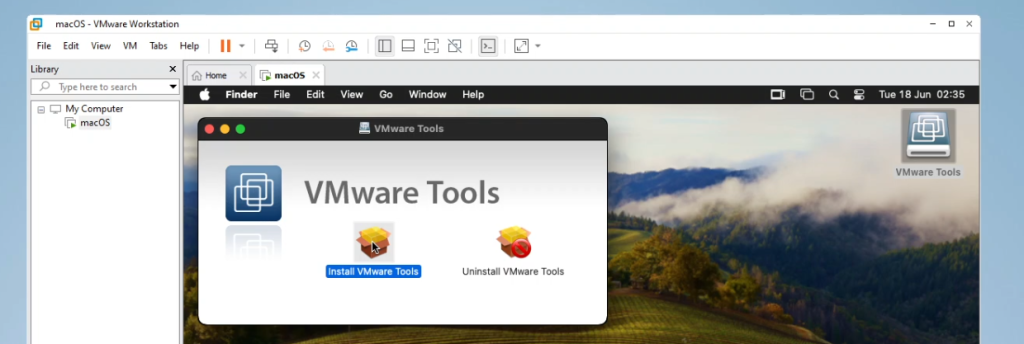
Click ok to close the VM settings and power on the virtual machine. From macOS now you should see a VMware Tools icon on the desktop. Open this and launch “Install VMware Tools”:
Enter your user’s password and click Allow for the installer to make changes to your VM:
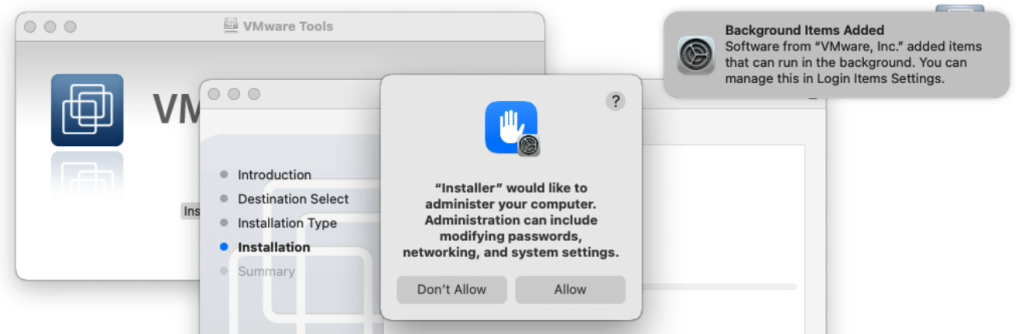
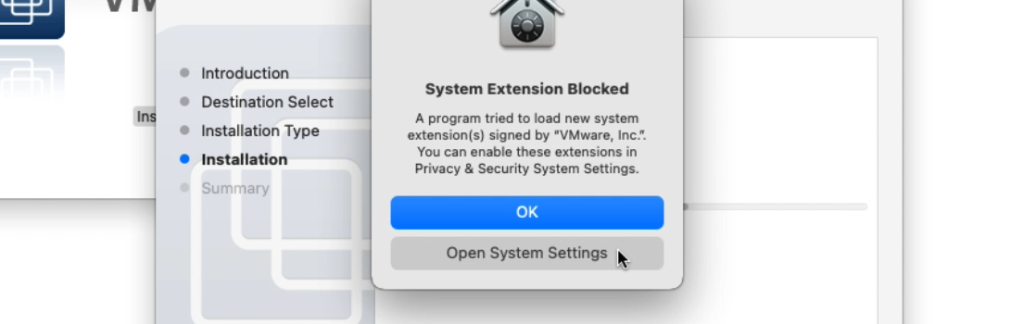
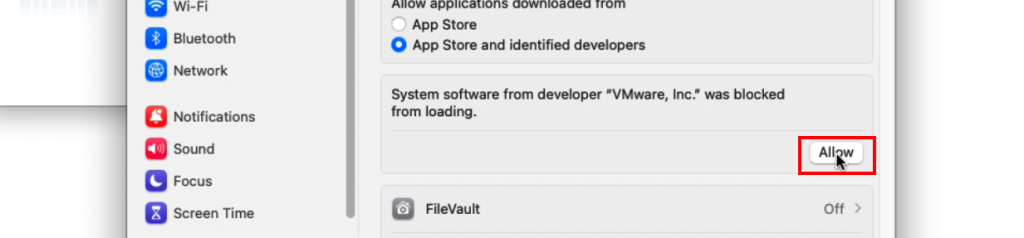
If you get a notification regarding system extensions that are blocked, click “Open System Settings” and Allow the extension from VMware as this is exactly what we want to have:
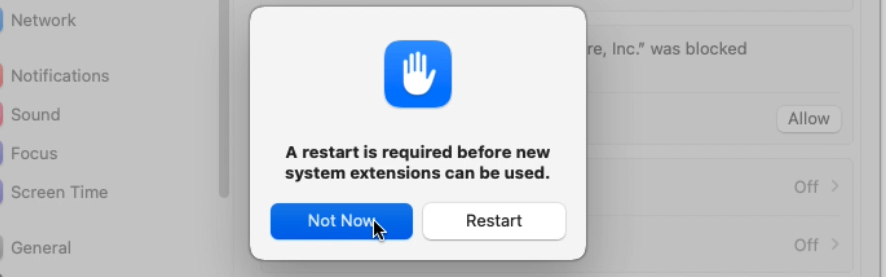
After entering your password, system settings might ask you to reboot the VM but choose “Not Now” here instead.
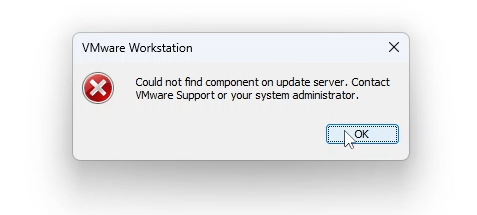
Even though I was relatively fast to allow the system extension, in my case the installer for VMware Tools still failed. If this would happen to you as well, just re-run the “Install VMware Tools” from the media that is mounted on the desktop. If all goes well, you should end up like this. Here, choose to Restart the VM:

After the reboot, the VMware tools should be installed and run in the background and you can just eject that ISO which we have mounted in the virtual CD/DVD drive.
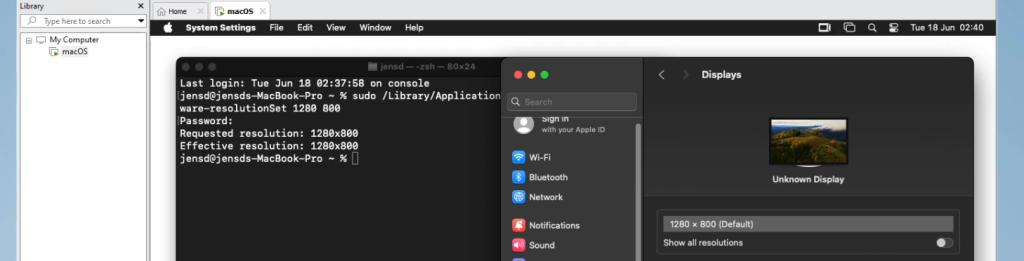
Step 10) Change VM resolution
Having the VMware tools installed will allow us to change the fixed resolution (1024×768) which we had in the virtual machine till now. To do so, simply change the size of the window in VMware workstation by dragging out one of the corners:
The VMware Tools will then take care of changing the resolution to fit with the size of the window:
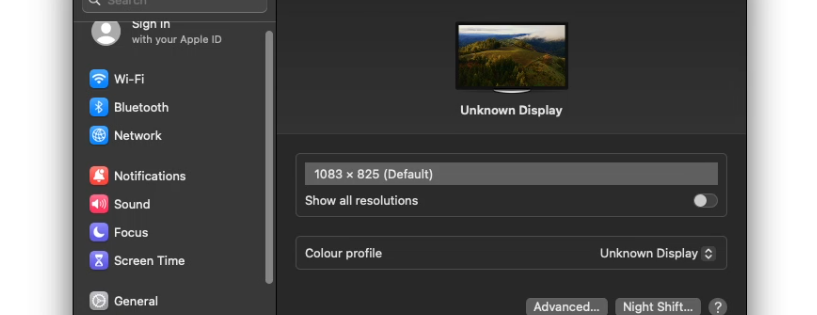
As you can see in the above screenshot, this leads to strange and non-standard resolutions that might cause compatibility issues with certain software. In case you want to set a standard resolution or just specify an exact resolution, open a terminal window and run the following:
sudo /Library/Application\ Support/VMware\ Tools/vmware-resolutionSet 1280 800
You can change the 1280 and 800 in the above command to the horizontal and vertical resolution you want to set:
From here on you can comfortably work with the virtual machine already. Let’s look into something that makes things even more convenient in the next step.
Step 11) Share files between your Windows PC and macOS VM
Although this is an optional step, it can be very handy if you want to share data and files between the guest and host machine. After we installed the VMware tools, it is possible to share folders between the Windows host and the macOS instance running virtually.
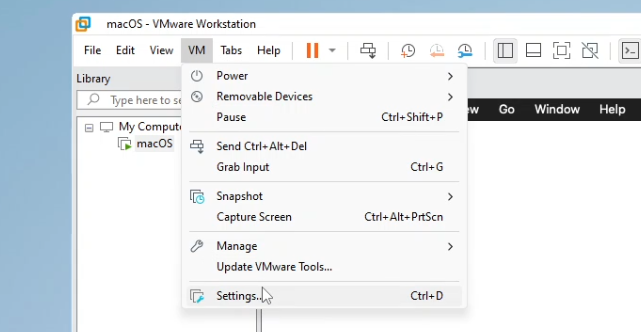
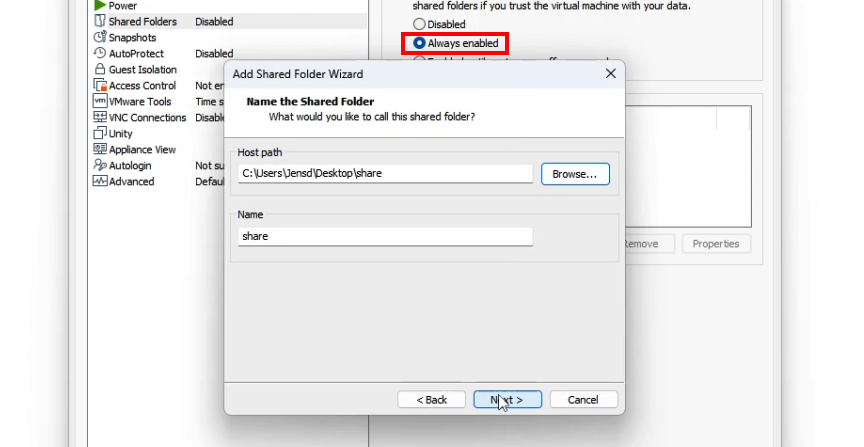
To do so, let’s enable this feature and choose which folders to share. In the VM list in VMware workstation, right click your VM and click Settings… or click on VM in the menu bar of VMware workstation and choose Settings…
Go to the Options tab > Shared Folders and select “Always enabled”, then click the Add… button and in the wizard, select a folder to share with the VM. I created a new folder on the desktop called “share” for this but an existing folder with or without files does fine as well:
Finish the rest of the wizard and then back in macOS, perform a reboot to enable file sharing and the shared folders:
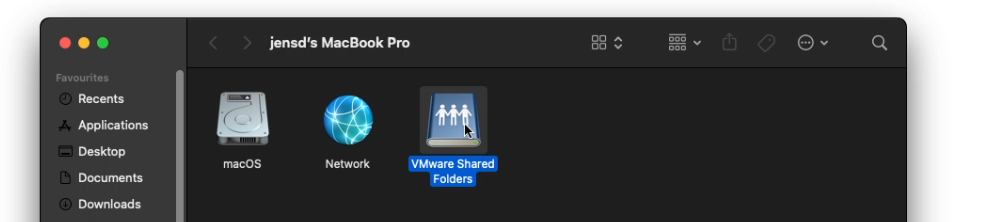
After the reboot you can access the shared folders by going to Go > Computer in Finder:
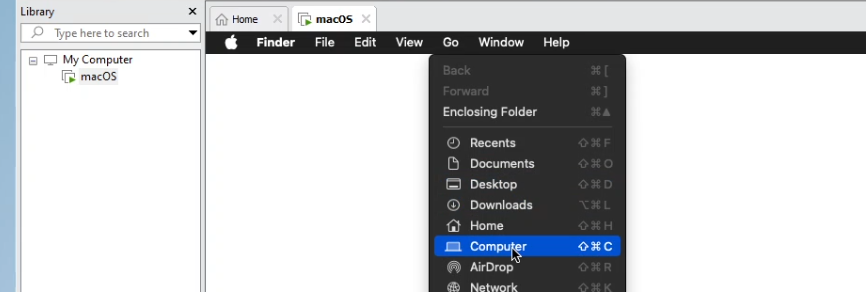
Then open “VMware Shared Folders”:
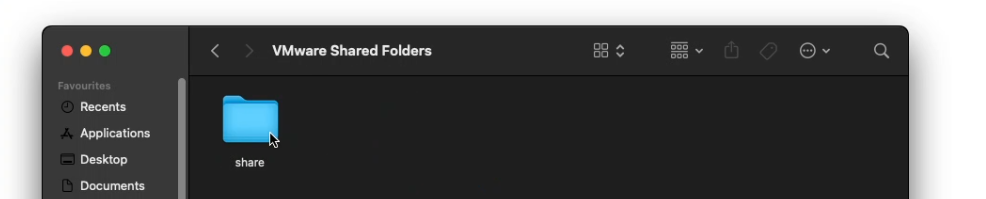
In here you will find all the folders that you have added when changing the VM settings earlier. In my case this is the new folder on the desktop called share:
Any files that you put in here, either from the Windows host or from the macOS VM will be accessible on both sides. For example, I downloaded and copied a static wallpaper to this folder on Windows and can use it without any issues on the macOS VM:
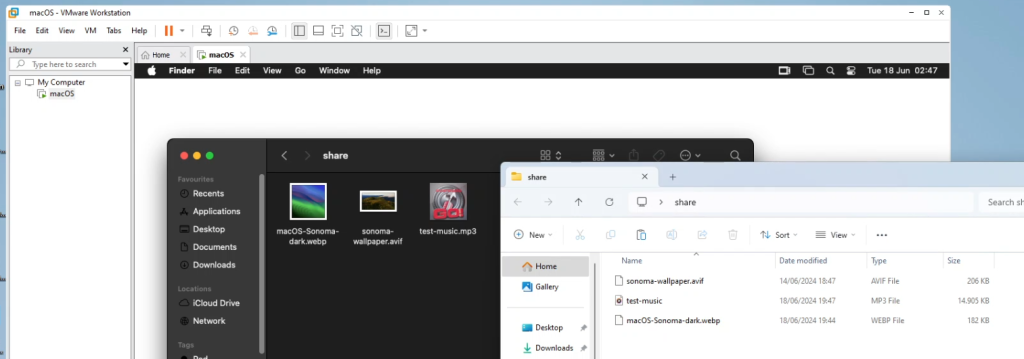
As you can see this makes it very convenient to exchange files back and forth:
Conclusion
These were quite a lot of steps to go through. From here you can go ahead an play around with the VM as if you would be working on a real Mac.
If you want some more flexibility, you can also easily take snapshots of the VM and return back to them when you break things or simply clone the virtual machine to a 2nd or 3rd instance:
Followed all the steps you laid out. Could not down load Sonoma install as you posted so just download the full install package from Apple and installed it in the application folder. The Mac update just kept looking for Sonoma download but never stopped. I installed Sonoma from the application file but at the very last step of instal I get the circle with a line thru it and won’t finish.
happend same with me you need to restart your vm and it will automatically ask for update so do that
Honestly, this is the best process guide i’ve found. Kudos..!
Can somebody who knows what their talking about answer me this:
– Boot times/system stability become unmanageable if I select 6 or 8 cores as apposed to 4. I.?
– After updating to Sonoma I managed to boot into OSX once, never again. Does the vmx feel need to be re-edited in anyway post-upgrade.?
– Would macOS 12/13 be a better upgrade path/more useable etc.
Before talk of my sys specs get raised. I’m running an Intel i7-12900, 64Gb DDR5 with a 3070 graphics card. It should have all the resources it needs. I’ve assigned the VM instance, 32Gb of RAM, ffs..
Maybe try just 2 cores? I get warnings that the guest may not support more than that. I’ve installed a sonoma iso directly (not using catalina+upgrade) with 160g disk and 16g memory
For those who get an error on Windows with : “C:\Program Files\qemu\qemu-img.exe” convert -O vmdk -o compat6 Catalina-BaseSystem.dmg catalina-installer.vmdk just add & at the beginning.
Like this : & “C:\Program Files\qemu\qemu-img.exe” convert -O vmdk -o compat6 Catalina-BaseSystem.dmg catalina-installer.vmdk
Thank you so much for your time making this and the video. Very much appreciated! This is the only guide I could get to work.
My AMD CPU wouldn’t boot the VM at first, but I remembered other guides had an AMD option for the VMX-file, so I added this to get the VM to boot:
smc.version = “0”
cpuid.0.eax = “0000:0000:0000:0000:0000:0000:0000:1011”
cpuid.0.ebx = “0111:0101:0110:1110:0110:0101:0100:0111”
cpuid.0.ecx = “0110:1100:0110:0101:0111:0100:0110:1110”
cpuid.0.edx = “0100:1001:0110:0101:0110:1110:0110:1001”
cpuid.1.eax = “0000:0000:0000:0001:0000:0110:0111:0001”
cpuid.1.ebx = “0000:0010:0000:0001:0000:1000:0000:0000”
cpuid.1.ecx = “1000:0010:1001:1000:0010:0010:0000:0011”
cpuid.1.edx = “0000:0111:1000:1011:1111:1011:1111:1111”
smbios.reflectHost = “TRUE”
You sir, are a legend. :)
Didn’t boot on my Ryzen, scrolled down to the comments, copied your AMD lines into the VMX and continued with the guide.
Thanks
Beste Jens,
Ik hoop dat ik u niet stoor. Mijn naam is Pascal en ik ben bij uw werk terechtgekomen via een interessant YouTube-filmpje dat ik onlangs bekeek (https://youtu.be/3rz8u-r6Z1M?si=NOclXbnyQwtnFIPK).
Via uw website en een korte zoektocht op Google vond ik ook uw LinkedIn-profiel. Uw expertise en passie voor technologie spraken me erg aan.
Ik woon ook in de regio Brugge en heb een probleem met een Mac Mini uit 2014 (serienummer C07VD16761J2) die ik tweedehands heb gekocht. Toen ik het apparaat wilde wissen en opnieuw installeren, stuitte ik op een Firmware Lock.
De geschiedenis van het apparaat is enigszins ingewikkeld:
1. Oorspronkelijk gekocht door een architectenbureau in Hasselt (Mamu Architects)
2. Daarna doorverkocht aan iemand die de Firmware Lock heeft ingesteld
3. Vervolgens nog tweemaal doorverkocht via 2dehands.be, waarvan de laatste keer aan mij
Ik heb al verschillende pogingen ondernomen om dit op te lossen:
– Lab9 in Brugge kon helpen met een originele factuur, maar die is niet meer beschikbaar (de aankoopperiode valt buiten de wettelijke bewaartermijn voor facturen)
– De tussenliggende eigenaar die de lock instelde, is niet meer te traceren
Gezien uw expertise vroeg ik me af of u misschien bereid zou zijn om een keer naar het toestel te kijken? Specifiek of u zou kunnen helpen bij het verwijderen van de Firmware Lock? Ik ben uiteraard bereid u te vergoeden voor uw tijd en moeite.
Ik begrijp dat dit een ongebruikelijk verzoek is en waardeer elke overweging die u hieraan wilt geven. Als u liever niet ingaat op dit verzoek, begrijp ik dat volledig.
Alvast bedankt voor uw tijd en aandacht.
Met vriendelijke groet,
Pascal CALEBOUT
Pascal,
Zover ik weet is dit alleen mogelijk bij devices waar je het geheugen kunt verwijderen.
Start het device zonder geheugen met de command+option+p+r ingedrukt totdat je 3 chimes hebt gehoord en daarna een login scherm ziet. Sluit de machine af en plaats het geheugen terug. Hierna zou je voorbij de lock moeten geraken.
Thank you for the guide! I was experiencing random crashes with my VM shortly after booting, and I discovered the issue was related to running the VM in full-screen mode at 2K resolution. Without dedicated video memory or GPU passthrough, the VM couldn’t handle the high resolution. Resizing the VM window resolved the problem immediately!
Additionally, while troubleshooting, I found that disabling the E-cores (Efficiency cores) via the VM’s configuration file significantly improved performance. This tweak specifically applies to Intel processors with hybrid architectures (P and E cores), so it won’t be relevant for AMD processors, which use a uniform set of high-performance cores. For more details on this, you can search for “VMware P-core performance.”
Hello!
Everything seems to work up to until the macos terms and conditions window shows up.
From that point on, I cannot click anything but the back button.
I am using a Ryzen 9 laptop, VmWare player and Vindows 11.
Do you have any clues as to why?
(I have completed all the steps, including editing the VM for ryzen)
Thanks!
Yes – this is a known issue. Workaround is to skip Apple ID login https://www.youtube.com/watch?v=vwkh2VJECHo
I wanted to say, Thank You! I have been searching and following a number of these types of walkthroughs to get one of the later versions of macOS to load in a VM on Windows 11. So many, I have lost count, and all of them worked between 50% to 85% – but none of them ever properly loaded Sonoma, (or Ventura, or Monterey even).
Your great and detailed instructions not only loaded macOS Sonoma in a VM, but it looks to be completely stable, as I can stop and restart it, take snapshots, get updates, and most important of all, I can use the App Store to download whatever I need, like x-code, swift, app store connect, steam, unity, you name it :)’
Thanks again, you are a true Gentleman, Scholar, and VM Legend!
Hello Jens,
First, thank you for the very detailed tutorial! I was able to install a working version of Catalina, which is already great.
My issue is that I need to install one of the latest versions of Xcode, which requires either Sonoma or Sequoia. I tried installing both, but after the second reboot (first reboot from Catalina, then a second after the 20-minute black and white progress bar screen), it enters a reboot loop and finally shows the “prohibited” symbol (the circle with a line through it), which indicates that the startup disk contains a macOS version that isn’t compatible with this Mac.
Is there a trick I might be missing? (I tried changing the VM parameters to macOS 15 or macOS 14, but no luck.)
I’m using an AMD Threadripper CPU, 128GB RAM, and an RTX 4090 GPU (I modified the vmx file with the amendments suggested by Gary).
Best regards,
Antoine
I get this error after modifying the vmx file and powering on the virtual machine. I get this error everytime and no config changes and unlocker tool makes it work at all.
Error: The CPU has been disabled by the guest operating system. Power off or reset the virtual machine.
I have an AMD Ryzen 7 5700 processor. Is it just not supported for loading macOS on virtual machines? Does anyone know how to fix this issue?
MS Copilot Assisted me with this Issue somehow. When I used ChatGPT it was not able to find me a working solution.
For AMD Windows 11 PCs:
smc.version = “0”
cpuid.0.eax = “0000:0000:0000:0000:0000:0000:0000:1011”
cpuid.0.ebx = “0111:0101:0110:1110:0110:0101:0100:0111”
cpuid.0.ecx = “0110:1100:0110:0101:0111:0100:0110:1110”
cpuid.0.edx = “0100:1001:0110:0101:0110:1110:0110:1001”
cpuid.1.eax = “0000:0000:0000:0001:0000:0110:0111:0001”
cpuid.1.ebx = “0000:0010:0000:0001:0000:1000:0000:0000”
cpuid.1.ecx = “1000:0010:1001:1000:0010:0010:0000:0011”
cpuid.1.edx = “0000:0111:1000:1011:1111:1011:1111:1111”
smbios.reflectHost = “FALSE”
This allowed me to install Catalina but installing Sonoma caused the computer to crash.
The next looping error I get is:
Your computer restarted because of a problem.
Ended up reinstalling Catalina. Any ideas on what is causing the issue?
Hi. I’m stuck at the VM tools process.
I can’t go future because the website have removed the tools and I can’t find it somewhere else on internet so if possible can you share the zip file with me.
I’m aware you couldn’t share it on Youtube so I came on you blog for asking for it.
please if possible can you share the file with me, I’m in real need of that vm tools zip file
How does the performance of macOS Sonoma in a VM compare to running it on native Apple hardware? adn can this method be applied to other versions of macOS, or is it specific to Sonoma?
The version of the auto-unlocker was not working, use this fork instead with the fix
https://github.com/WeshBg/auto-unlocker