
When building a Docker container image, in most cases, the machine where you build it on runs on the same CPU architecture as where you eventually want to use it. Today, more and more, there is a need for deploying containers on a different architecture as where it was built on. The most common scenario would be to build on your regular x86 desktop and to deploy to an ARM variant.
Introduction
Docker images and containers are standardized and are substantive as they contain everything your application needs in a single image with multiple layers. This enables portability and maximum flexibility in terms of where to deploy them, independent of the underlying host OS (Linux, Windows, macOS).
One limitation though, is that the container image needs to be built for the target architecture. For example, let’s say you want to build a container image on your desktop PC that will ultimately run on an embedded device like a Raspberry Pi. The desktop is most likely running on a x86_64 CPU but your Raspberry Pi is using an ARM-based CPU architecture. In this case, when using the regular steps to build a Docker image, the result is in an unusable image for your Raspberry Pi as it doesn’t understand the ARM architecture.
While ARM becomes more popular, especially after the recent announcements from Apple regarding Apple Silicon, I figured it was a good time to write an article about this.
Building images for non-x86 architecture
There are a few options to overcome this challenge:
- Develop on the target platform itself
- Use pre-built images, for example from Dockerhub
- Use Emulation like Docker buildx or binfmt and QEMU
The first option is the easiest to work with but limits you to the resources of the target device. For a raspberry Pi, this is still feasible but for slower embedded devices or some edge compute equipment, this might be a pain.
The second option greatly limits you in terms of customization and flexibility unless you plan to perform a standard task that has a pre-built image available.
The last and third option is what we will be looking at, and since I’m mainly focusing on Linux, the rest of the article will describe using binfmt and QEMU to accomplish this task.
QEMU and binfmt
QEMU is an open source project that is a fast processor emulator. It supports emulation of many CPU architectures like ARM, alpha, MIPS, PowerPC, SPARC, s390x, … QEMU has the option to do user mode emulation. In this mode, QEMU doesn’t emulate a full VM but only the foreign CPU itself. To execute foreign code in the emulated CPU, it captures the syscalls and forwards them to the host kernel. This way, we are interfacing the native kernel in the same way as any native piece of software.
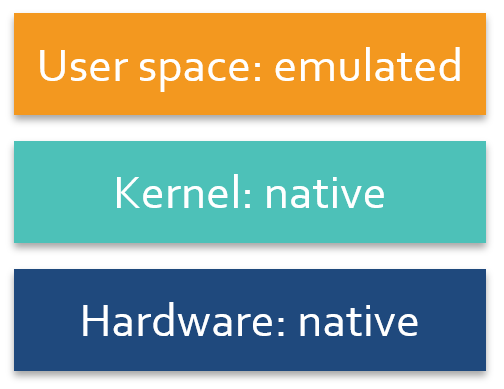
Binfmt is a subsystem that is part of the Linux kernel. It adds kernel support for miscellaneous Binary Formats. This piece will recognize arbitrary executable file formats and pass them to specific user space application such as emulators and virtual machines. For the purpose of this article, binfmt will be responsible for instructing the kernel to run non-x86 binaries with QEMU.
Prepare developer machine
As mentioned, the most common scenario would be to develop on a x86-based machine running Linux, Windows or Mac OS (for now) and building a container image for an ARM-based device.
The goal of the article is to build a small Apline-based container running a tiny Python script, service a simple webpage.
Starting point for our developer machine is a minimal install of Debian 10. This way the below steps should work on most existing installations. The target will be an ARM64v8 device (aarch64 Linux architecture), similar to a Raspberry Pi.
As you can see, the architecture of the machine we use to develop the Docker container image is x86-based:
jensd@deb10:~$ uname -m
x86_64
Our target platform is ARM-based:
jensd@arm:~$ uname -m
aarch64
Install Docker
The first step, if not done already, would be to install Docker on the freshly installed Debian machine. I’ll try to keep this short as it’s not the purpose of the article.
Install prerequisites for installing Docker from the separate repo:
jensd@deb10:~$ sudo apt-get update
…
jensd@deb10:~$ sudo apt-get install apt-transport-https ca-certificates curl gnupg-agent software-properties-common
Reading package lists… Done
Building dependency tree
…
Need to get 15.6 MB of archives.
After this operation, 48.3 MB of additional disk space will be used.
Do you want to continue? [Y/n] y
…
Processing triggers for man-db (2.8.5-2) …
Processing triggers for dbus (1.12.20-0+deb10u1) …
Install the GPG key and add the repository for Docker:
jensd@deb10:~$ curl -fsSL https://download.docker.com/linux/debian/gpg | sudo apt-key add -
OK
jensd@deb10:~$ sudo add-apt-repository "deb [arch=amd64] https://download.docker.com/linux/debian $(lsb_release -cs) stable"
Install the Docker packages:
jensd@deb10:~$ sudo apt-get update
…
jensd@deb10:~$ sudo apt-get install docker-ce docker-ce-cli
Reading package lists… Done
Building dependency tree
…
Need to get 159 MB of archives.
After this operation, 693 MB of additional disk space will be used.
Do you want to continue? [Y/n] y
…
Processing triggers for man-db (2.8.5-2) …
Processing triggers for libc-bin (2.28-10) …
In order to make things comfortable, it’s handy to allow our non-root user to access/run Docker commands:
jensd@deb10:~$ sudo usermod -a -G docker jensd
jensd@deb10:~$ newgrp docker
To test, we can run a small Alpine image and double check as which CPU architecture this runs as a Docker container:
jensd@deb10:~$ docker run -i -t alpine /bin/uname -m
Unable to find image 'alpine:latest' locally
latest: Pulling from library/alpine
df20fa9351a1: Pull complete
Digest: sha256:185518070891758909c9f839cf4ca393ee977ac378609f700f60a771a2dfe321
Status: Downloaded newer image for alpine:latest
x86_64
As you can see, the output, as expected, is x86_64, which matches with the same architecture of our build machine.
Install QEMU and binfmt
Next, we need to install binfmt and the QEMU emulation binaries:
jensd@deb10:~$ sudo apt-get install qemu-user qemu-user-static binfmt-support
Reading package lists… Done
Building dependency tree
…
Need to get 31.6 MB of archives.
After this operation, 301 MB of additional disk space will be used.
Do you want to continue? [Y/n] y
…
Processing triggers for man-db (2.8.5-2) …
Processing triggers for libc-bin (2.28-10) …
After the installation, we can find the static QEMU binaries in /usr/bin/qemu*static:
jensd@deb10:~$ ls -1 /usr/bin/qemu-*static
/usr/bin/qemu-aarch64_be-static
/usr/bin/qemu-aarch64-static
/usr/bin/qemu-alpha-static
/usr/bin/qemu-armeb-static
/usr/bin/qemu-arm-static
/usr/bin/qemu-cris-static
/usr/bin/qemu-hppa-static
/usr/bin/qemu-i386-static
/usr/bin/qemu-m68k-static
/usr/bin/qemu-microblazeel-static
/usr/bin/qemu-microblaze-static
/usr/bin/qemu-mips64el-static
/usr/bin/qemu-mips64-static
/usr/bin/qemu-mipsel-static
/usr/bin/qemu-mipsn32el-static
/usr/bin/qemu-mipsn32-static
/usr/bin/qemu-mips-static
/usr/bin/qemu-nios2-static
/usr/bin/qemu-or1k-static
/usr/bin/qemu-ppc64abi32-static
/usr/bin/qemu-ppc64le-static
/usr/bin/qemu-ppc64-static
/usr/bin/qemu-ppc-static
/usr/bin/qemu-riscv32-static
/usr/bin/qemu-riscv64-static
/usr/bin/qemu-s390x-static
/usr/bin/qemu-sh4eb-static
/usr/bin/qemu-sh4-static
/usr/bin/qemu-sparc32plus-static
/usr/bin/qemu-sparc64-static
/usr/bin/qemu-sparc-static
/usr/bin/qemu-tilegx-static
/usr/bin/qemu-x86_64-static
/usr/bin/qemu-xtensaeb-static
/usr/bin/qemu-xtensa-static
As you can see, there is plenty of architectures we can emulate using QEMU!
As a test, we can try to run the same Alpine image as we did as a test after installing docker, built for arm64v8, on our x86 box.
jensd@deb10:~$ docker run -v /usr/bin/qemu-aarch64-static:/usr/bin/qemu-aarch64-static -i -t arm64v8/alpine /bin/uname -m
Unable to find image 'arm64v8/alpine:latest' locally
latest: Pulling from arm64v8/alpine
b538f80385f9: Pull complete
Digest: sha256:3b3f647d2d99cac772ed64c4791e5d9b750dd5fe0b25db653ec4976f7b72837c
Status: Downloaded newer image for arm64v8/alpine:latest
aarch64
As you can see from the uname -m output, this Docker container is executing binaries compiled for aarch64, although it is physically running on our x86-based machine.
Build a test container image
Now that we got the necessary tools installed, we can start building a simple Docker image and prepare it for deployment on a different architecture.
The goal of this simple Docker image is to run a tiny Python based webserver that will tell us on which architecture it is running.
This is how the python script (webserver.py) looks like:
from http.server import BaseHTTPRequestHandler, HTTPServer
import platform

class S(BaseHTTPRequestHandler):
    def _set_headers(self):
        self.send_response(200)
        self.send_header('Content-type', 'text/html')
        self.end_headers()

    def do_GET(self):
        self._set_headers()
        r="<html><body><h1>Webserver on: " + str(platform.machine()) + "</h1></body></html>"
        self.wfile.write(bytes(r,"utf8"))

def run(server_class=HTTPServer, handler_class=S, port=9000):
    server_address = ('', port)
    httpd = server_class(server_address, handler_class)
    print ('Starting webserver on ' + str(platform.machine()) + ' architecture')
    httpd.serve_forever()

if __name__ == "__main__":
    run()
This script will listen on port 9000 and will, when a GET request comes in, return a simple HTML page saying Webserver on <architecture>.
First we’ll build the image for our developer machine, then we’ll make the necessary adjustments to build the same for another architecture. This way, you can see what changes are required to adapt/port one to another.
Dockerfile to create this image:
jensd@deb10:~$ cat Dockerfile-x86_64
FROM alpine
RUN apk add --no-cache python3
COPY webserver.py /webserver.py
EXPOSE 9000
ENTRYPOINT ["python3", "/webserver.py"]
At this point, we can build the image to test on the x86_64 dev machine:
jensd@deb10:~$ docker build -t web1 -f Dockerfile-x86_64 .
Sending build context to Docker daemon 26.11kB
Step 1/5 : FROM alpine
---> a24bb4013296
Step 2/5 : RUN apk add --no-cache python3
---> Running in db9d393c7dcd
fetch http://dl-cdn.alpinelinux.org/alpine/v3.12/main/x86_64/APKINDEX.tar.gz
fetch http://dl-cdn.alpinelinux.org/alpine/v3.12/community/x86_64/APKINDEX.tar.gz
(1/10) Installing libbz2 (1.0.8-r1)
(2/10) Installing expat (2.2.9-r1)
(3/10) Installing libffi (3.3-r2)
(4/10) Installing gdbm (1.13-r1)
(5/10) Installing xz-libs (5.2.5-r0)
(6/10) Installing ncurses-terminfo-base (6.2_p20200523-r0)
(7/10) Installing ncurses-libs (6.2_p20200523-r0)
(8/10) Installing readline (8.0.4-r0)
(9/10) Installing sqlite-libs (3.32.1-r0)
(10/10) Installing python3 (3.8.5-r0)
Executing busybox-1.31.1-r16.trigger
OK: 53 MiB in 24 packages
Removing intermediate container db9d393c7dcd
---> 9430f28cd7a0
Step 3/5 : COPY webserver.py /webserver.py
---> 557a4c8115a0
Step 4/5 : EXPOSE 9000
---> Running in 0b896bf63ac3
Removing intermediate container 0b896bf63ac3
---> fbcc355442e9
Step 5/5 : ENTRYPOINT ["python3", "/webserver.py"]
---> Running in 8b8a5805f3d8
Removing intermediate container 8b8a5805f3d8
---> 316a4c95080a
Successfully built 316a4c95080a
Successfully tagged web1:latest
Once the image is built, we can see it in the repository and we can check for which architecture it got built:
jensd@deb10:~$ docker images
REPOSITORY          TAG                 IMAGE ID            CREATED             SIZE
web1                latest              316a4c95080a        57 seconds ago      49MB
arm64v8/alpine      latest              62ee0e9f8440        4 months ago        5.32MB
alpine              latest              a24bb4013296        4 months ago        5.57MB
hello-world         latest              bf756fb1ae65        9 months ago        13.3kB
jensd@deb10:~$ docker inspect web1 | grep Arch
        "Architecture": "amd64",
We can now run the image and start a container from it:
jensd@deb10:~$ docker run --rm -ti -p 9000:9000 web1
Starting webserver on x86_64 architecture
172.17.0.1 - - [15/Oct/2020 07:49:10] "GET / HTTP/1.1" 200 -
In another session, we can query the webserver on port 9000 and see what it returns on a GET request:
jensd@deb10:~$ curl localhost:9000
<html><body><h1>Webserver on: x86_64</h1></body></html>
Or the same in a brower:
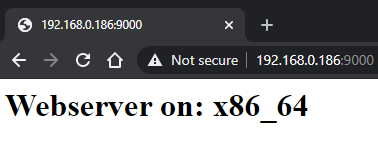
As expected, we get a response that we’re running on an x86_64 platform. Makes sense as so far we haven’t made any adjustments to change our image/container for anything else that the developer machine.
Build the test image for non-x86
At this point, we went through all the steps to build a “regular” Docker image for the same platform as where we built it on. Now we’ll look into the changes required in order to build for another architecture.
The only change we need to do is on our Dockerfile. We need to copy the static QEMU binary for the target architecture to our container and we need to use a base image that suits the same architecture.
As we need to copy that QEMU file to the image on build time we need to make sure it is available in the build context .:
jensd@deb10:~$ cp /usr/bin/qemu-aarch64-static .
Taking the above example and adapting it for aarch64 or arm64v8:
jensd@deb10:~$ cat Dockerfile-aarch64
FROM arm64v8/alpine
COPY qemu-aarch64-static /usr/bin
RUN apk add --no-cache python3
COPY webserver.py /webserver.py
EXPOSE 9000
ENTRYPOINT ["python3", "/webserver.py"]
This is all it takes to adapt the Dockerfile and build the image for our target platform: arm64v8/aarch64:
jensd@deb10:~$ docker build -t web2 -f Dockerfile-aarch64 .
Sending build context to Docker daemon 6.657MB
Step 1/6 : FROM arm64v8/alpine
---> 62ee0e9f8440
Step 2/6 : COPY qemu-aarch64-static /usr/bin
---> c35d81a3a086
Step 3/6 : RUN apk add --no-cache python3
---> Running in 9e01d3ca8e32
fetch http://dl-cdn.alpinelinux.org/alpine/v3.12/main/aarch64/APKINDEX.tar.gz
fetch http://dl-cdn.alpinelinux.org/alpine/v3.12/community/aarch64/APKINDEX.tar.gz
(1/10) Installing libbz2 (1.0.8-r1)
(2/10) Installing expat (2.2.9-r1)
(3/10) Installing libffi (3.3-r2)
(4/10) Installing gdbm (1.13-r1)
(5/10) Installing xz-libs (5.2.5-r0)
(6/10) Installing ncurses-terminfo-base (6.2_p20200523-r0)
(7/10) Installing ncurses-libs (6.2_p20200523-r0)
(8/10) Installing readline (8.0.4-r0)
(9/10) Installing sqlite-libs (3.32.1-r0)
(10/10) Installing python3 (3.8.5-r0)
Executing busybox-1.31.1-r16.trigger
OK: 52 MiB in 24 packages
Removing intermediate container 9e01d3ca8e32
---> 13b9f6f07e7d
Step 4/6 : COPY webserver.py /webserver.py
---> 44e8c54a66b8
Step 5/6 : EXPOSE 9000
---> Running in 6dbd9aff033f
Removing intermediate container 6dbd9aff033f
---> a9bbaec60a31
Step 6/6 : ENTRYPOINT ["python3", "/webserver.py"]
---> Running in 29067efc8955
Removing intermediate container 29067efc8955
---> 21c13086b01c
Successfully built 21c13086b01c
Successfully tagged web2:latest
Checking the architecture listed with Docker inspect for web2, shows us the following:
jensd@deb10:~$ docker inspect web2 | grep Arch
"Architecture": "arm64",
Running the image and start a container:
jensd@deb10:~$ docker run --rm -ti -p 9000:9000 web2
Starting webserver on aarch64 architecture
172.17.0.1 - - [15/Oct/2020 08:48:30] "GET / HTTP/1.1" 200 -
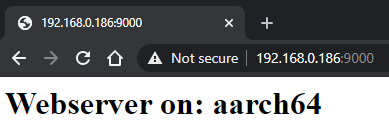
When doing the same test, to query the webserver, as with the native image for x86_64, we can see that this is really running as on ARM:
jensd@deb10:~$ curl localhost:9000
<html><body><h1>Webserver on: aarch64</h1></body></html>
And the same using a browser:
At this point, we can save/export the image and deploy it on a machine/device that is having the aarch64 CPU architecutre:
jensd@deb10:~$ docker save -o web_aarch64.tar web2
jensd@deb10:~$ ls web_aarch64.tar
web_aarch64.tar
After saving the image to web_aarch64.tar, we can copy it to our ARM device, load it and run it as if it was built on the same box:
jensd@arm:~$ scp jensd@192.168.0.186:/home/jensd/web_aarch64.tar .
The authenticity of host '192.168.0.186 (192.168.0.186)' can't be established.
ECDSA key fingerprint is SHA256:7S17jIT9fotQOdYjasxLpan9LHvcs7rj23eRtLFSWbU.
Are you sure you want to continue connecting (yes/no)? yes
Warning: Permanently added '192.168.0.186' (ECDSA) to the list of known hosts.
jensd@192.168.0.186's password:
web_aarch64.tar                                                100%   55MB  60.0MB/s   00:00
jensd@arm:~$ docker load -i web_aarch64.tar
f0256daf202a: Loading layer 6.631MB/6.631MB
4dc695e29258: Loading layer 45.21MB/45.21MB
4dd6fec867f3: Loading layer 2.56kB/2.56kB
Loaded image: web2:latest
jensd@arm:~$ docker run --rm -ti -p 9000:9000 web2
Starting webserver on aarch64 architecture
192.168.0.30 - - [15/Oct/2020 08:54:11] "GET / HTTP/1.1" 200 -
This results in the same webpage being displayed and architecture aarch64 as output.