
There are several options when you would like a NAS or Network Attached Storage. One of them is, instead of using dedicated NAS hardware, to build and configure your own (Linux-based) NAS system, using a standard distro. Getting dedicated NAS hardware has an advantage in terms of ease of use. On the other hand, building your own system and configuring the OS yourself has the advantage of flexibility, potential additional features and might even save you some money. But what about the power consumption? This post covers my journey for a self-built, Linux-based, NAS for home
Introduction
What do I need a NAS for?
NAS stands for Network Attached Storage and that’s exactly what it is for me currently. Most of the dedicated NAS devices offer a lot of additional features like cloud synchronization, a download manager, a media server, ability to organize photos and videos, surveillance camera recording and many more.
My current NAS, which will be replaced by the system in this article, is a 6 year old Zyxel 2-bay NAS with two 1TB disks in mirror (RAID 1). The bundled OS has been replaced by Arch-Linux a few years back as the manufactures’ OS no longer received (security) updates and it was not possible to create SMB v2 shares. In a sense, I was already running a self-configured Linux-based NAS.
The “services” which I use on that NAS are pretty basic: All disk space is mirrored over the two disks, using MDADM, and exposed in a single SMB-share with a single user. Additionally, I also use the ability to take a backup using the USB port to an external drive for off-site backup.
Why do I want to replace my current NAS?
The main incentive to replace my current NAS is simply because I’m running out of space. The current 2x1TB disks in mirror give me a net 1TB of space. After several cleaning actions it’s simply becoming too small due to the ever growing photo and video collection. Next to that, since those disks have been running for >6 years and they are regular desktop disks, I think it is time to replace them for reliability anyway. The NAS itself became less reliable as well as I had to recover it twice in the last year. Last but not least, since the current NAS is pretty limited in memory and CPU resources, it was not very capable in doing much more than sharing the disk space.
Part 1: Hardware
Consideration between a self-built NAS or dedicated hardware/OS
After looking what is available on the market, I would probably have to spend around €200 for a replacement 2-bay dedicated NAS. For that price I can get a low-entry model from Synology or QNAP. This would give me a device with a basic ARM CPU and 512MB or 1GB of RAM. With those specifications, it looks enough to perform the same tasks as my current device in a good way. Although NAS hardware in that price range also does come with support for additional features, after reading several reviews, this turns out to be quite limited. Mainly due to the lack of resources. If I’d want to do more using dedicated NAS hardware, I would quickly end up at models around €400. This is where the idea grew to approach it different.
My main concern to not go for non-dedicated hardware is power consumption. A dedicated NAS with tailored hardware, a low-power ARM CPU and no additional but the necessary hardware, results in an optimal power consumption for the task. Hence why, further in the this post, I will spend additional focus on that.
The simplicity/advantage of having a tailored NAS-OS is not something I see as a must, in contrary, as previous experience shows, I quickly feel limited by it. That’s also why, for my build, I will not use any of the available distributions tailored for NAS-usage like FreeNAS or OpenMediaVault.
Base hardware
As base hardware: the CPU, memory, motherboard, power supply and chassis, any working PC system would do. To select a system, I used the following criteria:
- Small (should fit in my utilities closet)
- Not too loud (larger, slow FAN(s))
- Low idle power usage (as the device will be on 24/7)
- Price range: €100-200 (otherwise I can as well get myself a “normal” NAS)
- Gigabit Ethernet port and USB3 (for backup)
- Enough SATA connections (min. 3, more is better)
- Physical place for at least two 3,5″ disks
The first five points made me end up with a refurbished office desktop SFF (Small Form Factor) PC. These are compact, not too loud and have no power hungry hardware in them. You can easily find decent hardware starting around €100, with an Intel core i3/i5 CPU and >=4GB of RAM.
The last two points were more difficult as most of these SFF desktops are designed for a single 3.5″ or even 2.5″ hard drive in combination with a slim format CD/DVD-drive. After some searching, I ended up with a Lenovo ThinkCentre M91P SFF.
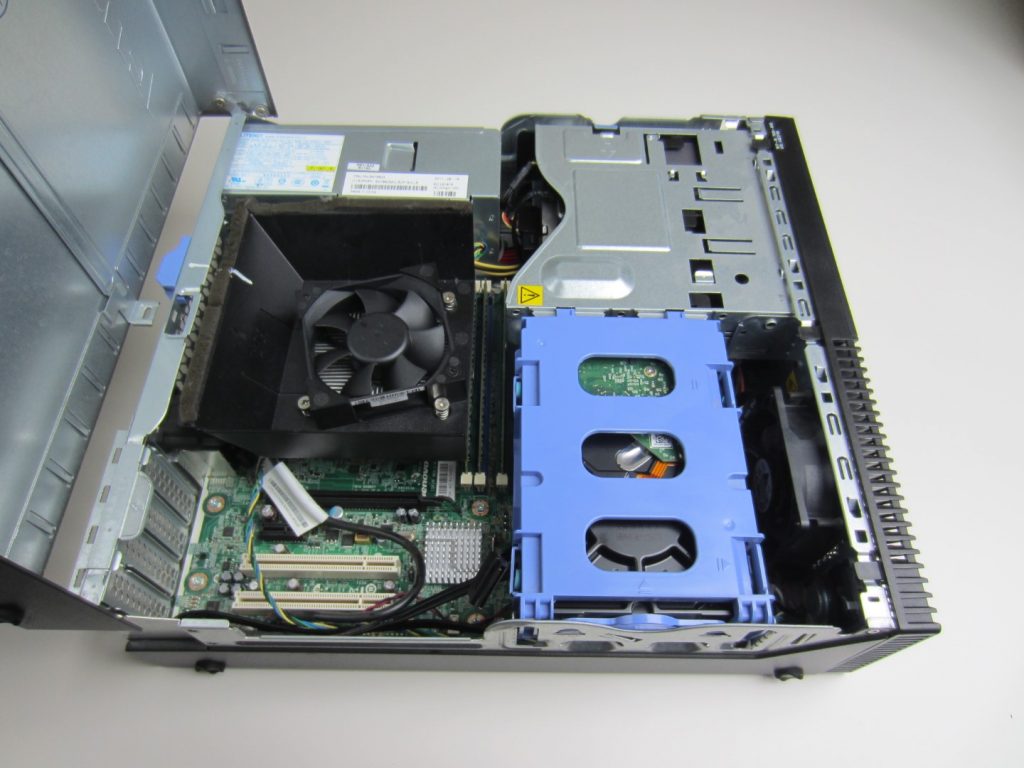
The M91P SFF has space for one 3.5″ disk, 4 SATA ports (2xSATA600 and 2xSATA300) and hosts a full size 5.25″ DVD-drive. Replacing that DVD-drive drive with a mounting frame should allow additional place for one 3,5″ hard disk and two 2,5″ disks or SSD.
For the rest, the machine came with an Intel Core i5, 4GB of DDR3 RAM and a 500GB HD with Windows 10 installed.
Hardware changes
Memory
As I planned to do more than just serving files over SMB with this upgrade, and I’d like to be able to run a few virtual machines as well, I decided to upgrade the 4GB of RAM to 16GB. I managed to find some old stock modules for €5/piece so that was a no-brainer.
Disks
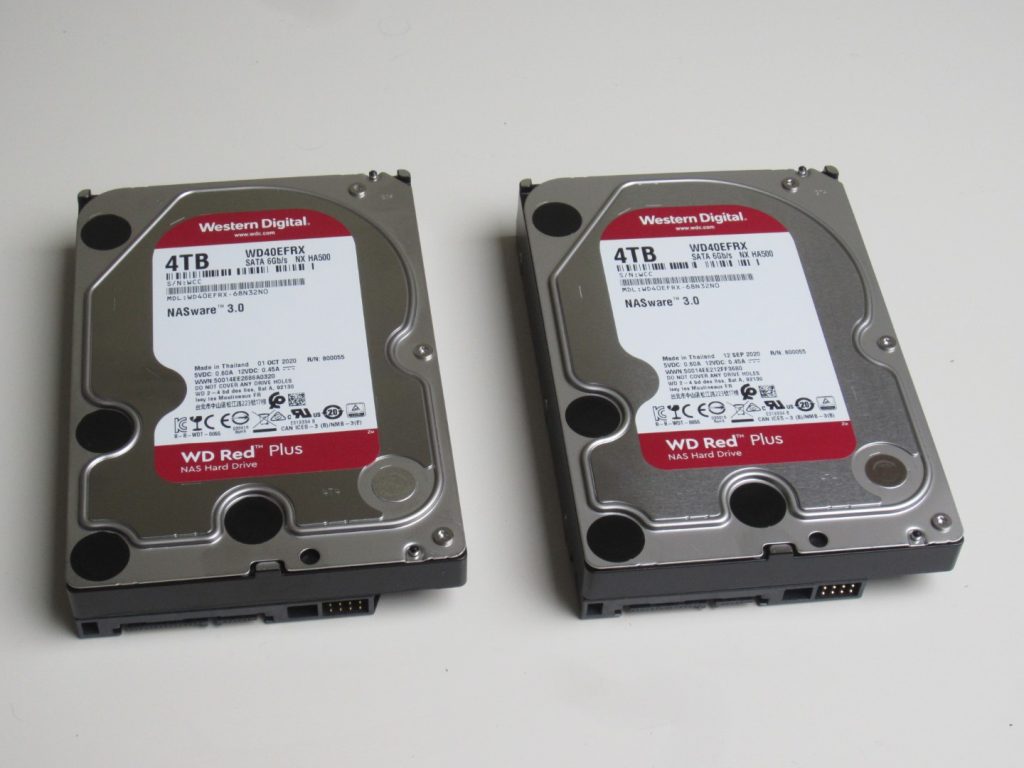
The goal is to host two disks in the SFF PC. The price step between 2TB and 4TB is, at the time of writing, very small and 4TB to 8TB is a lot more expensive. So 4TB seems like a good choice and gives me some space (literarily) for the future. After some reading, I decided to order two Western Digital Red Plus, 4 TB drives. These should be especially designed for NAS-usage.
Room for the disks
As mentioned briefly above, my plan is to replace the 5,25″ DVD drive with a mounting frame of the same size. These are commonly available and can host one 3.5″ disk and two 2,5″ disk/SSDs:
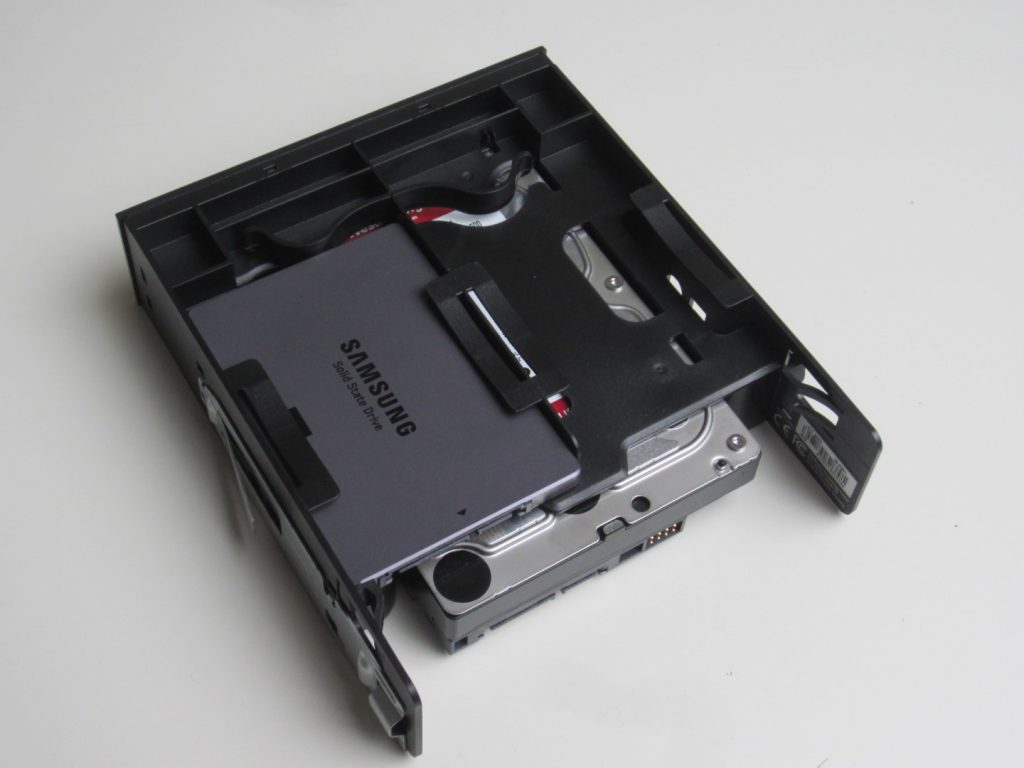
In order to connect the drives, I also needed some additional SATA cables and power splitters
The result: a rather compact machine with two 4TB disks and an additional 120GB SSD, 16GB of RAM and an i5 CPU neatly tucked together.
To try something new, I decided to spend some time on the hardware journey and I worked on a YouTube video that provides an in depth, step by step, overview of the changes:
Part 2: Software
Now that we got the hardware sorted, it’s time for installing an OS to the machine.
It might sound weird but I do not have a favorite Linux distribution. If possible, I prefer CentOS or Debian but this all depends on the use case. For this project, I decided to go for Debian since I plan to install Proxmox, for virtual machine management, later. The rest of the tasks that I plan to do with the NAS can be done with basically any available Linux distro.
Debian installation
I won’t spend a lot of words on this part as I just booted the system from a USB-drive and installed Debian, without graphical environment, on the SATA SSD (/dev/sdc).
Once the system booted, I installed a few basic additional packages:
- vim (still can’t get used to vi)
- xauth (to be able to run graphical apps remotely)
- net-tools (to have netstat for example)
- ntfs-3g (to be able to mount NTFS-based disks)
- sudo (to login using SSH with a regular user)
After booting up the system and installing the above packages, I added my non-root user to the sudo group and continued the work using SSH.
Prepare and create the disk mirror
Before we can start using the two 4TB SATA disks, we need to initialize them first. After the installation, with the brand new disks present, lsblk lists the following block devices:
jensd@nas:~$ lsblk
NAME MAJ:MIN RM SIZE RO TYPE MOUNTPOINT
sda 8:0 0 3.7T 0 disk
sdb 8:16 0 3.7T 0 disk
sdc 8:32 0 111.8G 0 disk
├─sdc1 8:33 0 953M 0 part /boot
├─sdc2 8:34 0 3.7G 0 part [SWAP]
└─sdc3 8:35 0 107.1G 0 part /
As you can see, sda and sdb are my 4TB disks and they do not have any partitions yet. Using fdisk, we can initialize the disks, or better, create a GPT partition table on them, and create a type 29 (Linux RAID) partition on them:
jensd@nas:~$ sudo fdisk /dev/sda

Welcome to fdisk (util-linux 2.33.1).
Changes will remain in memory only, until you decide to write them.
Be careful before using the write command.

Device does not contain a recognized partition table.
The size of this disk is 3.7 TiB (4000787030016 bytes). DOS partition table format cannot be used on drives for volumes larger than 2199023255040 bytes for 512-byte sectors. Use GUID partition table format (GPT).
Created a new DOS disklabel with disk identifier 0x92e38cbc.

Command (m for help): g
Created a new GPT disklabel (GUID: 09D603BD-39AD-394A-BBB1-33C122EFE960).

Command (m for help): n
Partition number (1-128, default 1):
First sector (2048-7814037134, default 2048):
Last sector, +/-sectors or +/-size{K,M,G,T,P} (2048-7814037134, default 7814037134):

Created a new partition 1 of type 'Linux filesystem' and of size 3.7 TiB.

Command (m for help): p
Disk /dev/sda: 3.7 TiB, 4000787030016 bytes, 7814037168 sectors
Disk model: WDC WD40EFRX-68N
Units: sectors of 1 * 512 = 512 bytes
Sector size (logical/physical): 512 bytes / 4096 bytes
I/O size (minimum/optimal): 4096 bytes / 4096 bytes
Disklabel type: gpt
Disk identifier: 09D603BD-39AD-394A-BBB1-33C122EFE960

Device Start End Sectors Size Type
/dev/sda1 2048 7814037134 7814035087 3.7T Linux filesystem

Command (m for help): t
Selected partition 1
Partition type (type L to list all types): 29
Changed type of partition 'Linux filesystem' to 'Linux RAID'.

Command (m for help): p
Disk /dev/sda: 3.7 TiB, 4000787030016 bytes, 7814037168 sectors
Disk model: WDC WD40EFRX-68N
Units: sectors of 1 * 512 = 512 bytes
Sector size (logical/physical): 512 bytes / 4096 bytes
I/O size (minimum/optimal): 4096 bytes / 4096 bytes
Disklabel type: gpt
Disk identifier: 09D603BD-39AD-394A-BBB1-33C122EFE960

Device Start End Sectors Size Type
/dev/sda1 2048 7814037134 7814035087 3.7T Linux RAID

Command (m for help): w
The partition table has been altered.
Calling ioctl() to re-read partition table.
Syncing disks.
The same step needs to be repeated for sdb obviously.
After preparing the disks, lsblk shows the following:
jensd@nas:~$ lsblk
NAME MAJ:MIN RM SIZE RO TYPE MOUNTPOINT
sda 8:0 0 3.7T 0 disk
└─sda1 8:1 0 3.7T 0 part
sdb 8:16 0 3.7T 0 disk
└─sdb1 8:17 0 3.7T 0 part
sdc 8:32 0 111.8G 0 disk
├─sdc1 8:33 0 953M 0 part /boot
├─sdc2 8:34 0 3.7G 0 part [SWAP]
└─sdc3 8:35 0 107.1G 0 part /
At this point, the two disks can be tied together as a RAID array. Briefly explained, RAID allows you to bundle physical disks together, in different modes, to expose them as a single volume. To create RAID arrays you can use hardware RAID (using a dedicated storage controller) or software RAID (using the features of the installed OS). Since The maximum performance I need is that of the Gigabit Ethernet connection, I’m happy with the performance of software RAID.
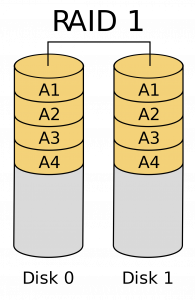
As type, I’m choosing RAID mirroring, also known as RAID 1. In RAID 1, both disks will have all data on them. This results in redundancy, which means my data is not lost as long as only one of both disks fail. As a side, this also should result in near-double read speed.
On Linux, the most popular option to perform software RAID is to use MDADM. To get started, we need to install the mdadm package on our Debian machine:
jensd@nas:~$ sudo apt install vim mdadm
Reading package lists… Done
Building dependency tree
Reading state information… Done
…
Processing triggers for man-db (2.8.5-2) …
Now MDADM is installed, we can instruct it to create a new array, using our tow 4TB disks we just initialized:
jensd@nas:~$ sudo mdadm --create /dev/md0 --level=mirror --raid-devices=2 /dev/sda /dev/sdb
mdadm: partition table exists on /dev/sda
mdadm: partition table exists on /dev/sda but will be lost or
       meaningless after creating array
mdadm: Note: this array has metadata at the start and
    may not be suitable as a boot device.  If you plan to
    store '/boot' on this device please ensure that
    your boot-loader understands md/v1.x metadata, or use
    --metadata=0.90
mdadm: partition table exists on /dev/sdb
mdadm: partition table exists on /dev/sdb but will be lost or
       meaningless after creating array
Continue creating array? y
mdadm: Defaulting to version 1.2 metadata
mdadm: array /dev/md0 started.
As a result, as I instructed in the command to mdadm, a new block device: /dev/md0 got created. This device represents the RAID mirror of /dev/sda and /dev/sdb.
To make sure that our array is reassembled automatically each time the system boots, we need to save our configuration in /etc/mdadm/mdadm.conf file. Fortunately, there is an easy way to do so:
jensd@nas:~$ sudo mdadm --detail --scan | sudo tee -a /etc/mdadm/mdadm.conf
ARRAY /dev/md0 metadata=1.2 name=nas:0 UUID=d03e0d04:83e653c0:2e3cd013:f803b5fd
jensd@nas:~$ sudo update-initramfs -u
update-initramfs: Generating /boot/initrd.img-4.19.0-12-amd64
In the background, MDADM will sync the data of both disks. This can take a long time as it requires reading/writing 4TB of data. You can check the status and health, including the sync status, using the following command:
jensd@nas:~$ sudo mdadm --detail /dev/md0
/dev/md0:
           Version : 1.2
     Creation Time : Thu Dec  3 13:32:59 2020
        Raid Level : raid1
        Array Size : 3906886464 (3725.90 GiB 4000.65 GB)
     Used Dev Size : 3906886464 (3725.90 GiB 4000.65 GB)
      Raid Devices : 2
     Total Devices : 2
       Persistence : Superblock is persistent

     Intent Bitmap : Internal

       Update Time : Thu Dec  3 13:33:29 2020
             State : clean, resyncing
    Active Devices : 2
   Working Devices : 2
    Failed Devices : 0
     Spare Devices : 0

Consistency Policy : bitmap

     Resync Status : 0% complete

              Name : nas:0  (local to host nas)
              UUID : d03e0d04:83e653c0:2e3cd013:f803b5fd
            Events : 6

    Number   Major   Minor   RaidDevice State
       0       8        0        0      active sync   /dev/sda
       1       8       16        1      active sync   /dev/sdb
As I mentioned, at this point, we can start using /dev/md0 just as any other block device. And in the same way, the first thing we need to do is to create a filesystem on it:
jensd@nas:~$ sudo mkfs.ext4 /dev/md0
mke2fs 1.44.5 (15-Dec-2018)
Creating filesystem with 976721616 4k blocks and 244187136 inodes
Filesystem UUID: 4fd98cb2-6060-48f5-9922-43d668372113
Superblock backups stored on blocks:
32768, 98304, 163840, 229376, 294912, 819200, 884736, 1605632, 2654208,
4096000, 7962624, 11239424, 20480000, 23887872, 71663616, 78675968,
102400000, 214990848, 512000000, 550731776, 644972544
Allocating group tables: done
Writing inode tables: done
Creating journal (262144 blocks): done
Writing superblocks and filesystem accounting information: done
Once we have the FS created, we can simply mount the array:
jensd@nas:~$ sudo mkdir /mnt/nas
jensd@nas:~$ sudo mount /dev/md0 /mnt/nas
jensd@nas:~$ lsblk
NAME MAJ:MIN RM SIZE RO TYPE MOUNTPOINT
sda 8:0 0 3.7T 0 disk
└─md0 9:0 0 3.7T 0 raid1 /mnt/nas
sdb 8:16 0 3.7T 0 disk
└─md0 9:0 0 3.7T 0 raid1 /mnt/nas
sdc 8:32 0 111.8G 0 disk
├─sdc1 8:33 0 953M 0 part /boot
├─sdc2 8:34 0 3.7G 0 part [SWAP]
└─sdc3 8:35 0 107.1G 0 part /
And a simple test to see if we can write something to that mounted array:
jensd@nas:~$ sudo touch /mnt/nas/test
jensd@nas:~$ ls -al /mnt/nas/
total 24
drwxr-xr-x 3 root root 4096 Dec 3 13:35 .
drwxr-xr-x 4 root root 4096 Dec 3 13:35 ..
drwx------ 2 root root 16384 Dec 3 13:33 lost+found
-rw-r--r-- 1 root root 0 Dec 3 13:35 test
Now finally, to make sure that the array always get mounted on boot, we can edit /etc/fstab to include the following (last line):
jensd@nas:~$ echo '/dev/md0 /mnt/nas ext4 defaults,nofail 0 0' | sudo tee -a /etc/fstab
/dev/md0 /mnt/nas ext4 defaults,nofail 0 0
Windows Share (Samba)
As mentioned in the beginning of this article, my main usage of the NAS is to access the storage from Windows (or other devices) using SMB. To serve the mountpoint I created earlier for use with SMB, we need Samba. This is the set of tools under Linux that implements the SMB-protocol.
As a start, we need to install the necessary packages:
jensd@nas:~$ sudo apt install samba samba-client
Reading package lists… Done
Building dependency tree
Reading state information… Done
…
Processing triggers for man-db (2.8.5-2) …
Processing triggers for libc-bin (2.28-10) …
jensd@nas:~$
Next, we need to configure what to expose and how to act on the network for Windows-based file sharing. This is done in /etc/samba/smb.conf. My sample config looks like this:
jensd@nas:~$ sudo cp /etc/samba/smb.conf /etc/samba/smb.conf.orig
jensd@nas:~$ sudo vim /etc/samba/smb.conf
[jensd@nas ~]$ cat /etc/samba/smb.conf
[global]
workgroup=WORKGROUP
server min protocol = SMB2
server max protocol = SMB3
server string = NAS
log file = /var/log/samba/%m.log

[data]
path = /mnt/nas/data
available = yes
valid users = jensd
read only = no
browseable = yes
writable = yes
There is a lot you can configure in smb.conf, as you can see in the sample smb.conf. The config above is a minimum and basically sets the SMB version to use, current Windows versions have SMB v1 disabled for security reasons, how the device should advertise itself and where to write log entries to. In the next section, I have one “share” called data, mapped to a subdirectory of /mnt/nas, my RAID 1 array.
After editing the file, we can activate it by restarting the smbd service. Apt enables it (and nmbd) by default so it should already run.
Last step, before we can test this SMB share, is to create a user on SMB side for the valid users I enabled access in smb.conf:
jensd@nas:~$ sudo smbpasswd -a jensd
New SMB password:
Retype new SMB password:
Added user jensd.
Obviously you need to make sure that user had permissions to the files on system level as well.
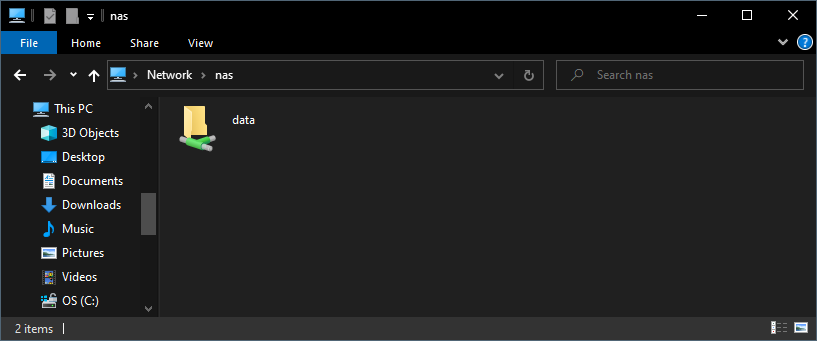
Finally, we should be able to access the files from a Windows desktop system. You can do so by typing in \\<ip address> or \\<name> in the address bar. In my example: \\nas:
For part 2: Software, as with the first part, I created a video on Youtube. You can find it here:
Part 3: Power consumption
The hardware is complete and the basic configuration of my NAS has been completed. In this stage, it is time to focus on the power consumption of the self-built NAS.
As mentioned early in this post, the main reason why I still considered a classic dedicated NAS would be power consumption. I’m not worried about the power consumption under load as this will only be a few minutes per day in average. It’s the idle consumption that needs to be as low as possible. A typical 2-bay NAS, including my current one, seems to use around 15-20W when idle. This results in a power consumption of ~180kWh/year. In Belgium that would be a cost of ~€45/year.
My goal is to tune the system as much as possible, without loss in user experience, in order to get as close as possible to 15-20W idle.
Before tuning
To make sure I measure my efforts correctly, I’ve been monitoring the power consumption of the machine using a smart power plug. Using some open tools, I was able to plot out the power consumption on a graph (which is food for a separate post).
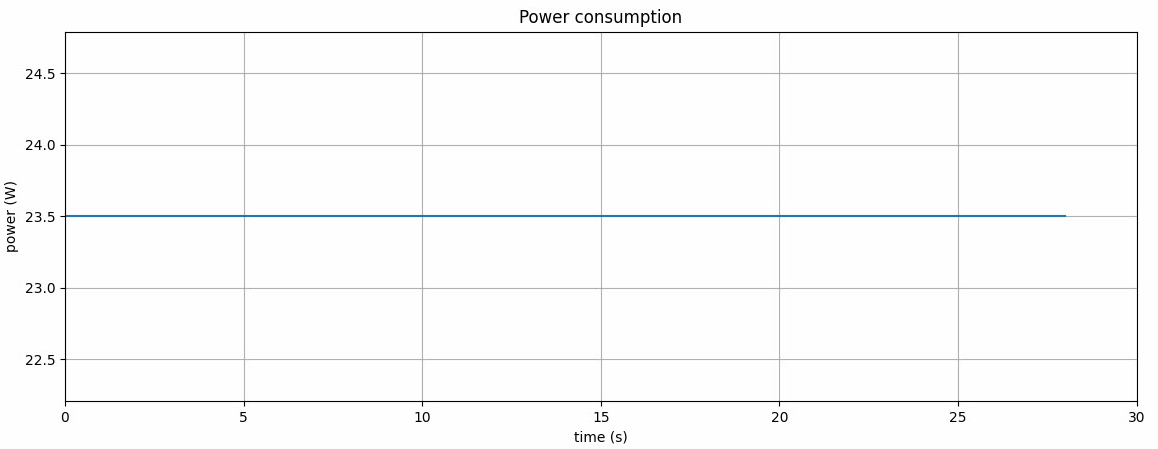
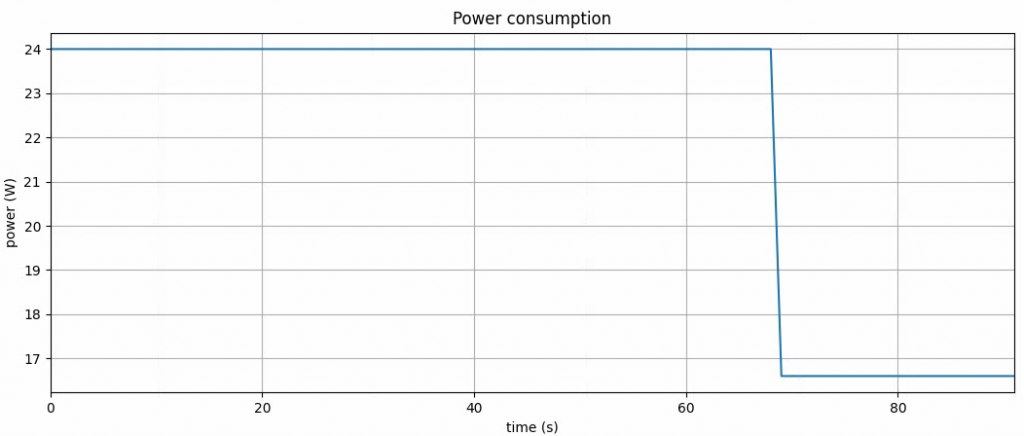
First, I disabled all components in the BIOS that were not needed, for example the soundcard and serial ports. Without any further specific tuning for power consumption, the machine seems to use around 23-24W in idle condition. This was a lot better that I had hoped for:
To see how soon we hit this state and out of curiosity, I decided to perform a reboot while monitoring the power consumption:
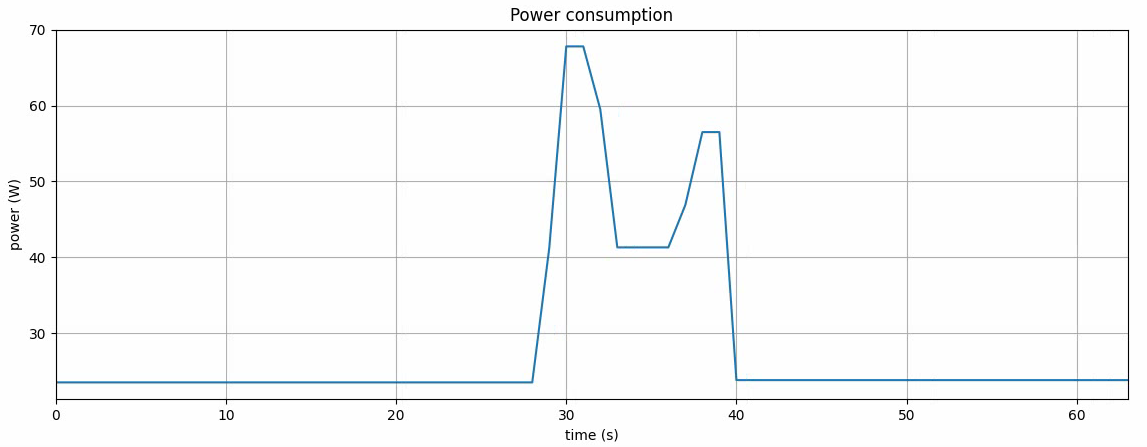
As expected, we see a peak in the power demand during the reboot. The peak seems to be around 70W, which is lower than some (high performance) laptops these days. This confirmed what I had hoped for, choosing for the SFF office PC.
Optimizing power consumption
The above results looked promising already. Still, I had a good look at what I could do to improve.
HD spindown
The first thing I though off, was to spin down the disks after they were not used for some time. This is not done by default on Debian as it might impact performance and with this comes a little trade off in comfort. When the disks are idle, they will not use any power but when trying to access data from then, it takes time for the disk to spin-up again.
To test the impact this measure would have on power consumption, I first did a manual test using hdparm. The -y option puts a disk instantly in standby/spindown state.
jensd@nas:~$ sudo hdparm -y /dev/sda
/dev/sda:
issuing standby command

jensd@nas:~$ sudo hdparm -y /dev/sdb
/dev/sdb:
issuing standby command
As you can see on the graph, putting both disks, one by one, to sleep results in a drop of around 8W.
When trying to read something from the RAID array, with the disks in this state, causes a delay in response as the system will first need to bring up the disks again. There is also a slight peak in consumption during that start. This is something I can live with.
In order to have the system spin-down the disks after they haven’t been used for some time, I wil install hd-idle. This tool will monitor /proc/diskstats on a regular basis and will instruct disks that were not being accessed for a predefined time to spin down.
For some reason, HD-idle is no longer in the main repositories for Debian 10 (Buster) but I figured out that it exists in backports. So we’ll start by adding backports as a source for packages:
jensd@nas:~$ sudo vi /etc/apt/sources.list
jensd@nas:~$ cat /etc/apt/sources.list
deb http://deb.debian.org/debian/ buster main
deb-src http://deb.debian.org/debian/ buster main

deb http://security.debian.org/debian-security buster/updates main
deb-src http://security.debian.org/debian-security buster/updates main

# buster-updates, previously known as 'volatile'
deb http://deb.debian.org/debian/ buster-updates main
deb-src http://deb.debian.org/debian/ buster-updates main

# buster-backports
deb http://deb.debian.org/debian/ buster-backports main contrib non-free
deb-src http://deb.debian.org/debian/ buster-backports main contrib non-free
In /etc/apt/sourcea.list, I added the last 3 lines. After that, we need to run apt update in order to use the new list.
jensd@nas:~$ sudo apt update
Hit:1 http://deb.debian.org/debian buster InRelease
Hit:2 http://deb.debian.org/debian buster-updates InRelease
Hit:3 http://deb.debian.org/debian buster-backports InRelease
Hit:4 http://security.debian.org/debian-security buster/updates InRelease
Reading package lists… Done
Building dependency tree
Reading state information… Done
17 packages can be upgraded. Run 'apt list --upgradable' to see them.
jensd@nas:~$
And finally, we can install hd-idle:
jensd@nas:~$ sudo apt install hd-idle
Reading package lists… Done
Building dependency tree
Reading state information… Done
...
To test the functionality of HD-idle, we can start it manually in debug mode. Just to check if it works, we can put a very low time to spin down the disks, for example 30 seconds:
jensd@nas:~$ sudo hd-idle -d -i 30
probing sda: reads: 23125, writes: 370
probing sdb: reads: 9184, writes: 370
probing sdc: reads: 377356, writes: 134168
...
probing sda: reads: 23125, writes: 370
probing sdb: reads: 9184, writes: 370
probing sdc: reads: 377356, writes: 134336
probing sda: reads: 23125, writes: 370
spindown: sda
probing sdb: reads: 9184, writes: 370
spindown: sdb
probing sdc: reads: 377356, writes: 134344
probing sda: reads: 23125, writes: 370
probing sdb: reads: 9184, writes: 370
probing sdc: reads: 377356, writes: 134344
...
The result, as mentioned in the debug output, can be seen on the power consumption graph, as expected:
Now that we know HD-idle is working fine, we can let it do it’s work from boot time and with a larger timeout. Setting the timeout very low will result in a lot of disk spin-down and spin-up. This is not a very good idea for the disk lifetime. For this machine, I set the timeout to 10 minutes (600s).
To set the HD-idle configuration, edit /etc/default/hd-idle:
jensd@nas:~$ sudo vi/etc/default/hd-idle
jensd@nas:~$ cat /etc/default/hd-idle
HD_IDLE_OPTS="-i 600 -l /var/log/hd-idle.log"
Next, start and enable the service using systemctl:
jensd@nas:~$ sudo systemctl start hd-idle
jensd@nas:~$ sudo systemctl enable hd-idle
Synchronizing state of hd-idle.service with SysV service script with /lib/systemd/systemd-sysv-install.
Executing: /lib/systemd/systemd-sysv-install enable hd-idle
Additional power saving
At this point, with an idle power consumption of around 15-16W, I knew there was not much more to save. Nevertheless I figured, I’d give it a try using powertop.
Powertop is a tool, similar like the regular top but focused on measuring power consumption. It also provides recommendations for tuning.
Powertop can be installed from the standard repositories using apt:
jensd@nas:~$ sudo apt install powertop
Reading package lists… Done
...
Setting up powertop (2.8-1+b2) …
Processing triggers for man-db (2.8.5-2) …
Processing triggers for libc-bin (2.28-10) …
Once the package is installed, we can run powertop using the powertop command.
PowerTOP 2.8      Overview   Idle stats   Frequency stats   Device stats   Tunables


>> Good          Enable SATA link power management for host4
   Good          Enable SATA link power management for host5
   Good          Enable SATA link power management for host3
   Good          Enable SATA link power management for host1
   Good          Enable SATA link power management for host2
   Good          Enable SATA link power management for host0
   Good          NMI watchdog should be turned off
   Good          VM writeback timeout
   Good          Autosuspend for USB device EHCI Host Controller [usb1]
   Good          Runtime PM for I2C Adapter i2c-6 (i915 gmbus dpd)
   Good          Autosuspend for unknown USB device 1-1 (8087:0024)
   Good          Autosuspend for unknown USB device 2-1 (8087:0024)
   Good          Runtime PM for I2C Adapter i2c-3 (i915 gmbus panel)
   Good          Runtime PM for I2C Adapter i2c-4 (i915 gmbus dpc)
   Good          Runtime PM for I2C Adapter i2c-2 (i915 gmbus vga)
   Good          Runtime PM for I2C Adapter i2c-0 (SMBus I801 adapter at f040)
   Good          Autosuspend for USB device EHCI Host Controller [usb2]
   Good          Runtime PM for I2C Adapter i2c-5 (i915 gmbus dpb)
   Good          Runtime PM for I2C Adapter i2c-1 (i915 gmbus ssc)
   Good          Runtime PM for PCI Device Intel Corporation 6 Series/C200 Series Chipset Family MEI Controller #1
   Good          Runtime PM for PCI Device Intel Corporation 82579LM Gigabit Network Connection
   Good          Runtime PM for PCI Device Intel Corporation 82801 PCI Bridge
   Good          Runtime PM for PCI Device Intel Corporation 6 Series/C200 Series Chipset Family SMBus Controller
   Good          Runtime PM for PCI Device Intel Corporation 2nd Generation Core Processor Family DRAM Controller
   Good          Runtime PM for PCI Device Intel Corporation 6 Series/C200 Series Chipset Family USB Enhanced Host Controller #2
   Good          Runtime PM for PCI Device Intel Corporation 6 Series/C200 Series Chipset Family KT Controller
   Good          Runtime PM for PCI Device Intel Corporation 6 Series/C200 Series Chipset Family USB Enhanced Host Controller #1
   Good          Runtime PM for PCI Device Intel Corporation Q67 Express Chipset Family LPC Controller
   Good          Runtime PM for PCI Device Intel Corporation 6 Series/C200 Series Chipset Family SATA AHCI Controller
   Good          Runtime PM for PCI Device Intel Corporation 2nd Generation Core Processor Family Integrated Graphics Controller
   Good          Wake-on-lan status for device eno1
The “Tunables” tab allows you to apply the recommendations for settings that are not optimal. Unfortunately these changes are not persistent and will not survive a reboot.
In order to apply the recommendations each time the system boot, including new recommendations, we can create a Systemd service to run powertop and auto-tune at boot time.
jensd@nas:~$ sudo vi /etc/systemd/system/powertop.service
jensd@nas:~$ cat /etc/systemd/system/powertop.service
[Unit]
Description=PowerTOP auto tune

[Service]
Type=idle
Environment="TERM=dumb"
ExecStart=/usr/sbin/powertop --auto-tune

[Install]
WantedBy=multi-user.target
jensd@nas:~$ sudo systemctl daemon-reload
jensd@nas:~$ sudo systemctl enable powertop
Created symlink /etc/systemd/system/multi-user.target.wants/powertop.service → /etc/systemd/system/powertop.service.
The result
Although there might be additional and more extreme measures to limit the power consumption, I’d like the NAS to be always available for usage and I believe the above measures should be sufficient to get close to the lowest possible idle power consumption.
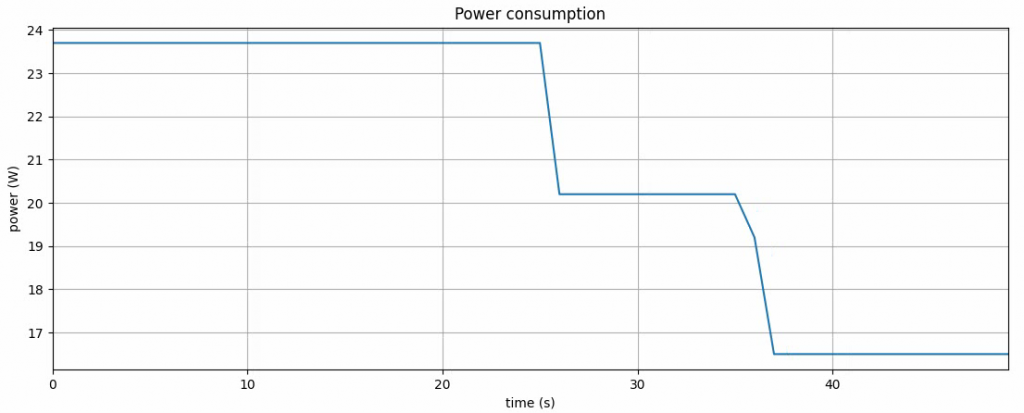
After implementing these changes, I wanted to check on the impact and I temporarily set the HD spindown back to 30 seconds and performed a reboot.
The result:
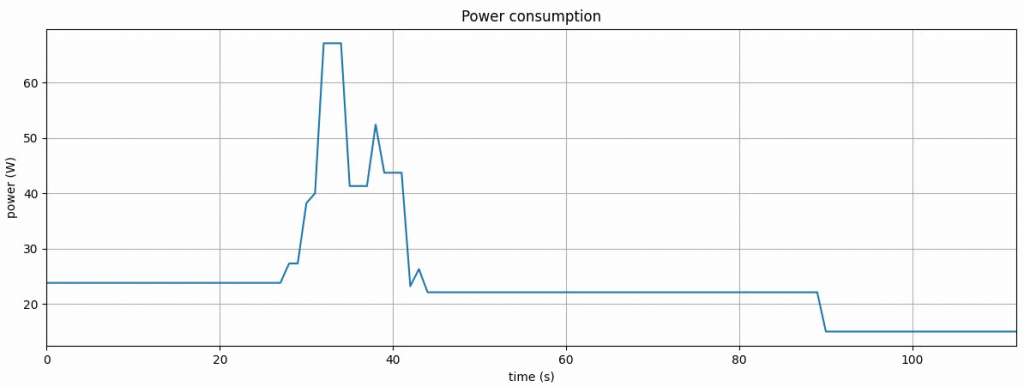
As you can see, before a reboot that causes the power saving measures to take effect, there is a power usage or around 24W. After the reboot, once HD-idle performed the spin-down of the disks, the result is around 14-15W.
This is a lot better than I had hoped for and comes close to a “real” NAS device, removing the last bit of doubt I had to go for this approach.
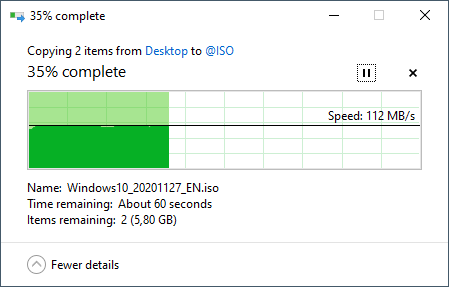
In terms of performance and transfer speed, the disks are faster, especially when reading from the RAID mirror than what the Gigabit ethernet connection can handle. This was not the case with my previous NAS as I got only around 40MB/s. With the new NAS system, I can see the maximum being around 112-113MB/s which comes close 1Gbit/s:
As with part 1 and 2, I also created a YouTube video with all the power saving steps explained above:
You might want to read ‘man smb.conf’, your example smb.conf contains a lot of default lines and you cannot use ‘valid users’ with ‘public = yes’, not that this matters, because you haven’t set ‘map to guest = bad user’ in global.
I’ll indeed remove public/guest ok=yes. Map to guest can be the default “never” as I only want access with valid credentials.
The rest of the defaults seems fine to me. I prefer to keep configs as simple as possible if not needed.
Thanks for pointing this out.
Thanks so much for taking the time to publish and share this!
Great article. I tweaked it a bit to do a RAID5 with 3 drives rather than a mirror, but otherwise it was spot on.
I also created a “Data” share under the NAS as you did, and while I can browse there and connect with my name and password from a Windows 10 PC, I don’t have permission to do anything in the Data shared folder.
When I created this folder via sudo mkdir, should I have changed the folder permissions to allow my normal Ubuntu user to have write permissions?
Thanks – Jim Holman
Thanks for the article! I’ve noted one issue though. First you’re partitioning your disk to create sda1 and sda1 partitions, but later on you’re instructing mdadm to use whole disks sda / sdb instead of partitions. This could cause /dev/md0 to disappear on reboot, so you will have to recreate your array to get data back. This is what happened on my end, and caused some stress to solve it.
So the right way is instead of
>sudo mdadm –create –verbose /dev/md0 –level=mirror –raid-devices=2 /dev/sda /dev/sdb
to use this:
>sudo mdadm –create –verbose /dev/md0 –level=mirror –raid-devices=2 /dev/sda1 /dev/sdb1
Hope this helps.
Very good article. Thanks again for sharing.
I love this post.
I’m thinking of building one myself, only changing the hardware to look for. Would you be so kind to give me some advice?:
Which SFF or similar would you pick nowadays?
Thank you very much in advance
you might want to add these 4 lines i have put in the bottom
[data]
path = /mnt/nas/data
available = yes
valid users = jensd
read only = no
browseable = yes
writable = yes
vfs object = recycle
recycle:repository = #deleted
recycle:keeptree = Yes
recycle:touch = Yes
Only if you want a recycle bin feature I believe. Don’t really want this myself but some people might.
Hi!
It’s a really great tutorial! I benefited a lot.
I encountered some minor problems when using hd-idle, in debug mode, I can see that sda (SSD) and sdb (HDD) are spindown, but sdc (which is the same batch of HDD as sdb) does not show spindown information for a long time.
I don’t know if there is any process that has been using SDC and is there a way to find out?
In addition, I did LVM for SDA and SDC (SDA for a virtual volume group called Cloud, and SDC for Media virtual volume group) to expand the disk capacity for these two different purposes. Does LVM affect HD-IDLE?