
Without a working BIOS, even the most powerful hardware can’t be brought to life. In some rare cases, the BIOS chip in your system can become corrupt, which will return your system completely unusable. To fix this situation but also for other reasons like simply a backup, tuning, modding or enabling hidden features, flashing your BIOS ROM is interesting. Recently I got in the situation where the BIOS chip in my Lenovo X1 Yoga got corrupt. To fix this, I purchased the CH341a MiniProgrammer. In this post you can find the documented steps I took to reflash the BIOS and bring my laptop back to life.
As mentioned in the introduction, the BIOS chip from my Lenovo X1 Yoga laptop got corrupt and I managed to repair things by reflashing it with a working BIOS ROM. For this article, I will repeat the steps I took, on a Dell Precision T1700 MT. The process is exactly the same.
Youtube Video
If you are interested, I also created a YouTube video from this blogpost. If you prefer classic text, you can just follow the rest of this article:
Introduction
There are several ways to (re-)program the contents on your BIOS chip. The easiest is by running a BIOS update/programming tool directly on your working machine. The BIOS is mostly only used during the initial boot time and can safely be reflashed on a started system. Obviously, for that to work, the system still has to be able to boot. If this is no longer the case, you will need to reprogram the BIOS using another device.
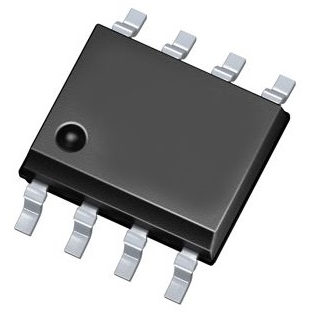
BIOS chips come in several different packages. Today, in my experience, most of the times, a SOIC-8 package is used. This is a soldered 8 pin (2×4) IC. This was the case for the Lenovo X1 yoga but also for the Dell Precision T1700 MT and some other systems I checked.
Hardware requirements
1) Programmer
In order to read and write the contents on our BIOS chip, we will need a programmer that can physically connect with it and perform those actions.
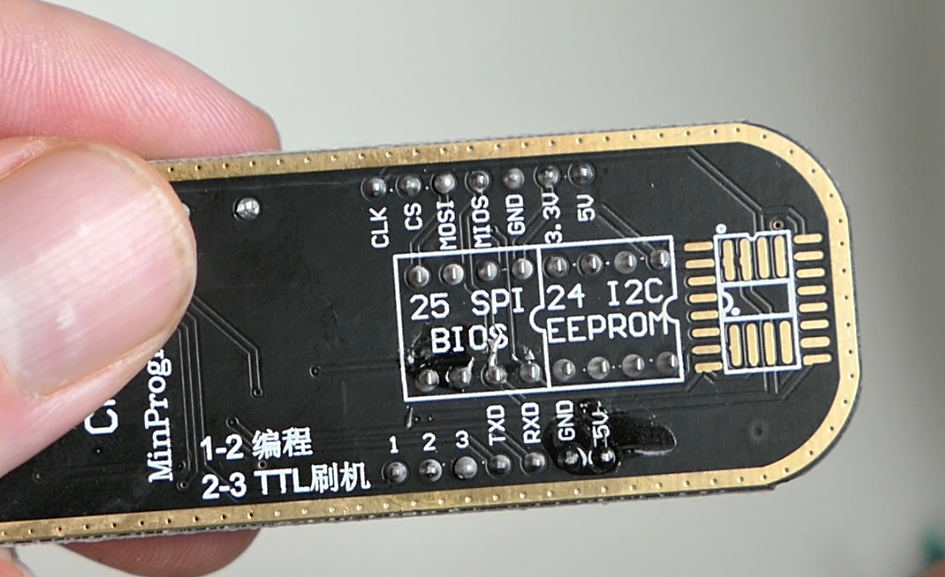
There are a lot of different types of programmers out there but a popular model, most likely due it’s wide availability for low prices on Ebay, Amazon or Aliexpress, is the CH341a MiniProgrammer:
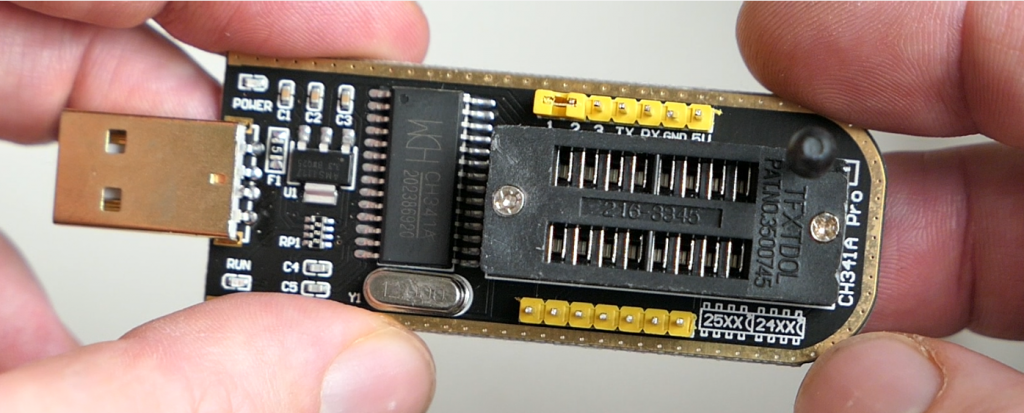
This device allows a variety of options to program/flash SPI flash or BIOS chips but also other types of EEPROMs of type 24XX and 25XX which are found in various devices like routers, access points, videocards,… and is suited to program the SOIC-8 BIOS chips that are used in a lot of systems these days.
2) Adapter, cable or clip
In case your BIOS chip is socketed, you can remove the chip from the board and place it on top of the programmer (with an adapter). If it’s soldered on the board you will either need to de-solder it or use a clamp/clip that fits the package type of your BIOS chip.
Although desoldering this type of IC is not very hard, it’s still a lot easier to use a clip that is suited for the package type. This avoids the need to remove the chip from the motherboard and the risk to potentially damage other components.
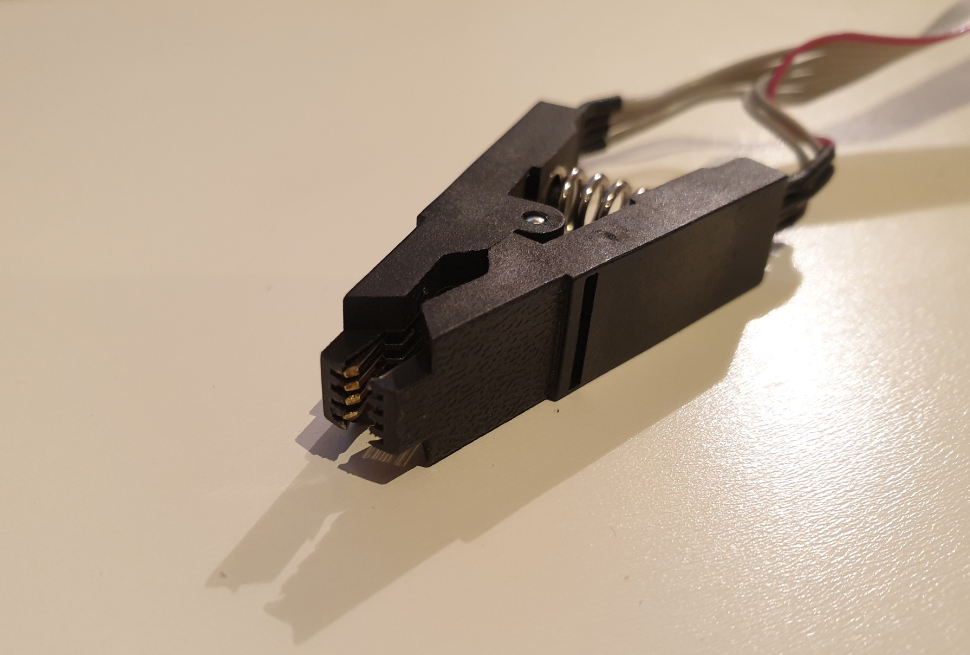
The clip, as you can see above, can be placed on top of the chip on the board. When doing so, you need to carefully pay attention that the red wire, indicating pin 1, matches with the side of the IC that has a small dot, indicating pin 1 on chip side.
The rest of the connections should follow the same rule. On the CH341a MiniProgrammer, there is also an indication to where pin 1 should be inserted. As you can see, this is more towards the middle: top row, 4th pin from left to right, of the pin layout for a SPI/BIOS chip (type 25).
While connecting the IC to the programmer, make sure the motherboard is powerless and the programmer is not connected to USB either as this could potentially corrupt/erase or even break the BIOS chip.
3) Locate the BIOS chip on the motherboard
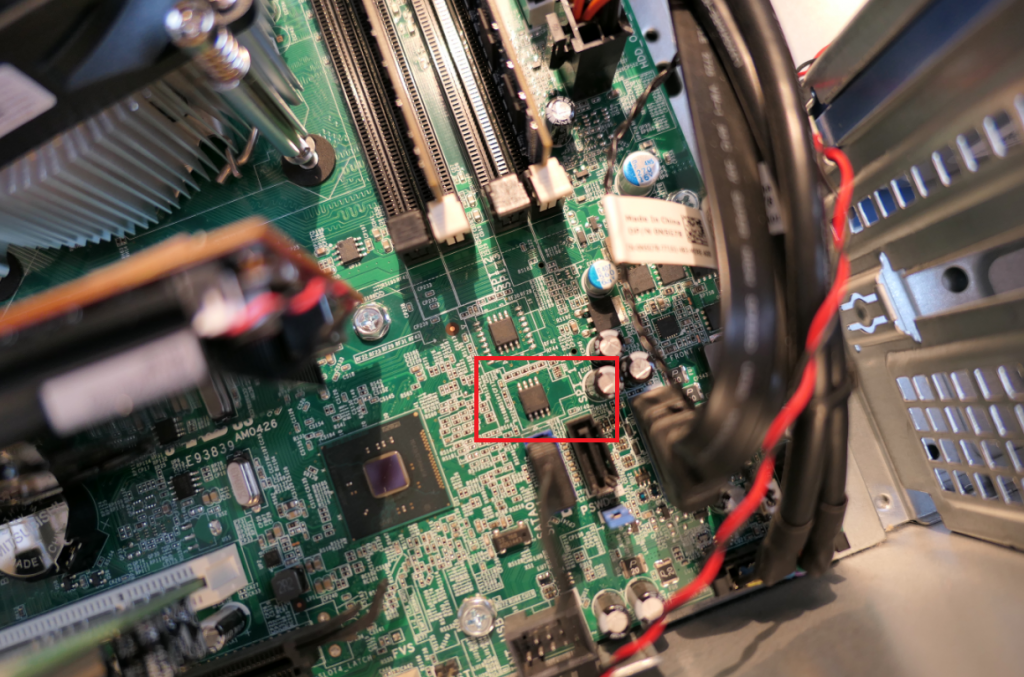
The location of the BIOS chip on the motherboard is not always very clear. By searching for ICs that look like a SOIC-8 chip, you can already eliminate a lot. If you’re lucky it has a nearby label like BIOS or SPI. Also, I noticed that in most cases it is not too far from the CMOS battery. Unfortunately there is no fixed rule. You probably will need to search a bit or put your hopes on mighty Google to find someone else that already went through the same exercise.
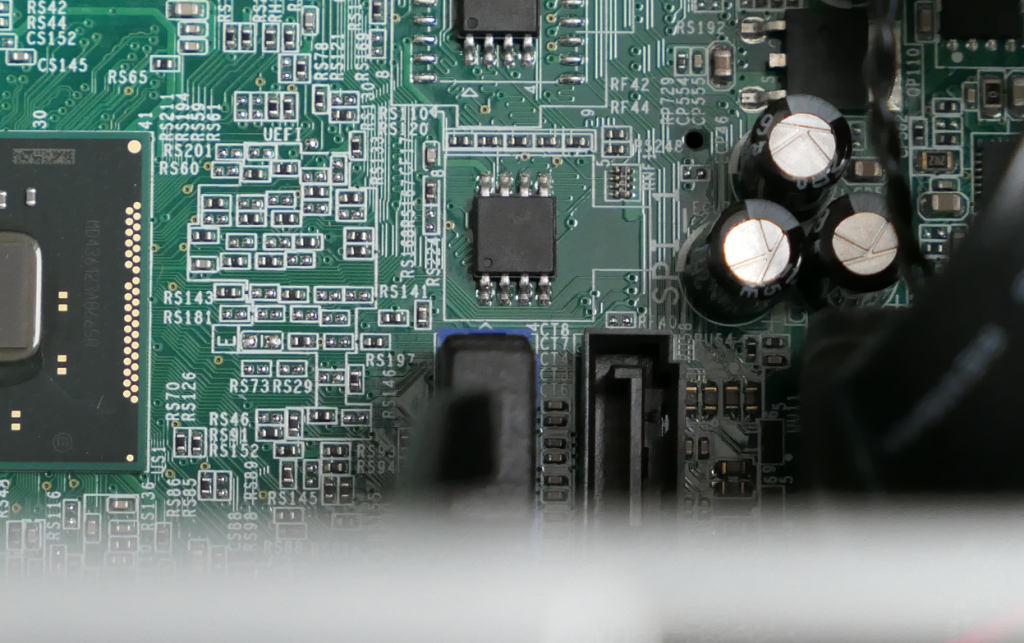
For the Dell system, I found the BIOS chip on the lower right part of the motherboard, next to a label “SPI”:
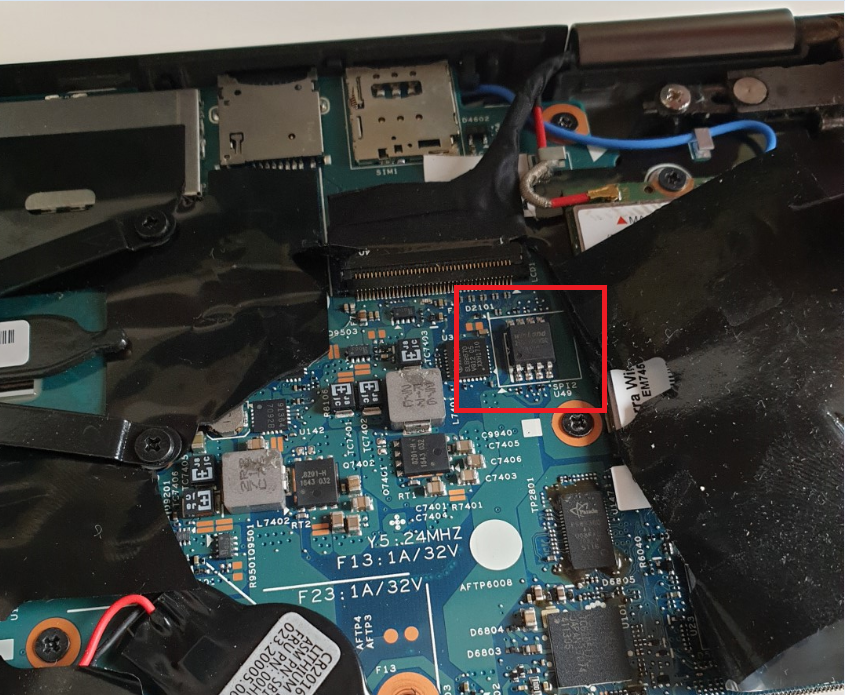
For my Lenovo X1 Yoga, it was harder to find as the laptop has a plastic foil covering the internal components and I didn’t want to completely remove it. It turned out to be located near the cellular modem, under the connector for the screen:
4) Identify BIOS chip type
The programmer is not always able to detect the exact chip type. To make sure, you will need to read the physical label on the chip itself or make sure to look up which exact type is used in your system.
For the Dell system I used, the text was pretty readable by taking a proper macro picture and zooming in:
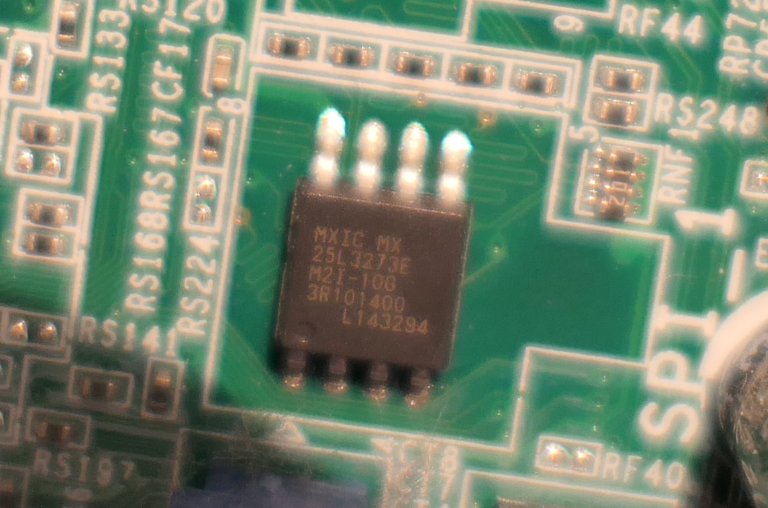
The label is among the detected types: MX25L3273E.
For the Lenovo X1 Yoga, I was not able to read the label as it got washed out somehow. All I could see was the Winbond label. After a quick Google search I found that for that device, the SPI type was W25Q128FV.
Software requirements
Windows
For Windows, you will need a tool to read and write the contents of the BIOS flash chip. For this post, I used AsProgrammer which you can download from here: https://github.com/nofeletru/UsbAsp-flash/releases/
There are probably other working tools but I found this one to give the best results with the CH341a. Drivers were not needed for the programmer. It just worked when connecting it to USB on Windows 10.
Linux
For Linux, similar as in Windows, you will need a tool to read/write to the SPI. Here I used flashrom which is part of most distributions’ repositories. Same as for Windows, no additional kernel modules were needed to recognize and use the CH341a on my system.
You can easily install flashrom using your package manager.
For example for Debian 10:
jensd@deb10:~$ sudo apt install flashom
Reading package lists… Done
Building dependency tree
Reading state information… Done
…
BIOS chip programming
For both Windows and Linux, the same sequence of steps can be following:
- Connect the clip to the BIOS chip, nothing should be powered
- Connect the clip or adapters to the CH341a programmer
- Connect the CH341a programmer to USB.
I recommend using an extension cable instead of putting it directly in your USB port. - Start the tool to program (AsProgrammer for Windows, flashrom for Linux)
- Make sure you configure the correct type of programmer and BIOS chip
- Read the data from the chip twice and save it to a file each time
- Verify the checksum of both files
This is to make sure that there is no corruption when reading data from the chip. As reading in this condition could brick/corrupt it. - Write the correct/modified file to the chip
- Optionally perform another read and verify the checksum of this with the written file to make sure the contents matches with what you flashed in it.
Programming under Windows
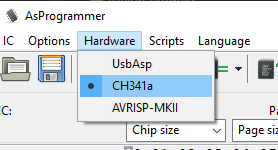
We start with step 5 as explained above. After starting AsProgrammer we first need to set it to use a CH341a. This can be done in the hardware menu:
Next. we can click the icon to detect the chip type:
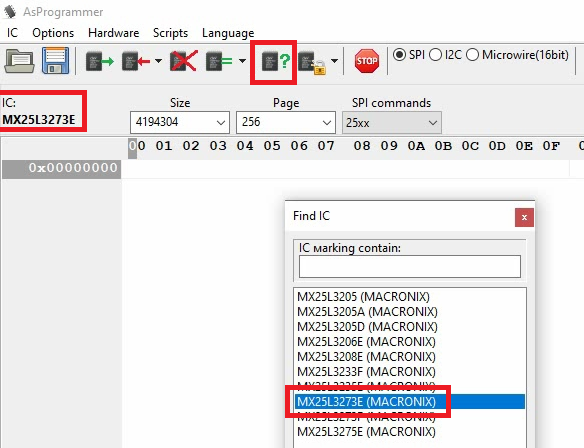
As mentioned above, the programmer is not always able to detect the exact type and gives you a list of possible options. We identified the Dell BIOS chip as type MX25L3273E so we can select this from the list here.
Next, step 6, we can read the data from the chip by clicking the icon with the green arrow. Once reading is completed, save the output to a file by clicking on the save (disk) icon.
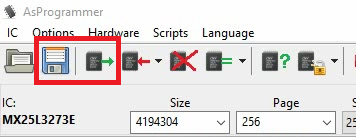
It’s important to repeat this step twice as we need to make sure that communication with the IC is working as expected:

After completing and saving the second dump of the BIOS, we can compare the two files to see if they are exactly the same. This is step 7. We can do that easily by calculating the MD5 checksum from them. In Windows this can be done using certutil with the following command:
Microsoft Windows [Version 10.0.18363.1256]
(c) 2019 Microsoft Corporation. All rights reserved.

C:\Users\jensd>cd c:\data\BIOS

c:\data\BIOS>certutil -hashfile bios1 md5
MD5 hash of bios1:
83bcd273cf7a5fd9a1075b823c83a0e2
CertUtil: -hashfile command completed successfully.

c:\data\BIOS>certutil -hashfile bios2 md5
MD5 hash of bios2:
83bcd273cf7a5fd9a1075b823c83a0e2
CertUtil: -hashfile command completed successfully.
In the above output we can see that both files generated the same hash, so they are identical. This is a good indication that communication with the IC and programmer works as expected.
Both files can now be saved as a backup in case things go wrong of in case you want to reflash the BIOS to an older version.
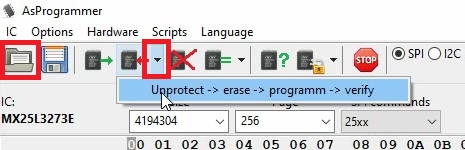
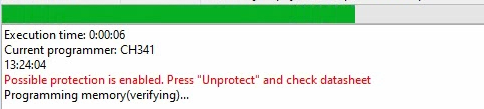
Next, we can finally write the new or modified contents to the BIOS chip. This can be done by first opening a rom file in AsProgrammer, using the open button, then clicking the down arrow next to the write button and choosing Unprotect -> erase -> programm -> verify:
You can follow the progress and status in the bottom of the window:
Once programming is done, optionally, you can read the BIOS chip again, as indicated above, and compare the hash of the written file with the actual contents after writing. This is to make sure that there is no corruption and the contents of the chip matches exactly with the data you wanted to be there.
Programming under Linux
The steps under Linux are the same as from Windows. Only here we will use the CLI tool flashrom. As on Windows, we need to go through step 5 and set the correct programmer and BIOS type. The easiest is to launch the tool and let it try to detect the type of BIOS chip:
jensd@deb10:~$ sudo flashrom --programmer ch341a_spi -r backup1.bin
flashrom  on Linux 4.19.0-13-amd64 (x86_64)
flashrom is free software, get the source code at https://flashrom.org

Using clock_gettime for delay loops (clk_id: 1, resolution: 1ns).
Found Macronix flash chip "MX25L3205(A)" (4096 kB, SPI) on ch341a_spi.
Found Macronix flash chip "MX25L3205D/MX25L3208D" (4096 kB, SPI) on ch341a_spi.
Found Macronix flash chip "MX25L3206E/MX25L3208E" (4096 kB, SPI) on ch341a_spi.
Found Macronix flash chip "MX25L3273E" (4096 kB, SPI) on ch341a_spi.
Multiple flash chip definitions match the detected chip(s): "MX25L3205(A)", "MX25L3205D/MX25L3208D", "MX25L3206E/MX25L3208E", "MX25L3273E"
Please specify which chip definition to use with the -c <chipname> option.
Same as with AsProgrammer, we can see that flashrom is able to come up with a selection but we still have to specify the exact type using the -c option. As our type is MX25L3273E, we can now read the contents of the chip and save it to file backup1.bin using the following command:
jensd@deb10:~$ sudo flashrom --programmer ch341a_spi -r backup1.bin -c "MX25L3273E"
flashrom  on Linux 4.19.0-13-amd64 (x86_64)
flashrom is free software, get the source code at https://flashrom.org

Using clock_gettime for delay loops (clk_id: 1, resolution: 1ns).
Found Macronix flash chip "MX25L3273E" (4096 kB, SPI) on ch341a_spi.
Reading flash... done.
jensd@deb10:~$ sudo flashrom --programmer ch341a_spi -r backup2.bin -c "MX25L3273E"
flashrom  on Linux 4.19.0-13-amd64 (x86_64)
flashrom is free software, get the source code at https://flashrom.org

Using clock_gettime for delay loops (clk_id: 1, resolution: 1ns).
Found Macronix flash chip "MX25L3273E" (4096 kB, SPI) on ch341a_spi.
Reading flash... done.
Same here again is to read the contents twice and save it in two different files. Once done, it’s time for step 7 and we can compare the checksum of the files to see if they are matching:
jensd@deb10:~$ md5sum backup1.bin
83bcd273cf7a5fd9a1075b823c83a0e2  backup1.bin
jensd@deb10:~$ md5sum backup2.bin
83bcd273cf7a5fd9a1075b823c83a0e2  backup2.bin
Like on Windows, using this method we can be sure that the programmer can communicate properly with the chip and we reduce the chance for corruption. All seems to be good in the above output. If you see a different hash, you first need to fix this before proceeding.
backup1.bin and backup2.bin can be saved for later as they are a proper backup of the current contents of you BIOS chip.
The next step is to write the backup, dump or modded file using flashrom. This time we use the -w option and specify the input file:
jensd@deb10:~$ sudo flashrom --programmer ch341a_spi -w bios.bin -c "MX25L3273E"
flashrom  on Linux 4.19.0-13-amd64 (x86_64)
flashrom is free software, get the source code at https://flashrom.org

Using clock_gettime for delay loops (clk_id: 1, resolution: 1ns).
Found Macronix flash chip "MX25L3273E" (4096 kB, SPI) on ch341a_spi.
Reading old flash chip contents... done.
Erasing and writing flash chip...
Warning: Chip content is identical to the requested image.
Erase/write done.
Optionally here as well is to read the contents again and to compare the MD5 checksum with the file we used as input (bios.bin).
In the example above, I wrote back the earlier backed up file, so flashrom was smart enough to detect this and give me a warning about it.
Hopefully this article can help some people that, just like I was, feel bad because their expensive piece of hardware completely stopped working just because the contents of one tiny IC got corrupted.
Thank you for this excellent guide it has saved me an awful lot of time doing all the research myself. Particularly as the CH431A programmer comes with no instructions whatsoever, having said that it is a very low cost item which would be very time consuming to make for yourself.
My current requirment is to reflash the BIOS on a secondhand laptop which has an unknown BIOS setup password and so far no software based tools have been of help.
Thanks for the nice feedback, hopefully you managed to flash the (modded) BIOS.
ChrisN,
I wrote an article about a HP laptop, to remove the Bios setup password as well as update to a later Bios. You can find it at https://j0hn88.wordpress.com/2016/01/23/reprogram-it-hp-elitebook-2530p-bios-eeprom/ which might help you. As it was a HP laptop, I needed to use cpqtag.exe to add the serial number
Please see also the SNANDer program –
https://github.com/bigbigmdm/SNANDer-VCC
https://github.com/Droid-MAX/SNANDer
It is the universal NAND/NOR/Microwire/I2C flash linux programmer.
Please be carefull cuz it’s output is 5v and may melt the 1.8v chips.
Please STOP spreading this non-sense, like little kids who hear something cool and shout it out everywhere to sound smart.
Its voltage (unit of electric potential), which will adapt to the IC. Voltage does NOT “melt” anything. High current (amperes) does, while here we are working with microeletronics, thus very low current.
Please research before spreading non-sense.
Also please look at: youtube.com/watch?v=J8-Sh7DjiXw&pp=ygUGY2gzNDFh
Can I use programmer android LED TV??? How do
Depends completely what you want to do with it. I’m sure some of the ICs will be able to be read/flashed with the explained method but you will need to know what you’re doing exactly before you will get a proper result.
Great, thank you. My CH341A came faulty, was not recognizable by the system. Upon closer inspection, there was a tiny solder bridge between the data lines (at the contact points of the USB plug). After removal of the bridge, it works OK. Your statement “no additional kernel modules were needed to recognize and use the CH341a on my system” saved me from looking for software problems.
Good to hear this helped. Also took me some time to figure this out, hence why I decided to specifically mention it.
Hi, thanks for the post, it’s really interesting. Did you remove connectors from de motherboard (keyboard, screen, hdd, etc., even the CPU) or just the AC adapter and the battery?
For the laptop, I only disconnected power and the battery (last time even just disabled it in the BIOS first).
For the regular PC, the peripherals were disconnected but I don’t think this is necessary.
Hi Jensd, just to let you know that it worked fine for me, so now my laptop is up and running again! I disconnected power and battery (also the CMOS battery but nothing else in the motherboard). It was tricky to attach the clip to the IC, some patience was needed, and it was very exciting when I managed to write the chip.
Thank you so much for your quick response!
Good to hear that this helped you to fix your laptop! Thanks for the update.
Hi, great you tube video on the ch341a programmer, I have a couple of questions, I have a Acer spin 5 sp513-52-n and the bios is bricked, going to try for the first time to use ch341a programmer to reinstall the updated bios. do you know if the bios file xxxxx.fd file has to be modified. one website said it has to be under 8 megs and I have to strip the headers off the file. my bios chip is mx25l6473f. not sure what to do. the file size is 9.4 megs. Any thoughts on the matter would be greatly appreciated.
Not sure for your machine exactly but in most cases that I looked at, a file to be flashed as an update (on the device itself) is not directly suitable for flashing using a programmer.
You would need a working backup of the BIOS in order to flash it. I’ve had luck to find such on https://www.badcaps.net/forum/ for example.
Hi Tony, you cannot flash the .fd file to the BIOS, but you can get the image from it with this tool: https://github.com/LongSoft/InsydeImageExtractor/releases (this image must be exactly the same size as the memory in the chip).
It is even posible to use a binary editor to get this image. Open the .fd file and look for the begining of the backup BIOS image (if you’ve got one), in my case, the string “_IFLASH_BIOSIMG” was just before the begining of the image (the begining was aligned to 16 bytes). From this offset you have to take exactly the size of your BIOS (8 MB in your case).
I’ve read that just with this you have a bootable BIOS image, although you could lose some data stored in your original BIOS (like the serial number or Windows Id for example). Optimal situation is to have the original BIOS bakcup and a .fd file of the same version to try to “merge” both of them.
Hope it helps!
Hi Jensd,
my ch341a programmer adapter didn’t match with programmer socket numbering, so i took cables and places them in order. my programmer gets stuck after i press unprotect-> erase->write->verify command. also there is no status update till the time i press stop once.
I am getting an error number of bytes not equal to ic size. IC is 25L3206E on hp pavillion G6- 2014tx laptop. How do I verify that I have placed the clip properly?
Thanks for the info and video. I also have a Bricked 20FR Thinkpad Yoga X1. Did you simply backup and restore the same image to resolve your boot problems or can you advise on how you created a new bios image to restore
I found a working backup on the badcaps forum. If you like, I can share it with you. Send me an email and I will send you the backup I used (or a more recent one).
Is an M25Q128JV a bios chip? I tried this guide and it doesn’t detect in AsProgrammer(I found M25Q128FV instead). Although I was able to read and take backup, I was not able to write back.
Can you also provide a link to download a rom file. Lenovo apparently only provides .exe and I’m stuck not being able to write anything on the chip.
P.S. please tell me if you need more details to help……
Thank you
Extract the “Lenovo BIOS Update USB drive package” for the BIOS version needed. Then find the *.rom or *.ROM BIOS file and rename the extension to .bin.
Now flash your BIOS with this *.bin file, good luck!
Ps you might not need to rename the extension, it depends on the programming software used…
Hi it seems after updating to latest bios my system sku and serial are gone. not sure as to how to change that.
I have a laptop with a Winbond 25Q128JVSQ. Do you have access to a program that supports this chip with the CH341A module for R/W operations?
Hi everyone,
Is anyone has a ch341a programmer software that supports KH25L6406E? Got my chinese board brick. After reboot it won’t POST.
TIA
Hello
I was searching for a linux solution because the Windows utility delivered together with the reader is awful and DB is not updated
and I ended up with your hint about this cool Windows utility hosted by a nice Russian guy on github!
Fantastic hint and thank you for the guide on how to use it!
I am experiencing problems running the program, thought you might provide some guidance?
1. Downloaded from the location you suggested
2. Extracted to a folder on my C: drive
3. Double clicked the AsProgrammer application file
4. Received 3 error pop-ups
5. Code execution cannot proceed because CH341DLL.DLL was not found. reinstalling the program may fix this problem
6.Code execution cannot proceed because FTD2XX.DLL was not found. reinstalling the program may fix this problem
7. Code execution cannot proceed because libusb0.dll was not found. reinstalling the program may fix this problem
8. I found all 3 of these files in the same directory as AsProrammer application file
9. I found NO Readme file for guidance.
10 Any guidance or outside reference will be greatly appreciated.
Whete can i find files for hp chrome ook bios chip
Thank you SO MUCH for the EXCELLENT tutorial. A quick question, I followed all your instructions carefully (noting pin 1 placement) and I’ve tried different combinations of clip placement to the soldered BIOS chip on the motherboard (just in case there was an error with assembly at the plant) but I still can’t seem to get AsProgrammer to recognize the chip.
Link to physical setup: https://drive.google.com/file/d/1Pt3n-03eOw-ii3Z2RUOLTqU6Ob3A2vUb/view?usp=sharing
BIOS Chip attempting to flash: Winbond W25Q64JV
https://www.winbond.com/resource-files/w25q64jv%20spi%20%20%20revc%2006032016%20kms.pdf
I have a MX25L6445E chip on an Intel Desktop board. This chip should be supported by the CH341a. Is a *.BIO file (that is intended to be flashed using the Intel “IFlash2” DOS utility) the correct binary format to be directly flashed using the CH341a?
Hi, I have a GigaDevice GD25B256D and none of the programmers have support for it. Can someone help please?
Pingback: e-waste resurrection – stinky.blog
Extreamily wonderfull explaination and beautifully documented instructions. If I am not sucessful, I will hang my head in shame. Thank you!
Thank you for the video! I now know how to program flash on Linux, which commands must be entered. I managed to program 25Q64! But I have a question: is it possible to program the flash programmer ch341a chip sti 5518 doc? It has pins TDO >TDI >TCK>TMS>TRST , and on the programmer , CLK>CS>MOSI>MIOS> Can it be combined or not?
Is it possible to program a satellite tuner through the COM port in Linux Mint 20, what commands should be typed or is it impossible? Дякую!
messed around for a afternoon with asprogrammer on windows (didnt use youre link found your video afterwards thought i had damaged the chip because i removed it )no luck ,swapped to linux boom bang dong done on first run no dodgy drivers needed sometimes linux just gets results instead of lost hours on windows ,my chip was a Paragon a clone of EN25QH64 by EON Linux recognized it straight away 4 hours vs 10mins on flashrom thankyou for yuore video ,im pretty sure I would have carried on hitting a brick wall with windows
Thank you for writing out all the steps. Easy to follow and worked at once :-)
Many thanks!
Hi my real problem is getting the sofware from GitHub…I download the Zip file and then when I open it I get messages that I don’t understand. Could you explain what to do please. It would be very much appreciated.
“please insert the lat disk of the multi-volume set and click OK to continue” for example
Pingback: Unbricking your Steam Deck without a BIOS Backup
Please see my universal (93xxx, 24xxx, 25xxx chips supported) linux program https://github.com/bigbigmdm/IMSProg
Thanks for this. I’m in the middle of trying to resurrect a Lenovo G50-80. The CH341a wouldn’t drive the chip on the motherboard so I removed it and read the BIOS and merged it with a virgin BIOS from badcaps. Unfortunately the chip fails to write under Windows and LINUX, so I’ve just ordered a couple of replacement chips. It’s an interesting diversion at least.
Please start IMSProg, press [ctrl+P], press [Read], then set all status register bits to zero. Press [write registers]. Then read the bios chip again…
How would one go about getting the modified bios file to install?
good morning the video is really very nice, I bought a PC in China, mounts an I 9 10980HK blocked by bios A.M.I works only at the basic frequency, the bios does not allow turbo mode overclocking menus, , memory profiles, and other functions, some guys in a blog have read it with cr 341 and rewritten enabling a whole series of functions, What program can I use to change (rewrite) the BIOS? Thank you very much
There’s a typo in the `sudo apt install` command: missing “r” in “flashrom”
am doua laptopuri vechi la care am utat parola bios ..imi cere la deschidere
ASUS x58c respectiv x5dij .Nu au nici buton ,,reset clr_cmos ‘;si nici cipul de bios nu am putut identifica Cum sa procedez Asistentul virtual Asus ma tot invarte si nu-mi da un raspuns exact