
Using a database to store information is very common. The more information gets stored in a database, the more critical it becomes. At a certain point, the need for a redundant, high(er) available database-setup raises. When you’re using PostgreSQL, you can setup streaming replication quite easily in order to have your data redundant on two or more nodes. But wouldn’t it be a shame if you wouldn’t use the copies of your data to balance the load of your primary database-server? In this post, I’ll try to explain how to setup a redundant PostgreSQL database with load balancing.
To achieve redundancy, I’ve chosen to use the built-in streaming replication of PostgreSQL. Another tool, repmgr, will be used for easier control of the replication between those redundant PostgreSQL-instances. The tool doesn’t replicate data itself but it allows you to easily control the replication, the standby-server(s) and monitor the status of the whole replication process.
More information about repmgr: http://www.repmgr.org/
In order to use both (or more if you would like to) copies of the database-data, I will use pgpool. Pgpool can pool the connections to the nodes and will monitor their status and trigger failover (by repmgr) if needed. Pgpool has the capability to load balance traffic, based on the type of SQL-query. For example, a SELECT query can perfectly be executed on a slave (read-only) node and save resources on the master (read-write) node.
More information about pgpool: http://www.pgpool.net/
Setup
For this post, I’ll setup two nodes as redundant PostgreSQL DB (a primary and a standby) and one machine which will do the pooling and distribution. The pool is a single point of failure and ideally should also be redundant. For my case, the most important is that all data stays available in case of a failure.
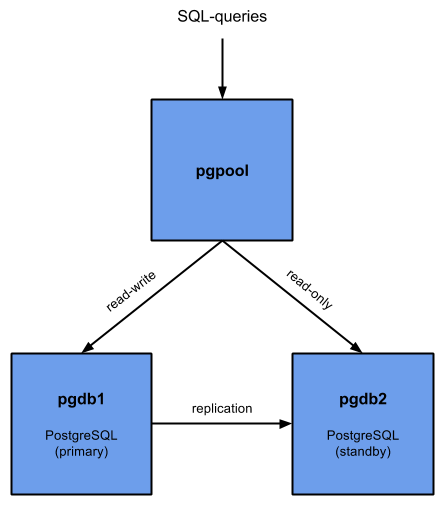
As you can see in the above scheme, SQL queries will be distributed to the primary and standby, based on the type of query. Data written to the master should get replicated to the standby.
In case of a failure of the primary, the standby should replace the primary and become read-write. This will make sure that the database stays available for all applications. In the meanwhile, you can investigate what happened to the old primary and, after a checkup, start it as the new standby.
The version of PostgreSQL used in this post will be 9.4 but you can basically replace that with any other supported (recent) PostgreSQL version.
Prerequisites
Hostnames
Before we will get started with the setup, it’s important that all nodes in the setup can connect to each other via their hostname. If that’s not an option, you could use IP’s instead of hostnames but that would make this explanation less clear :)
Public key authentication
Another prerequisite is that all nodes can connect to each other over SSH without a password prompt with users root and postgres. SSH will be used to rsync the data from the primary to the standby and to initiate a failover from pgpool. Password-less SSH can be achieved with public key authentication.
For root, we’ll need to generate a new RSA-keypair for all nodes:
[jensd@pgdb1 ~]$ sudo su - -c "ssh-keygen -t rsa"
Generating public/private rsa key pair.
Enter file in which to save the key (/root/.ssh/id_rsa):
Created directory '/root/.ssh'.
Enter passphrase (empty for no passphrase):
Enter same passphrase again:
Your identification has been saved in /root/.ssh/id_rsa.
Your public key has been saved in /root/.ssh/id_rsa.pub.
The key fingerprint is:
8d:9c:3d:a3:6f:5f:d1:fc:93:93:51:7e:42:be:6c:97 root@pgdb1
The key's randomart image is:
...
[jensd@pgdb1 ~]$ sudo cat /root/.ssh/id_rsa.pub
ssh-rsa AAAAB3NzaC1yc2EAAAADAQABAAABAQDmrgQ/Mawvir2C7G2PapVeiLA4zqkAUw/dWQWj4ehx7vezDDz/qp4bgbiCK6K25uTVgxasTJ3Xa/BeaPkOP4cSkm3qFWkE6Z/0t3ZPNZHqXd7xWJSZR0LF/UEZ14Ucq/q9qVF6I/LoqqtTSpI73XPkgMU/BzQ/ZeLr5EzFrsV66axVX0u7DZXAijbc7KKVc6Gi+M1oHQKWYGKsKOpFasRDynXoCfiEN+cSIP0mVhPpmlmMwpHekGtpRcdOx1OBqgoiML46L0hnNtIP1mci1LXF04cWq4XAoBCnCNi5onn7BKX/NYUI+9Q9xMgEnwf03CoqMLjsRqMBqOKP7KtDr2T5 root@pgdb1
[jensd@pgdb2 ~]$ sudo su - -c "ssh-keygen -t rsa"
Generating public/private rsa key pair.
Enter file in which to save the key (/root/.ssh/id_rsa):
Created directory '/root/.ssh'.
Enter passphrase (empty for no passphrase):
Enter same passphrase again:
Your identification has been saved in /root/.ssh/id_rsa.
Your public key has been saved in /root/.ssh/id_rsa.pub.
The key fingerprint is:
1f:10:02:de:e1:28:d9:c2:4c:0d:df:1c:1d:2b:26:7c root@pgdb2
The key's randomart image is:
...
[jensd@pgdb2 ~]$ sudo cat /root/.ssh/id_rsa.pub
ssh-rsa AAAAB3NzaC1yc2EAAAADAQABAAABAQDbBBIyD/tzDzVBsDwoaVhDnY949LUeaLDGp9hZp2AGLezepTtKp4E38mdUTW2DxlaQu/j247pOkgaeGuVj7wnUjLbTH+BdKwjBmpEY3XRXtyKxXc8O2rM43KR0LICCKdl/xcdWGgbO3vmI3rApdY/v5d6vXqhjh5tyeNmXbuU1j1pnG/+ivI2UXPWAtCIHq5v8fUGI4wPVzjIgh516CiandI0tIXeSuLG9P7pFpI1uxYyZ2RvgPHkj3dJwcGAuDVAGe+Ed6uJ4xZjLPnqCzI8gLrqxoe4LVXrMN6IyCHP0ZbdgombocYXG8ZrSQX3K8Tv5cUTTQwqTsppakpcjoWB1 root@pgdb2
[jensd@pgpool ~]$ sudo su - -c "ssh-keygen -t rsa"
Generating public/private rsa key pair.
Enter file in which to save the key (/root/.ssh/id_rsa):
Created directory '/root/.ssh'.
Enter passphrase (empty for no passphrase):
Enter same passphrase again:
Your identification has been saved in /root/.ssh/id_rsa.
Your public key has been saved in /root/.ssh/id_rsa.pub.
The key fingerprint is:
3d:68:60:e9:3e:05:9d:04:04:05:1a:33:e1:a7:22:f7 root@pgpool
The key's randomart image is:
...
[jensd@pgpool ~]$ sudo cat /root/.ssh/id_rsa.pub
ssh-rsa AAAAB3NzaC1yc2EAAAADAQABAAABAQDe7j8/3bpMOwQSIo//sfvDpWXrZBZ1ilpGRNcTQadYA3FkZBkBAYqHc2J3OhCt0FpgXrGGGyafy79oVhJKMDtv1MvtUyenDd9KL6rP0GrbzLF7Kc+HNoA2CP1u8Lbr9zNPxghlQUUjWGB5+mn9F07yTjDuNkv5H8jM9dSno1ZS/vmQk9sZhzTdr4VO4a5IvIc7IQtiOovvE7Tgov8aISPGAegiGglafX0ELvUbknLW7YJROcFwAG+nahsfMjug+lr/q2oWqhr8X+i+MEusPPGyS8VRjINKn/dgV0xwSO+QcqDG/ruIXHMGfGEskiPZHB0knsqtrDySFv5j8GkLcHpH root@pgpool
As you can see, I did a cat of the public part of the keypair on each node. To allow all machines to connect to each other an accept each other’s key, we’ll need to add the generated public keys of all hosts to /root/.ssh/authorized_keys:
[jensd@pgdb1 ~]$ sudo cat /root/.ssh/authorized_keys
ssh-rsa AAAAB3NzaC1yc2EAAAADAQABAAABAQDmrgQ/Mawvir2C7G2PapVeiLA4zqkAUw/dWQWj4ehx7vezDDz/qp4bgbiCK6K25uTVgxasTJ3Xa/BeaPkOP4cSkm3qFWkE6Z/0t3ZPNZHqXd7xWJSZR0LF/UEZ14Ucq/q9qVF6I/LoqqtTSpI73XPkgMU/BzQ/ZeLr5EzFrsV66axVX0u7DZXAijbc7KKVc6Gi+M1oHQKWYGKsKOpFasRDynXoCfiEN+cSIP0mVhPpmlmMwpHekGtpRcdOx1OBqgoiML46L0hnNtIP1mci1LXF04cWq4XAoBCnCNi5onn7BKX/NYUI+9Q9xMgEnwf03CoqMLjsRqMBqOKP7KtDr2T5 pgdb1
ssh-rsa AAAAB3NzaC1yc2EAAAADAQABAAABAQDbBBIyD/tzDzVBsDwoaVhDnY949LUeaLDGp9hZp2AGLezepTtKp4E38mdUTW2DxlaQu/j247pOkgaeGuVj7wnUjLbTH+BdKwjBmpEY3XRXtyKxXc8O2rM43KR0LICCKdl/xcdWGgbO3vmI3rApdY/v5d6vXqhjh5tyeNmXbuU1j1pnG/+ivI2UXPWAtCIHq5v8fUGI4wPVzjIgh516CiandI0tIXeSuLG9P7pFpI1uxYyZ2RvgPHkj3dJwcGAuDVAGe+Ed6uJ4xZjLPnqCzI8gLrqxoe4LVXrMN6IyCHP0ZbdgombocYXG8ZrSQX3K8Tv5cUTTQwqTsppakpcjoWB1 pgdb2
ssh-rsa AAAAB3NzaC1yc2EAAAADAQABAAABAQDe7j8/3bpMOwQSIo//sfvDpWXrZBZ1ilpGRNcTQadYA3FkZBkBAYqHc2J3OhCt0FpgXrGGGyafy79oVhJKMDtv1MvtUyenDd9KL6rP0GrbzLF7Kc+HNoA2CP1u8Lbr9zNPxghlQUUjWGB5+mn9F07yTjDuNkv5H8jM9dSno1ZS/vmQk9sZhzTdr4VO4a5IvIc7IQtiOovvE7Tgov8aISPGAegiGglafX0ELvUbknLW7YJROcFwAG+nahsfMjug+lr/q2oWqhr8X+i+MEusPPGyS8VRjINKn/dgV0xwSO+QcqDG/ruIXHMGfGEskiPZHB0knsqtrDySFv5j8GkLcHpH pgpool
[jensd@pgdb1 ~]$ sudo chmod 600 /root/.ssh/authorized_keys
In the above, I added each of the generated public RSA-keys to the authorized_keys-file on pgdb1. Don’t forget the last line to change the permissions or SSH will not accept this file.
Since we really want unattended access (so no password or any other question), I’ll also add all hosts to the known_hosts-file. This prevents the question to add the hosts fingerprint on the first connection:
[jensd@pgdb1 ~]$ ssh-keyscan -H {pgdb1,pgdb2,pgpool}|sudo tee /root/.ssh/known_hosts
...
Since my authorized_keys and known_host on pgdb1 is fine for all other hosts, I’ll scp these files to the other nodes:
[jensd@pgdb1 ~]$ sudo scp /root/.ssh/{authorized_keys,known_hosts} pgdb2:/root/.ssh
Warning: Permanently added the ECDSA host key for IP address '192.168.202.102' to the list of known hosts.
root@pgdb2's password:
authorized_keys                                           100% 1161     1.1KB/s   00:00
known_hosts                                               100% 2346     2.3KB/s   00:00
[jensd@pgdb1 ~]$ sudo scp /root/.ssh/{authorized_keys,known_hosts} pgpool:/root/.ssh
Warning: Permanently added the ECDSA host key for IP address '192.168.202.103' to the list of known hosts.
root@pgpool's password:
authorized_keys                                           100% 1161     1.1KB/s   00:00
known_hosts                                               100% 2346     2.3KB/s   00:00
It’s a good thing to test the authentication now, by just trying to SSH between all nodes. You shouldn’t get any prompt at all and be presented with the other host’s command prompt.
For example:
[jensd@pgdb1 ~]$ sudo ssh pgdb2
Last login: Wed Jun  3 12:45:40 2015 from pgdb1
[root@pgdb2 ~]#
To setup the SSH-authentication for the postgres-user, we first need to create the user:
[jensd@pgdb1 ~]$ sudo mkdir /var/lib/pgsql
[jensd@pgdb1 ~]$ sudo groupadd -r -g 26 postgres
[jensd@pgdb1 ~]$ sudo useradd -r -u 26 -M -d /var/lib/pgsql -n -g postgres postgres
[jensd@pgdb2 ~]$ sudo mkdir /var/lib/pgsql
[jensd@pgdb2 ~]$ sudo groupadd -r -g 26 postgres
[jensd@pgdb2 ~]$ sudo useradd -r -u 26 -M -d /var/lib/pgsql -n -g postgres postgres
[jensd@pgpool ~]$ sudo mkdir /var/lib/pgsql
[jensd@pgpool ~]$ sudo groupadd -r -g 26 postgres
[jensd@pgpool ~]$ sudo useradd -r -u 26 -M -d /var/lib/pgsql -n -g postgres postgres
One option at this point, to setup public key authentication, would be to repeat the steps as we did for root. But I’ll just reuse the generated keys, known_hosts and authorized_keys from root and use them for user postgres:
[jensd@pgdb1 ~]$ sudo scp -r /root/.ssh pgdb1:/var/lib/pgsql
id_rsa                                                    100% 1675     1.6KB/s   00:00
authorized_keys                                           100% 1162     1.1KB/s   00:00
id_rsa.pub                                                100%  392     0.4KB/s   00:00
known_hosts                                               100% 2523     2.5KB/s   00:00
[jensd@pgdb1 ~]$ sudo scp -r /root/.ssh pgdb2:/var/lib/pgsql
id_rsa                                                    100% 1675     1.6KB/s   00:00
authorized_keys                                           100% 1162     1.1KB/s   00:00
id_rsa.pub                                                100%  392     0.4KB/s   00:00
known_hosts                                               100% 2523     2.5KB/s   00:00
[jensd@pgdb1 ~]$ sudo scp -r /root/.ssh pgpool:/var/lib/pgsql
id_rsa                                                    100% 1675     1.6KB/s   00:00
authorized_keys                                           100% 1162     1.1KB/s   00:00
id_rsa.pub                                                100%  392     0.4KB/s   00:00
known_hosts                                               100% 2523     2.5KB/s   00:00
We created the homedir for postgres as root and also copied the ssh-related files with root permissions, so for everything to work, we need to change the ownership and the SELinux context:
[jensd@pgdb1 ~]$ sudo chown -R postgres:postgres /var/lib/pgsql
[jensd@pgdb1 ~]$ sudo restorecon -R /var/lib/pgsql/
[jensd@pgdb2 ~]$ sudo chown -R postgres:postgres /var/lib/pgsql
[jensd@pgdb2 ~]$ sudo restorecon -R /var/lib/pgsql/
[jensd@pgpool ~]$ sudo chown -R postgres:postgres /var/lib/pgsql
[jensd@pgpool ~]$ sudo restorecon -R /var/lib/pgsql/
It’s also a good idea to test the SSH-connection between all hosts using the postgres user from everywhere:
[jensd@pgpool ~]$ sudo su - postgres
Last login: Wed Jun  3 19:56:36 CEST 2015 on pts/0
-bash-4.2$ ssh pgdb2
-bash-4.2$ exit
logout
Connection to pgdb2 closed.
Repository
The standard CentOS repositories do not contain pgpool or repmgr and for CentOS 7, the supported PostgreSQL version will be 9.2. Because we want to use Postgesql 9.4, repmgr and pgpool, we need to add the PGDG repository to Yum.
PGDG is a project that maintains RPM builds of PostgreSQL and related components. You can find more information and repo-URL’s for PGDG here: http://yum.postgresql.org/repopackages.php
Let’s add the repo on all nodes:
[jensd@pgdb1 ~]$ sudo yum install http://yum.postgresql.org/9.4/redhat/rhel-7-x86_64/pgdg-centos94-9.4-1.noarch.rpm -y
...
Complete!
[jensd@pgdb2 ~]$ sudo yum install http://yum.postgresql.org/9.4/redhat/rhel-7-x86_64/pgdg-centos94-9.4-1.noarch.rpm -y
...
Complete!
[jensd@pgpool ~]$ sudo yum install http://yum.postgresql.org/9.4/redhat/rhel-7-x86_64/pgdg-centos94-9.4-1.noarch.rpm -y
...
Complete!
Setup the primary PostgreSQL node
Now that we finished with all prerequisites, it’s time to really get started. The first step is to install the PostgreSQL database for the master and configure it correctly for replication.
Let’s start with installing the necessary packages:
[jensd@pgdb1 ~]$ sudo yum install postgresql94 postgresql94-server postgresql94-contrib rsync -y
...
Complete!
I experienced some problems with the latest verion of repmgr (repmgr94-3.0.1-1 at the time of writing), especially to recover from a failed node, so I decided to use the previous version of repmgr. When I did, all problems seemed to disappear.
[jensd@pgdb1 ~]$ sudo yum install -y http://yum.postgresql.org/9.4/redhat/rhel-7-x86_64/repmgr94-2.0.2-4.rhel7.x86_64.rpm
...
Complete!
After the installation, initialize PostgreSQL:
[jensd@pgdb1 ~]$ sudo /usr/pgsql-9.4/bin/postgresql94-setup initdb
Initializing database ... OK
Configure database access by editing /var/lib/pgsql/9.4/data/pg_hba.conf:
# TYPE  DATABASE        USER        ADDRESS             METHOD
local   all             all                             trust
host    all             all         127.0.0.1/32        md5
host    all             all         ::1/128             md5
host    repmgr          repmgr      192.168.202.101/32  trust
host    replication     repmgr      192.168.202.101/32  trust
host    repmgr          repmgr      192.168.202.102/32  trust
host    replication     repmgr      192.168.202.102/32  trust
host    all             pgpool      192.168.202.103/32  trust
host    all             all         192.168.202.103/32  md5
The above gives access to both DB-nodes to the databases used for replication without a password, allows user pgpool from the PGpool-node and allows all other users, using a password via pgpool.
Configure PostgreSQL itself and streaming replication by editing /var/lib/pgsql/9.4/data/postgresql.conf:
listen_addresses = '*'
max_connections = 200
shared_buffers = 512MB
effective_cache_size = 1536MB
work_mem = 2621kB
maintenance_work_mem = 128MB
default_statistics_target = 100
shared_preload_libraries = 'repmgr_funcs'
wal_level = hot_standby
wal_buffers = 16MB
checkpoint_segments = 32
checkpoint_completion_target = 0.7
archive_mode = on
archive_command = 'cd .'
max_wal_senders = 1
wal_keep_segments = 5000
wal_sender_timeout = 1s
hot_standby = on
log_destination = 'stderr'
logging_collector = on
log_directory = 'pg_log'
log_filename = 'postgresql-%a.log'
log_truncate_on_rotation = on
log_rotation_age = 1d
log_rotation_size = 0
log_min_duration_statement = 0
log_checkpoints = on
log_connections = on
log_disconnections = on
log_line_prefix = '%t [%p]: [%l-1] user=%u,db=%d '
log_lock_waits = on
log_statement = 'all'
log_temp_files = 0
datestyle = 'iso, mdy'
timezone = 'Europe/Brussels'
lc_messages = 'en_US.UTF-8'
lc_monetary = 'en_US.UTF-8'
lc_numeric = 'en_US.UTF-8'
lc_time = 'en_US.UTF-8'
default_text_search_config = 'pg_catalog.english'
It’s a good idea to merge the changed parameters with the existing, default, contents of postgresql.conf since it contains a lot of useful comments (annotated). I’ve just posted the effective settings here to keep it clear.
To get good values for your buffers and memory reservations, you can use this as a source: http://pgtune.leopard.in.ua/
Create the directory for the repmgr configuration files:
[jensd@pgdb1 ~]$ sudo su - postgres -c "mkdir -p /var/lib/pgsql/repmgr/"
Configure repmgr by editing /var/lib/pgsql/repmgr/repmgr.conf:
cluster=db_cluster
node=1
node_name=pgdb1
conninfo='host=pgdb1 user=repmgr dbname=repmgr'
pg_bindir=/usr/pgsql-9.4/bin/
master_response_timeout=5
reconnect_attempts=2
reconnect_interval=2
failover=manual
promote_command='/usr/pgsql-9.4/bin/repmgr standby promote -f /var/lib/pgsql/repmgr/repmgr.conf'
follow_command='/usr/pgsql-9.4/bin/repmgr standby follow -f /var/lib/pgsql/repmgr/repmgr.conf'
Don’t forget to set the owner of the configuration file to postgres:
[jensd@pgdb1 ~]$ sudo chown postgres:postgres /var/lib/pgsql/repmgr/repmgr.conf
Open TCP port 5432 in the firewall for PostgreSQL-communication:
[jensd@pgdb1 ~]$ sudo firewall-cmd --permanent --zone=public --add-service=postgresql
success
[jensd@pgdb1 ~]$ sudo systemctl reload firewalld
Enable and Start PostgreSQL on the master:
[jensd@pgdb1 ~]$ sudo systemctl enable postgresql-9.4
ln -s '/usr/lib/systemd/system/postgresql-9.4.service' '/etc/systemd/system/multi-user.target.wants/postgresql-9.4.service'
[jensd@pgdb1 ~]$ sudo systemctl start postgresql-9.4
Create the required users for replication and repmgr and the repmgr DB:
[jensd@pgdb1 ~]$ sudo su - postgres
Last login: Wed Jun  3 20:51:13 CEST 2015 on pts/0
-bash-4.2$ psql
psql (9.4.2)
Type "help" for help.

postgres=# CREATE ROLE pgpool SUPERUSER CREATEDB CREATEROLE INHERIT REPLICATION LOGIN ENCRYPTED PASSWORD 'secret';
CREATE ROLE
postgres=# CREATE USER repmgr SUPERUSER LOGIN ENCRYPTED PASSWORD 'secret';
CREATE ROLE
postgres=# CREATE DATABASE repmgr OWNER repmgr;
CREATE DATABASE
postgres=# \q
The last step is to register pgdb1 as master node for repmgr:
[jensd@pgdb1 ~]$ sudo su - postgres
Last login: Wed Jun  3 20:58:59 CEST 2015 on pts/0
-bash-4.2$ /usr/pgsql-9.4/bin/repmgr -f /var/lib/pgsql/repmgr/repmgr.conf master register
[2015-06-04 11:48:12] [NOTICE] master node correctly registered for cluster db_cluster with id 1 (conninfo: host=pgdb1 user=repmgr dbname=repmgr)
Setup the standby PostgreSQL node
Setting up the standby node doesn’t require a lot of configuration. On the first sync with the primary, most of the configuration is taken from here.
As with the primary, the first thing is to start with installing the necessary packages:
[jensd@pgdb2 ~]$ sudo yum install postgresql94 postgresql94-server postgresql94-contrib rsync -y
...
Complete!
[jensd@pgdb2 ~]$ sudo yum install http://yum.postgresql.org/9.4/redhat/rhel-7-x86_64/repmgr94-2.0.2-4.rhel7.x86_64.rpm
...
Complete!
When all packages are installed, we can sync the configuration and contents of the primary with the standby:
[jensd@pgdb2 ~]$ sudo su - postgres
Last login: Wed Jun  3 21:05:59 CEST 2015 on pts/0
-bash-4.2$ /usr/pgsql-9.4/bin/repmgr -D /var/lib/pgsql/9.4/data -d repmgr -p 5432 -U repmgr -R postgres standby clone pgdb1
[2015-06-04 15:37:40] [ERROR] Did not find the configuration file './repmgr.conf', continuing
[2015-06-03 21:06:40] [NOTICE] repmgr Destination directory /var/lib/pgsql/9.4/data provided, try to clone everything in it.
[2015-06-03 21:06:40] [NOTICE] Starting backup...
receiving incremental file list
pg_control
        8192 100%    7.81MB/s    0:00:00 (xfer#1, to-check=0/1)

sent 30 bytes  received 261 bytes  194.00 bytes/sec
total size is 8192  speedup is 28.15
receiving incremental file list
PG_VERSION
           4 100%    3.91kB/s    0:00:00 (xfer#1, to-check=1024/1025)
backup_label
         219 100%  213.87kB/s    0:00:00 (xfer#2, to-check=1023/1025)
...
[2015-06-03 21:06:49] [NOTICE] Finishing backup...
NOTICE:  pg_stop_backup complete, all required WAL segments have been archived
[2015-06-03 21:06:50] [NOTICE] repmgr standby clone complete
[2015-06-03 21:06:50] [NOTICE] HINT: You can now start your postgresql server
[2015-06-03 21:06:50] [NOTICE] for example : pg_ctl -D /var/lib/pgsql/9.4/data start
In case you experience problems with the synchronisation and you need to repeat this step, first delete the contents of the PostgreSQL datadir (rm -rf /var/lib/pgsql/9.4/data/*) and try again.
After the synchronization with the primary, configure repmgr, similar as you did on the primary by creating the directory for the repmgr configuration files:
[jensd@pgdb2 ~]$ sudo su - postgres -c "mkdir -p /var/lib/pgsql/repmgr/"
and by editing /var/lib/pgsql/repmgr/repmgr.conf:
cluster=db_cluster
node=2
node_name=pgdb2
conninfo='host=pgdb2 user=repmgr dbname=repmgr'
pg_bindir=/usr/pgsql-9.4/bin/
master_response_timeout=5
reconnect_attempts=2
reconnect_interval=2
failover=manual
promote_command='/usr/pgsql-9.4/bin/repmgr standby promote -f /var/lib/pgsql/repmgr/repmgr.conf'
follow_command='/usr/pgsql-9.4/bin/repmgr standby follow -f /var/lib/pgsql/repmgr/repmgr.conf'
Don’t forget to set the owner of the configuration file to postgres:
[jensd@pgdb2 ~]$ sudo chown postgres:postgres /var/lib/pgsql/repmgr/repmgr.conf
Open TCP port 5432 in the firewall for PostgreSQL-communication:
[jensd@pgdb2 ~]$ sudo firewall-cmd --permanent --zone=public --add-service=postgresql
success
[jensd@pgdb2 ~]$ sudo systemctl reload firewalld
Enable and Start PostgreSQL on the standby:
[jensd@pgdb2 ~]$ sudo systemctl enable postgresql-9.4
ln -s '/usr/lib/systemd/system/postgresql-9.4.service' '/etc/systemd/system/multi-user.target.wants/postgresql-9.4.service'
[jensd@pgdb2 ~]$ sudo systemctl start postgresql-9.4
As the last step in the standby node setup, register the standby in repmgr:
[jensd@pgdb2 ~]$ sudo su - postgres
Last login: Wed Jun  3 21:15:59 CEST 2015 on pts/0
-bash-4.2$ /usr/pgsql-9.4/bin/repmgr -f /var/lib/pgsql/repmgr/repmgr.conf standby register
[2015-06-03 21:16:01] [NOTICE] Standby node correctly registered for cluster db_cluster with id 2 (conninfo: host=pgdb2 user=repmgr dbname=repmgr)
Test the replication
Before we will do a test, let’s first look at the status of repmgr:
[jensd@pgdb2 ~]$ sudo su - postgres -c " /usr/pgsql-9.4/bin/repmgr -f /var/lib/pgsql/repmgr/repmgr.conf cluster show"
Role      | Connection String
* master  | host=pgdb1 user=repmgr dbname=repmgr
  standby | host=pgdb2 user=repmgr dbname=repmgr
The above seems to look good. At this point, updates on the master should be replicated to the slave so it’s a good time to see if that really works as we would expect by creating a new database on the primary node.
Before we create the database on the primary, let’s list the databases from the standby-node:
[jensd@pgdb2 ~]$ psql -U postgres -c "\list"
                                  List of databases
   Name    |  Owner   | Encoding |   Collate   |    Ctype    |   Access privileges
-----------+----------+----------+-------------+-------------+-----------------------
 postgres  | postgres | UTF8     | en_US.UTF-8 | en_US.UTF-8 |
 repmgr    | repmgr   | UTF8     | en_US.UTF-8 | en_US.UTF-8 |
 template0 | postgres | UTF8     | en_US.UTF-8 | en_US.UTF-8 | =c/postgres          +
           |          |          |             |             | postgres=CTc/postgres
 template1 | postgres | UTF8     | en_US.UTF-8 | en_US.UTF-8 | =c/postgres          +
           |          |          |             |             | postgres=CTc/postgres
(4 rows)
Create the database on the primary:
[jensd@pgdb1 ~]$ psql -U postgres -c "CREATE DATABASE test"
CREATE DATABASE
Same command as we did before the DB-create: list the current databases on the standby:
[jensd@pgdb2 ~]$ psql -U postgres -c "\list"
                                  List of databases
   Name    |  Owner   | Encoding |   Collate   |    Ctype    |   Access privileges
-----------+----------+----------+-------------+-------------+-----------------------
 postgres  | postgres | UTF8     | en_US.UTF-8 | en_US.UTF-8 |
 repmgr    | repmgr   | UTF8     | en_US.UTF-8 | en_US.UTF-8 |
 template0 | postgres | UTF8     | en_US.UTF-8 | en_US.UTF-8 | =c/postgres          +
           |          |          |             |             | postgres=CTc/postgres
 template1 | postgres | UTF8     | en_US.UTF-8 | en_US.UTF-8 | =c/postgres          +
           |          |          |             |             | postgres=CTc/postgres
 test      | postgres | UTF8     | en_US.UTF-8 | en_US.UTF-8 |
(5 rows)
As you can see, the new database, test, got replicated to the standby.
Another test which you could do, is to check if the standby is read-only:
[jensd@pgdb2 ~]$ psql -U postgres -c "CREATE DATABASE test2"
ERROR:  cannot execute CREATE DATABASE in a read-only transaction
The above result is good, since we don’t want somebody to update our standby, everything should pass via the primary and get replicated to the standby.
Setup pgpool
The next chapter is to setup pgpool in order to distribute queries to the primary and standby and to make sure that we failover to the standby in case the primary isn’t available anymore.
As with the DB-nodes, we’ll start with installing the necessary packages:
[jensd@pgpool ~]$ sudo yum install postgresql94 pgpool-II-94 -y
...
Complete!
Configure pgpool by copying the sample configuration file:
[jensd@pgpool ~]$ sudo cp /etc/pgpool-II-94/pgpool.conf.sample-stream /etc/pgpool-II-94/pgpool.conf
Edit the following settings in the copied sample file /etc/pgpool-II-94/pgpool.conf, do not replace the contents of the file but edit everything listed under here:
listen_addresses = '*'
port = 5432
backend_hostname0 = 'pgdb1'
backend_port0 = 5432
backend_weight0 = 1
backend_data_directory0 = '/var/lib/pgsql/9.4/data'
backend_flag0 = 'ALLOW_TO_FAILOVER'
backend_hostname1 = 'pgdb2'
backend_port1 = 5432
backend_weight1 = 1
backend_data_directory1 = '/var/lib/pgsql/9.4/data'
backend_flag1 = 'ALLOW_TO_FAILOVER'
enable_pool_hba = on
pid_file_name = '/var/run/pgpool-II-94/pgpool.pid'
sr_check_user = 'pgpool'
sr_check_password = 'secret'
health_check_period = 10
health_check_user = 'pgpool'
health_check_password = 'secret'
failover_command = '/etc/pgpool-II-94/failover.sh %d %H'
recovery_user = 'pgpool'
recovery_password = 'secret'
recovery_1st_stage_command = 'basebackup.sh'
In the above settings, we specified that on failover, the script failover.sh should be executed, so we’ll need to create this file in /etc/pgpool-II-94/failover.sh:
#!/bin/sh
failed_node=$1
new_master=$2
(
date
echo "Failed node: $failed_node"
set -x
/usr/bin/ssh -T -l postgres $new_master "/usr/pgsql-9.4/bin/repmgr -f /var/lib/pgsql/repmgr/repmgr.conf standby promote 2>/dev/null 1>/dev/null <&-"
exit 0;
) 2>&1 | tee -a /tmp/pgpool_failover.log
Make sure that this script is executable:
[jensd@pgpool ~]$ sudo chmod 755 /etc/pgpool-II-94/failover.sh
We also specified in the configuration that we want to use pool_hba.conf so we need to create this file in /etc/pgpool-II-94/pool_hba.conf:
# TYPE  DATABASE    USER        CIDR-ADDRESS          METHOD
local   all         all                               trust
host    all         all         127.0.0.1/32          trust
host    all         all         ::1/128               trust
host    all         all         0.0.0.0/0             md5
The above allows all users to connect using a password.
Every user that needs to connect via pgpool needs to be added in pool_passwd. First we need to create this file and let it be owned by postgres:
[jensd@pgpool ~]$ sudo touch /etc/pgpool-II-94/pool_passwd
[jensd@pgpool ~]$ sudo chown postgres:postgres /etc/pgpool-II-94/pool_passwd
Next, we can add users to the file. Let’s do that for the pgpool-user which we created earlier:
[jensd@pgpool ~]$ sudo su - postgres -c "pg_md5 -m -u pgpool secret"
You’ll have to repeat this step for every user that needs access to the DB.
Last step is to allow connection via PCP to manage pgpool. This requires a similar approach as with pool_passwd:
[jensd@pgpool ~]$ echo "pgpool:$(pg_md5 secret)"|sudo tee /etc/pgpool-II-94/pcp.conf
pgpool:5ebe2294ecd0e0f08eab7690d2a6ee69
Now that the configuration of pgpool is complete, it’s time to open up the firewall, enable and start the pgpool service:
[jensd@pgpool ~]$ sudo firewall-cmd --permanent --zone=public --add-service=postgresql
success
[jensd@pgpool ~]$ sudo systemctl reload firewalld
[jensd@pgpool ~]$ sudo systemctl enable pgpool-II-94
ln -s '/usr/lib/systemd/system/pgpool-II-94.service' '/etc/systemd/system/multi-user.target.wants/pgpool-II-94.service'
[jensd@pgpool ~]$ sudo systemctl start pgpool-II-94
Test pgpool
If all went well, at this point, you should have a working installation of pgpool that will execute queries on the replicated PostgreSQL nodes.
Let’s test if everything is working by executing a query on the databases via pgpool:
[jensd@pgpool ~]$ psql -U pgpool --host pgpool --dbname postgres -c "\list"
                                  List of databases
   Name    |  Owner   | Encoding |   Collate   |    Ctype    |   Access privileges
-----------+----------+----------+-------------+-------------+-----------------------
 postgres  | postgres | UTF8     | en_US.UTF-8 | en_US.UTF-8 |
 repmgr    | repmgr   | UTF8     | en_US.UTF-8 | en_US.UTF-8 |
 template0 | postgres | UTF8     | en_US.UTF-8 | en_US.UTF-8 | =c/postgres          +
           |          |          |             |             | postgres=CTc/postgres
 template1 | postgres | UTF8     | en_US.UTF-8 | en_US.UTF-8 | =c/postgres          +
           |          |          |             |             | postgres=CTc/postgres
 test      | postgres | UTF8     | en_US.UTF-8 | en_US.UTF-8 |
(5 rows)
This should also work from another host that has network access to the pgpool-machine.
Pgpool has a range of show-commands available that allow you to get the status of pgpool itself. They’re executed as normal SQL but will be intercepted by pgool.
To get the status of the nodes connected to pgpool:
[jensd@pgpool ~]$ psql -U pgpool --dbname=postgres --host pgpool -c "show pool_nodes"
 node_id | hostname | port | status | lb_weight |  role
---------+----------+------+--------+-----------+---------
 0       | pgdb1    | 5432 | 2      | 0.500000  | primary
 1       | pgdb2    | 5432 | 2      | 0.500000  | standby
(2 rows)
As you can see, pgdb1 is the primary and pgdb2 is the standby node.
Test failover
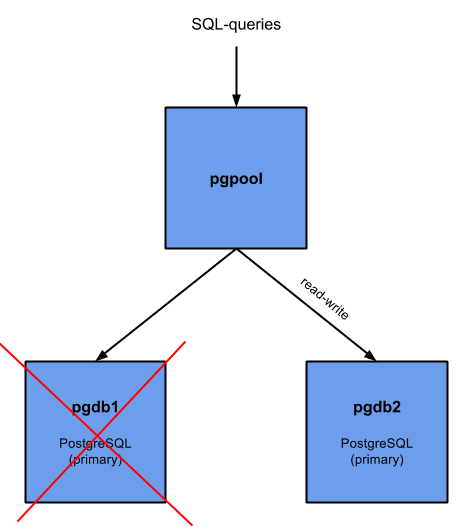
We can easily test the failover-scenario by bringing down the primary database node and see what happens:
[jensd@pgdb1 ~]$ sudo systemctl stop postgresql-9.4
Our setup becomes like this:
Result on pgpool:
[jensd@pgpool ~]$ psql -U pgpool --dbname=postgres --host pgpool -c "show pool_nodes"
 node_id | hostname | port | status | lb_weight |  role
---------+----------+------+--------+-----------+---------
 0       | pgdb1    | 5432 | 3      | 0.500000  | standby
 1       | pgdb2    | 5432 | 2      | 0.500000  | primary
(2 rows)
You can see that the former slave (pgdb2) has now became the primary. the former primary (pgdb1) has now become a standby but has an offline status (3).
Result in repmgr:
[root@pgdb2 jensd]# sudo su - postgres -c " /usr/pgsql-9.4/bin/repmgr -f /var/lib/pgsql/repmgr/repmgr.conf cluster show"
Role      | Connection String
[2015-06-03 22:01:33] [ERROR] connection to database failed: could not connect to server: Connection refused
        Is the server running on host "pgdb1" (192.168.202.101) and accepting
        TCP/IP connections on port 5432?

  FAILED  | host=pgdb1 user=repmgr dbname=repmgr
* master  | host=pgdb2 user=repmgr dbname=repmgr
In the script which we defined and was called when the primary went unavailable (/etc/pgpool-II-94/failover.sh), we specified to log to /tmp/pgpool_failover.log. Contents of the file after the failover:
[jensd@pgpool ~]$ cat /tmp/pgpool_failover.log
Thu Jun  3 21:59:51 CEST 2015
Failed node: 0
+ /usr/bin/ssh -T -l postgres pgdb2 '/usr/pgsql-9.4/bin/repmgr -f /var/lib/pgsql/repmgr/repmgr.conf standby promote 2>/dev/null 1>/dev/null <&-'
+ exit 0
As you can see, the database stays available via pgpool and the former standby became read-write.
Recover after failover to a master-slave situation
After the failover, you end up in a working, non-redundant situation. Everyhting keeps working for users of the database but it would be good to go back to a primary-standby configuration.
The goal is to get to this setup:
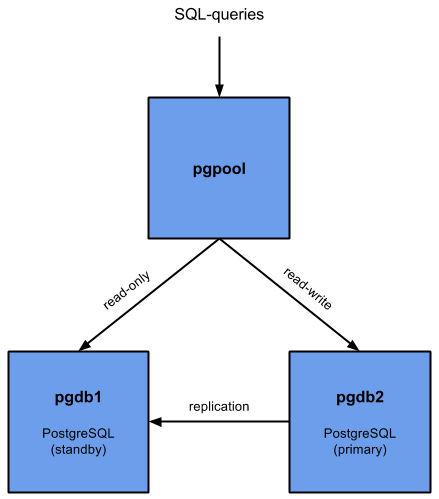
The first step in this process is to investigate why the primary DB became unavailable and resolve that problem. Once you’re sure that the host (pgdb1 in our example) is healthy again, we can start using that host as the new standby-server.
First, make sure that the database on pgdb1 isn’t started:
[jensd@pgdb1 ~]$ sudo systemctl stop postgresql-9.4
Then, we’ll sync the data of pgdb2 (the current primary) to the previously failed node (pgdb1). In the meanwhile, the database has got some updates and changes so we need to make sure that those get replicated to pgdb1 before we start it as a standby:
[jensd@pgdb1 ~]$ sudo su - postgres
Last login: Thu Jun  3 22:35:57 CEST 2015 on pts/0
-bash-4.2$ /usr/pgsql-9.4/bin/repmgr -D /var/lib/pgsql/9.4/data -d repmgr -p 5432 -U repmgr -R postgres --force standby clone pgdb2
[2015-06-03 22:52:40] [ERROR] Did not find the configuration file './repmgr.conf', continuing
[2015-06-03 22:52:40] [NOTICE] repmgr Destination directory /var/lib/pgsql/9.4/data provided, try to clone everything in it.
[2015-06-03 22:52:41] [NOTICE] Starting backup...
[2015-06-03 22:52:41] [WARNING] directory "/var/lib/pgsql/9.4/data" exists but is not empty
receiving incremental file list
pg_control
        8192 100%    7.81MB/s    0:00:00 (xfer#1, to-check=0/1)

sent 102 bytes  received 235 bytes  674.00 bytes/sec
total size is 8192  speedup is 24.31
receiving incremental file list
backup_label
         219 100%  213.87kB/s    0:00:00 (xfer#1, to-check=1224/1226)
...
[2015-06-03 22:52:42] [NOTICE] Finishing backup...
NOTICE:  pg_stop_backup complete, all required WAL segments have been archived
[2015-06-03 22:52:43] [NOTICE] repmgr standby clone complete
[2015-06-03 22:52:43] [NOTICE] HINT: You can now start your postgresql server
[2015-06-03 22:52:43] [NOTICE] for example : pg_ctl -D /var/lib/pgsql/9.4/data start
At this point, the data is (more or less) in sync with the current primary on pgdb2, so let’s start pgdb1 to act as the standby:
[jensd@pgdb1 ~]$ sudo systemctl start postgresql-9.4
Repmgr notices automatically that the new standby got available:
[jensd@pgdb1 ~]$ sudo su - postgres -c " /usr/pgsql-9.4/bin/repmgr -f /var/lib/pgsql/repmgr/repmgr.conf cluster show"
Role      | Connection String
  standby | host=pgdb1 user=repmgr dbname=repmgr
* master  | host=pgdb2 user=repmgr dbname=repmgr
For pgpool, we need to re-attach the failed node in order for it to be visible and usable as a standby-node:
[jensd@pgpool ~]$ pcp_detach_node 0 localhost 9898 pgpool secret 0
UnknownError
[jensd@pgpool ~]$ pcp_attach_node 0 localhost 9898 pgpool secret 0
[jensd@pgpool ~]$ psql -U pgpool --dbname=postgres --host pgpool -c "show pool_nodes"
 node_id | hostname | port | status | lb_weight |  role
---------+----------+------+--------+-----------+---------
 0       | pgdb1    | 5432 | 2      | 0.500000  | standby
 1       | pgdb2    | 5432 | 2      | 0.500000  | primary
(2 rows)
At this point, we’re back in a redundant status where the old standby (pgdb2) functions as the primary and the old primary (pgdb1) functions as a standby. If both machines are equal, you can leave the situation as is and continue to use it in this way.
Recover to the original situation
In case you want to go back to the initial setup (pgdb1 as primary, pgdb2 as standby), you can initiate a manual failover by stopping the current new primary (pgdb2) and recover it to use as a standby:
[jensd@pgdb2 ~]$ sudo systemctl stop postgresql-9.4
When the master (pgdb2) stopped, a failover was triggered and pgdb1 gets assigned as primary again:
[jensd@pgpool ~]$ psql -U pgpool --dbname=postgres --host pgpool -c "show pool_nodes"
 node_id | hostname | port | status | lb_weight |  role
---------+----------+------+--------+-----------+---------
 0       | pgdb1    | 5432 | 2      | 0.500000  | primary
 1       | pgdb2    | 5432 | 3      | 0.500000  | standby
(2 rows)
Now, sync pgdb2 with the new primary (pgdb1) and start it:
[jensd@pgdb2 ~]$ sudo su - postgres
Last login: Thu Jun  3 22:54:16 CEST 2015 on pts/0
-bash-4.2$ /usr/pgsql-9.4/bin/repmgr -D /var/lib/pgsql/9.4/data -d repmgr -p 5432 -U repmgr -R postgres --force standby clone pgdb1
[2015-06-03 23:00:06] [ERROR] Did not find the configuration file './repmgr.conf', continuing
[2015-06-03 23:00:06] [NOTICE] repmgr Destination directory /var/lib/pgsql/9.4/data provided, try to clone everything in it.
[2015-06-03 23:00:07] [NOTICE] Starting backup...
[2015-06-03 23:00:07] [WARNING] directory "/var/lib/pgsql/9.4/data" exists but is not empty
receiving incremental file list
pg_control
        8192 100%    7.81MB/s    0:00:00 (xfer#1, to-check=0/1)

sent 102 bytes  received 234 bytes  672.00 bytes/sec
total size is 8192  speedup is 24.38
receiving incremental file list
backup_label
         219 100%  213.87kB/s    0:00:00 (xfer#1, to-check=1224/1226)
...
[2015-06-03 23:00:08] [NOTICE] Finishing backup...
NOTICE:  pg_stop_backup complete, all required WAL segments have been archived
[2015-06-03 23:00:09] [NOTICE] repmgr standby clone complete
[2015-06-03 23:00:09] [NOTICE] HINT: You can now start your postgresql server
[2015-06-03 23:00:09] [NOTICE] for example : pg_ctl -D /var/lib/pgsql/9.4/data start
-bash-4.2$ exit
logout
[jensd@pgdb2 ~]$ sudo systemctl start postgresql-9.4
Re-attach pgdb2 to pgpool in order to use it as a slave:
[jensd@pgpool ~]$ pcp_detach_node 1 localhost 9898 pgpool secret 1
UnknownError
[jensd@pgpool ~]$ pcp_attach_node 1 localhost 9898 pgpool secret 1
[jensd@pgpool ~]$ psql -U pgpool --dbname=postgres --host pgpool -c "show pool_nodes"
 node_id | hostname | port | status | lb_weight |  role
---------+----------+------+--------+-----------+---------
 0       | pgdb1    | 5432 | 2      | 0.500000  | primary
 1       | pgdb2    | 5432 | 2      | 0.500000  | standby
(2 rows)
After going trough all of the above steps, we’re back to the inital situation where pgdb1 acts as the primary and pgdb2 acts as the standby.
Thank you very much for this very detailed and useful tutorial for having a HA PostgreSQL server.
When configuring pgpool.conf, you mention basebackup.sh for recovery_1st_stage_command. Probably the version available on the pgpool site could work, but I’m wondering if thanks to repmgr, it could be simplified. Do you have an example of it ?
Hi,
No idea if it could be simplified, I used the default supplied script to keep things simple.
thanks for your tutoriall dude ….. god bless you
this helped a lot! thanks!
Hi Jens, thx for this really good one! Rare stuff with so high quality…
Hi,
Thanks for very detailed tutorial. This is very helpful.
But do you have any idea how to setup PG-Pool redundancy?
Thanks in advance.
Great tutorial !.
Is there any tool that automates the last part of “sync pgdb2 with the new primary” and also pgpool re-attach the failed node ? or this is mainly done manually by the DBMS?
In case the pgpool is not required in the installation how can the repmgr be activated/triggered (detecting the failure and doing the fail-over change) ?
Thanks
even i am looking for this…any luck?
Excellent tutorial, helped me a lot!
Do you know where can I find the logs? In the pgpool.conf I turned on “log_connections”, “log_hostname”, “log_statement” and “log_per_node_statement”, just for testing purposes, so I can monitor the nodes and the balancing, but don’t know where I can find it.
Thanks!
Hey Jens, thank you for the awesome article!
Your instructions were very helpful for the Chef cookbook I developed: https://github.com/irvingpop/postgresql-cluster
Even if you’re not a Chef user, you may find the enhancements useful that I made to the following scripts: failover.sh, follow_master.sh, pgpool online recovery and pgpool_remote_start (all located in the templates directory)
Hello
Excellent tutorial, helped me a lot!
But pgpool2 fails to restart after reboot because the /var/run/pgpool-II-94 directory is empty
Any Idea ??
Wonderful Technical Note!!
hello…
I want to configure both nodes with read-write access. can it possible?? Please help….
Hi,
Having both nodes as read/write is not possible. This would cause issues with consistency. I don’t think there are many redundant DB solutions out there which could do that :)
Hi
Thank you for the wonderful article.
I’m new to postgresql and pgpool.
I have query regarding the “basebackup.sh” file, where it is present and if not from where can I get this file and what will be the location to place this file.
Also do I need to put this file on the pgpool node or on the database nodes s well.
Thanks
It should come with pgpool, you can try to perform a search on your system for it (for example: find / -name basebackup.sh). If you can’t find it, it should be downloadable from here: https://github.com/opentodonet/pgpool-scripts
Thank you for the reply Jens.
I have found the “basebackup.sh” script file. I want to automate the recovery of the failed node. At present, I have to run the “pcp_recovery_node” command manually on the Pgpool node to recover the failed node. I have placed the script ‘basebackup.sh’ and ‘pgpool_remote_start’ on the Postgresql database nodes.
How can I automate this process, without any manual intervention. The failed node should get recovered and also add it to the cluster as well. My ‘basebackup.sh’ does not conatins the creation of trigger file. Is this the proper way to do the failover or I am missing something.
Please find the ‘basebackup.sh’ script used by me:
#!/bin/bash
# first stage recovery
# $1 datadir
# $2 desthost
# $3 destdir
#as I’m using repmgr it’s not necessary for me to know datadir(master) $1
RECOVERY_NODE=$2
CLUSTER_PATH=$3
#repmgr needs to know the master’s ip
MASTERNODE=`/sbin/ifconfig eth0 | grep inet | awk ‘{print $2}’ | sed ‘s/addr://’`
cmd1=`ssh postgres@$RECOVERY_NODE “repmgr -D $CLUSTER_PATH –force standby clone $MASTERNODE”`
echo $cmd1
The very best implementation of postgresql-pgpool i’ve come across on the web after intensive search. You made the whole procedure look simple. Thanks
In addition, the you have any gui manager of pgpool over postgresql. I would like my clients to make use of gui for operations instead of the command line.
Hi, I’m not aware of any GUI managers for pgpool. For PostgreSQL itself, there is pgAdmin3.
You have pgpool admin for that:
http://www.pgpool.net/docs/pgpoolAdmin/index_en.html
Jens,
Thanks for wonderful tutorial on PostgreSQL hot stand by setup using repmgr and pgpool. It was awsome experience for me to configure hot stand by in postgresql for the first time. Just by following your instructions, one can setup the same successfully. Only change I made was used newer version of Postgresql 9.5 instead of 9.4. However, if you can show the way how to configure the same without using pgpool that will be additional help for those who do not want to use pgpool.
Pingback: Comando de administración Pgpool modo Balanceo de Carga y Postgresql replication Slots – Linux Trucupei Blog
Pingback: Automatic recovery of the failed postgresql master node is not working with pgpool II - Tech
Hello All,
I configured according to the guidelines, but there is a problem. I have 2 servers:
Masterdb and standbyDB.
MasterDB down -> standbyDB up to master.
I move MasterDB -> standby “Ok” (follow the instructions)
But when StandbyDB (master) down the MasterDB (standby) can not become a master
Using PostgreSQL 9.5, pgPool-II-9.5, and repmgr 3.1.3 there are a few tweaks that are helpful to be aware of.
First, basebackup.sh doesn’t appear to be needed with the repmgr. I don’t think. I could be wrong, I’m still digging, but so far it’s working without it.
Second, repmgr defaults to use pg_basebackup instead of rsync. pg_basebackup requires the destination directory to be empty. If using the command:
/usr/pgsql-9.5/bin/repmgr -D /var/lib/pgsql/9.5/data -d repmgr -p 5432 -U repmgr -R postgres –force standby clone pgdb2
You’ll get an error about “pg_basebackup: directory “/var/lib/pgsql/9.5/data” exists but is not empty. To use the rsync option instead of pg_basebackup, and so you don’t have to start from an empty directory, use this instead (add -r):
/usr/pgsql-9.5/bin/repmgr -D /var/lib/pgsql/9.5/data -d repmgr -p 5432 -U repmgr -R postgres -r –force standby clone pgdb2
That will use the rsync method and continue as expected. Hope this saves someone some time.
Also, very well written instructions. There are a few config changes with the different versions I was using, but by an far one of the best write-ups on setting this up. Thank you.
Good jobs man. It’s save my life. :D
Hi,
After failing the master, it dose not switch to the standby. here is the the failoer error:
Failed node: 1
+ /usr/bin/ssh -T -l postgres PGDB1 ‘/usr/pgsql-9.5/bin/repmgr -f /var/lib/pgsql/repmgr/repmgr.conf standby promote 2>/dev/null 1>/dev/null <&-'
Host key verification failed.
You didn’t setup passwordless SSH properly
This is really a beautiful techi doc. I am not database guys, but after reading it. It make my mind open in database replication.
But i have a question, suppose i have an application what need to integrate with this replication. Can someone please explain me how this replication work with application like Apache or others. Means should all data will be send to pgpool and then pgpool will decide where it go. OR data will go to directly with pgnode1 or pgnode2…
Any suggestion will be appropriated. And thanks a lot for this doc.
Thanks for very detailed tutorial. This is very helpful.
really brilliant
but i have an issue
when i make pgdb1 down i should restart pgpool and pgdb1 to get new settings
and when back to the original situation also need restart the three nodes
is it my own issue or what
what is the log file to manage connection
list all active connection
list what IPs doing
is that available or not ???
Pingback: Install postgresql-9.5 replicate with repmgr from source – "DOKUMENTASI"
hi,
When i stop postgresql in master, I checked again on pgpool error:
root@localhost ~]# psql -U pgpool –dbname=postgres –host pgpool -c “show pool_nodes”
psql: server closed the connection unexpectedly
This probably means the server terminated abnormally
before or while processing the request.
Please help me!
Thanks for this detailed post. I am trying to achieve this on Postgresql 96 and Pgpool-II. I am able to start the pgpool service.
When I try to run the command (psql -U pgpool –host localhost –dbname postgres -c “\list”) – I get an error (FATAL: no pg_hba.conf entry for host “192.168.3.14”, user “pgpool”, database “postgres”, SSL off)
Since I am trying this from the node where pgpool is running, why am I to have entries in pg_hba.conf as I am not trying to access the local posgres but the one on the db servers through pgpool. My command has “–host localhost” as the node name is not pgpool. Is that of concern?
Please help.
thanks
angleo
Is addition to the above if I issue the command as is:
psql -U pgpool –host pgpool –dbname postgres -c “\list”
I get the error
psql: could not translate host name “pgpool” to address: Name or service not known
hence my change to use –host localhost
It’s working. It was just a config issue on one of the servers. Thanks
Dear, how you solve it
when I try this command “psql -U pgpool –host pgpool –dbname postgres -c “\list”
the error appear :
psql: could not connect to server: Connection refused
Is the server running on host pgpool and accepting
TCP/IP connections on port 5432?
in case: I solved this issue but same you issue appear “FATAL: no pg_hba.conf entry for host “192.168.3.14”, user “pgpool”, database “postgres”, SSL off”
how you solve it please ?
Very informative and precise article .loved your style of keeping things simple and explaining the . Keep it up . Also, can you create a article on automatic failover and failback ?
Thanks ,Rupesh
Dears,
when I stop node 1 the error appear “psql: FATAL: failed to create a backend connection DETAIL: executing failover on backen” can any one help me ??
any one help me ?
Dear,
Can you explain about this script in the postgresql.conf:
shared_preload_libraries = ‘repmgr_funcs’
My postgresql cannot start when i use this script.
for repmgr v4 you have to change it to repmgr
shared_preload_libraries = ‘repmgr_funcs’
to
shared_preload_libraries = ‘repmgr’
Because that’s for a much older version. replace ‘repmgr_funcs’ with ‘repmgr’
Very informative and helpful, have created this setup first time without any errors.
Thanks.
Thanks very much for your great info. is there any tutorial for Debian 8 or 9
great tutorial, but i will aks, why my pgpool status is 1,. how to change status to 2?
Why would you use PgPool online recovery with taking base backup of the primary to recover failed (detached) slave when streaming replication with WAL archiving can be used? It is time-consuming process to recover slave from larger base backup. In case when slave gets detached because of some network glitch or short downtime applying brute force approach like base backup is less compelling. Is there any reason that I’m missing here?
Thanks a lot.
Hi,thanks a lot.It was very useful information.Really good.I have a query if we have more than one standby this is not working.Any ideas please….
Hello,
I have done above mentioned steps but pgpool somehow giving below error. Working fine till replication.
postgres@pgpool:~$ psql -U pgpool –dbname=postgres –host pgpool -c “show pool_nodes”
ERROR: unrecognized configuration parameter “pool_nodes”
postgres@pgpool:~$
Very informative and helpful. I was able create this entire set up first with postgresql 12 and repmgr 5.0 on RHEL 7.7. There are few changes may be due to version change.
1. shared_preload_libraries = ‘repmgr’ not ‘repmgr_funcs’
2. log_file not logfile
log_level not loglevel
log_file=’/var/lib/pgsql/12/data/log/repmgr.log’
log_level=NOTICE
3. cluster=db_cluster not required and will be ignored if set
4. pcp_attach_node 1 localhost 9898 pgpool secret 1 — this syntax will not work. we need to use below.
-bash-4.2$ pcp_detach_node -h pgpool -U pgpool -p 9898 -n 0 -W
Password:
pcp_detach_node — Command Successful
-bash-4.2$ pcp_detach_node -h pgpool -U pgpool -p 9898 -n 1 -W
Password:
pcp_detach_node — Command Successful
-bash-4.2$ pcp_attach_node -h pgpool -U pgpool -p 9898 -n 0 -W
Password:
pcp_attach_node — Command Successful
-bash-4.2$ pcp_attach_node -h pgpool -U pgpool -p 9898 -n 1 -W
Password:
pcp_attach_node — Command Successful
5. You can do switchover also. should be run from standby. Also you need to detach and attach both primary and standby in pgpool.
repmgr -f /var/lib/pgsql/repmgr/repmgr.conf standby switchover
-bash-4.2$ repmgr -f /var/lib/pgsql/repmgr/repmgr.conf standby switchover
NOTICE: executing switchover on node “postgres1” (ID: 1)
NOTICE: local node “postgres1” (ID: 1) will be promoted to primary; current primary “postgres2” (ID: 2) will be demoted to s
NOTICE: stopping current primary node “postgres2” (ID: 2)
NOTICE: issuing CHECKPOINT
DETAIL: executing server command “/usr/pgsql-12/bin/pg_ctl -D ‘/var/lib/pgsql/12/data’ -W -m fast stop”
NOTICE: current primary has been cleanly shut down at location 0/19000028
NOTICE: promoting standby to primary
DETAIL: promoting server “postgres1” (ID: 1) using pg_promote()
NOTICE: waiting up to 60 seconds (parameter “promote_check_timeout”) for promotion to complete
NOTICE: STANDBY PROMOTE successful
DETAIL: server “postgres1” (ID: 1) was successfully promoted to primary
NOTICE: setting node 2’s upstream to node 1
WARNING: unable to ping “host=postgres2 user=repmgr dbname=repmgr connect_timeout=5”
DETAIL: PQping() returned “PQPING_NO_RESPONSE”
NOTICE: starting server using “/usr/pgsql-12/bin/pg_ctl -w -D ‘/var/lib/pgsql/12/data’ start”
NOTICE: NODE REJOIN successful
DETAIL: node 2 is now attached to node 1
NOTICE: switchover was successful
DETAIL: node “postgres1” is now primary and node “postgres2” is attached as standby
NOTICE: STANDBY SWITCHOVER has completed successfully
Awsome info.
I am going to set up this on Ubuntu 18 LTS with PostgreSQL v10.x.
Is there any new feature or simplified methods introduced, if anyone comes across any new observations/improvements then pls share/inform, I will circle back and comment on my findings here ASAP.
Thanks,
Ravi
Fantastic & very detailed article.
One quick question, if I may. What do you suggest we should do to create a HA pgpool cluster?
Cheers
There is no need to clone again when switching master back. You can just run repmgr standby switchover on the slave.
Cloning is also only needed when there are not enough WAL files, otherwise you can use pg_rewind too.
I was interested in how one does a restore while remaining available as read-only.
Hello all, What happens when the standby server goes down? pgpool 4.5.2 blocks connections and the cluster cannot be accessed, leaving the database inaccessible from pgpool even if the primary server works perfectly. Does anyone know a solution or a script to solve this problem?