
It’s fairly easy to create bootable USB installation media for Windows 10 when using Microsoft’s Media creation tool. Unfortunately this tool is not available for macOS. This post explains you how to do this without using a Windows-based PC or VM and without using BootCamp assistant. This can come in handy when trying to install Windows on your mac or when there is simply only an Apple Mac available and you need to boot the Windows installer for various reasons.
YouTube Video
If you are interested, I also created a YouTube video from this blogpost. If you prefer classic text, you can just follow the rest of this article:
Introduction
Unfortunately, since some time, it became a bit more complicated to create this USB drive from macOS. The main reason for this is because macOS supports only FAT32 as filesystem that is compatible with Windows (and ExFat but that causes issues to boot from). FAT32 has a file size limit of 4GB while the installation ISO now contains one file that is larger.
To overcome this, we will need to use a tool, Wimlib, which is able to split this file in two parts. More about this later.
Create bootable Windows 11 installation USB
In case you’re looking for the instructions to create a bootable USB drive to install Windows 11 instead, have a look at the following article: https://jensd.be/1740/windows/create-a-bootable-windows-11-installation-usb-on-macos
Download the Windows 10 ISO
Let’s start by downloading the ISO from Microsoft. This can be done from: https://www.microsoft.com/en-us/software-download/Windows10ISO. When you open this link on macOS, it should show you the ability to download the ISO rather than the Media Creation tool, which is shown when opening the same on a Windows-based PC.
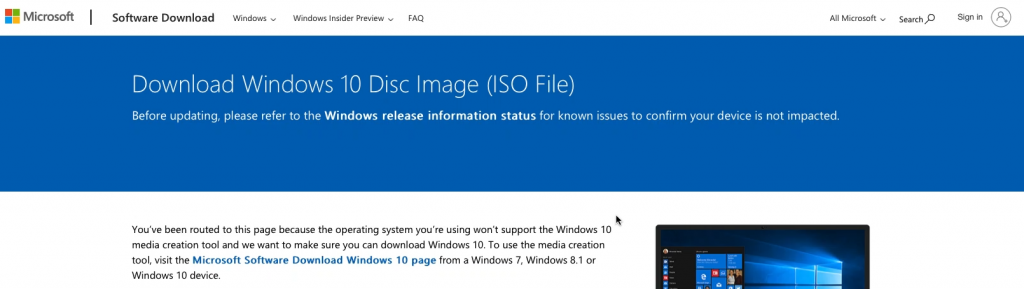
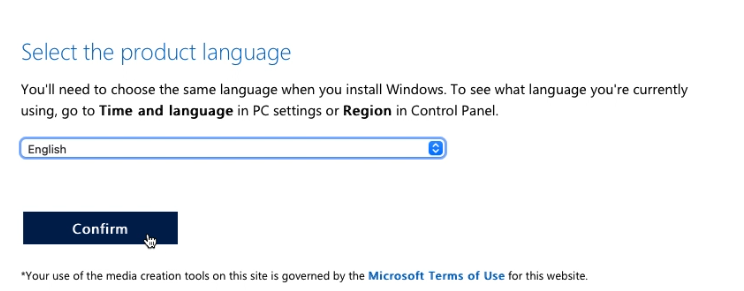
Choose for Windows 10, then select the preferred language, go for the “64-bit Download” and wait for the download to complete to get the .iso file on your Mac:
Prepare the USB drive
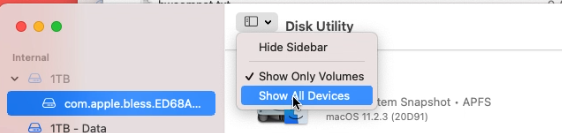
While the ISO is downloading, we can prepare our USB drive. You will need one that is at least 8GB. Insert the drive in your Mac and start Disk Utility.
In Disk Utility, choose to show all devices:
Then, on the left side, select your USB drive from the list and click Erase on the top right menu. In the dialog, enter a name for the drive (WINUSB here), choose to format as “MS-DOS (FAT)” and “Master Boot Record” as scheme. Finally click “Erase” to complete the process.

Copy all smaller files to the USB drive
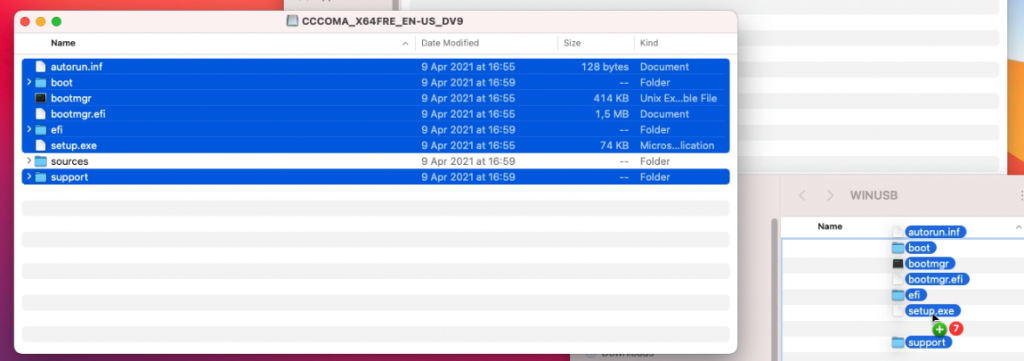
After the previous step, our USB drive is prepared. Once the ISO file is download as well, double click the ISO file to mount it. Then open it in Finder. As you can see, the sources folder contains one large file: install.wim which is over 4GB and will not fit on the FAT32-formatted USB drive:
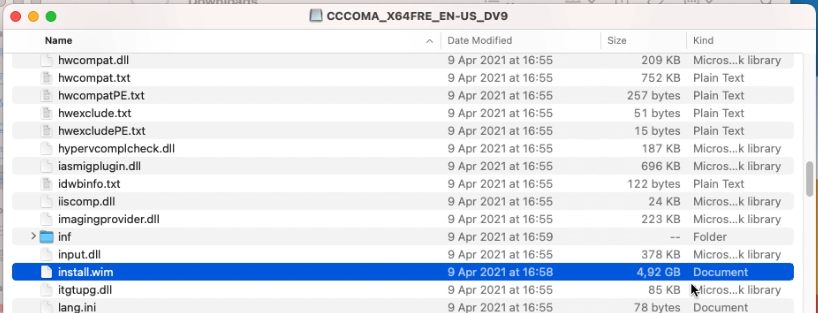
We will take care of that later so for now, copy all remaining files to the USB drive using Finder.
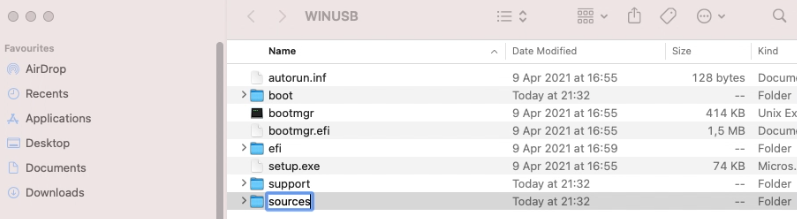
I typically start by copying all separate files and folders, except for the sources folder:
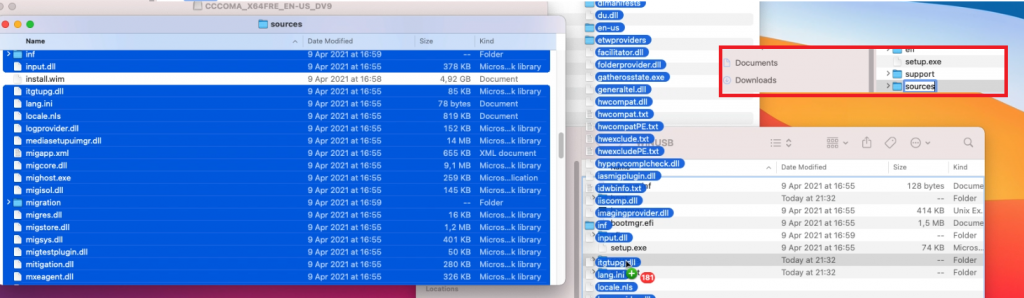
Then I create the sources folder and copy all files from sources with the exception of install.wim:
Prepare to split install.wim
So far things were pretty straightforward and if it wouldn’t be for that large file it would be a piece of cake. Unfortunately we have to work around that by splitting the file in two parts, smaller than the limit of our file system on the USB drive.
To accomplish this, we can use Wimlib (https://wimlib.net/). This is a tool that is developed to work with, and modify, .wim files. The easiest way to get this installed on your Mac is by using Brew (https://brew.sh/).
So, as just mentioned, we start by installing Brew. As is instructed on the Brew website, copy and paste the mentioned line in a terminal and execute it.
user@users-iMac ~ % /bin/bash -c "$(curl -fsSL https://raw.githubusercontent.com/Homebrew/install/HEAD/install.sh)" ==> Checking forsudoaccess (which may request your password). Password: ==> This script will install: /usr/local/bin/brew /usr/local/share/doc/homebrew ... ==> Next steps: Runbrew helpto get started Further documentation: https://docs.brew.sh user@users-iMac ~ %
Once Brew is installed, we can use it to install Wimlib:
user@users-iMac ~ % brew install wimlib
 ==> Downloading https://ghcr.io/v2/homebrew/core/openssl/1.1/manifests/1.1.1k
...
==> Installing wimlib
==> Pouring wimlib--1.13.4.big_sur.bottle.tar.gz
🍺  /usr/local/Cellar/wimlib/1.13.4: 65 files, 2.7MB
user@users-iMac ~ %
Split install.wim and get it on the USB drive
Now that we have Wimlib installed, we can use it to split the large install.wim file and copy it to our USB drive. In the same or a new Terminal session, execute the following:
user@users-iMac ~ % wimlib-imagex split /Volumes/CCCOMA_X64FRE_EN-GB_DV9/sources/install.wim /Volumes/WINUSB/sources/install.swm 4000
Splitting WIM: 4654 MiB of 4654 MiB (100%) written, part 2 of 2
Finished splitting "/Volumes/CCCOMA_X64FRE_EN-GB_DV9/sources/install.wim"
In the command above, we told to execute the wimlib-imagex tool (part of Wimlib) and passed some arguments:
- “split” to indicate that we want to split this larger file
- “/Volumes/CCCOMA_X64FRE_EN-GB_DV9/sources/install.wim” which is the source file to split. Keep in mind that the name under /Volumes depends on the ISO name so you need to adjust this accordingly. Just do ls /Volumes from the terminal to see what is there.
- “/Volumes/WINUSB/sources/install.swm” the destination of where the split files should end. As with the ISO name, here WINUSB is the volume label I gave to my USB drive when erasing it with Disk Utility. Adjust this as well when you chose something different earlier.
- 4000 the max. size of the destination file, so the file will be split in a part of 4000MB and the rest.
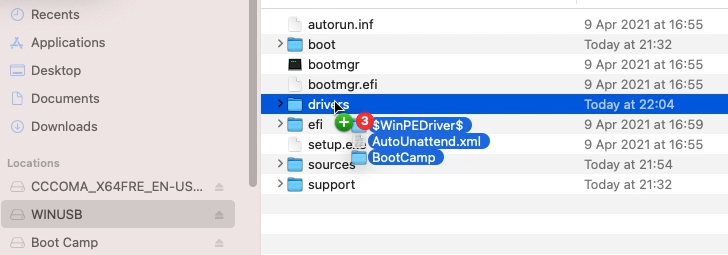
After this command completes, you can see that now two files were created on the USB drive:

The Windows 10 installer knows how to deal with these and will just work fine.
That should be all you need to create a bootable USB drive for Windows 10 installation.
(Optionally) download Windows 10 drivers for your Mac
If you plan to use the USB drive, which you created with the above steps, on a regular PC then you can skip this step. If you, on the other hand, plan to use this for installation on a Mac, it is a good idea to go through these additional steps.
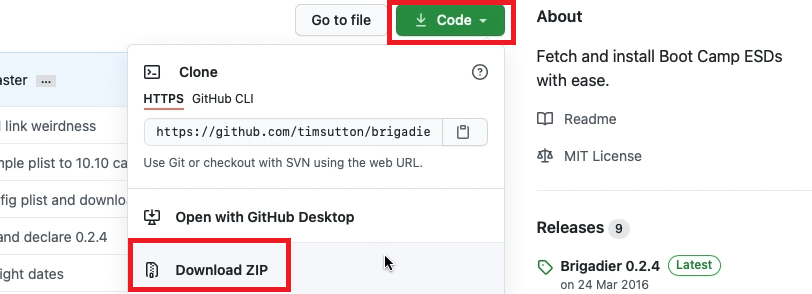
The goal of this is to fetch the necessary drivers for use on Mac. As I did from Windows in a previous article, I will use Brigadier for this. Brigadier, which is basically a script, works just from macOS directly as well.
From the author’s Github page: https://github.com/timsutton/brigadier, click the green Code button then choose to “Download ZIP”
Once the file is downloaded, open a fresh Terminal session and navigate to the “brigadier-master” in your Downloads folder, then simply execute it using ./brigadier:
user@user-iMac ~ % cd Downloads/brigadier-master
user@user-iMac brigadier-master % ./brigadier
Using Mac model: iMac13,1
...
Expanding flat package...
Extracting Payload...
Extracted to /Users/user/Downloads/brigadier-master/BootCamp-041-84821/WindowsSupport.dmg
user@user-iMac brigadier-master %
As you can see in the output, executing brigadier automatically detected the model identifier of the mac which we executed this on. If you want to download the required drivers for another model, you can simply pass it using the –model parameter. The files got downloaded as a subfolder of brigadier-master as WindowsSupport.dmg
All that is left to do is to navigate to the folder using Finder, then to open WindowsSupport.dmg to mount it and to copy those files to the USB drive:
After going through the installation, executing BootCamp/setup.exe will install most of the required drivers or at least enough to continue the rest of the driver installation using Windows update.
Boot from the USB drive
As the final step, now that the USB drive is prepared, with or without additional drivers for your Mac, you can boot from it.
On a regular PC, this is usually done by pressing a key at BIOS time to bring up a boot menu (F11 is often used for this) or, for some older BIOS, by changing the boot order from the BIOS setup.
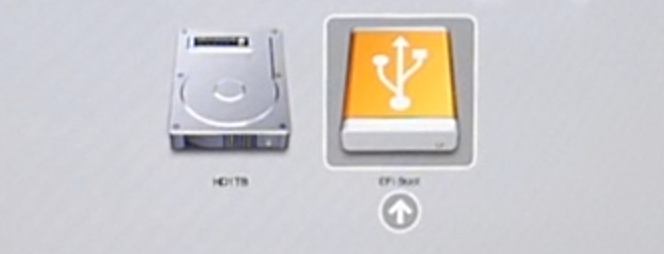
On a Mac, you can choose to boot from USB by holding down the Alt key on boot and to select the USB drive from the boot loader:
Hi Jensd,
How much time it takes to split the install.wim file? I am on a M1 Mac but waited two hours and it is still not completed. ISO file is 21H2
Hey Lakresha,
For me it only took a few minutes, maybe close some applications to free up disk space and pause any other file transfers that are occurring? Also, M1 Mac(books) do not have any support for a windows operating system outside of virtualization currently, so you won’t be able to install it if that is what you’re planning. This is less a fault of Apple’s and more a problem with Microsoft not licensing their Arm version of Windows 10 to consumers, and this also makes bootcamp unusable on Apple Silicon as well.
Hi Bennett,
Thanks for the tips. And sorry for the late reply.
I was going to reinstall Windows 10 on my old laptop and only had a M1 MacBook Air at that time. In addition, I closed all other apps during the process but the same result. I saw several bloggers also recommending this trick. It should work but not my case. I ended up using a GUI app (UUByte ISO Editor) to finalize the job in less than 20 minutes. It has a built-in module to split the iso file.
I found it to be very slow when splitting directly onto the USB stick. I replaced /Volumes/WINUSB/sources/install.swm with ~/Desktop/install.swm in the wimlib-imagex command, then copied install.swm and install2.swm to the sources folder on the USB stick after it had finished.
One thing to note is that Monterey no longer has the Scheme dropdown in Disk Utility — thanks, Apple!
I ended up using `diskutil eraseDisk MS-DOS “WINUSB” MBR disk4` to do it (be *very* careful to look at the “Device” entry for the USB drive in Disk Utility and make sure you have the right drive number, or you could erase the wrong disk! The last parameter should be what’s in the Device entry, without the “s1” at the end.)
Hi Jansd,
Do you know why the splitting process got stuck on M1 Mac? It has been 10 hours and the splitting is still in progress. I am using the latest Windows 10 ISO 21H1.
Maybe slow storage device?
By far the easiest guide that i found, thank you sir!
I know there is a tool called SYSGeeker wonderISO that can be used to process the larger ISO file, it can split the oversized install.wim into a couple of smaller files.
source:
https://www.sysgeeker.com/how-to-create-windows-10-bootable-usb-on-mac-catalina.html
How do you install wimlib after home-brew?
It’s in the article. You can use “brew install wimlib”. Good luck with the installation :)
Hi, i paste “brew install wimlib”, and nothing occurs, just a commands saying “fg:no current job
zsh : not found”
In more recent versions of the Brew installation script, you need to add brew to your PATH.
This can be done with the following commands:
jensd@jensds-MacBook-Air ~ % echo ‘eval “$(/opt/homebrew/bin/brew shellenv)”‘ >> /Users/jensd/.zprofile
jensd@jensds-MacBook-Air ~ % eval “$(/opt/homebrew/bin/brew shellenv)”
I don’t understand exactly what I have to do. Very sorry Do I paste the command instead of typing brew install Wimlib ?
Downloading Command line Tools for Xcode stuck for long time what that happen
Shouldn’t be needed as far as I remember but that won’t hurt either.
Normally only needed once, if you dont have homebrew installed already itll download xcode
I am stuck and I am receiving this response:
Usage:
wimlib-imagex split WIMFILE SPLIT_WIM_PART_1 PART_SIZE_MB [–check]
Some uncommon options are not listed; see `man wimsplit’ for more details.
Pingback: How to create bootable Windows 10 installer USB for PC? - PhotoLens
i can’t create usb bootable with bootcamp assistant, your guide is amazing, it worked well for my iMac14,1, thank you very much.
Good to hear, glad to see this helped :)
Hi there, when i used this method, windows setup is throwing an error at start of installation: Windows cannot open the required file C:\Sources\install.swm
Many thanks with the user guide. The original boot camp having issue whereby always saying error formatting disk and I can’t continue to next step. I’m so happy I came across your tutorial video. I’ve followed and completed all your steps. But ended up with no boot disk after I pressed option key during start up on my iMac late 2013. I really not sure what had gone wrong.
when it comes to split the install.wim. it gave me an error when running the command.
“$ wimlib-imagex split /Volumes/CCCOMA_X64FRE_EN-GB_DV9/sources/install.wim /Volumes/WINUSB/sources/install.swm 4000
[ERROR] Can’t open “/Volumes/CCCOMA_X64FRE_EN-GB_DV9/sources/install.wim” read-only: No such file or directory
ERROR: Exiting with error code 47:
Failed to open a file.”
to fix this i copied the install.wim file from the mounted windows .iso file to the downloads folder
then ran
“$ wimlib-imagex split ~/Downloads/install.wim /Volumes/WINUSB/sources/install.swm 4000”
and it worked. you should edit this tutorial to reflect this. thanks.
Could it be that the volume name was different in your case (and not CCCOMA_X64FRE_EN-GB_DV9)?
The command should still work as long as /Volumes/CCCOMA_X64FRE_EN-GB_DV9/sources/install.wim is correct.
Had the same error code at the beginning. To solve this, just unmount and then remount the volume CCCOMA_X64FRE_EN-GB_DV9 and then hit the same command prompt again. It worked.
Thanks for this, I am able to get the windows 10 media installer file via my Macbook onto the flash drive. I am about to install this onto my Asus laptop. When I got to the screen where I have to choose “Where do you want to install Windows?”, I have the following questions:
(1) I have 5 partitioned drives showing up (all are Drive 0) with the OS one having the largest GB size. As many videos show that I have to either “Delete” all the drive to have an unallocated drive (a clean install) or to “Format” one of these drives, I am hesitant to do this since I don’t want to lose any of my files or manufacturer’s files as none of the files have been backed up before. Will the action of formatting or deleting wipe out any files which will further crash my laptop?
(2) Which partitioned drive should I use if I don’t do a clean install since only 2 of the existing partitioned drives have enough GB size (OS drive >400GB in total; OEM Restore ~20GB in total)?
I am not an expert, but you should always back up your personal files on a flash drive or something else before doing a new install. As for manufacturer’s files, I have never heard of that type of files before.
#2 This depends on your purpose. If your Os is already Windows, then you will want to overwrite the Os partition. As long as you backed up your personal files, rewriting that partition with the new Win10 Os will be completely safe. I wouldn’t overwrite the OEM restore partition for sure.
After about a week of not having time and countless dead ends, this tutorial was exactly what I needed!!! Thank you so much, you saved my gaming rig!
Good to hear this helped. Thanks for the nice feedback.
Hey man i just got a new pc for christmas and tried installing windows for 2 WEEKS and i just couldn’t, it was problem after problem and i was starting to lose hope until I discovered you I copied all of your steps and it WORKED THANK YOU SO MUCH you helped me big time and i just don’t know how to repay you thankyou :)))
Thanks a lot for the nice feedback. Glad to see it helped you!
Hi Jensd, Will this USB bootable will work to upgrade my Windows 7 to W10 on my Macbook Pro’s Parallels virtual machine? Thanks,
It should work for that but there is no need to go through all these steps to upgrade a VM.
Just mount the downloaded ISO for Windows 10 in a virtual CD/DVD drive over there and upgrade.
The command wimlib-imagex split does not work says it is unknown command
Hello Jensd,
unfortunately I cannot download the drivers for my MacBook Pro. I get the message when I execute brigadier:
Using Mac model: MacBookPro17,1.
Couldn’t find a Boot Camp ESD for the model MacBookPro17,1 in the given software update catalog.
Am I doing something wrong? Thanks for your help :)
Thanks for the great guide.
I have an issue with windows not finding a disk to install to.
How to solve this?
For me, this installation was just half the process; I was trying to install to another external USB drive: I got the following error when trying to choose a disk to install to:
“Windows cannot be installed to this disk. Setup does not support configuration of or installation to disks connected through a USB or IEEE 1394 port.”
I was booting from exfat, which might cause that problem but not sure. On a side note, using exfat made the file splitting of install.wim obsolete.
.
.
.
The following resource helped with my issue!
https://decryptingtechnology.blogspot.com/2015/09/install-windows-10-on-usb-external-hard.html?showComment=1643548369873
Please follow very precisely and take a look at the comments, there are adjustments to be done if you have the split install.swm file and also some of the partition sizes need to be adjusted for new windows versions to work.
Pingback: Create a bootable Windows 11 installation USB on macOS | Jensd's I/O buffer
I AM STUCK!!!!
I have a MacBook Air that I am using to create the USB device and have tried many solutions.
I appreciate the extremely detailed step by step above, but after completing all the steps, including splitting the install.wim, when I insert the USB in the PC I am trying to install Windows 10 – I still get the cursor in the top left corner and nothing ever happens. (As though the USB is not bootable)
Any ideas would be amazing!!
Did you solve this problem, I have the same :( ?
FYI, newer Macs such as the mid-2020 iMac can no longer boot from USB drives formatted as MBR. GUID is obligatory. https://discussions.apple.com/thread/7889087
Pingback: create windows installer on mac - pladata
When I try to find the volumes this is what pops up. zsh: command not found: 1s
The command is ls (not one but the letter L).
Hi there,
What about the partitioning between windows and macos, where can i choose the size of them? For example in Bootcamp Assistent where you can choose a specific size for both.
This article is not about installing Windows on your Mac. It’s about creating installation media. This can then be used on a regular PC and Mac. If you’re looking for more information about installing Windows on a Mac using this drive, you can find that here: https://jensd.be/1011/windows/install-windows-10-on-a-macbook-air-2019-2020-with-t2-chip or here: https://jensd.be/1429/windows/install-windows-11-on-your-mac-without-parallels-or-bootcamp-assistant
I’m on macOS Monterey and am using this branch from the brigadier project: https://github.com/timsutton/brigadier/tree/python3
it works with python3.
thanks for this tip; it’s what worked for me
Need help please,
Great Tutorial, although the issue that i am having is that when i go through the process of splitting the file needed and i type in the complete commands all i am met with is :bash /users/username is a directory and nothing happens. any ideas would be great, thank you for making this.
I’m having this same issue. I’ve been trying for hours. I even renamed my USB drive the same name as given in the example. It will not run.
Hi there! SUPER thanks for the article. I did everything it was written. But my windows can’t load USB. I mean nothing happens.
The thing is that when I format usb on my Mac it does not offer me to choose Master Boot Record.
Could it be the issue?
thank
Hi, take in mind that the destination volume must not have white spaces in its name; otherwise it will give you this message:
“Usage:
wimsplit WIMFILE SPLIT_WIM_PART_1 PART_SIZE_MB [–check]
Some uncommon options are not listed; see `man wimsplit’ for more details.”
Greetings from Zárate, Buenos Aires, Argentina!
Hi
Thanks for this great guide. I’m stuck on the Brigadier section, though. The script downloaded is called Brigadier-main rather than -master. Could you run through the steps again of what I need to be inputting into terminal? It can’t find the directory, or finds it if I rename it but then won’t execute it. I’ve tried zipped and unzipped, also tried using the earlier release, but with the same result.
Yea I continued through by just saying ‘cd downloads/brigadier-main’ and then type ‘./brigadier’ but get ‘env: python: No such file or directory’
Thanks for tuto. After mounting the usb, why not downloading directly the ISO file into the usb ? You will have all data un the disk ans on iso file.
Do it works like it ?
Thanks for reply
Hi! when i run brigadier it says on terminal env: python: no such file or directory
how can i fix this?
If you’re struggling with the command-line for Brigadier. Have a look at Bombardier, which comes with a GUI, same purpose: https://github.com/ninxsoft/Bombardier
Hi
I tried this tutorial but at the step “download Windows 10 drivers”
it stopped before the end with the message in Terminal :
/System/Library/Frameworks/Python.framework/Versions/2.7/Resources/Python.app/Contents/MacOS/Python: can’t open file ‘./brigadier’: [Errno 1] Operation not permitted
after the command : brigadier-main % sudo ./brigadier.
Besides, the downloaded folder is brigadier-main not brigadier-master.
Cant you help me ?
If you’re struggling with the command-line for Brigadier. Have a look at Bombardier, which comes with a GUI, same purpose: https://github.com/ninxsoft/Bombardier
Neither Brigadier nor Bombardier are being recognised in the terminal. It says “no such file or directory”.
I have resetted the Mac a few times and can’t seem to get out of the situation.
PLS HELP IM STUCK
Yes I’m having this same issue
When I have to split the file I write what is Nesscary but gives an error saying “wimlib-images split WIMFILE SPLIT_WIM_PART_1 PART_SIZE_MB {- – check}
Please help me in the step
Hi, thanks for the tutorial, I used the birgadier-main zip and it didn’t work, so I tried the Bombardier-main zip and when I wrote ./Bombardier into the code it said zsh: permission denied: ./Bombardier
Any advice?
This is very helpful
Hi does when I tried to execute brigadier with the command ./brigadier it gave me and import error each time does anyone know how to fix this issue
In case you’re struggling with the command-line for Brigadier. Have a look at Bombardier, which comes with a GUI, same purpose: https://github.com/ninxsoft/Bombardier.
Hello, I have been using Catalina patcher on an old MacBook 5,1 (alluminium Unibody, late 2008) for a few years now and it has been excellent so far. However Catalina is getting quite old and since I don’t want to use OCLP to upgrade to a new mac OS thinking it would be too heavy for this old Mac I tried to clean install Windows 10 on it, removing mac OS completely. I tried this guide and also created usb bootable drives with Unetbootin and Rufus with no success. The outcome was always the same. Mac booted from the usb drive and then got stuck. Could the APFS format of the internal hard drive be the problem? Any thoughts/suggestions?