
For some time now, Microsoft has been pretty intrusive about pushing the use of a Microsoft account on Windows-based PCs. Over the time, it became harder and harder to setup or upgrade Windows using a local account or even without internet access. Although having a Microsoft account could have its advantages, many people, including myself, prefer to make that decision on their own. In this post, I’ll explain, for the various Windows 11 versions like Home or Pro, how you can work around the need for a Microsoft account and how you can switch back to a local account in case you started using one already.
YouTube Video
If you are interested, I also created a YouTube video from this blogpost. If you prefer classic text, you can just follow the rest of this article:
Introduction
As mentioned above, Microsoft has been making it harder to create and use a local account on your Windows PC in the last years. This started with the release of Windows 8, which offered the option for the first time. At the time, there was a distinct option to choose for a local account after installing Windows. That option became more and more hidden in following releases to eventually even completely disappear on the Home edition. So far there are no plans in turning this evolution back. Even more, there are plans to remove the option in the Pro edition as well and even plans to avoid completing the installation without internet access.
Logging in with your Microsoft account, if you have one, allows you to synchronise settings between different machines and should give you the benefit of better integration with Microsoft’s services like OneDrive, Skype, Office 365, Cortana,… All of that results in sharing more of your data with Microsoft and having your data passing over the internet. Even if there might not be any bad intentions with the data, which I’m not so sure of, it somehow feels wrong. Another argument is security. As access to your own device can now suddenly be remotely controlled.
In the rest of this post, I’ll explain how you can avoid the need to create and use a Microsoft account when installing a fresh copy of Windows or using it for the first time. This includes the point where you are stuck in Windows Home, when there is no internet/network connectivity. In the second part, I cover how to add users with a local account and finally, how you can switch over to a non-Microsoft account user if you’re already using one.
Shortcuts to these parts:
- Avoid the need for a Microsoft account for a fresh installation
- Add additional local accounts
- Convert an existing Microsoft account user to a local account
Avoid the need for a Microsoft account for a fresh installation
After installing a fresh copy of Windows or if you first boot up your new PC, there is a wizard that pops up to complete the installation. After choosing a keyboard layout and offering you the option to connect to the internet (for Wifi), comes the question to create a user to be able to login to this PC.
Depending on the edition of Windows, this wizard looks a bit different and offers different options.
- Windows 11 Home with internet connection available
- Windows 11 Home without internet connection available
- Windows 11 Pro with internet connection available
- Windows 11 Pro without internet connection available
Windows 11 Home with internet connection available
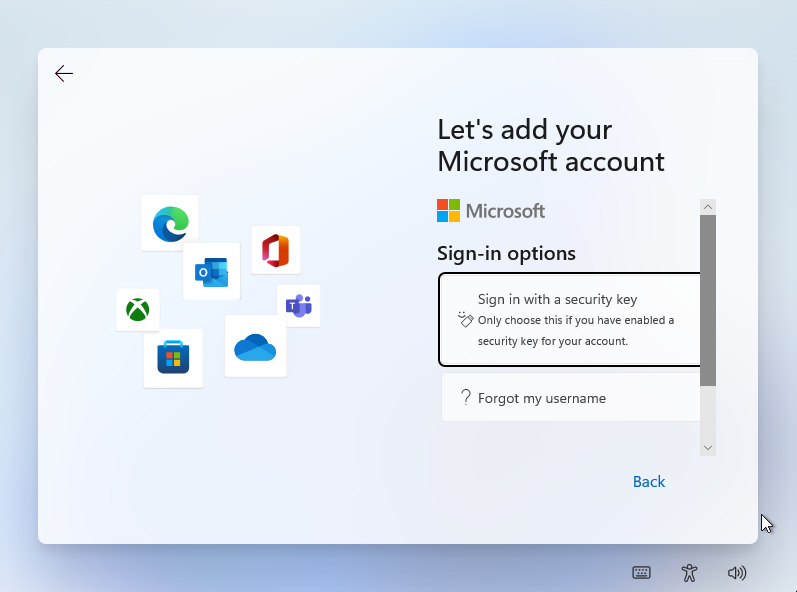
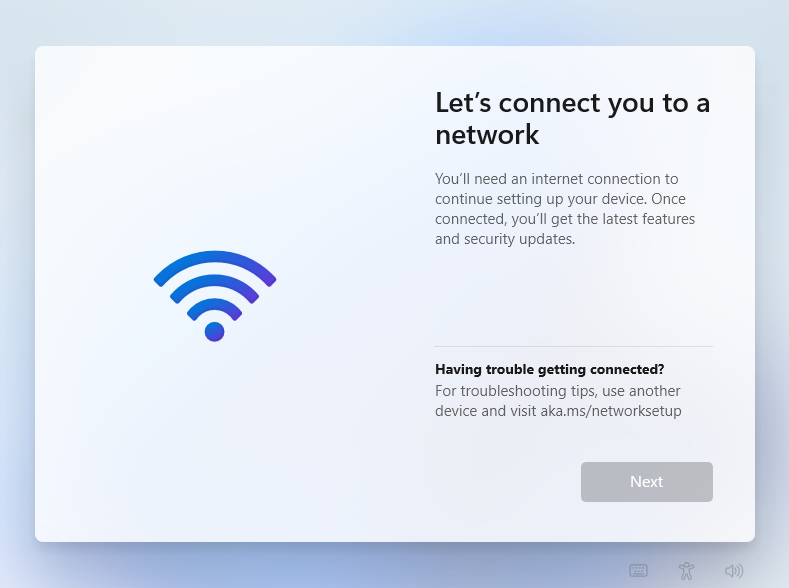
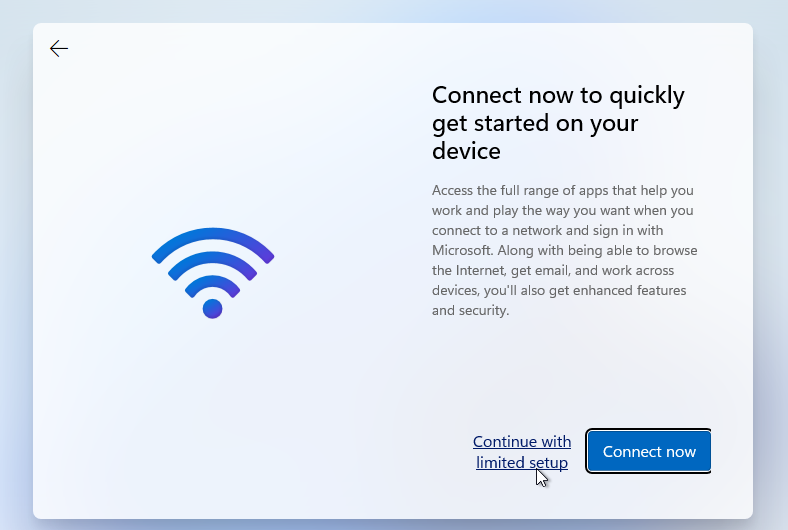
When there is an internet connection available, either because you have connected to Wifi or because you have internet using a cable connection, you will not see any option to avoid creating a Microsoft account or logging in to an existing one:
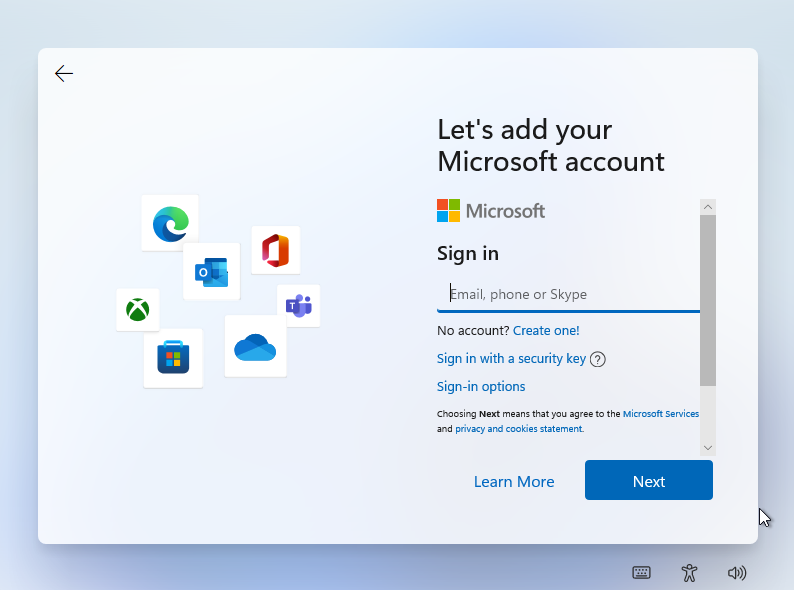
Clicking on “Sign-in options” displays the following and there no option to create a local account either:
To work around this, we need to disconnect the computer from the internet.
Option 1 is to simply disconnect the network cable, then skip the next step (about the command prompt) and continue further (click the previous button in the wizard).
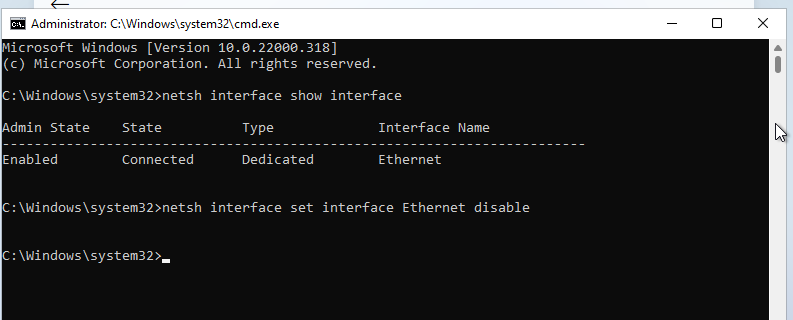
Option 2 is to disable the interface. This is the only option when you connected to wifi (for example a laptop). For this, we need to open a command prompt and disable the network interface. To do so, press Shift + F10. If all goes well, you should see a command prompt pop up as you see below. On some laptops, this might be Shift + Fn + F10.
In the command prompt, type the following to list the interfaces known to the system:
netsh interface show interface
Then disable the interface connecting you to the internet with:
netsh interface set interface <name> disable
So in my example, the name of the interface was Ethernet:
After these steps, close the command prompt window.
Now that the interface is either disconnected or disabled, press the back button in the wizard:

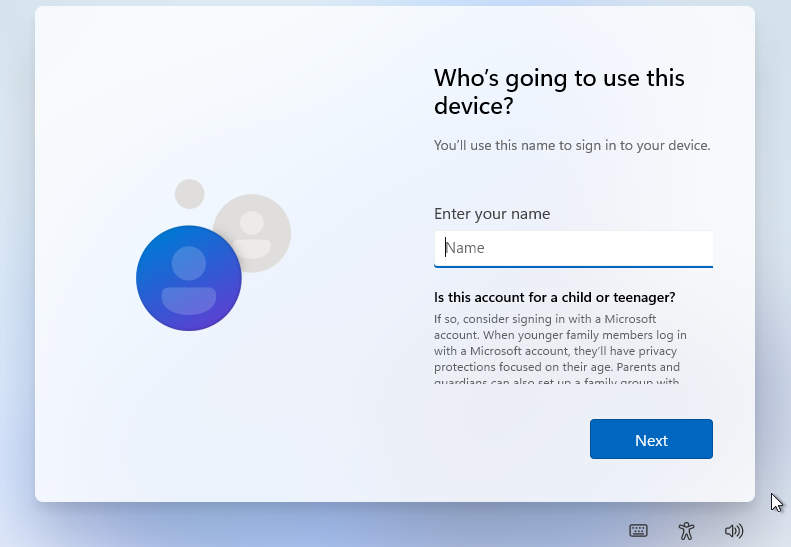
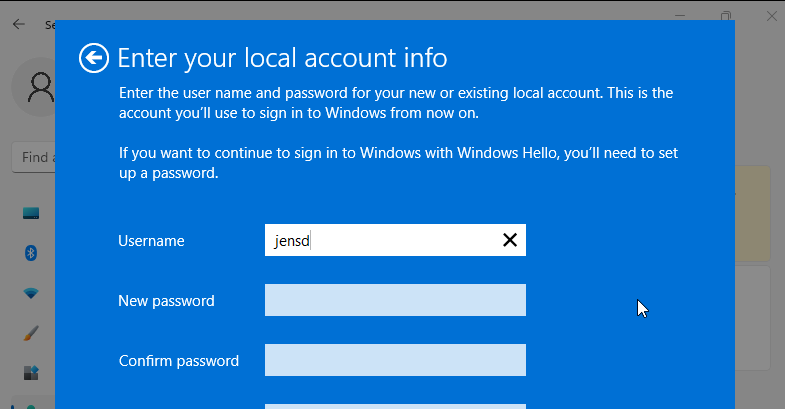
If all goes well, after some thinking, the wizard should display you the following and will allow you to create a local user:
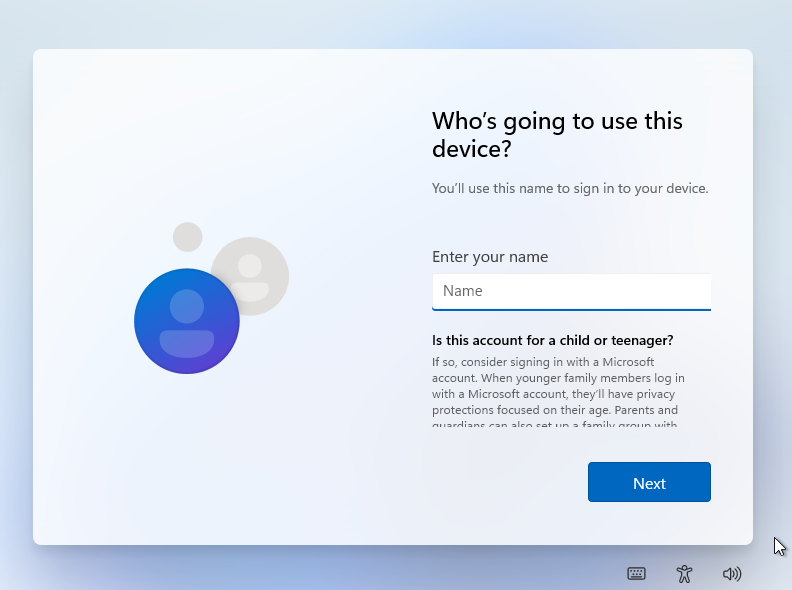
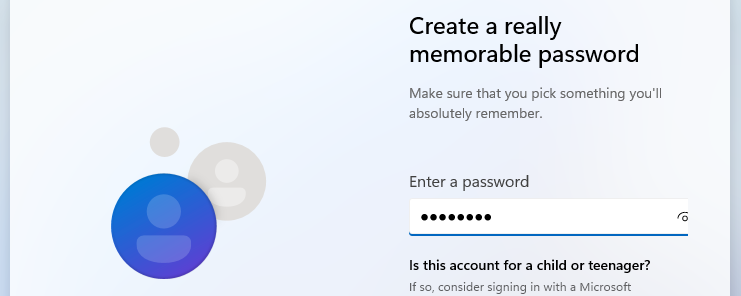
After entering the user ID, you can choose to set a password. I prefer to do this later using Ctrl + Alt + Del to avoid the need to answer the mandatory security questions in the wizard.
After this step, there will be a few additional questions like the mentioned security questions, and privacy related settings like location sharing, data sharing, advertising ID,…
After completing the steps, the rest of the installation takes place:

Once everything completes, you should end up with your fresh Windows 11 desktop.
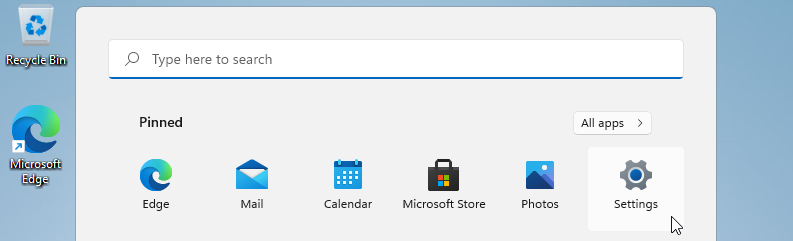
Now the last thing to do, is to re-enable that network interface which we disabled during the wizard. If you chose to disconnect the cable, you can simply reconnect it and you are done.
If you disabled the interface using the command prompt, click the start menu and go to Settings:
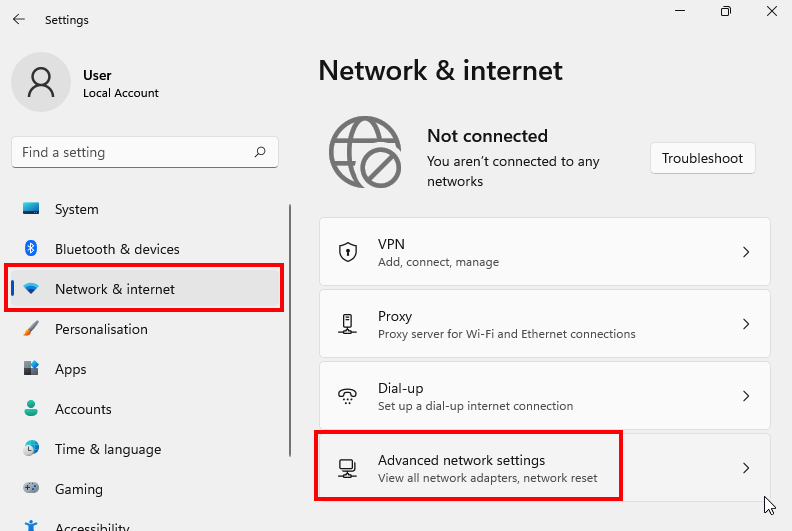
In the menu, choose Network & Internet and then go to Advance network settings:
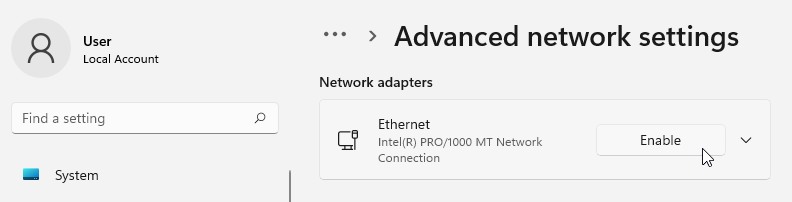
Here, click Enable on the adapter that you disabled earlier using the command prompt:
That’s it, you now have successfully avoided the mandatory Microsoft account:
Windows 11 Home without internet connection available
When there is no internet connection available (cable disconnected, no recognised interface or no Wifi access point chosen in the wizard’s first steps), you get to see the following:
This means that you are completely stuck with setting up this machine. Even if there is a network card with a valid connection but Windows does not have a driver for it, you are not able to continue. Talking about being pushy…
The workaround here again involves opening the command prompt. To do so, press Shift + F10. If all goes well, you should see a command prompt pop up as you see below. On some laptops, this might be Shift + Fn + F10.
In the command prompt, type the following:
OOBE\BYPASSNRO
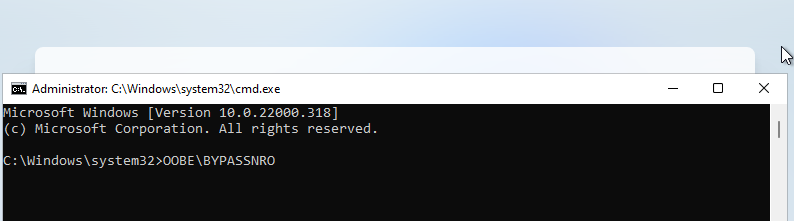
Once you press enter, the system will immediately restart:

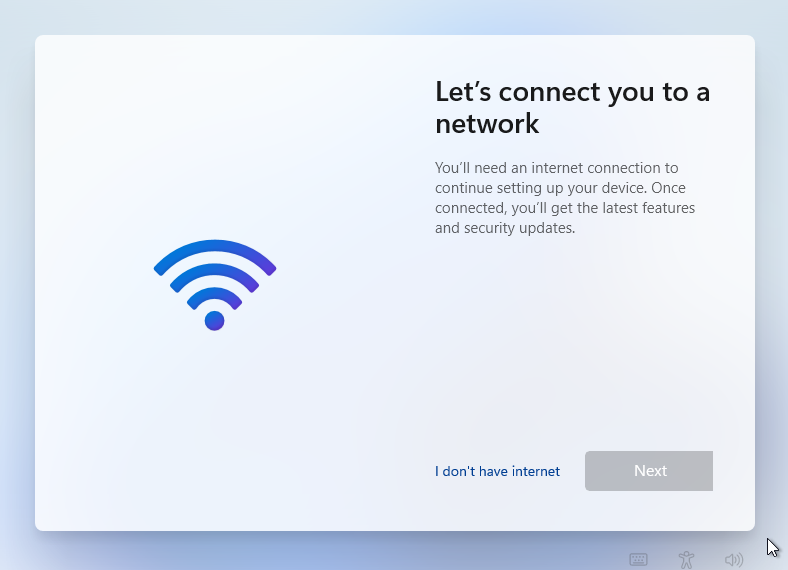
After that, the wizard restarts from the beginning and you will need to reselect your country and keyboard layout. If you previously skipped the wifi setup, do so again. After those first steps, you will now see that there is an additional option: “I don’t have internet” available:
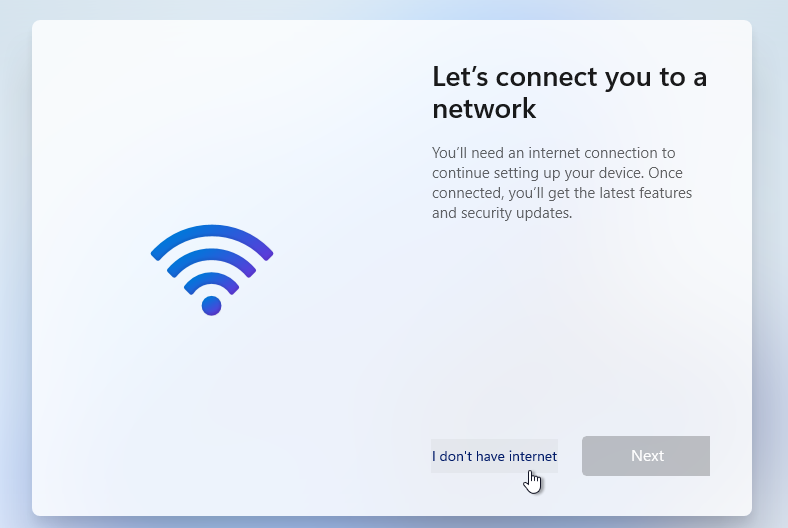
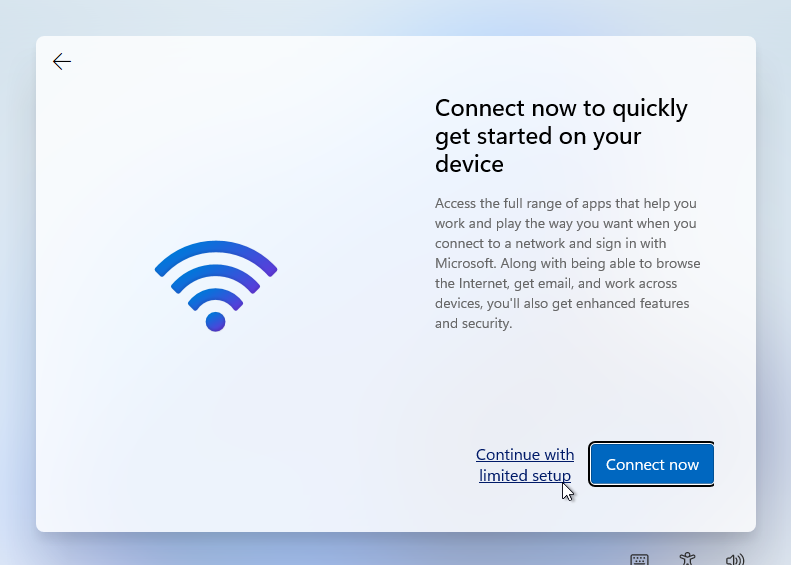
After clicking it, you get another warning, which you can skip by clicking “Continue with limited setup”:
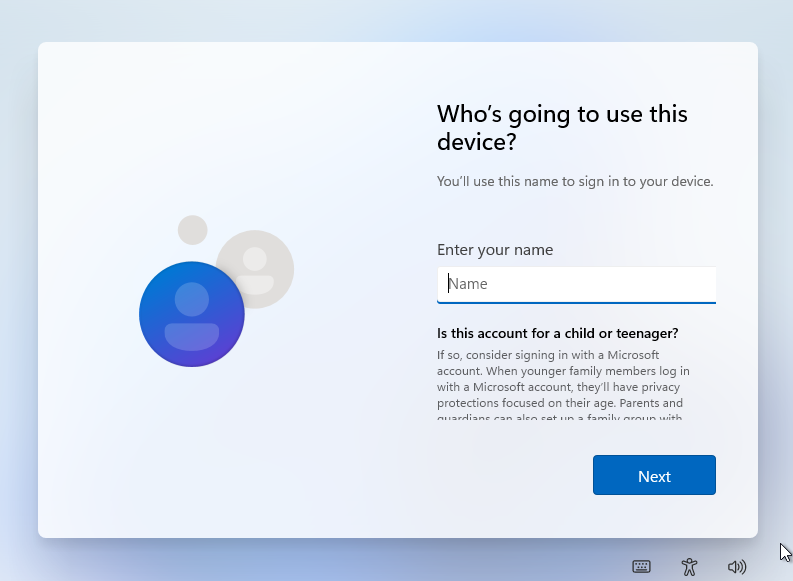
Going through these steps, should present you now with the option to create a local account:
After completing the rest of the wizard, you can just reconnect your cable or connect to wifi without issues.
Windows 11 Pro with internet connection available
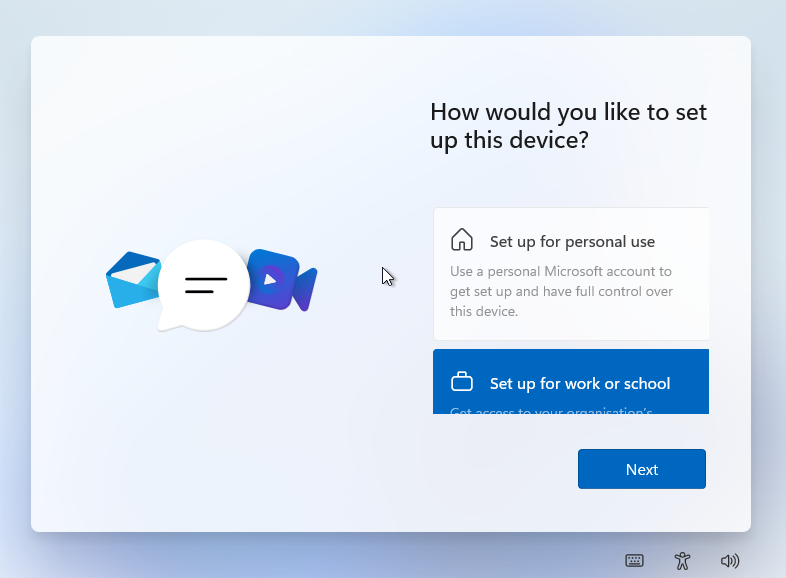
For the Windows 11 Pro edition, at least for the time being, you can avoid the need for a Microsoft account out of the box. The option to do so is hidden pretty well but doesn’t require any workaround like is the case for the Home edition.
When an internet connection is available, the wizard gives you the option to choose to “Set up for personal use” or “Set up for work or school”. The first option only allows you to do this using a Microsoft account. The second one: “Set up for work or school” gives you more options, so choose that one:
In the next screen, you will see that the first option is to log in to a Microsoft account. Here, choose “Sign-in options”:
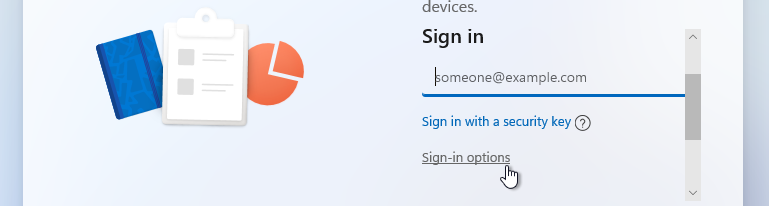
Next, although this is not clear at all, choose to use “Domain join instead”:
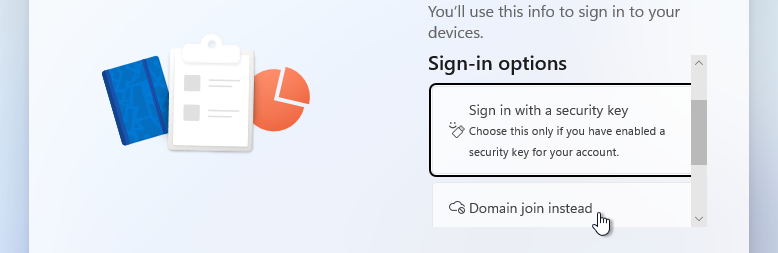
Although that option suggest that you will need to enter a domain account, this is not the case and you are just creating a local account instead…
Once completed, you can just click your way through the rest of the wizard and you will end up with a local user account.
Windows 11 Pro without internet connection available
When there is no internet available at the time the wizard is displayed, in contrast with the Home edition, here you see the option by default to choose “I don’t have internet”:
After choosing that, you get an additional warning where you can choose “Continue with limited setup”:
In the next screen, you get to create a local user account without further issues:
Once completed, you can just click your way through the rest of the wizard and you will end up with a local user account.
Add an additional local user
So far, the article is only covering how you can avoid the need for a Microsoft account during initial setup. Once you managed to get past this and avoided the MS account trap, you can add additional local accounts without too much hassle.
Go to Start – Settings – Accounts and choose Family and other users:
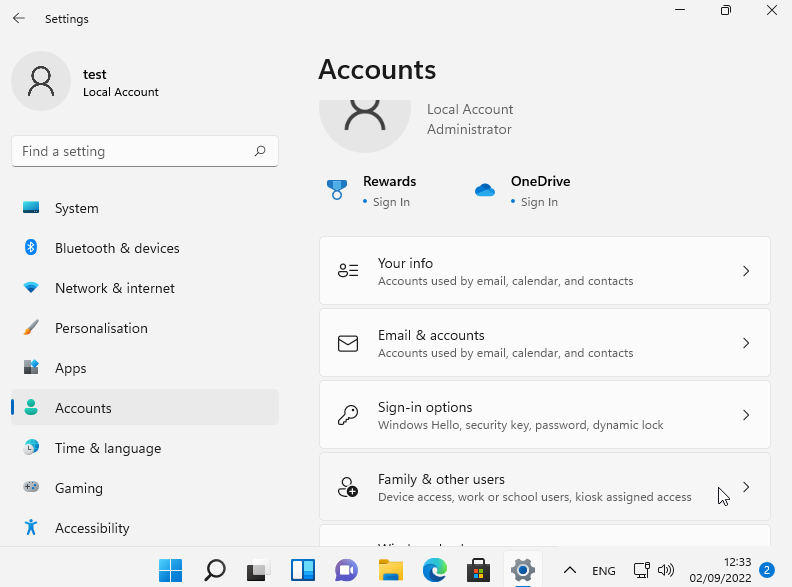
In the next screen, choose Add account:

As expected, you are encouraged to supply the Microsoft account login but here you can click “I don’t have this person’s sign-in information”:
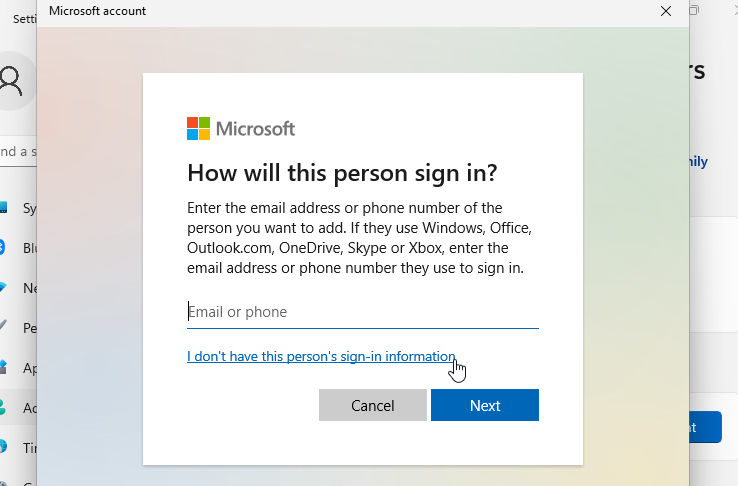
Then choose for “Add a user without a Microsoft account”:
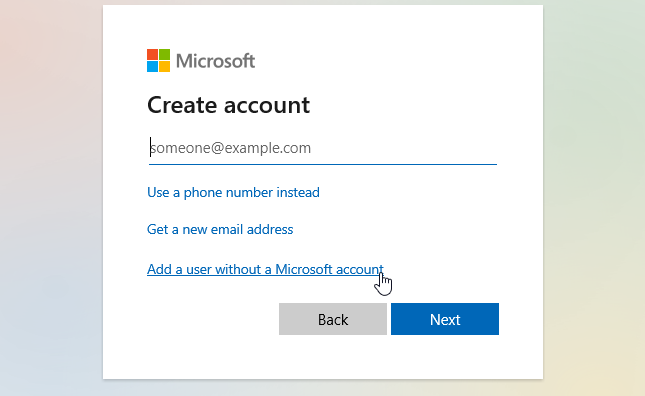
Eventually, you can supply the username and password for that additional user:
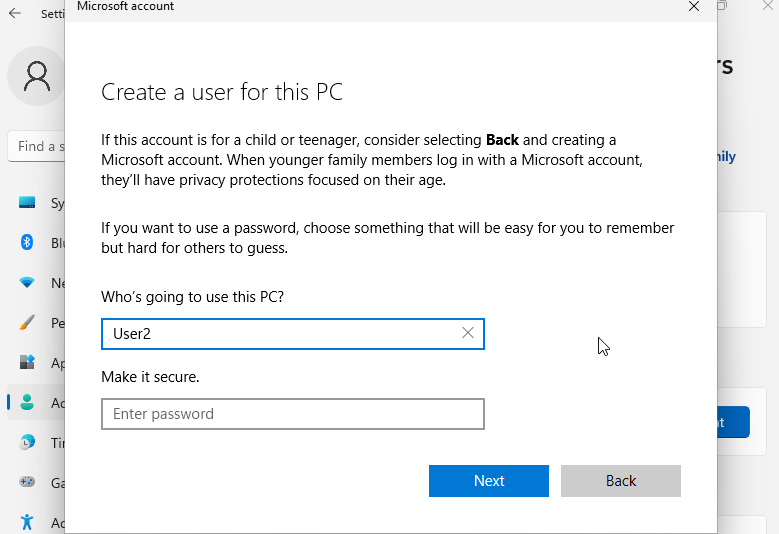
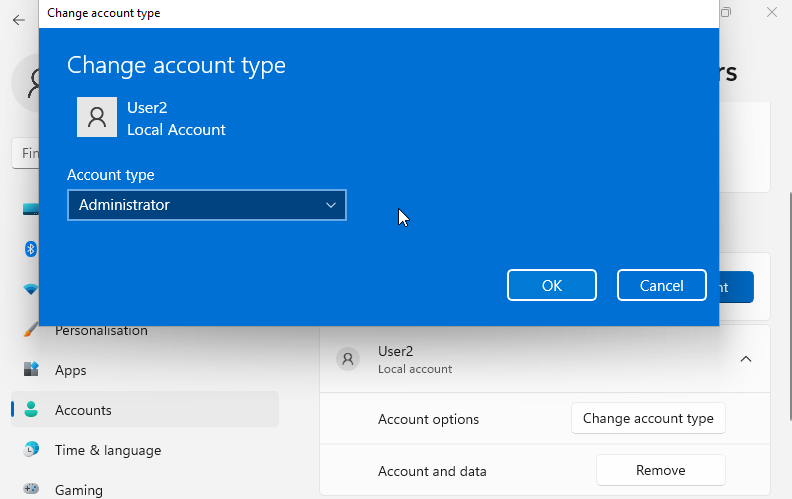
If you like, after creating the local account, you can also change the account type to Administrator. This can be done by clicking on the account (User2 in my example), followed by “Change account type”:
Converting your current Microsoft account user to a local user account
In case you didn’t manage earlier to bypass the need for a Microsoft account or you figured it would be a good idea, you can switch back that user account to a local account. Fortunately, Microsoft did not make this too hard to accomplish.
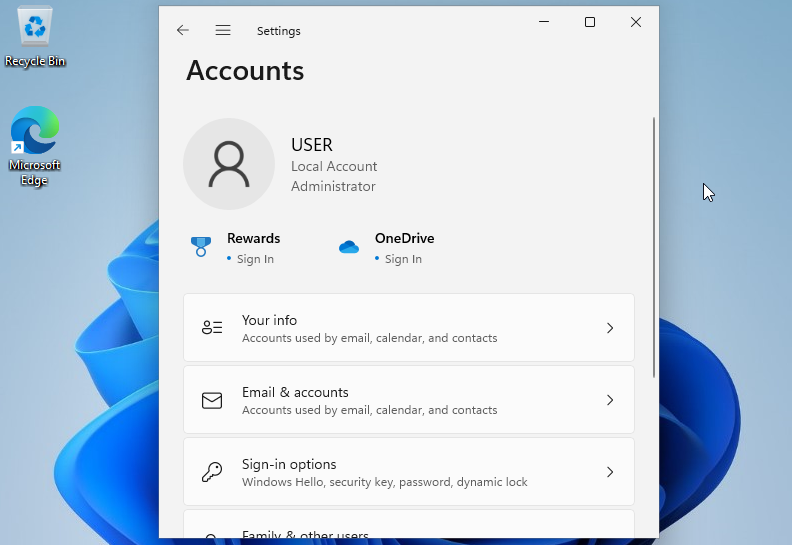
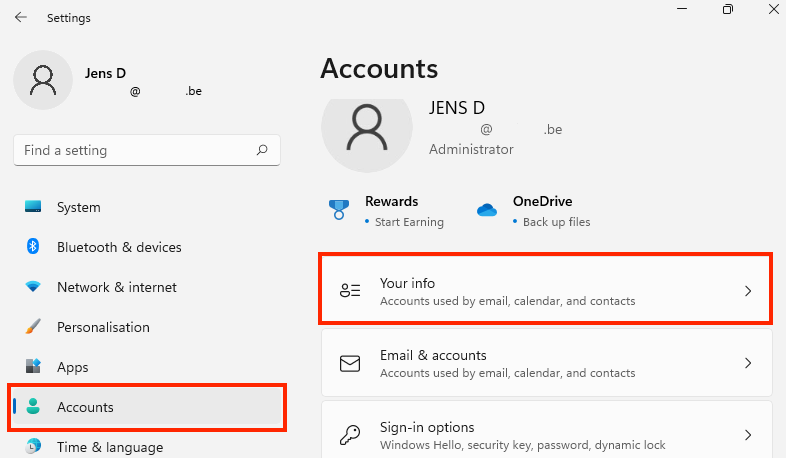
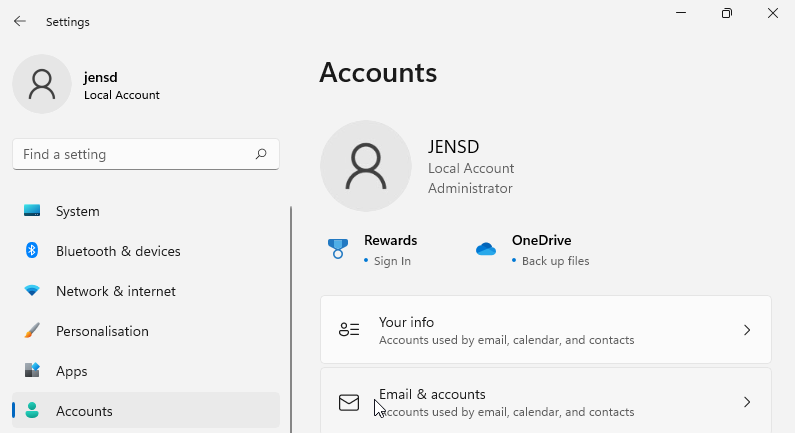
The first step is to login to the PC using the Microsoft account and then navigate to Start – Settings – Accounts and then click on “Your info”:
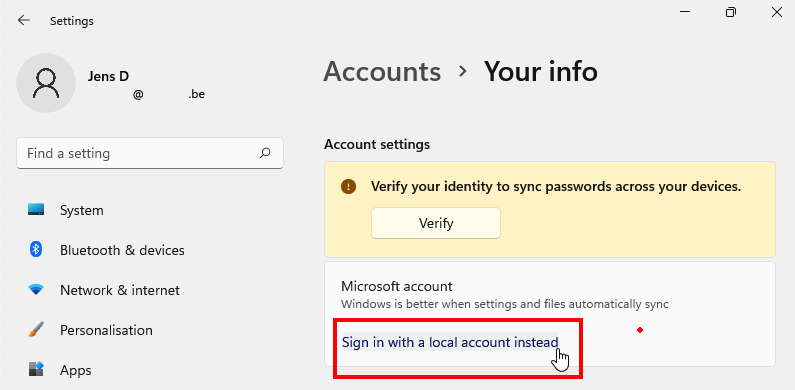
In Your info, scroll down to the Microsoft account section and click on “Sign in with a local account instead”:
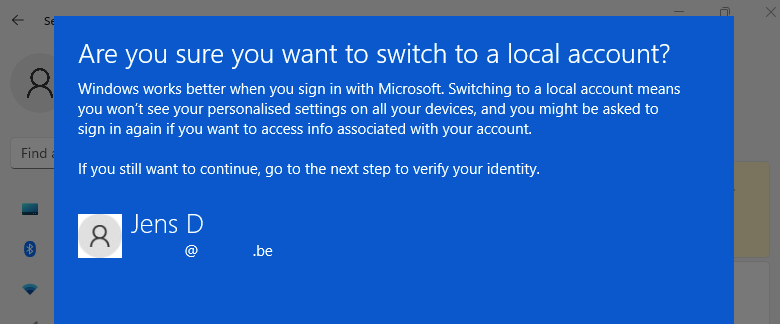
Then, in the dialog, confirm that you want to switch this account to a local user:
After clicking next, you need to provide a username and (optional) password to use for this user:
If all goes well, you will be logged out and you can log back in with your freshly converted local account:
This is not right Microsoft if you force me to have internet well the you need to pay for said internet I want my money back for you falsely lead me to think I was buying a product I could use as I see fit then I get it home to set it up and I can only do that if I have internet hummmm sounds a bit fishy give me around $500.00 back I will produce the receipts oh yeah you need to reimburse me on my printer also useless without a computer so dis appointed in the way we the people are getting treated SAd so sad
Pingback: Install Windows 11 on a Mac Pro 1,1 or 2,1 | Jensd's I/O buffer
Ok
It took about 30 minutes of trying different things listed here but it finally worked. Much appreciated. Why does Microsoft insist on seeing exactly what I’m doing?
Microsoft se toenemende dwang om een onlineaccount te gebruiken bij Windows-installaties kan worden gezien als een beperking van de digitale autonomie van gebruikers, aangezien niet iedereen zijn persoonlijke gegevens voortdurend aan cloudservices wil koppelen.