Since a few weeks, Microsoft has released their 22H2 update. This update has some new features and bugfixes. With the introduction of Windows 11 also came some restrictions on supported hardware. Like the need for a fairly recent CPU, TPM 2.0 and secure boot. The 22H2 update seems to change some things that could prevent to work around the hardware checks. The original method to upgrade from Windows 10 to 11 on unsupported hardware is no longer working and also on Windows 11 installations that used any of the workarounds to overcome the hardware check, the 22H2 update will most likely not be offered through Windows update. In this article I will describe alternative and how to still upgrade Windows 11 22H2 on unsupported hardware, either running already on Windows 11 or from Windows 10.
Update for Windows 11 25H2
As Microsoft released their 2025 update of Windows 11 by now, the instructions to upgrade to the latest (25H2) version are different. I documented these in a separate post which you can find over here:
Below you can find the article for 23H2 as reference but keep in mind that some things might no longer work since 25H2 is released.
YouTube Video
If you are interested, I also created a YouTube video from this blogpost. If you prefer classic text, you can just follow the rest of this article:
For the upgrade from Windows 10 to Windows 11 22H2:
For the upgrade from an existing Windows 11 install to Windows 11 22H2:
Introduction
If you would be looking to do a fresh install or dual boot, the original workaround still works for the 22H2 version. I did an extensive article on that which you can find here: https://jensd.be/1472/windows/install-windows-11-on-unsupported-hardware.
The workaround that I will explain here works for both upgrading from Windows 10 or to upgrade to Windows 11 22H2 on an unsupported system that is already on Windows 11.
From Windows 10
If you’re currently on Windows 10, home or pro, You will probably see a message in Windows update about upgrading to Windows 11. The PC health check application can be used to find out if that is possible and gives more details. For example, on a Dell OptiPlex 9020, which I will use for the rest of the article, it tells us that this machine does not have a supported CPU, no TPM 2.0 and no secure boot.

When trying to run the upgrade from the installation media for Windows 11, it basically tells us the same thing and we are not able to continue.

From Windows 11 where the 22H2 update is not being offered
If you are already on Windows 11 and do not get the update to 22H2 offered, for example because you worked around the hardware checks for an unsupported system, the chance is high that the upgrade to 22H2 is never shown in Windows Update.
For example, on my Dell Optiplex 9020, which has unsupported hardware, I do not get to see the 22H2 update:

Windows Update tells me everything is up to date and there are no optional updates available either:

Solution
The solution to this is to use the installer from the ISO to upgrade to 22H2. Obviously, we will need to work around the hardware check that is part of the installer.
To work around this in the past, we could simply delete a file, called appraiserres.dll from the installation media and there would not be any hardware check. With the 22H2 release, this method no longer works and if you try to use it, you would see the following.
Fortunately, it’s not very hard to fix this. The only difference in the procedure is that we now will need to replace the file with a version that is always telling that the hardware is fine, rather than removing it.
This method works for both Home and Pro. After upgrading, if you had an activated system, the new version will be activated as well.
Step 1) Get the Windows 11 ISO
To start, we need to download the Windows 11 22H2 ISO. You could simply download the ISO from Microsoft’s website but this can lead to a mismatch with the language version of your original Windows installation. By using the Media Creation Tool instead, it will detect the correct version and there is more chance for success.
On the Microsoft Windows 11 download page, which you can find here: https://www.microsoft.com/en-us/software-download/windows11, click on Download now in the Create Windows 11 Installation Media section:

Once downloaded open the file from your Downloads folder:

Accept the licensing terms and leave the recommended version as is selected automatically. As mentioned this prevents a language mismatch which would not allow you to keep your files during the upgrade:

In the next screen, Choose to download the ISO file rather than creating installation media and save it in your Downloads folder as well:

Let the tool do the rest of the work and once completed, click Finish:

Step 2) Apply the workaround
Now that we have the ISO downloaded with the Media Creation Tool, navigate to where you decided to save the ISO file. We can now mount this ISO by simply double-clicking on it:

As you can see, this creates an extra virtual DVD drive on this computer representing the ISO file which we downloaded.
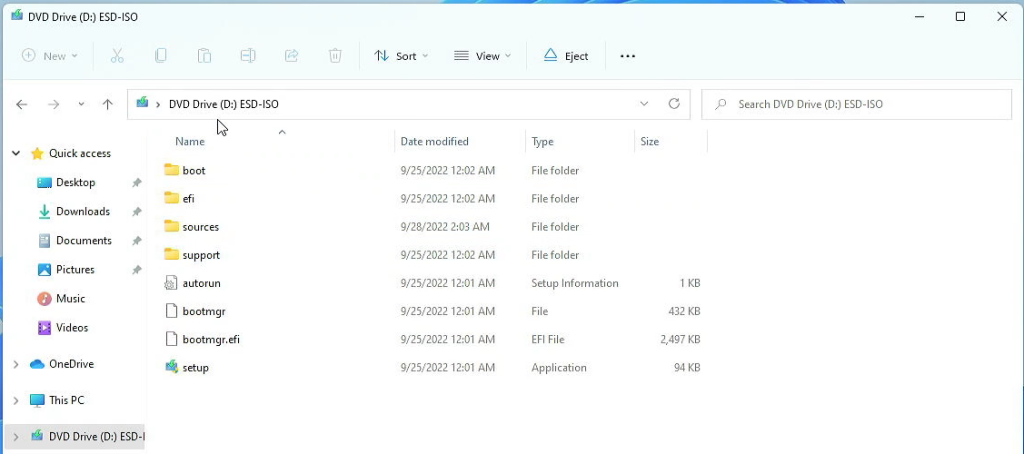
Since we need to replace a file here we will first need to copy all of the contents of the mounted ISO to a new folder on the desktop. First create that folder, I’ll call it 22H2:
Then we can, from the DVD drive, select all files and copy them in the 22H2 folder on the desktop:
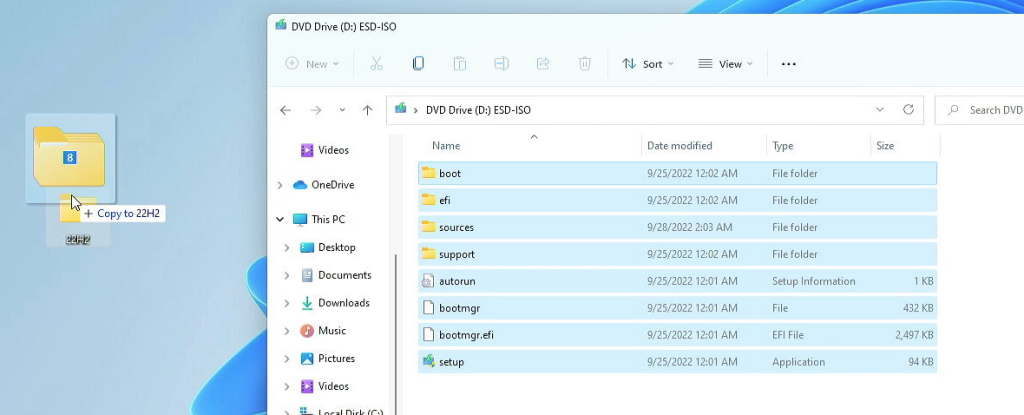
Since we have a copy, we no longer need the ISO so we can right click on the virtual DVD drive and choose Eject. If you’re short on space you can now also delete the file from your Downloads folder:

At this point we need to replace the appraiserress.dll file, this file is located in the sources folder and it is responsible for the hardware check.
You can download the modified version of this file from here: https://jensd.be/download/appraiserres.zip. Once you have downloaded the zip file with the modified appraiserress.dll, open it and simply drag it into the sources folder:
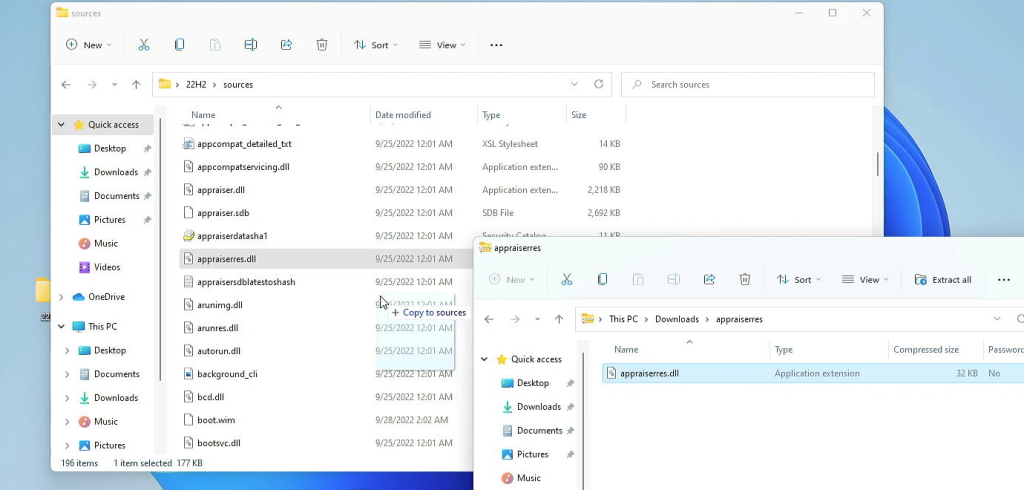
Then confirm that you want to replace it:

To double-check, make sure that the file size in the sources folder is now 192 kilobytes:
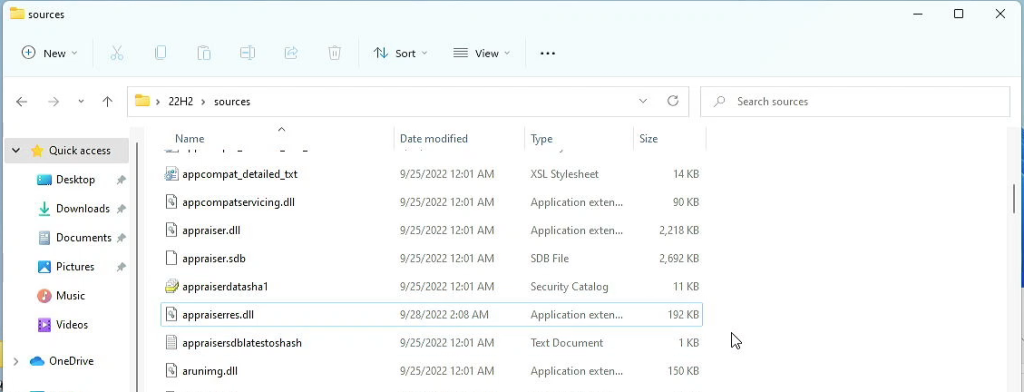
That’s all we had to do to apply the workaround to the installer and we’re ready to start installing the upgrade.
Step 3) Upgrade to Windows 11 22H2
All preparation is done at this point and now we can just launch setup.exe from the 22H2 folder:
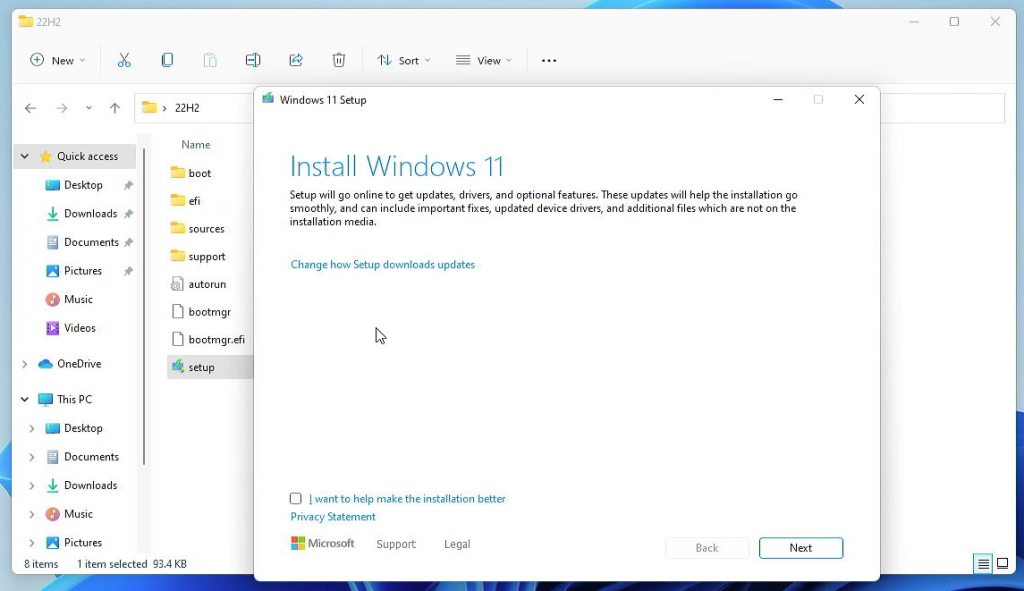
In the first step, make sure to disable any updates as that might undo the replaced file. To do so, go to “Change how Setup downloads updates” and check “Not right now”:

If this doesn’t work or you want to be very sure, you can also disconnect the cable or disconnect from wifi.
The rest of the steps should be pretty straightforward. Accept the licensing terms and if all goes well, you should see the following screen. Click Install to continue with the upgrade:

Once you do, the upgrade will take place and your current installation will become Windows 11 22H2 not important if you started this from Windows 10 or already from Windows 11.

This takes a bit of time and one or more reboots, I think it was around 15 minutes on my Dell OptiPlex 9020. If your user is password protected, you will need to log in at some point.

Eventually if all goes fine, you should be greeted with your trusty desktop but this time running Windows 11 22H2. About this PC shows us clearly that we are on Windows 11 22H2, still on the same unsupported hardware:
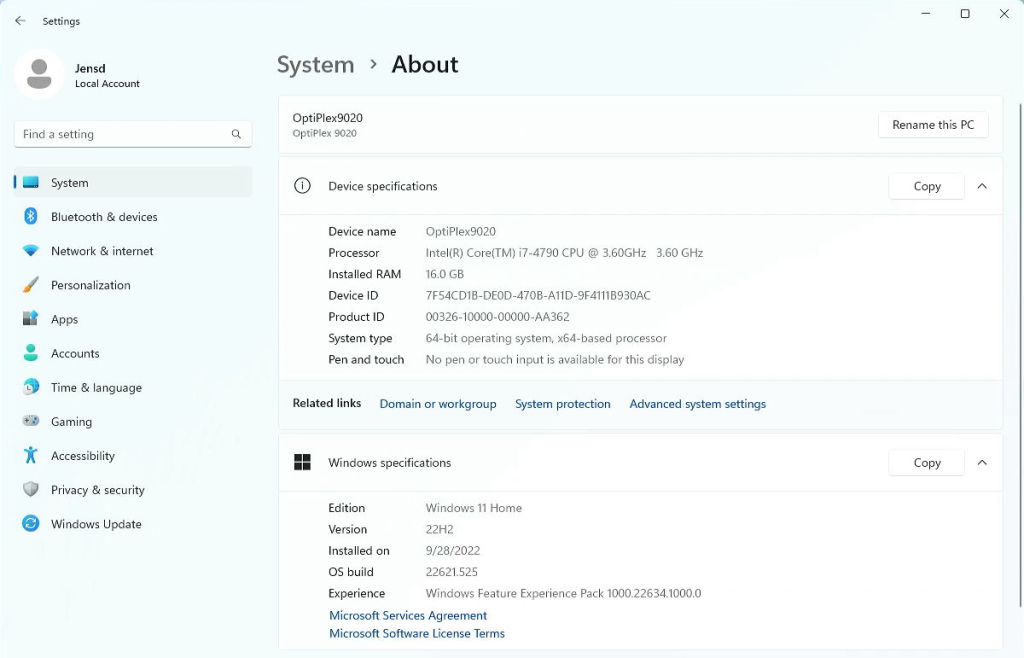
As I mentioned in the beginning, the installation stays activated as it was:

And in case you would be curious, updates seem to work fine as well. Probably until the next big feature update, which time will tell:

Step 4) Cleanup
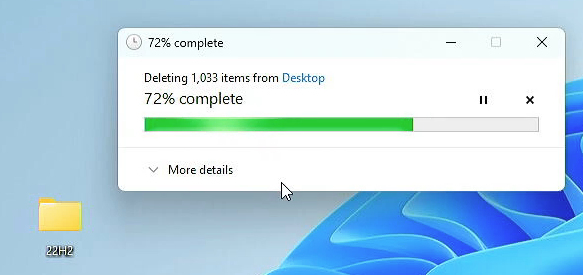
At this point you can also safely delete the folder that we created from the desktop:
Hope this post can help you to upgrade to Windows 11 22H2.

Pingback: Install Windows 11 on unsupported hardware | Jensd's I/O buffer
Hi, I tried your 22H2 upgrade but am still getting the message that states “it looks like you are unsupported ….” Has the 22H2 changed since you created this work around?
Thanks,
Jim
This was tested just yesterday, so I doubt it changed. Microsoft typically does not update their installation media but rather relies on Windows Update to provide updates.
Are you sure you have replaced the file correctly and started the upgrade from the copied files and not the mounted ISO?
I can’t run the setup.exe file when copying it to my disk
Did you copy all files?
Yes, literally everything there is to select, but it keeps telling me “Failed to launch the setup application”
Had similar problems trying to do the update. I initially allowed it to check for updates and it failed. Tried that a couple times. Then I tried to run it without updates but I noticed it was checking for updates anyways. Realizing that I disabled the network interface card on my VM at which point it got past the checks and continued the install.
Just followed your guide for a straightforward upgrade ob my Dell Latitude 7250. Many thanks!
Everything works perfectly. Thank you man!
Thank you, very helpfull!
Everything worked as you said except it starts to install and then kicks out at about 22 percent??
Any suggestions would be appreciated.
Thanks
Works fine on Windows 11 ver. 21H2 Pro, but not on 21H2 Enterprise.
Any ideas?
Is it possible you can create a DLL file for Enterprise edition too in the (hopefully immediate) future?
No experience with enterprise so far. Haven’t really worked with that edition.
ur using win11 home, mine using win11 pro 21h2 can i use ur method to upgrade 22h2 pro version
Sure, this method works in the same way for home and pro. It will keep the version that is already installed.
It’s not true, I did the uograde exactly the same way and I’ve got home edition instead of pro now.
Worked for enterprise for me!
Hi,
I downloaded the ISO and replaced the DLL file, disabled updates, wifi, all networks and I am getting “We can’t tell if your PC is ready to continue installing Windows 11. Try restarting Setup.
same here, hope we get a solution soon
Me too!
Thanks for sharing this article. I have successfully uipgraded to 22H2 with an unsupported CPU.
I can confirm that this also works by choosing USB flash drive instead of ISO. I simply replaced the appraiserres.dll file and startet the the upgrade.
Jens, it does not work, I get the same message as the first poster here…
Any idea? Correct dll is in place…
Same with you. I replaced but cannot pass to installation.
Hi Jens,
I does not work, did everything correct. Any idea? I get the same message as poster nr. 1 gets.
Hi Jens,
And now it SUDDENLY does work, bizar. Thx.
I’m sorry, I got one screen further, it does NOT work… any idea?
How did your initial install look like? Was it a fresh install of Windows 11 or upgrade? And with which method?
Seems some people are having the message “We can’t tell if your PC is ready to continue installing Windows 11” and I’m trying to find out what could be the cause of this.
Bedankt Jens,
Werkt perfect!
I got the same issue, after replacing the DLL, I got to the step which ask me to accept the license. Then I got the “We can’t tell if your PC…” message after clicking the accept button on the license page.
My desktop originally has win 10 pre-installed and I upgraded it to win 11 by modifying the Registry.
Could you try to remove the added registry key (most likely you mean AllowUpgradesWithUnsupportedTPMOrCPU in HKEY_LOCAL_MACHINE\SYSTEM\Setup\MoSetup) and re-run the setup?
Would be interesting to have the ability to play around with a system that shows this message.
Or at least see what the logfiles of the installer say. They are in C:$WINDOWS.~BT\Sources\Panther\ setupact.log and setuperr.log
If possible to send these to me, that would be helpful.
Hi Jens,
looks like the downloaded appraiserres.dll has invalid format (error C1). The errors in setuperr.log are like:
2022-10-08 12:20:31, Error CONX Windows::Compat::Appraiser::Utilities::ExtractResourceToFile (675): Could not LoadLibrary to resource: [193].[gle=0x800700c1]
2022-10-08 12:20:31, Error CONX Windows::Compat::Appraiser::SetupAppraiser::InitializeData (1640): Failed to extract data file resource: [0x800700c1].[gle=0x800700c1]
Also, dumpbin fails to dump the DLL saying it is a MS_DOS executable. dumpbin on the original DLL works as expected. When the DLL is deleted instead of replaced the error is at the same place but changes to error code 2, which is file not found.
Thanks, Jan
Looks like the main thing is that there should be a file (I read that an empty file works just fine as well).
No file -> fails
Any file that doesn’t return the hardware as incompatible -> works
this solution worked.thanks
I removed this registry key and still the same error..
There is some information around the Net to use zero byte length appraiserres.dll and disconnect from network and nope, it doesn’t work.
I’m thinking maybe this bypass doesn’t work with machines without any kind of tpm module like my old zotac mini pc I’m trying to upgrade? Maybe this works for machines with at least tpm 1.2 installed…
2022-11-28 00:53:09, Error CONX Appraiser: ERROR,SdbpGetManifestedMergeStubAlloc,1017,SdbpGetMergeSdbsDisabled failed [c0000034]
2022-11-28 00:53:21, Error MOUPG CDlpResponseImpl<class CDlpErrorImpl<class CDlpObjectInternalImpl<class CUnknownImpl > > >::CheckUserInterrupt(1788): Result = 0x800704D3
2022-11-28 00:53:21, Error MOUPG CDlpResponseImpl<class CDlpErrorImpl<class CDlpObjectInternalImpl<class CUnknownImpl > > >::Execute(1924): Result = 0x800704D3
2022-11-28 00:53:21, Error MOUPG CDlpActionImpl<class CDlpErrorImpl<class CDlpObjectInternalImpl<class CUnknownImpl > > >::ExecuteResponse(1371): Result = 0x800704D3
2022-11-28 00:53:21, Error MOUPG CDlpActionCompat::ExecuteSysReqScan(809): Result = 0x800704D3
2022-11-28 00:53:21, Error MOUPG CDlpActionCompat::ExecuteRoutine(638): Result = 0x800704D3
2022-11-28 00:53:21, Error MOUPG CDlpActionImpl<class CDlpErrorImpl<class CDlpObjectInternalImpl<class CUnknownImpl > > >::Execute(493): Result = 0x800704D3
2022-11-28 00:54:03, Error CONX Appraiser: ERROR,SdbpGetManifestedMergeStubAlloc,1017,SdbpGetMergeSdbsDisabled failed [c0000034]
2022-11-28 00:54:07, Error MOUPG CSetupResponseTemplate::OnCancel(238): Result = 0x800704C7
2022-11-28 00:54:07, Error MOUPG CSetupResponseTemplate::ExecuteRoutine(143): Result = 0x800704C7
2022-11-28 00:54:07, Error MOUPG CDlpResponseImpl<class CDlpErrorImpl<class CDlpObjectInternalImpl<class CUnknownImpl > > >::Execute(1923): Result = 0x800704C7
2022-11-28 00:54:07, Error MOUPG CDlpActionImpl<class CDlpErrorImpl<class CDlpObjectInternalImpl<class CUnknownImpl > > >::ExecuteResponse(1365): Result = 0x800704C7
2022-11-28 00:54:07, Error MOUPG CDlpActionCompat::ExecuteSysReqScan(809): Result = 0xC1900201
2022-11-28 00:54:07, Error MOUPG CDlpActionCompat::ExecuteRoutine(638): Result = 0xC1900201
2022-11-28 00:54:07, Error MOUPG CDlpActionImpl<class CDlpErrorImpl<class CDlpObjectInternalImpl<class CUnknownImpl > > >::Execute(493): Result = 0xC1900201
2022-11-28 00:54:07, Error MOUPG CDlpTask::ExecuteAction(3300): Result = 0xC1900201
2022-11-28 00:54:07, Error MOUPG CDlpTask::ExecuteActions(3454): Result = 0xC1900201
2022-11-28 00:54:07, Error MOUPG CDlpTask::Execute(1631): Result = 0xC1900201
2022-11-28 00:54:07, Error MOUPG CSetupManager::ExecuteTask(2928): Result = 0xC1900201
2022-11-28 00:54:07, Error MOUPG CSetupManager::ExecuteTask(2891): Result = 0xC1900201
2022-11-28 00:54:07, Error MOUPG CSetupManager::ExecuteInstallMode(998): Result = 0xC1900201
2022-11-28 00:54:07, Error MOUPG CSetupManager::ExecuteDownlevelMode(569): Result = 0xC1900201
2022-11-28 00:54:08, Error MOUPG CDlpTask::Cancel(982): Result = 0xC1800104[gle=0x00000003]
2022-11-28 00:54:08, Error MOUPG CDlpTask::Cancel(986): Result = 0xC180010A[gle=0x00000003]
2022-11-28 00:54:08, Error MOUPG CDlpTask::Cancel(982): Result = 0xC1800104[gle=0x00000003]
2022-11-28 00:54:08, Error MOUPG CSetupManager::Execute(313): Result = 0xC1900201
2022-11-28 00:54:08, Error MOUPG CSetupHost::Execute(454): Result = 0xC1900201
Tried with modified file and regedit hack removed. Any other workaround?
Seems some people are having the message “We can’t tell if your PC is ready to continue installing Windows 11” and I’m trying to find out what could be the cause of this.
Indeed. And I’m in the same situation as the last poster Wei. Updated via the Mediacreationtool ( I thought, lol). I will check after work, and remove also the MoSetup folder AND Labconfig with the 3 bypass entries? (bypass TPM, mem, CPU)?
Jens, nogo: setuperr.log is empty.
En setupact.log staat niet veel in.
2022-10-08 01:12:31, Info UI Determining whether we should run ConX or legacy setup
2022-10-08 01:12:31, Info UI Will launch ConX setup experience
2022-10-08 01:12:31, Info UI Initializing Media class driver for audio support
2022-10-08 01:12:31, Info UI Initializing media class driver status: 126
2022-10-08 01:12:31, Info UI Launching ConX setup experience
2022-10-08 01:12:31, Info UI Inspecting ConX Setup Cmdline
2022-10-08 01:12:31, Info UI Launching F:\Sources\SetupPrep.exe /auto upgrade /eula accept /compat ignorewarning /priority normal
I have had success on two old machines. Thank you so very much for your work.
The level of maintenance required any more is just all consuming.
Not that it will work for everyone but…..
I just downloaded the ISO using Rufus paying attention to matching languages then using
ISOUltra I inserted your file replacing the original and saved out to a new .iso file.
Using this new .iso file I mounted it from within WIN11 and launched setup.exe in Admin mode.
KerPow! and I’m off to the races.
One machine is an old Z270 I5 machine.
Again… Thank you so very much.
Thanks Bud, worked as described!!
Pingback: วิธีทำให้คอมเก่าอัปเดต Windows 11 เป็นเวอร์ชันล่าสุด 22H2 ได้ โดยที่ไฟล์ยังอยู่ครบเหมือนเดิม – Info Tha
Pingback: Windows 11 22H2 – timebdnews
It works perfect, thank you very much
Hello Jens mate in the tutorial it set to download Windows 11 Home whereas I already have Windows 11 Pro installed on unsupported hardware so how do I get the Pro version from the media download?
The download contains all versions. During upgrade it will use the same version as is already installed. No need to do anything different for another version.
Jens,
Thanks a lot, your workaround worked for the second time for me. First, months ago, I updated my unsupported machine from Windows 10 to 11, and now I was able to install 22H2.
But some problems occurred, which were not associated with your patch, and which I’d like to describe in order to help those who might encounter them too.
My update stopped, showed BSOD, and returned to previous Win version, first in the “first boot” phase with “SYSREP_SPECIALIZE” error, then after unplugging my external hard drives, in the “second boot” phase with “MIGRATE_DATA” error.
What eventually worked for me – and I don’t know whether it was all those measures together but I’d tried to use them separately before and it failed, są maybe yes, they had to be taken all together – was:
1. Disactivating my antivirus protection (firewall and system protection) together with Windows Defender firewall.
2. Unplugging all my external hard drives.
3. Uninstalling Windows Media Player (I still had it on my system) and the new Microsoft Multimedia Player.
Hope it might be helpful to someone. Good luck!
Using bootcamp on BigSur. Windows 10 with prior registry hacks, this didn’t work. However, after removing both hacks (HKEY_LOCAL_MACHINE\SYSTEM\Setup\MoSetup & the “Labs” file hack), upgrading from 10 to 11 worked perfectly!
Thanks so much.
Great to hear. It must have something to do with this.
When I attempt to perform the install it states Installing Windows Server and not windows 11 Pro as I would expect.
I have checked my system info and I definitely have Windows 11 Pro 212H OS Build 22000.1098
i upgraded my windows 11 21h2 to 22h2 a couple hours ago without any issue on an unsupported device.
Process: the official registry workaround from Microsoft was the only thing i did when i first installed windows 11 a year ago. so i needed not to do it again, before i upgraded, i updated my device’s drivers to the current and did the same with windows update. I headed to Microsoft’s windows 11 download page and downloaded the windows 11 iso. mounted it and q. no errors, no pauses, a smooth install
The registry workaround where you set (allowupgradeswithunsupportedtpmorcpu) still requires TPM 1.2 (if I’m not mistaken) so it doesn’t work for anyone on unsupported hardware.
Nevertheless, still a valid workaround that works great.
Windows 11 Setup says “Install Windows Server” instead of “Install Windows 11”
Works great! Thanks
Works on my Dell Inspiron 9400 (13 years old). On 2 pc’s of more recent date I also get the following message “We can’t tell if your PC is ready to continue installing Windows 11”. So until now it is a dead end for my 2 pc’s I still use. My Dell is only used for testing!
Did you use a different method to do the initial install or upgrade to Windows 11 on these?
I used the same method to upgrade from 21h2 to 22h2.
The initial install from Windows 10 to 11 worked fine on all pc’s and laptops.
With thanks to GitHub and a tweaked setup! My pc’s have amd cpu’s, maybe that makes the difference!
I had the same issue, found out that I previously ran Skip_TPM_Check_on_Dynamic_Update.bat script, I had to run that script again to undo the changes it made. After that this instruction worked.
https://github.com/AveYo/MediaCreationTool.bat/blob/main/bypass11/Skip_TPM_Check_on_Dynamic_Update.cmd
This solution workt for me before upgrading from 21h2 to 22h2. Installing from usb without a modified appraiserres.dll!
And…bingo!
Works now!!! After ‘We can’t tell if your PC….’
works for me, ty
Thanks, Cornel and Jens. This worked for me on the second attempt on a ten-year-old Dell XPS 2710 with no TPM and an usupported (i7-3770) CPU. It’s a back-up machine in my guest room for use by visiting friends and family, so I am very happy to have extended its useful life.
Tried it and did not work for me.
I keep getting this
We can’t tell if your PC is ready to continue installing Windows 11. Try restarting Setup.
Did you try my solution?
Worked perfectly first try, Acer Aspire E5-575G-369A with i3-6100u
The “We can’t tell if your PC is ready to continue installing Windows 11. Try restarting Setup” issue!
Solved by running the above Skip_TPM_Check_on_Dynamic_Update script two times so you end up with it removed again.
And using the modified appraiserres.dll.
So are now running 22H2 on Macbook Pro from 2012.
Hi, i used the procedure but my installer stucks at 71%. Is there anything that i can do for it?
Replace the appraiserres.dll with your mod. dll file. Turn off Wi-Fi and installed upgrade windows 11 pro successfully without a hitch.
Thank you very much
Thanks so much!!! Worked a treat.
Intel(R) Core(TM) i7-7567U CPU @ 3.50GHz 3.50 GHz
8.00 GB (7.89 GB usable)
64-bit operating system, x64-based processor
Was very angry when I couldn’t install 11 from 10 as my machine was unsupported despite the spec.
Managed to put it on last year but the update didnt come through.
Will bookmark your site for any future support.
Thanks again!!!!
upgrade did not work for me on a windows 11 21H2 system with French windows installation language.
“We can’t tell if your PC is ready to continue installing Windows 11. Try restarting Setup”
Here is my language config:
C:\WINDOWS\system32>dism /online /get-intl
Deployment Image Servicing and Management tool
Version: 10.0.22000.653
Image Version: 10.0.22000.1098
Reporting online international settings.
Default system UI language : fr-FR
The UI language fallback is : en-US
System locale : fr-FR
Default time zone : Romance Standard Time
Active keyboard(s) : 0409:0000040c, 0409:00000809, 0409:00000813, 0409:00020409, 040c:0000040c, 080c:0000080c, 2000:0000080c
Keyboard layered driver : PC/AT Enhanced Keyboard (101/102-Key)
Installed language(s): en-US
Type : Fully localized language.
Installed language(s): fr-FR
Type : Partially localized language, MUI type.
Fallback Languages en-US
The operation completed successfully.
trying a french windows 11 22h2 upgrade gave
The “We can’t tell if your PC is ready to continue installing Windows 11. Try restarting Setup” issue!
Solved by running the above Skip_TPM_Check_on_Dynamic_Update script and using the modified appraiserres.dll
Thanks a lot
Muchas gracias por tu trabajo, ha ido todo bien, para los que no les funciona, hay que instalar como administrador y cuando termina reiniciar, luego buscar actualizaciones y a poder ser hacer primero las de Framework, y buscar las opcionales, he tenido que instalar una por una, la 9, luego la 10 y luego la 11, y al final todo estupendamente
Doesn’t work.
Although the trouble with my computer is that it is fully compatible under PC Health Check but 22H2 installation does not recognise it.
Pingback: Win 11 22H2 No TPM « John Galea's Blog
How does one install the above mentioned command?
https://github.com/AveYo/MediaCreationTool.bat/blob/main/bypass11/Skip_TPM_Check_on_Dynamic_Update.cmd
I just see very shorly the command window but it disappears in half a second.
Does that mean it has been installed?
The modified DLL to upgrade already unspported installations of Windows 11 worked perfectly with the newest 22H2 ISO, thanks alot! :)
I upgrade from Win11 Home 21H2 to Win11 Home 22H2 by simply replacing:
%SystemDrive%\$WINDOWS.~BT\Sources\appraiserres.dll
With the file appraiserres.dll present on Win 10 Home (yes, a Windows TEN file).
That replace is done while install is on the screen where you choose if dowload updates or not (just after selecting not to download but before pressing the button)
I upgrade from Win11 Pro 21H2 to Win11 Pro 22H2 by simply replacing:
%SystemDrive%\$WINDOWS.~BT\Sources\appraiserres.dll
With the file appraiserres.dll present on Win 10 Pro (yes, a Windows TEN file).
That replace is done while install is on the screen where you choose if dowload updates or not (just after selecting not to download but before pressing the button)
I did not need to alter the ISO, no need for a Registry hack, no need to download anything outside official microsoft site, etc., just use one file of a Windows 10 Install media that replaces one file (not on the ISO, on the System drive while in middle of the install proccess).
At install time (run SETUP.EXE from ISO), when it reaches the screen where you can choose to download updates or not, on the root of system drive there is a folder $WINDOWS.~BT with a sub-folder called Sources, inside it the install media has created a file appraiserres.dll (Win 11 version), that file if replaced with the one of Windows 10 (the one for the same 64 Bits version HOME/PRO), that makes Windows 11 install bypass unsupported hardware detection.
Remember: The file that is replaced is the one that the installer creates on the system drive while installing, not the one on the ISO, etc.:
%SystemDrive%\$WINDOWS.~BT\Sources\appraiserres.dll
Replacing that file with the Windows 10 version did work for me (tested on HOME & PRO, not only on virtual Machine, also on real hardware).
Hi Jens, do you know if this update also works in the following manner?
I installed windows 11 21h2 by making a bootable windows 10 usb stick, and replacing the big file from windows 10 with that of the windows 11. So no checks etc.
If i now use the big file from 22h2 and copy that to the windows 10 bootable usb stick. Can i upgrade in that way? Or do you have no experience with that way of installing?
Rgds
Patrick
Should work as well but in general not preferred as you need both the Windows 10 and Windows 11 22H2 ISO. But it does work to my idea :)
Hi Patrick, just used your idea on 3 different pc’s, and it’s working like a charm!
No need to put of updating, or leave the pc disconnected from the internet, just go about it, as you do with a regular clean install.
On mine, the file that needed copied was under sources, and called install.esd, it was by far the largest file there, almost 4,000,000KB
Thank you very much!
And thank you jensd for your great work on this subject!!
I get everything right and start the installation. It gets to 100%, closes and nothing happens. It didn’t reboot anytime and I still have the 21H2 version.
The big file was istall.esd or install.wim
I will try this again for updatijg, as it worked perfect on all my machines, intel desktop, amd desktop, intel laptops
Just used this method to upgrade from 22H1 to 22H2 with no problem – many thanks!
Thank you very much, was able to upgrade to windows 11 with the change
i did all the steps invovled sourc file is 191kb started install it came up we cant tell if pc has enough space to continue install try setup.exe again i have 295gb of avaialable space
I’ve seen this error a few times. As far as I’ve read, it has something to do with a lack of space in the EFI volume. Is it possible that you installed other OS’es (like Linux or another Windows version) as multi-boot before?
Hi there, I followed everything you said in your video and at the moment I want to replace the appraiserres.dll file says is there not enough space, I’ve tried several times but I received the same answer, if you kindly helped me to achieve this I’ll be always thankful, thanks in advance.
This probably means that you are trying to replace the file in the mounted ISO and not in the copied files to your desktop.
Well I used this method to upgrade to windows 11 it worked,but it always say we ran into a problem:( so I entered safe mode my drivers were outdated and I searching for a software that can update my driver
All thumbs-up! Many thanks! Happy Holidays! Stay safe.
The installation delete all apps, be careful before installing
If you do this the right way, no applications or data will get deleted. Possibly there was a language mismatch. In that case, at the last step, it will tell you that there is no option to keep your files and applications. Just be careful to read everything and make sure to follow the steps.
My pc does not meet win 11 install requirements, however I installed Win 11 Pro early in 2021 and it’s been working fine with 21H2. I wanted to upgrade to 22H2
So I’ve tried a number of methods of installing from various technical site suggestions and none has been successful. I always ended up with the attempted install failing at the FIRST_BOOT. I recently downloaded from your site the modified appraisserres.dll file 192k. I then read your suggested methods and watched your YouTube videos. I came to the conclusion that if I remained connected to the internet then this may be a problem for the install to succeed.
I disconnected my internet cable from the pc and installed 22H2 and it went right through without any problem. I checked that I had 22H2 ok,
As soon as I connected to the internet then the problems began, initially blue screen, kernel issue followed by a diagnostic routine. I shut down the pc removed the internet cable and rebooted, Win 11 22H2 came right back to life with all my apps, files and data all perfectly intact.
I ran some tests in device manager for outdated drivers, scan now , chkdisk etc
Everything seemed okay
Jensd, can you offer me any advice
Regards Brian
The only thing I can come up with, without looking at event logs in Windows, is that there is an issue with the driver of your network card (or the card itself).
As long as you don’t use it, everything works fine. As soon as you start to use it, you get issues.
I’d check if you can find a newer driver from the manufacturer or experiment with an alternative network card or adapter and see if the problem also exists.
Ik draai een dual boot van windows 11. Een voor mijn DTP werkzaamheden en een voor games en dergelijke. Ik heb de versie voor DTP gisteren probleemloos naar 22h2 gebracht.Vandaag heb ik voor de games versie de volledige methode helemaal vaaf het begin gedaan. Tot het moment dat ik setup start in de 22h2 map op mijn bureaublad ging alles goed.
Ik start setup, geef aan nu geen updates te downloaden, klik op volgende, en krijg daarna de foutmelding “We kunnen nu niet bepalen of uw pc gereed is om windows 11 te blijven installeren. start Setup opnieuw.”
Ik heb voor de zekerheid de hele procedure 2x herhaald maar zonder resultaat.
Doe ik ergens iets niet goed of werkt bovenstaande methode niet op een dual boot pc?
Met vriendelijke groet
Probeer de skip TPM check command van GitHub eerst.
Daarna de setup uitvoeren.
Voor mij was dat de oplossing!
worked first time no problems so far xps 9530 win 11 pro
Dank je wel.Werkt op mijn Acer Aspire x3990 Desktop.Duidelijke uitleg en niet moeilijk
Work great on Lenovo YogaBook yb1-x91l !
Win10 -> to win 11 21h2 (using regedit MoSetup trick)
Win 11 21h2 –> 22h2 whith this trick!
Thanks a lot!
Tried following the instructions. I got the “We can’t tell if your PC is ready to continue installing Windows 11. Try restarting Setup” message and the install stopped. Tried a few things but with the same result.
I then searched my downloads folder for the the original Skip TPM script that I used to install W1 in the first place. I had two versions and didn’t remember which one I used, so I ran both scripts twice to make sure the CMD window said it was uninstalled. Then the instructions above worked straight away. I did not disconnect the ethernet cable.
So in my case the problem was that the original Skip TPM fix was still in place. Bear in mind that the script does not just modify the registry it also
“Registers a WMI event subscription named ‘Skip TPM Check on Dynamic Update’ that deletes the ‘C:\$WINDOWS.~BT\appraiserres.dll’ file when the vdsldr.exe executable is launched during Windows 11 setup”
This could be what is interfering with the install.
So many thanks.
Ik heb net jullie handleiding gevolgd en een Windows 11 21H2 pro guest succesvol op 22H2 kunnen updaten. Prima oplossing en informatie! Bedankt voor de moeite!
Worked like charm on Lenovo X220
WORKED PERFECTLY, 2/8/23, PC IS COMPLETING FINAL UPDATES FOR VER. 22H2. COULDNT THANK YOU ENOUGH.
Thanks my friend for this very informative article! It worked perfectly on my slight-aged-but-still-loved ThinkPad T570 going from an earlier version of Win 11 Pro to the 22H2 version.
I also note that the OS seems to be a lot snappier in terms of performance after the upgrade. Why Microsoft would deliberately hold back this upgrade seems suspicious to me.
I have uploaded windows 11pro, 22H2 in 4 computers in total following the above instruction. I could upgrade all of them in 1 chance without any hiccup of any kind. Of the 4 two have Tpm 2 and came with windows 10, but unsupportive processor. The other two are unsupported in all aspects, originally came with windows 7 and 8 each. Upgraded to windows 10, then dual boot to win 10 and win 11 21H2. I could upgrade flawlessly. The instructions are thorough. However one has to follow religiously. Those who got stuck in the mid way, I would suggest them to start all over again. The steps are virtually failproof. One can open two computer side by side. The one which needs to be upgraded and the other to follow the instructions so that you do not miss or mix up a steps. Internet disconnection is also important and do not reconnect until everything is complete. However before proceeding with the steps one thing I may suggest, that the sleep function should be disabled (it may be set to never)- during the upgrading process so that the downloading and installation process could continue flawlessly.
By the way I am an absolute layman.
The following models I have upgraded.
AMD PRO A10-8770 R7 3.5Ghz (2 Desktops)
TOSHIBA Sattelite P50t-A , i5-3337u ( laptop)
DELL Inspiron One 2320 i3-2120 (All in one)
Worked great for me thank you so much.
This method worked fine as of today, for Win11 pro virtual machine under XCP-ng.
Worked OK first time.
Microsoft Surface Studio(Gen 1)
Said Windows Server on install, but installed Windows 11 and works great.
Installed an unofficial version of Ventura 13.2.1 with Bootcamp running Windows 11 22H2 MBP mid-2015 11.4 iGPU graphics, using your technique. Thank you. For those who use with opencore make sure to run post install fix for ntfs drivers in misc menu.
This is working perfectly!
Many thanks
Excellent, Just followed your guide, everything works perfectly. Thank you so much Jen
I successfully installed Win 11 22H2 on my unsupported Dell Precision M4800 laptop. The System > About shows I’m running Windows 11 Pro, Version 22H2, OS Build 22621.525, and typing ‘winver’ in a Run window also shows Windows 11, 22H2.
However, if I go into Windows Update it thinks I’m still running Windows 10 as the history shows all my Win 10 updates. I’ve rebotted and shutdown and restarted but still get the bad updates for Win 10.
Any thoughts would be appreciated. Thanks.
Well, for whatever reason the system fixed itself after shutting down last night and restarting this AM. Windows Update now has all the Win 11 updates ready for installation :-) Not sure if this had anything to do with it but I stopped and restarted the Windows Update service before reconnecting the network ethernet cable.
Have you been able to successfully install updates on your unsupported system…?
This worked perfectly on my 2019 16” MacBook Pro i9. I previously had Windows 10 Pro and I went through the upgrade without a glitch. Thanks so much!
it works! Optiplex 9010 however i updated most of my hardware and such, the only requirements i was missing is:
TPM 2.0 (i got TPM 1.2)
and CPU however my cpu is fairly new so microsoft has not test it.
No bugs, No errors and i kept all my settings, apps and such!
Life saver :D
good
You got a special place in heaven dude!
My PC with i7 3770 just got updated with no issues .
Thanks a lot for these all explanation on the site . Every step was crystal clear
Thank you but unfortunately it didn’t woek with the new modified dll file same error message like guys above.
setpactlog
2023-06-25 23:49:11, Info UI Determining whether we should run ConX or legacy setup
2023-06-25 23:49:11, Info UI Will launch ConX setup experience
2023-06-25 23:49:11, Info UI Initializing Media class driver for audio support
2023-06-25 23:49:11, Info UI Initializing media class driver status: 126
2023-06-25 23:49:11, Info UI Launching ConX setup experience
2023-06-25 23:49:11, Info UI Inspecting ConX Setup Cmdline
2023-06-25 23:49:11, Info UI Launching D:\Win11_22H2_English_x64v2\Sources\SetupPrep.exe
Already deleted old skiptpm registers in both labconfig and mosetup.
also tried to mix it with your old method with windows 10 and still same error?!
hope you can reply and advice.
Could someone please confirm if it’s possible to download updates in Windows 11 if the system supports Secure Boot and has TPM 2.0 enabled but has an unsupported processor?
Hello pls I have followed all the steps but it isn’t working.
I get the error “we couldn’t update the system reserved partition”
what do you think the solution is?
I have the same problem: “We couldn’t update the system reserved partition” in Win 11 Setup with correctly replaced .dll – my computer is a Dell laptop Inspiron 7506 2n1 (i7-1165G7) Win 11 21H2 with
*: 100MB (free 9MB) FAT32 GPT (EFI System partition) – Active & System
*: 16MB (free 0B) Other GPT (Reserved Partition) – None
C: 951MB (free 393GB) NTFS GPT (Data Partition) – Boot
*: 1.6GB (free 766MB) NTFS GPT (Recovery Partition) – None
*:DELLSUPPORT 1.06GB (Free73MB) NTFS GPT (Recovery Partition) – None
Jens – do you have any suggestions?
Many thanks!
Ok, found a solution – you need to make some space on the system reserved partition. Here is a link to how to make that happen. It worked for me and the error did not happen again.
https://support.microsoft.com/en-us/topic/-we-couldn-t-update-system-reserved-partition-error-installing-windows-10-46865f3f-37bb-4c51-c69f-07271b6672ac
Thank you for this post. It worked perfectly for both old and new version of Windows 11.
Windows 11 updates fail–> 2023-09 Cumulative Update Preview for .NET Framework 3.5, 4.8 and 4.8.1 for Windows 10 Version 22H2 for x64 (KB5031041)
Any solution to keep the updates coming in?
Presentations don’t get any better than this. Thank you.
Pingback: Cheatsheet: install debloated Windows 11 on QEMU | Scott's Blog
Hi
Last year, I upgraded my unsupported PC from W11 21H2 to W11 22H2 using your instructions and my PC has worked perfectly, catching all Cumulative and Preview updates including the latest W11 22H2 Preview update (moment 4) with copilot preview etc.
Just wondering if you will be doing the same for how to upgrade from W11 22H2 to W11 23H2 on an unsupported device again this year?
Also works with 23H2 :)
Did an updated post on 23H2 in case you would be interested: https://jensd.be/2070/windows/upgrade-to-windows-11-23h2-on-unsupported-hardware
This solution also works with Windows 11 23H2.
Has anyone tried this on 24H2?