
Apple often removes support for newer macOS version for older hardware. Even if this hardware would be perfectly capable of running the new version, you are out of luck and will not be able to install that new version in a supported way. Fortunately in most cases there is a workaround or patch available to get that version up and running. In this article, I’ll go through the process of creating a bootable USB drive which allows installation of macOS Big Sur on unsupported models. This allows for both a fresh installation or an upgrade.
Newer version of macOS: Sonoma
In the meanwhile, macOS Sonoma has been released. Another method is available to install the latest version of macOS on unsupported hardware. I did a separate post that covers that version of macOS, so have a look at it over here if you are interested.
YouTube Video
If you are interested, I also created a YouTube video from this blogpost. If you prefer classic text, you can just follow the rest of this article:
Introduction
It’s never nice to hear that a new version of macOS will not longer be supported on your Mac. Especially if the system specifications clearly show that it has plenty of resources to run that unsupported version. Apple has its reasons to stop support for older models. It simply requires quite a lot of extra work and it also motivates people to buy new hardware.
In some cases there are genuine hardware limitations. For example, since Mojave there is a requirement to have a Metal-supported video card. Or you might simply not have enough RAM or a CPU which is too slow. In that case, even though it’s still possible to install the unsupported version, you will not be happy with the results.
Patching background
To end up with a patched Big Sur installation, there are a few possible options. For this article, I will use MicroPatcher, made by BarryKN (https://github.com/barrykn/big-sur-micropatcher). Alternatively there is also Big Mac (https://github.com/StarPlayrX/bigmac).
These patchers require quite a lot of reading and consideration in order to end up with a proper USB drive for installation. Fortunately, there is also MicroPatcherAutomator (https://github.com/moosethegoose2213/automator-for-barrykn-micropatcher). This project greatly simplifies the work and introduces a GUI that can be used to create the media.
Prepare the USB drive
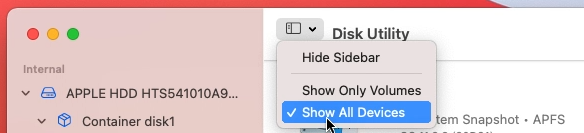
The installation will require a USB drive of 16GB or larger. So start by inserting the drive and start Disk Utility. In Disk Utility, choose to show all devices:
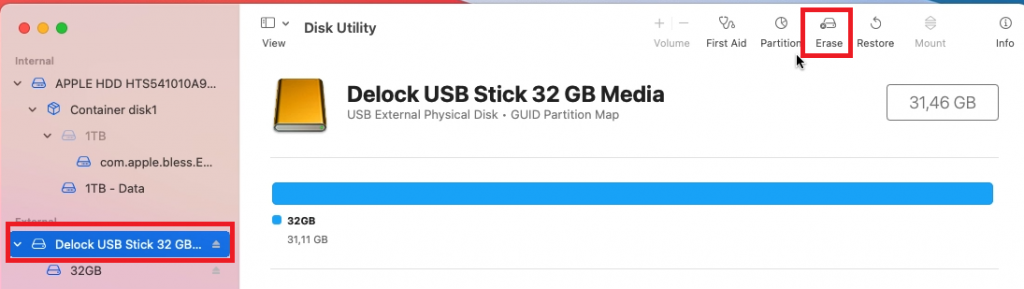
Select your USB drive on the left side, then click erase in the top menu:
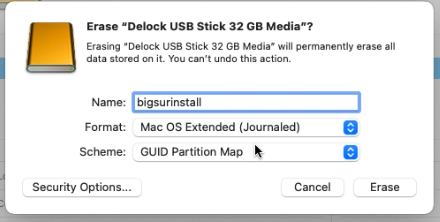
Choose a name for the drive, Mac OS Extended (Journaled) as file systen and GUID as partition scheme. Then click Erase.
If all goes well, your USB drive should be prepared and you are ready for the next step.
Download and run MicroPatcherAutomator
Now that the USB drive is prepared, we can download the tool which we will use for the rest of the process.
Download the latest version of the tool using the following link: https://github.com/moosethegoose2213/automator-for-barrykn-micropatcher/releases/download/v2.0/MicropatcherAutomator.dmg and once downloaded, open the DMG file.
When the DMG opens, you will see a singel icon/program in it with a hedgehog as logo. Right click on it and choose open.

Click Open on the warning regarding an unverified developer and click Continue to go to the next screen in the tool:
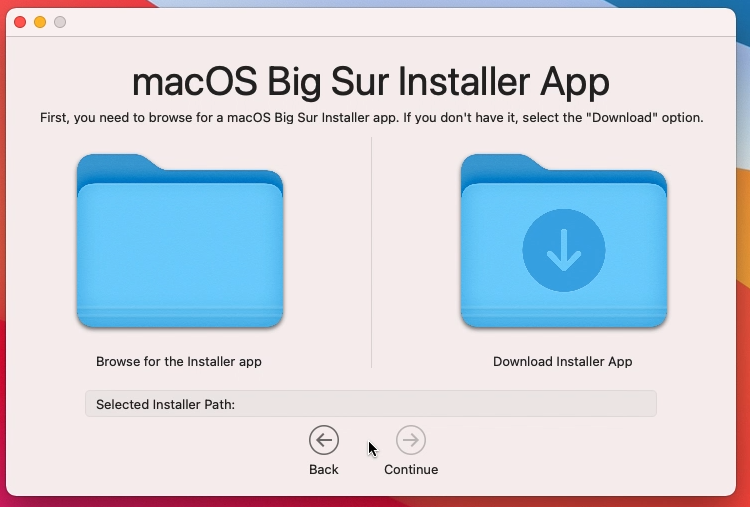
Here you basically get to choose if you want to use a pre-downloaded installer or just download a fresh copy of the Big Sur installer. I chose for the second option: “Download Installer App”. Click Continue and enter your password in order to continue with the download:
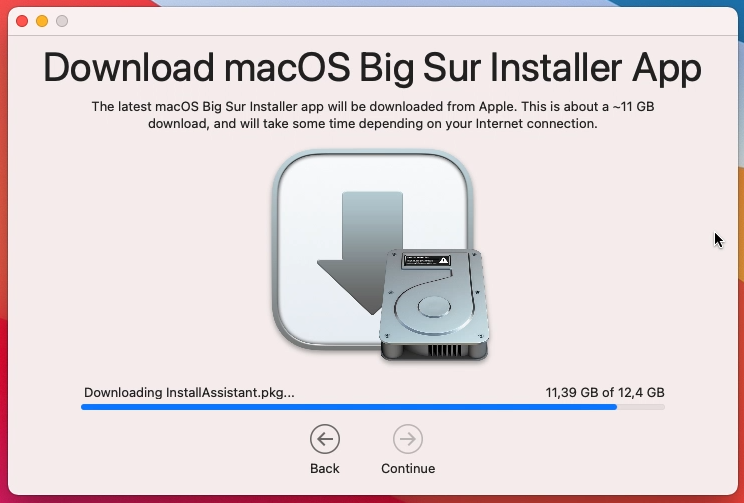
It can take quite some time to complete. After all, it’s a ~12,5GB download. Once done, the tool will ask if you want to use this downloaded installer to create a patched USB drive. Which we obviously do want:

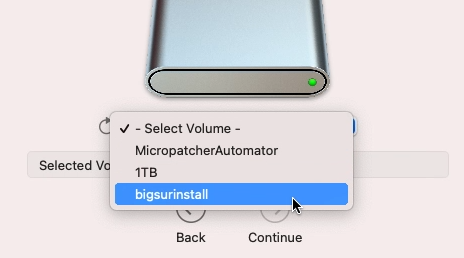
In the next screen, select the volume to use for the installer. Here its important to select the name of the volume which we used when preparing the USB drive in the first step (with Disk Utility). In my case this was “bigsurinstall”:
Continue with the process and enter your password again when requested. MicroPatcherAutomator will now copy all files to the USB drive and make the necessary changes related to the patching process. In my case this took around 50 minutes to complete:
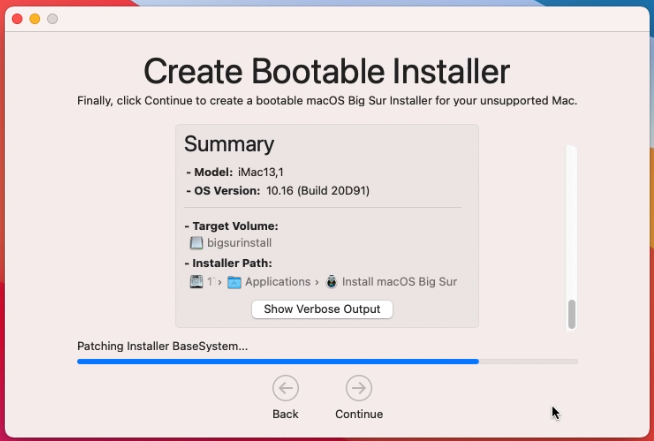
If all goes well, and you were patient enough, you should end with the following screen:

Use the patched USB to install Big Sur on our unsupported Mac
Now that we should have a working USB drive, it is time to test it. As suggested in the last step of MicroPatcherAutomator, we need to restart our Mac (or at least the Mac where you want to install Big Sur) and boot it while holding the Option/Alt key.
After the chime, the bootloader should show up and you should be able to see the following:
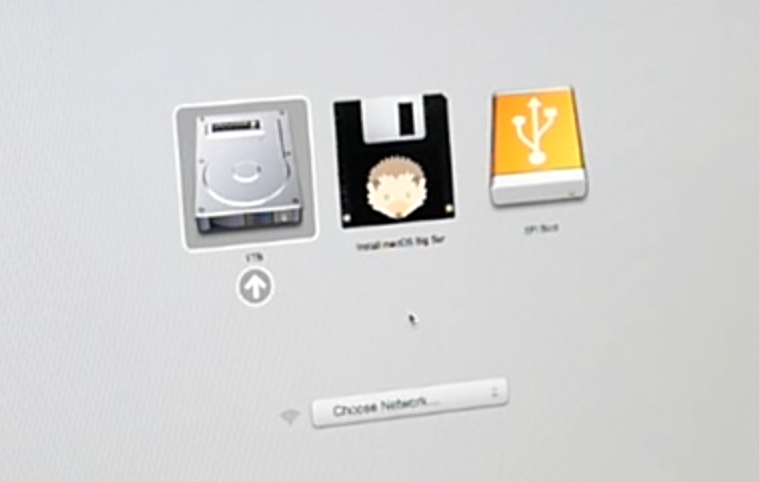
The first icon (1TB) is my currently installed macOS instance. The other two, the icon with the hedgehog and the USB-drive icon are coming from our patched USB drive.
Here it is important to first launch the last icon (EFI Boot). Once you do this, the system will immediately power off. This is expected and prepares for the next step. If you skip this step, you will end up with a forbidden sign at boot in the next step.
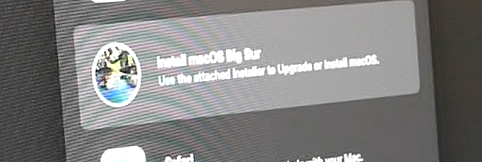
Repeat the process and hold the Alt/Option key while powering on your system again. This time, instead of selecting the EFI Boot option, choose the middle one: “Install macOS Big Sur”.
This will boot the installer from the USB drive and once completed you end up in Recovery:
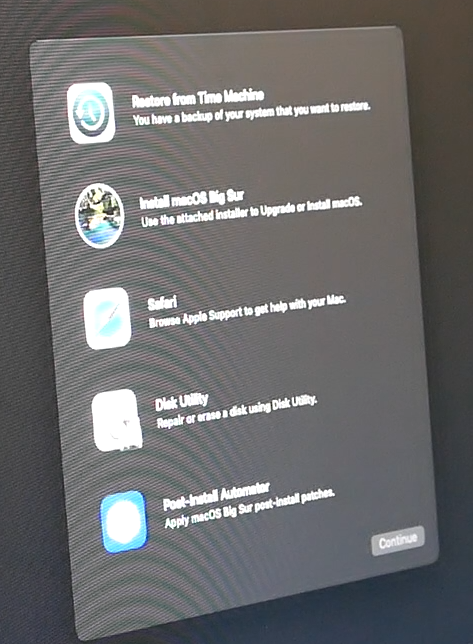
Unfortunately it’s not very visible on the screenshot but as you can see there is an additional option to be found here: Post-InstallAutomator. This is one of the things that were done by the Automator tool and once Big Sur is installed, we will need to execute this as well.
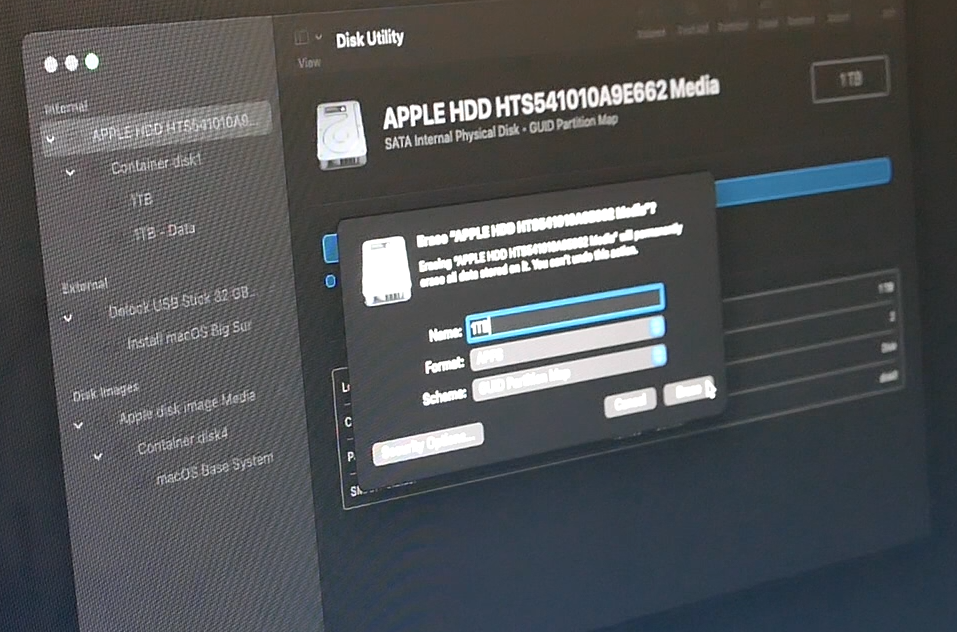
Before we can install Big Sur, we can format the hard drive to prepare, so choose Disk Utility from the menu. In Disk Utility, choose to select all devices (similar as when preparing the USB drive), then select your hard drive (or SSD) on the left and click Erase. This time, after giving your disk a name, choose for AFPS as file system and click Erase to continue:
After the formatting is completed, close Disk Utility and select the Install macOS Big Sur option from the menu:
Click Continue, accept the license agreement and select the freshly formatted drive as destination on where to install macOS.
From here on, you can again take a coffee (or similar) as the installation can take quite some time. If all goes well, you should see the following screen after a series of reboots:
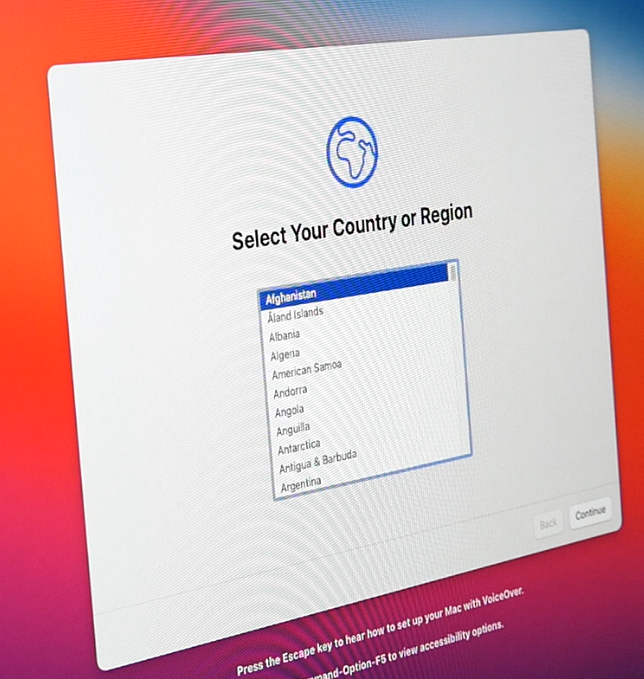
Navigate through the questions here to end up with the Big Sur desktop.
Having a look at About this Mac shows the following:
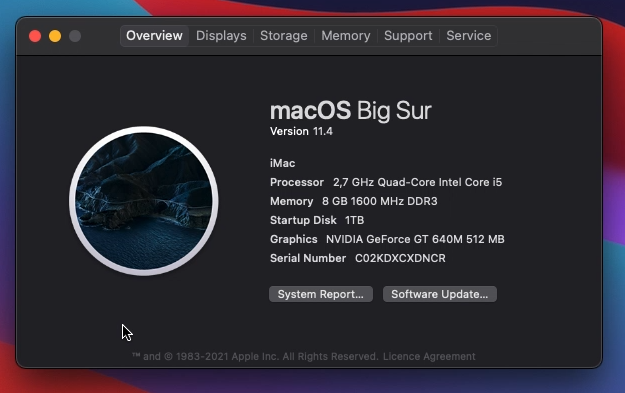
Finish the patching process after installation
You might notice that the model is shown as a generic iMac. This will not really allow you to install any updates. Also, and probably more important: not all hardware is working as expected yet. In my experience mainly networking was not available right after the installation:

As mentioned earlier, if you remember, there was an added option in the recovery menu after booting from the USB drive. This is exactly what this is for.
So repeat the whole process to boot from the USB drive (restart, hold Alt/Option and select Install macOS Big Sur, no need to first choose the EFI Boot option). In the recovery menu, this time, select Post-install Automator.
This will start a dialog where you can select the Volume where you installed Big Sur. This is the name you chose when formatting your HD/SSD before installing. 1TB in my case:
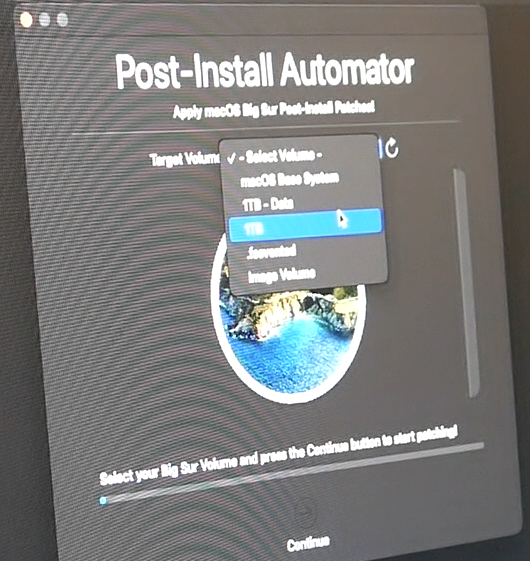
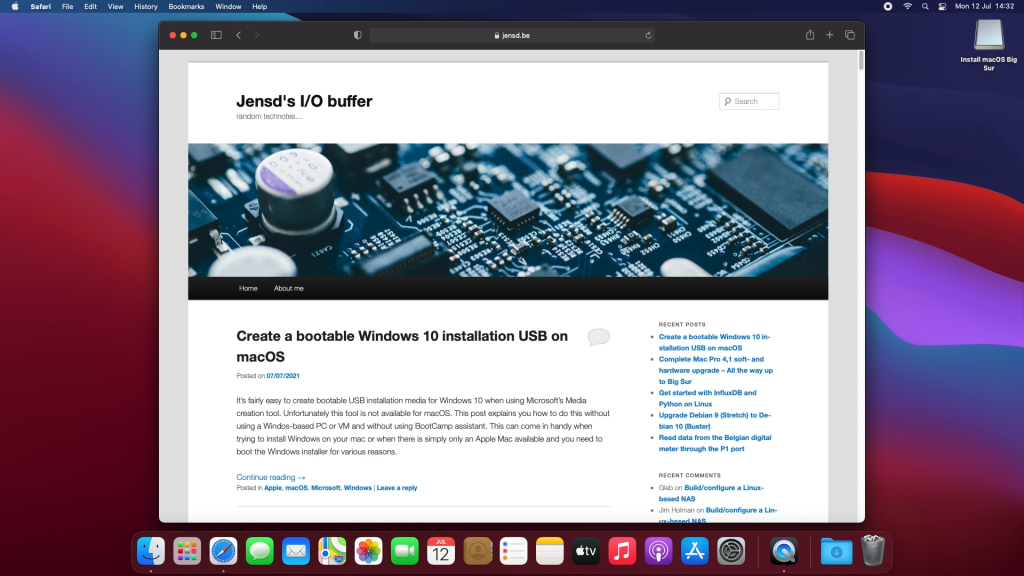
Click Continue and let the tool make the necessary changes to your installation.
If all goes well, you will be asked to perform a reboot and after that, all hardware should be availableand you can connect to a network to visit your favorite website:
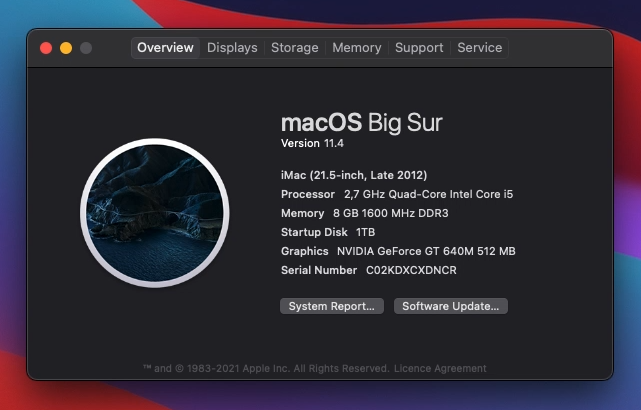
After patching, we can see that the model is now shown correctly and updates will be presented for installation:
Hi, I am not getting the EFI Boot option icon at all, only the “Install macOS Big Sur” icon is visible but it doesn’t have the hedgehog icon either. When i select it it displays the Not Allowed icon (crossed circle).
I am using the Micropatcher automator 2.0 and downloading a fresh copy of big sur via the app.
My Mac Pro is 5,1 from 2010, firmware 144
Latest Mojave works fine.
I have tried on the original ATI HD5770 1GBwith boot menu but no Metal 2. Also I have RX265 with support for Metal 2 but no boot menu so I couldn’t see anything.
Is the graphics card the reason?
The micropatcher itself seems to have completed excatly as per the guide above.
What am I doing wrong?
You need to re-partition the disk and select “GUID Partition Table” in Disk Utility (options) when doing so.
Good evening
Came across your channel, real cool and informative
I’ve got a Mac Pro 2008
I’m really new and don’t have a clue where to start
Advise on [ How to connect to a new Monitor, I was told I need a HDMI to DVI cable is that correct ?
[ how to get the best from the computer
[ I’m a marketer and would use it for photoshop ,video editing , leaflet creation , PowerPoint ect
[it has a 1T memory card
[ I see a lot of videos upgrading like space, speed , ect
Thanks
Pingback: Perform a clean install of macOS on your device | Jensd's I/O buffer
I noticed during the creation of the installer, Micropatch Automator showed details about the process, including the location of the installer disc image and the model identifier of my Mac.
Does this mean the new installer will only work on this Mac, or similar models? I was planning to use this installer on several different old quad-core Macs, including 2012 Minis and a 2013 iMac. Would it be a mistake to use the installer on computers other than the one that created the installer? The fact that the model identifier was noted by Micropatch Automator has me worried.
when i click EFI Boot button, error icon had appeared.
can anybody help me?
In the macOS Big Sur Installer App, I have choose for “Download installer app, and then I click Continue, click Continue again and enter my admin password in order to continue with the download. But it won’t download.
Can you help me?
iMac (27-inch, Late 2013) with macOS Catalina.
same problem here Jens, any feedback?
Same problem here ????
Pingback: Install macOS Monterey on unsupported models | Jensd's I/O buffer
Hi, i’ve followed all the steps until installing it. At the white screen it says “Less than a minute remaining…” It’s been 20 minutes. This takes extremely long and it shouldn’t be taking this long im pretty sure. Is this bad?
I noticed that can sometimes indeed take much longer than one minute (not only with Big Sur) but all should be fine afterwards. Just be patient :)
Jens, i use your installer for big sur however every time I try to perform the third step selecting the hedgehog icon the computer will not go to recovery mode and i cannot run the post install patch It appears big sur is installed however wifi and Bluetooth are disabled. Can i restore these settings tru terminal?
Did you try to re-run EFI boot? I noticed that this is sometimes needed (for example after a PRAM reset).
An alternative might be to use the OpenCore Legacy Patcher. Did a post and a video on that recently for Monterey: https://jensd.be/1589/apple/install-macos-monterey-on-unsupported-models
Hi Sir,
I have a mid 2011 MacBook Air, the model is A1369. Can i upgrade it to Big Sur with your method ?
Thank you!
Jens thank you for this blog. I have created my USB installer, restart with option key, select EFI boot, start up iMac with option key, select hedgehog icon, but it doesn’t boot into recovery. Any ideas please?
It’s stuck on the apple logo screen with the progress bar about half way
Hi,
I would like to know if I need to use a specific version of Big sur, all the process goes well but when I ask to install Big sur and wait to start in recovery mode, I get the Apple logo with the progress bar but stay there. Thanks
I also had the same problem and it seems like newer versions of original MacOs has to be installed on the Computers new SSD before this system here by Jensd seems to function. So on a new SSD I first installed the system that came with the Computer ( I think it was Lion) and then I installed another one on top of that which was Sierra and after that I was able to install this version of Big Sur from this website. I think it must have been any kind of Firmware to the disk that came along with the two intermission updates I chose. It took a long time, but in the end I succeeded. I don’t know if this is the right answer for you, but here it lead to success.
No post-install automator in the boot menu!!!
I tried Install macOS Big Sur on unsupported models and it works fine on an iMac late 2013 and on MacBook Pro 13 inch Mid 2012, but on my MacBook Pro today march 13th 2022 the Update buttons on Macbook Pro 2013 says that Big Sur Version 11.6.2 is the latest which Apple says is wrong and the they say version 11.6.4 is the latest. Otherwise the computer works excellent and is of course on internet with wifi that never fails. Anyone who knows why this MacBook will not update to the latest version of Big Sur. ?? Is it safe to try the even newer Monterey on this MacBook Pro 13 inch Mid 2012 ??
I have tried Install Big Sur on unsupported models as mentioned here and both fails on updates so I have given it up and reformatted and installed the Apple version that Apple says is correct and that is Catalina on both iMac 2013 and MacBook 2012. I don’t dare to live with computers that does not automatically get updates as they should.
Thank you very match , it works on my Mac 7.1
Mid 2010 , smoothly with networking at the same time though I I lcontinue patching following your advise so as as to accelerate the Mac,thanks alot
Tried this again in 2022 May and now it works fine and computers get updates.
The best thing is to make the bootable usb-memory stick on a newer computer running Big Sur og Monterey. Then use that memory stick to update old computers. Thanks for a very good webpage.
i have installed macos big sur on multiple macs. but on macmini 2011 server i7 post-installation wont work,
What exactly is not working?
after installation , when i select post-installation, i get an error message that this mac model is not able to patched.
I believe that these patched machines either has to be patched by Micropatcher of any kind or be reinstalled with a newer macOS version downloaded from Apple. The one makes a usb-memorystick with Apples way of doing it and then putting this macOS update into the Micropatcher USB-stick. When one does reinstalling with a newer version all own data dissapears and have to be put back from iCloud or from backup media.
So this Micropatched Big Sur systems lacks the ability to be updated from Apple. One can ether live with that or install Apples guaranteed version and in my case that is Catalina.
How do you get these unsupported Macs who have installed Big Sur to automatic be updated to newer versions of Big Sur. When you press System Update in Settings nothing happens. When never versions of Big Sur like 11.6.6 and 11.6.7 are released on all other Mac automatically this never happens on Big Sur on unsupported Macs installed with Micropatcher Automator.
Hey Patch installed but do nothing. Now i stuck with no wifi :( any idea how to manually install it?
Hello Jensd,
I have been having troubles using the micropatcherautomator as the big sur is missing off the server.
Any chance you could load it up or redirect it?
Hi Jens, really appreciate all the work you put into these projects. Ultimately, I could not get this to work. I have a Mac Pro 4,1 upgraded to 5,1 following your excellent instructions. Left original GPU in the Mac Pro, so that I had access to the boot screen. Created the micropatcher USB drive with downloaded Big Sur. First selected EFI, auto shutdown, then selected the install Big Sur icon. Reformated my SSD using Disk Utility, finally coming to the install icon, all per your instructions. I get through the minute countdown, 1 reboot to grey apple, 1 reboot to white apple, and then final reboot to another grey apple, progress bar hangs about half way through. I then took my High Sierra drive and cloned it and tried installing over the top of it, same result. I then took our IMAC 2015 which is running Monterey, and created a fresh USB install from there, ended up with the same hanging result. After multiple tries, I just couldn’t get there, so I’ll just run with High Sierra.
Ik heb de laatste versie geïnstalleerd maar kom ik bij herstel menu dan werken mij muis en toetsenbord niet meer dus kan niet meer verder ?
Dit is een macbook air 3.1 van 2011 (laat)
After following at the steps when it’s done and I do a restart the EFI partition never shows up
Hi,
I have a question regarding the security vulnerabilities using the micropatcher, or BigMac. I am not an experienced “coder” but try to read through thoroughly before I install something. Can someone explain why using the patcher must turn off the most USER SECURITY features, like FileVault, SIP, Volume Seal etc.
I read a long discussion about another patcher – OCLP – that using these modified boot loaders enables “them” to collect your personal data (account passwords, email passwords, personal information from the system, even access to files, etc.).
I dont know how, but is it true? Can some of you coders show character and explain, why does using newer os version, which the hardware can run costs all of your user security features. It somehow feels like letting you bare and naked infront of anyone who “is able” to use the computer language better than you. Sorry if I got it wrong, but just want an explanation (if anyone is willing).
Thank you.
Hi, I was going to start doing this install when on the screen for downloading big sur installer app, I don’t know why but the is no blue in the loading bar for the past 30 minutes. Is their a solution to this?