
macOS Monterey was released a few days ago. Just as with most new releases of macOS, also for macOS Monterey, Apple decided to remove official support for some of the older Mac hardware. In general anything older than a 2015 model is no longer supported. This doesn’t necessarily mean that those Mac models cannot handle the new operation system, in most cases it would run it just fine. Luckily, if you want to, there are always ways to get around these restrictions. In this article, I will describe step by step how to install macOS Monterey on officially unsupported models by using OpenCore Legacy Patcher.
Newer version of macOS: Sonoma
Although this post is still very relevant, in the meanwhile, macOS Sonoma has been released. A very similar method is available to install the latest version of macOS on unsupported hardware. I did a separate post that covers that version of macOS, so have a look at it over here if you are interested.
YouTube Video
If you are interested, I also created a YouTube video from this blogpost. If you prefer classic text, you can just follow the rest of this article:
Introduction
In an earlier post, I described how to install the predecessor of Monterey, Big Sur, on unsupported models. I used MicroPatcher for that article and mentioned BigMac there as well. For this article, I will go for a different method and I will use OpenCore Legacy Patcher to get around the hardware checks.
In contrast to MicroPatcher, this method uses an unmodified macOS installer. Instead, it tricks the installer in thinking it is running on a newer, supported, model.
Supported models
You can find a comprehensive list of models on which OpenCore is supported over here: https://dortania.github.io/OpenCore-Legacy-Patcher/MODELS.html
The minimum OS version installed needs to be 10.9 (Mavericks)
For hardware without Metal support, using a patch, the following should work:
- MacBook5,1 (Late 2008) and later
- MacBookAir2,1 (Late 2018) and later
- MacBookPro4,1 (Early 2008) and later
- Macmini3,1 (Early 2009) and later
- iMac8,1 (Early 2008) and later
- MacPro3,1 (Early 2008) and later
With Metal support, everything newer than the following is fine:
- MacBook8,1 (Mid-2015) and later
- MacbookAir6,1 (Mid-2012) and later
- MacBookPro9,1 (Mid-2012) and later
- Macmini6,1 (Late 2012) and later
- iMac13,1 (Late 2012) and later
- MacPro4,1 (Early 2009) and later (with Metal GPU)
Overview of the process
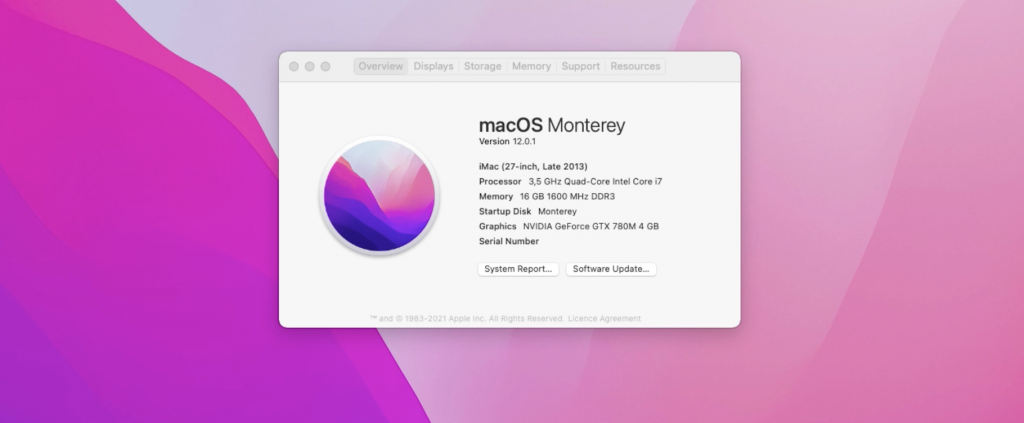
For the article, I will be using a Late 2013 iMac with model identifier iMac14,2. My model has the highest specced CPU: an i7 4771, a 256GB SSD, 16GB RAM and the NVIDIA GeForce GTX 780M with 4 GB. This is interesting as support for NVIDIA GPUs has been mainly removed in Monterey. It was running macOS Catalina as a starting point, which is the last officially supported release on this model.
The steps we need to go through are the following. These need to be executed on the device where you would like to install Monterey.
- Download the Install macOS Monterey app without using the App Store
- Create a bootable USB drive for macOS Monterey
- Build and install OpenCore on the USB drive
- Boot from the USB drive and install macOS Monterey
- Install OpenCore on the SSD/hard drive
- Optionally install patches (mainly for non-Metal or non-supported GPUs like my NVIDIA card)
Step 1) Download the Install macOS Monterey app without using the App Store
The first step in this whole process, is to get our hands on the installer. As the device which we want to get Monterey on is officially not supported, the installer for Monterey will not be shown in the App Store on this device. So we need to find another way to get our hands on InstallAssistant.pkg for Monterey.
Mr. Macintosh keeps a list with versions and links to directly download the InstallAssistant.pkg file. You can find this here: https://mrmacintosh.com/macos-12-monterey-full-installer-database-download-directly-from-apple/:
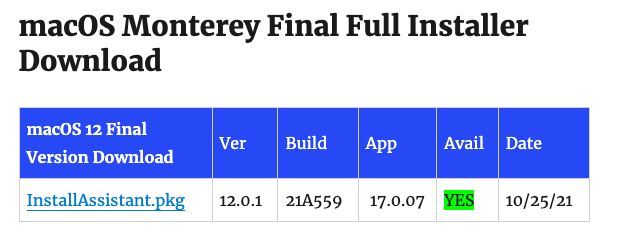
At the time of writing, the latest and release version was 12.0.1 (build 21A559) and I used the following link to download the package from Apple: https://swcdn.apple.com/content/downloads/39/60/002-23774-A_KNETE2LDIN/4ll6ahj3st7jhqfzzjt1bjp1nhwl4p4zx7/InstallAssistant.pkg
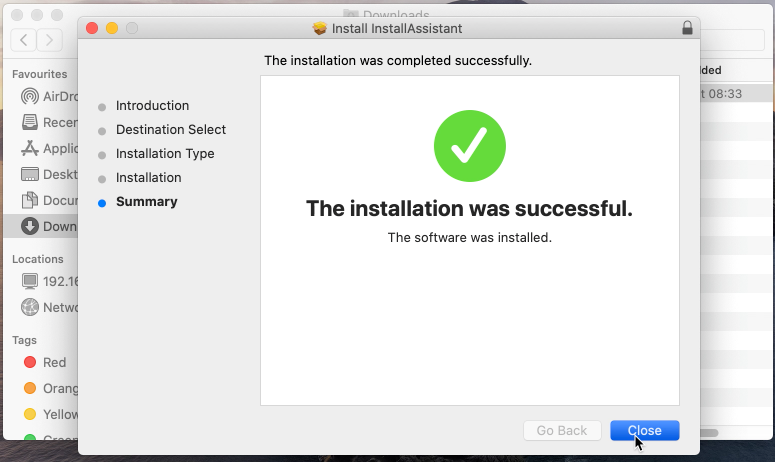
Once you have downloaded the .pkg, you can double-click on it and run through the dialogs to install “Install macOS Monterey” to your Applications folder:
In case you would encounter issues due to any hardware checks (I did not experience any on my iMac), you can also manually extract the .app from the .pkg and move the .app to your Applications folder. You can use the following command in terminal for that.
jensd@jensds-iMac ~ % cd Downloads
jensd@jensds-iMac Downloads % pkgutil --expand-full InstallAssistant.pkg monterey/
jensd@jensds-iMac Downloads % mv monterey/Payload/Applications/Install\ macOS\ Monterey.app /Applications/
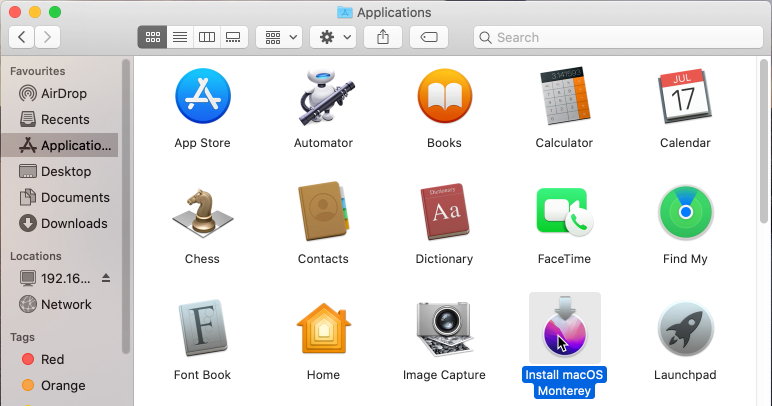
If this went well, you should now have the Install macOS Monterey application in your Applications folder. This is what we need for the next step:
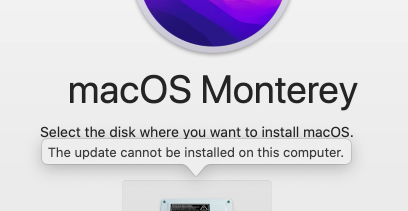
Running this just like on an unsupported model, like mine, won’t work as you will get a “The update cannot be installed on this computer” during the installation:
Step 2) Create a bootable USB drive for macOS Monterey
Now that we have the installer downloaded and ready, we will use it in this step to create a bootable Monterey installation USB.
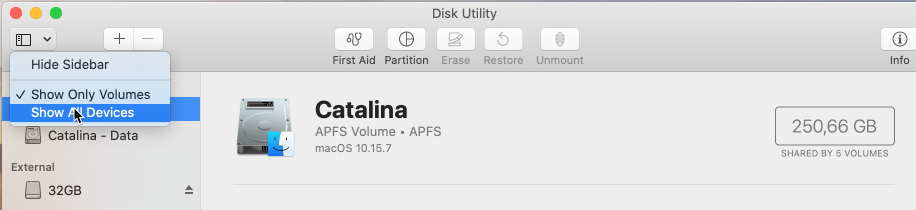
First we need to prepare the USB drive to make sure we can boot from it and patch it with OpenCore in the next steps. To do so, insert the USB drive and open Disk Utility. In Disk Utility, click to show All devices:
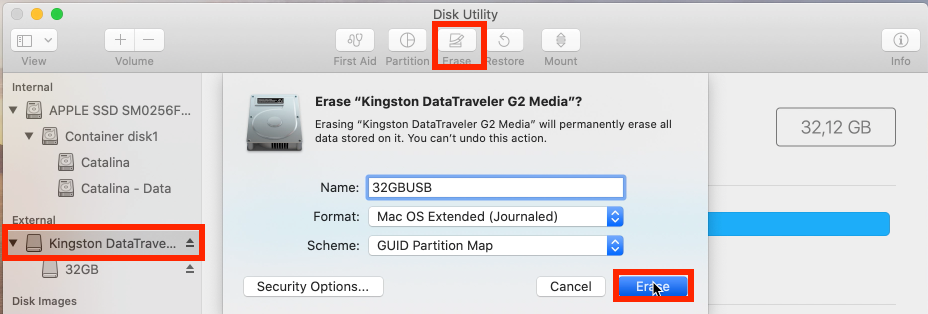
Then, in the left column, select your USB drive and click Erase on the top menu. Now give the drive a name, I chose 32GBUSB, select Mac OS Extended (Journaled) and GUID Partition Map as scheme and click Erase:
When this is done, we can use the installer to prepare the USB and get files on it. Open a terminal window and execute the following command:
jensd@jensds-iMac ~ % sudo /Applications/Install\ macOS\ Monterey.app/Contents/Resources/createinstallmedia --volume /Volumes/32GBUSB
Password:
Ready to start.
To continue we need to erase the volume at /Volumes/32GBUSB.
If you wish to continue type (Y) then press return: y
Erasing disk: 0%... 10%... 20%... 30%... 100%
Making disk bootable...
Copying to disk: 0%... 10%... 20%... 30%... 40%... 50%... 60%... 70%... 80%... 90%... 100%
Install media now available at "/Volumes/Install macOS Monterey"
This can take some time, depending on the speed of your USB drive. In case you called your drive different when erasing it within Disk Utility, you will need to adapt this in the command here.
At this point, we have a standard bootable USB drive for installing Monterey. This one could be actually be used now to install Monterey on supported hardware.
Step 3) Build and install OpenCore on the USB drive
From here we start with the steps that are needed to overcome the fact that our hardware is no longer officially supported. We will use OpenCore Legacy Patcher for that.
OpenCore is a bootloader that is often used for Hacintosh builds but it runs on real Apple hardware just fine as well. OpenCore patches or changes some data in memory, making the software think it is running on newer hardware and by this bypasses any restriction.
To start with this, we first need to download the latest version, which can be found here: https://github.com/dortania/Opencore-Legacy-Patcher/releases
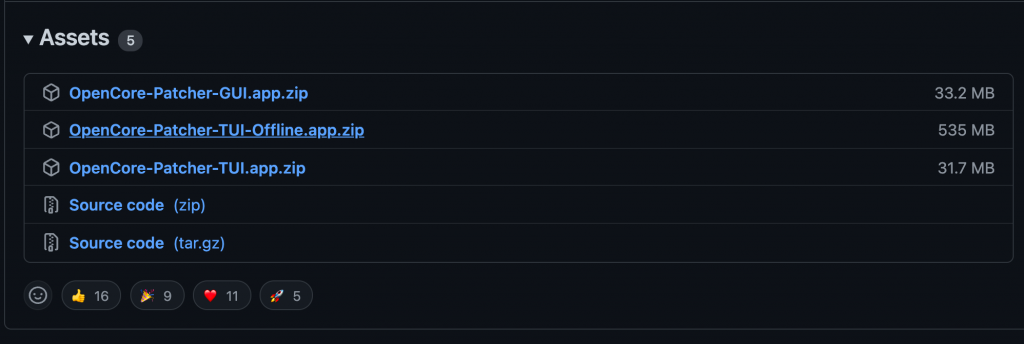
As you can see, there is a graphical version (OpenCore-Patcher-GUI.app.zip), an offline text-based version (OpenCore-Patcher-TUI-Offline.app.zip) and a text version (OpenCore-Patcher-TUI-Offline.zip). That last one, the regular text version, will do just fine.
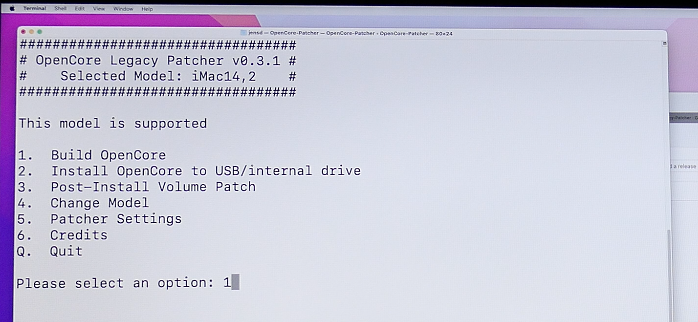
After downloading OpenCore-Patcher-TUI.app.zip, extract it by clicking on it in Finder and open the application. You should see a terminal window now with several options:
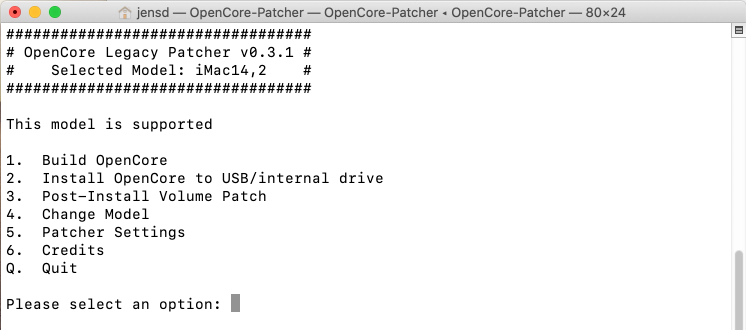
We need to start with option 1) Build OpenCore:
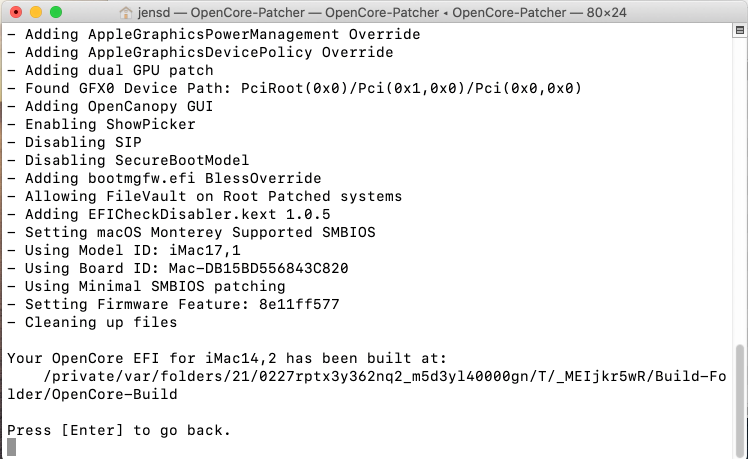
This shouldn’t take very long. As you can see in the output, this has built OpenCore specifically for the Mac model which we are working on (iMac14,2 in my case).
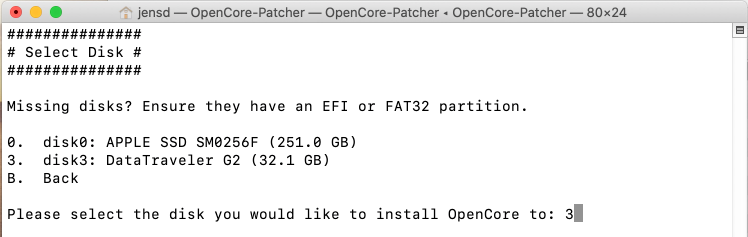
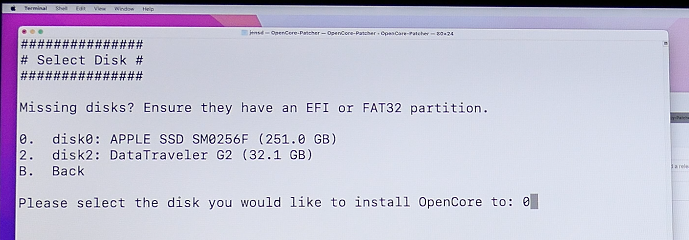
Press Enter to go back to the main menu and now choose option 2) Install OpenCore. After entering this option, select your USB drive from the list (disk3 in my case):
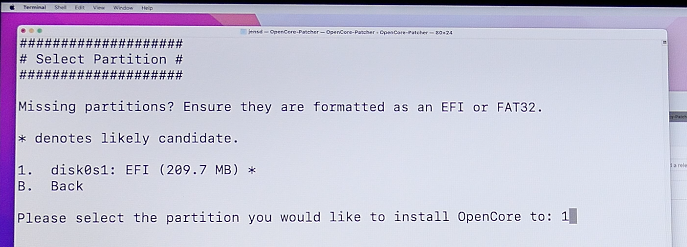
In the next screen, select the only EFI partition which exists on that drive:
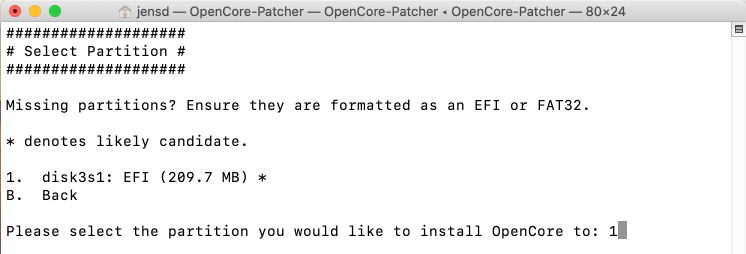
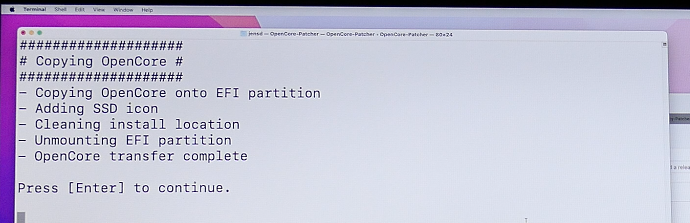
This will install the OpenCore bootloader to the EFI partition on the USB drive. In a later stage, we will repeat this process but for the internal drive in our Mac.
Step 4) Boot from the USB drive and install macOS Monterey
Boot OpenCore and launch the installation
The USB drive is fully prepared in the previous three steps. Now it is time to boot the Mac from the USB drive in order to install Monterey. To do so, reboot your Mac and hold down the Option key during boot time.
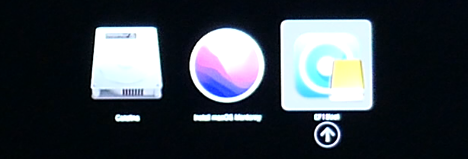
Holding down the Option key brings up the bootloader. In there, you should see the currently installed system (named Catalina in my case), an entry to install Monterey and an EFI boot entry with the OpenCore logo. The last two are on our USB drive.
From here, the standard bootloader, we can’t start the installation as we need to do this from OpenCore to hide the real system identifier. Instead, select the EFI boot entry using the arrow keys and press enter:
This brings you in OpenCore, which looks very similar to the standard bootloader. THe only difference is the text at the right bottom corner. From here you can now choose the “Install macOS Monterey” option:

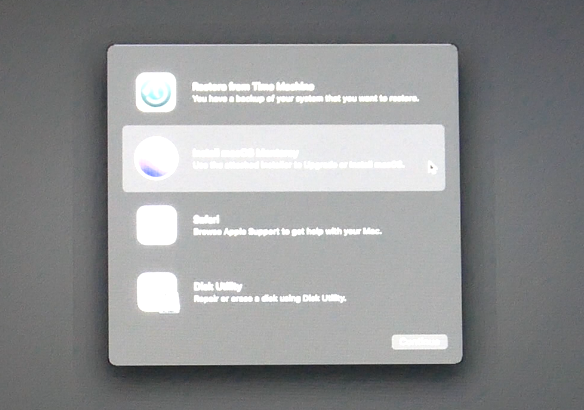
This will launch the installer from the USB drive, which can take some time. Once you arrived in the installer, you should see something like this:
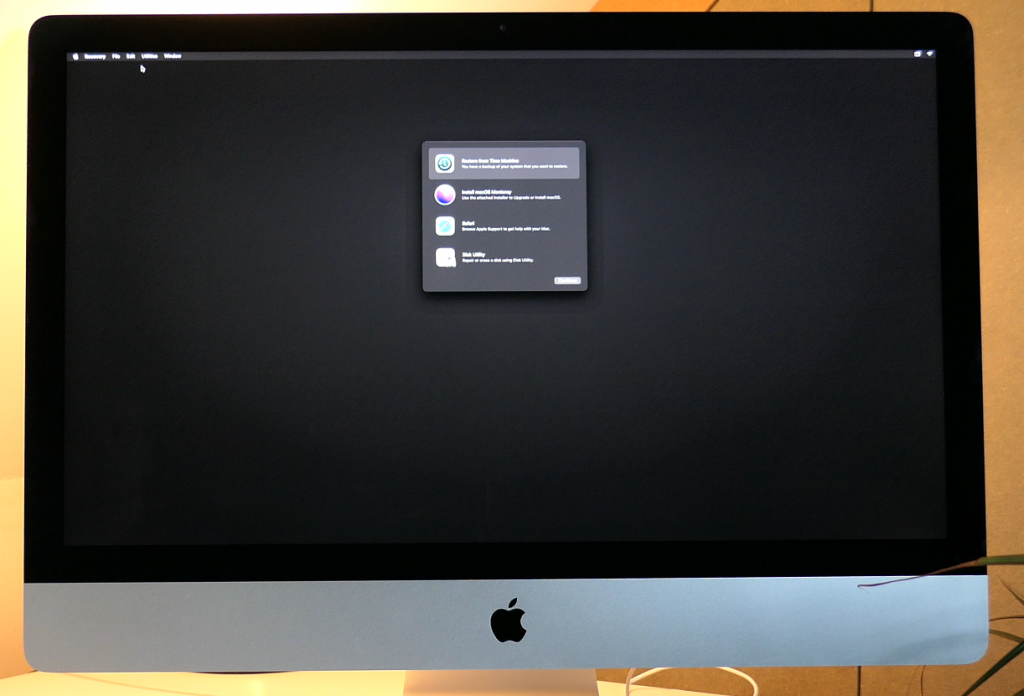
Prepare your internal SSD/HD for the installation
At this point we need to decided where we will install Monterey:
- Fresh install: remove the existing installed system, and give the full drive to Monterey
- Dual boot: add a new Volume and resize the existing one(s) to keep your current macOS and add Monterey
- Upgrade: upgrade your existing installation
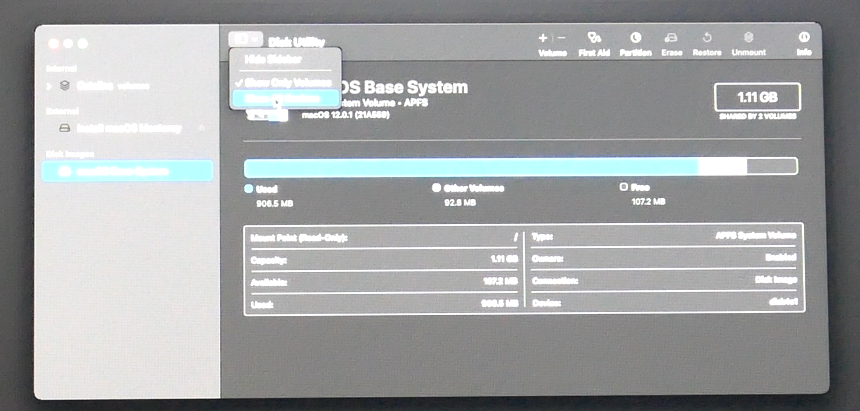
For the first two, we need to launch Disk Utility first from the menu as we need to prepare our drive. In Disk Utility, first click on the button to show All devices:
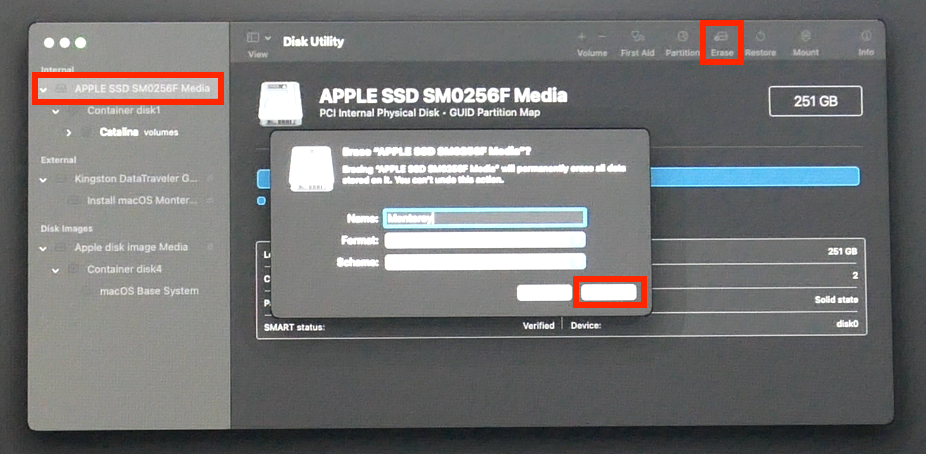
For option 1, to go for a single OS and do a fresh install of Monterey, click your drive (internal SSD/HD) on the left side and click Erase. Give your drive a name (I chose Monterey), choose APFS as Format and GUID as scheme:
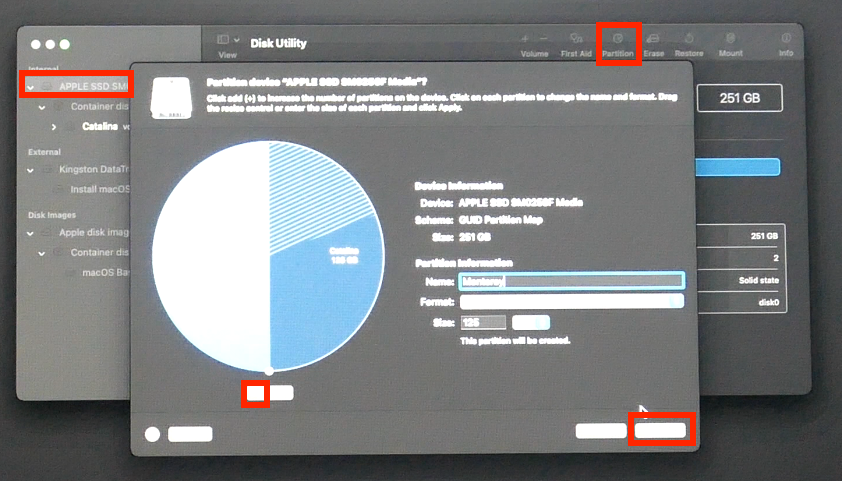
For option 2, to add Monterey together with your current macOS install, click your drive (internal SSD/HD) on the left side and click Partition. Click the plus sign here to add a partition and choose to add a partition rather than a volume.
You can change the size on the left side, name the volume (I chose Monterey) and choose APFS as format:
As soon as Disk Utility is ready with the operations on the drive, we are good to move to the next step.
Install Monterey
Now that our disk is prepare, or you decided to upgrade the existing install, you can start the installation from the menu:
Click Continue, accept the license agreement and select the volume on which you want to install Monterey. Here you need to select:
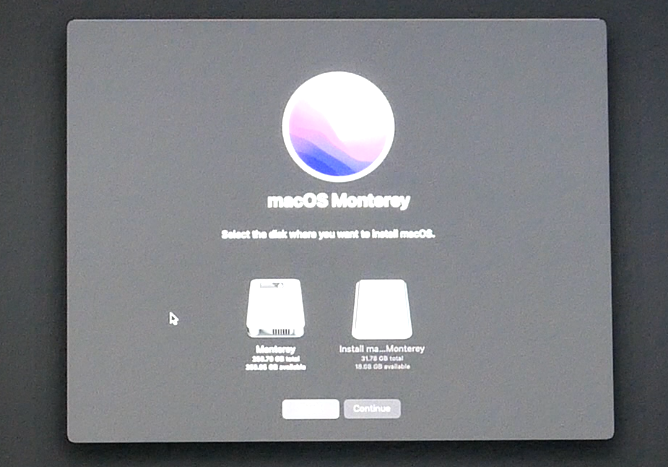
- Fresh install: the only internal volume you see here (called Monterey in my example)
- Dual boot: the volume which you added during the partition part (called Monterey in my example)
- Upgrade: select the volume which you want to upgrade (called Catalina in my case)
From here on, you can relax and sit back as the installation can take quite some time. If all goes well, you should see the following screen after a series of reboots:
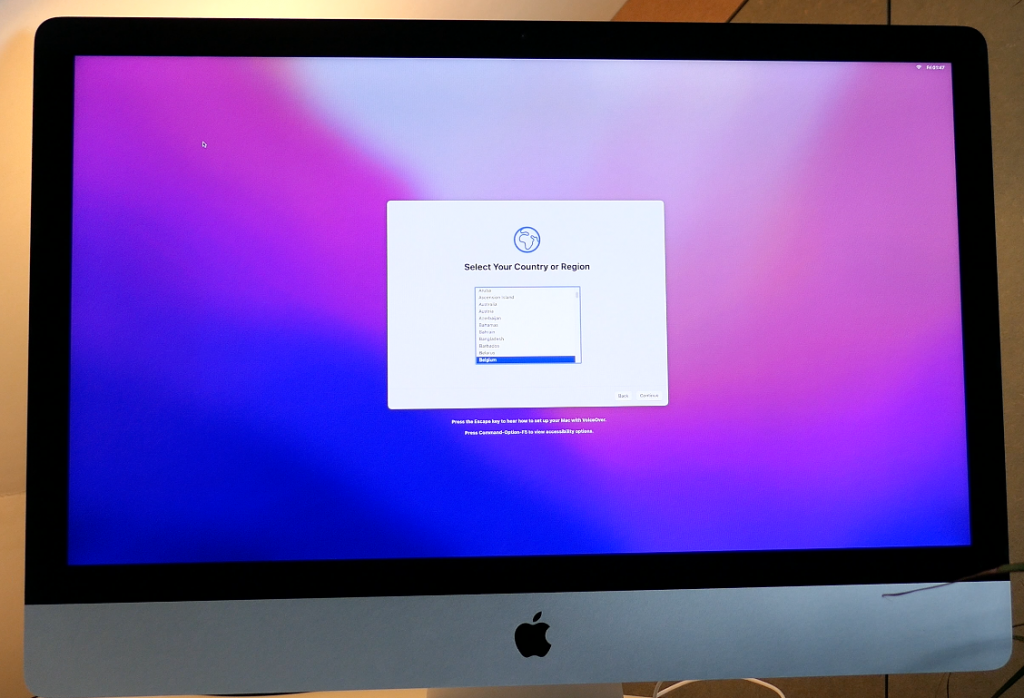
Navigate through the questions, which differ depending on which type of install you decided to go for. You can notice in some cases that everything is pretty slow. This is due to the lack of video card drivers or Metal support. which we will fix in step 6.
If all goes well, you should end up on the desktop of your newly installed macOS Monterey system:
Step 5) Install OpenCore on the SSD/hard drive
So far we have successfully installed Monterey on our Mac. But to start it, we still need to boot from the USB drive as that is where OpenCore is currently installed. In order to fix this, we need to install OpenCore to the internal HD/SSD instead.
This goes in the same way as we did in step 3) for the USB drive. We first need to download the latest version of the OpenCore Legacy Patcher, which can still be found here: https://github.com/dortania/Opencore-Legacy-Patcher/releases
Again, download OpenCore-Patcher-TUI.app.zip, extract it by clicking on it in Finder and open the application. In the terminal window, we again need to start with option 1) Build OpenCore:
Once complete, go back to the main menu and now choose option 2) Install OpenCore. Here we now need to select our internal drive (SSD or HD) instead of the USB drive:
In the next step, select the EFI partition on it:
Just as in step 3, this will install the OpenCore bootloader to the EFI partition, allowing the official bootloader to boot from it:
At this point it is safe to eject and remove your USB drive. In case you have a fully supported (AMD-based) graphical card, you should be done here and you can do a reboot to test if everything still works.
In some cases it might be needed to boot holding the Option key, then select OpenCore.
Step 6) Optionally install patches
If the model of Mac which you are using doesn’t have a Metal-supported card or you are having one of the NVIDIA-based models where Apple decided to remove support for, you need to go through this additional step.
In this step, we will install some patches ion the system that will either add graphics acceleration for non-Metal card or fix the driver issues for others.
Re-launch the downloaded OpenCore legacy patcher, which you downloaded in the previous step. Now choose for option 3) Post-Install Volume Patch:
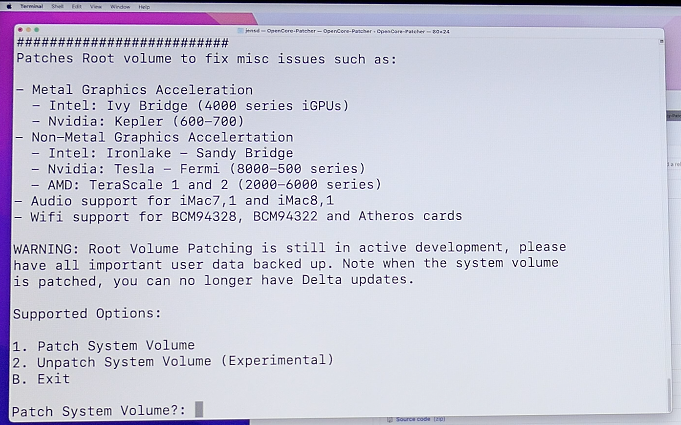
Then select 1) Patch System Volume:

Depending on which patch is needed for your system, a selection will be made and applied after confirmation.
After going through this, perform a reboot and you should be done. In some cases it might be needed to boot holding the Option key, then select OpenCore.
Performance
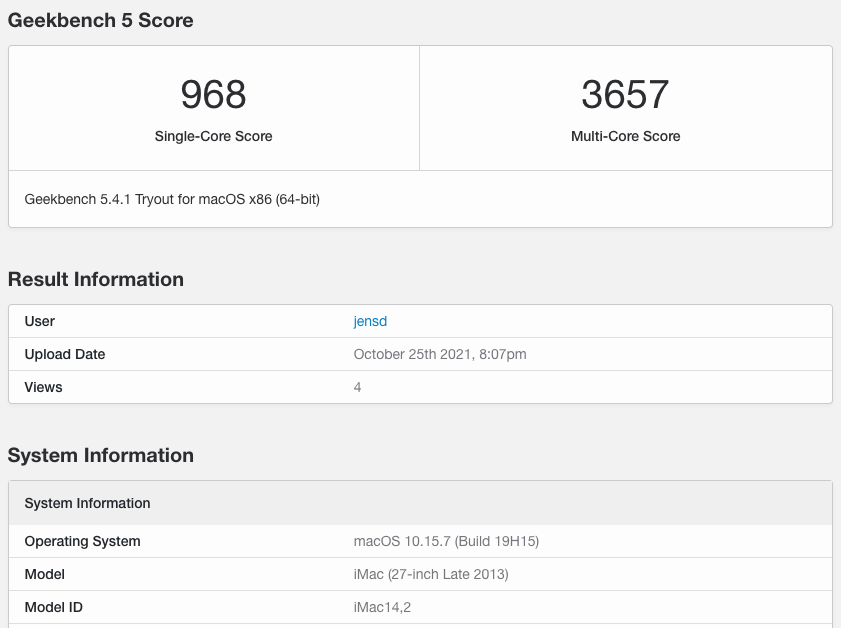
As I wanted to check if there would be any performance impact after upgrading to Monterey, I did a Geekbench 5 test on my system while it was still on Catalina:
These were the results for my iMac while being on the last supported OS: Catalina:
And the same test after upgrading to Monterey:
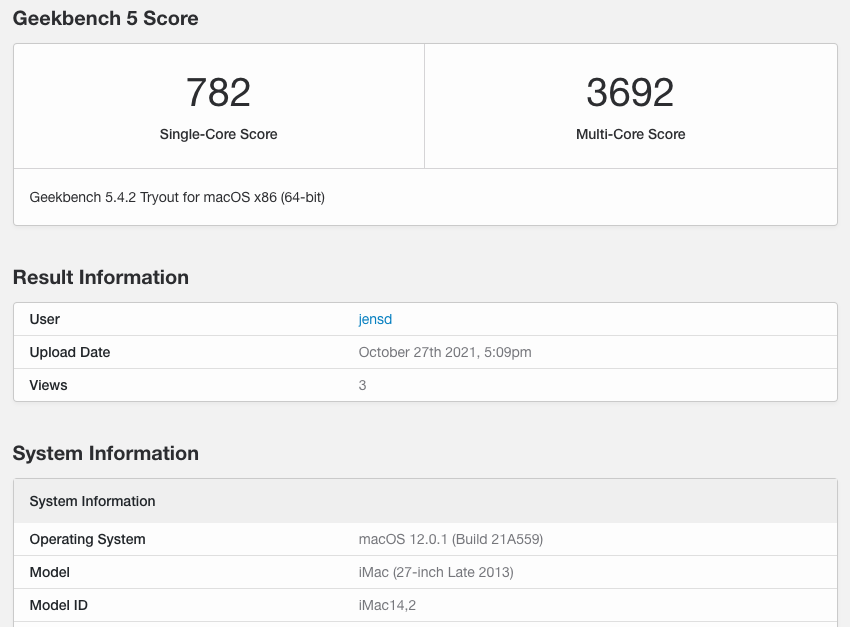
Strange to see that the single core score is lower but the important one, Multi-Core, is slightly higher so definitely not worse.
In general the system feels very snappy and I don’t really notice any performance loss in comparison with Catalina.
Hope this post will help you to extend the life of your beloved Apple Mac :)
Hi Jens!
Thanks for your explanation. I’m thinking to do a Fresh install ( MacMini 6.1) in that case, I don’t really need a extra patch for graphics, isn’t it ?
I understand that With Metal support, everything newer than the following is fine – includes mine (MacMini6.1) at this moment it’s Capitan installed.
So, can you confirm me please? For be sure.
After that, any update of Monterey will work? or it’s better OFF updates?
Thanks for your time
I think a patch is also needed for the Intel HD graphics in your Mac Mini, which should be HD 4000 (Ivy Bridge).
It works in the same way to apply them. Updates should be fine but maybe better to wait a few days after they get released to see if it won’t cause issues.
Thanks Jensd!
I’m Capitan right now… I’ll do a fresh install of Catalina because I saw that have a new format (not Mac OS register) and then go forward a new fresh install of Monterey. It’s the best option? or I have to install first Big sur?…
I mean … Catalina, then Big sur .. and later Monterey.
For a fresh install, you can just go immediately for Monterey. No need to do this for each version.
Hi, thanks for the great tutorial. Everything was pretty much straight forward up to installing Monterey from the bootable USB. The installation starts, but is then halted with the error message: “The Operation Couldn’t Be Completed. Permission Denied.”
Any idea how to fix this?
Mac Mini 6,2 Running OS X Catalina 10.15.7
Make sure you selected the whole USB-drive (use show all devices in Disk Utility) and Erase the USB Drive using GUID as scheme.
You could also check if you see the USB-drive as bootable using the Startup Disk utility and force it to boot from it over there as well.
when i opened the opencore again to install it on the internal hard drive it gave me error about /var/ path of folder that it’s not exist, can you tell em why that happened plz?
Hello Jens,
Thanks so much for the effort for this excellent step-by-step guide, its completely clear and easy to follow. I have all the tools mentioned in the guide but I have not yet proceed to install anything on my MA mid 2013 (currently with Catalina) as I have some questions:
1. I plan to have install Monterey on a 128 GB USB drive which I have currently partitioned it to allocate both the installer, and the OS, so, if I follow the procedure, will this allow me to chose the specific partition in my USB drive? (That is, Step 5) Install OpenCore on the SSD/hard drive). I don’t want to neither update nor make a clean install it as I want to test this new MacOS first.
2. After installing OpenCore in my USB flash drive, can I undone the installation if I format the drive or it will be permanently be modified?
3. After installing the new OS, what about the needed security and regular Apple software updates? For what I read in other forums, no OTA will be possible using this method on unsupported macs; I guess I could download them manually. Can you confirm please?
Kind regards
JM
1) Should work in theory but I didn’t try that yet
2) After formatting/erasing the drive, all will be back to normal. The patcher just changes files in the EFI partition.
3) Updates should be coming in but it might be good to wait a few days to accept them and see if others got them tested first.
Pingback: Install macOS Monterey on unsupported models - DZTECHNO
It didn’t work on a Retina 15-inch Late 2013 macbook pro
What exactly didn’t work?
I have the same issue with adi.
I followed the steps until step 4th
the situation are:
1. Install completed, but MacBook Pro cannot enter the login screen
2. I can hear the “Voice over” instructions, but the screen also in the boot process.
3. I can follow the “Voice over” to set up whole OOBE settings and enter to the desktop while the screen still in the boot process. like fullscreen snapshot cover the real desktop.
4. Every keyboard and mouse event are executed well
I think the hole process is perfect but at the end of it, I just cannot enter the desktop. What should I do.
Thanks
My MacBook Pro is A1398 15′,1TB, 16GB, NVIDIA GeForce GT 750M 2GB GDDR5
Not sure what is happening. You have nothing on the screen? Or there is something over it?
Was this a fresh install or upgrade?
Yes, It’s a fresh install.
There is a Apple icon and a process bar running about 20% on the screen when I hear the “voice over” instructions.
And process bar is freeze while I finish whole OOBE settings.
Any suggestions?
THANKS Jensd
I have the same exact issue? Can you fix it? Thanks in advance!!! Help please -> @ulisesmathey
Sale model. Macbook pro 15” latr 2013. Stuck with the apple logo and can hear the voice over reading the screen.
I have same MacBook Pro as adi and mine hangs upon final boot screen with the apple logo. the install hangs just before the line gets to the apple logo and stops there. let it go for two days. have retired many time still the same out come have the intel iris pro 1536 MB video card
I solved this issue. Because of Nvidia graphic card driver is not Patched.
follow these steps:
1. Restart Macbook with OpenCore-Patcher EFI,
2. Press “Shift” key to safe mode
3. open “OpenCore-Patcher” in usb disk
4. go through 1 Bulid & 3 Post-Install Volume Patch & Patch System Volume
5. Select your graphic card type, and yes
6. Waiting download drivers almost 100mb. then done
7. reboot with OpenCore-Patcher EFI,
8 Enter Monterey
then Solved
that did it thank you so much !!!!!!!!!
I did everything on a macbook pro mid 2014 (11.1), it works ok and boots with the usb drive, no kernels needed. The only problem i’m getting is that i cannot boot without the usb drive. I tried to install open core to internal ssd by disabling first verbose and the picker but i get a blank screen followed by a question mark. When the usb drive is inserted works perfectly. What could it be? Should i disable filevault?
It could be that you will need to boot holding Option first, then manually select your internal drive.
After you are in macOS, you can configure the startup device using the Startup Disk Utility.
Hi,
Thank you very much for that great manual to get my iMac10.1 Later 2009 running Monterey. That’s a great help to get the system up to date with all Apps able to preform update (especially MS-Office 365) too. Great stuff!
I followed the instruction step by step without getting any surprises at all. The preparation and installation was running like shown in your video.
But I have one remark:
If you are running the update on some very outdated iMac like the 2009 Later model, please make sure to use the OFFLINE VERSION of OpenCoreLegacyPatcher (560MB file). This is a great help, because your WIFI-Adapter is not working anymore after for installation and first start of Monterey.
To fix issue this with unsupported WiFi-Adapter, you have to install the Legacy Patch to get WIFI running again. If you just download ed the online version of OCLP (32MB), you are not able to perform the patch, because it demands an existing Internet connection.
PS: a proper workaround is an Ethernet cable connection
Thanks for the tutorial..I did it on my MBP 2010 15inch..
I have little problem..after fully install the monterey, the graphics are very laggy..
NVidia GeForce GT 320M 256mb..
What should I do ?
Did you install the patches after going through the installation?
That should fix the graphics performance.
The problem hangs on HID: Legacy Shim 2
and the error icon =(
How can I do this AND use “BOOTCAMP”? It says create 200mb partition so I tried. No luck. What now?
Didn’t use Bootcamp on Monterey yet but you could create a bootable USB drive for Windows 10 or 11 and install it without bootcamp.
Did articles on that as well.
– For Windows 10: https://jensd.be/1349/windows/create-a-bootable-windows-10-installation-usb-on-macos
– For Windows 11: https://jensd.be/1429/windows/install-windows-11-on-your-mac-without-parallels-or-bootcamp-assistant
I installed win11 with the mentioned tutorial. Nevertheless after monterey installation, I have a warning that I won’t be able to boot Windows:
– Found Windows Boot Loader
Would you like to continue installing OpenCore?
Installing OpenCore onto this drive may make Windows unbootable until OpenCore is removed from the partition
We highly recommend users partition 200MB off their drive with Disk Utility
Name: OPENCORE
Format: FAT32
Size: 200MB
I created a partition of 1.5 GB named opencore. and try again but I got the same message… Should I install opencore on this new partition? Many thanks
How can I run macOS Monterey & BOOTCAMP? Also the recovery screen is still OS X. Even though I am on macOS Monterey. Why?
Didn’t use Bootcamp on Monterey yet but you could create a bootable USB drive for Windows 10 or 11 and install it without bootcamp.
Did articles on that as well.
– For Windows 10: https://jensd.be/1349/windows/create-a-bootable-windows-10-installation-usb-on-macos
– For Windows 11: https://jensd.be/1429/windows/install-windows-11-on-your-mac-without-parallels-or-bootcamp-assistant
How to remove Open-Core or make the recovery menu [command+r on boot] MacOS Monterey? Thanks for the quick reply. I’m on a mid-2012 MacBook Pro.
Your video is very clear and is an excellent guidance.
I am running Big Sur 11.6.1 on MBP 10,1 mid 2012 with 16 gb ram i7 chip and retina display.
I want to upgrade to Monterey. and do a fresh install.
Therefore my internal ssd will be erased. Question: do I lose all my data and progs in the process?
If you choose for a fresh install, all will be gone. That’s kind of the reason why one would want to do a fresh install.
In case you want to keep what you have, you can upgrade or do a dual boot.
Can i upgrade to this windows 11 on x32 windows 10 with x64 processor.
In the Microsoft Website it is specified that it requires x64 processor not os.
Kindly reply. I also left an like and subscribed your channel
As far as I know there is no upgrade path from a 32 bit Windows 10 to Windows 11. You can do a fresh install or dual boot though.
Hi Jans,
Thank you for the great tutorial. I managed to update my iMac late 2012. The only thing I notice is that the graphics are slow. I looked if I can find the metal support string in System information, but it’s not there. Should you recommend to run the post install script?
Just give it a try. The patcher will check if patches are needed or not.
Can’t get this to work on my Macmini5,1 (2011). All goes as expected until the Monterey installer is launched from the OCLP boot-picker. Progress bar under the Apple logo stalls indefinitely after filling to the 30–50% range. Repeated reboots, Option-select at boot, clearing NVRAM all haven’t solved the problem. I even tried it with OCLP and the Big Sur and Catalina installers; same result. Help?
Turns out the problem was related to using the built-in SD card slot; somehow it got deactivated during the boot process, thus taking offline the very installer that was in the process of booting. Attaching the SD card via an external USB card reader solved the problem. (As the 2011 Mini has only USB 2.0 ports (not 3.0), the install was slow, but it worked.)
just updated my macbook pro late 2013 to 12.1.
Hi Everyone,
First of all thanks very much to Jens for this excellent tutorial!
Has anyone tried to install Monterey on an iMac 14,2 with a 3,1 TB Fusion Drive?
Can the EFI Boot still be installed on either the 128GB SSD or the 3 TB HardDrive (or both)?
How would you patch the EFI of the Fusion Drive?
Thanks very much for letting me know.
Interesting question! Is this an original-recipe Fusion Drive (created via CoreStorage and formatted in HFS+), or has it been re-created as an APFS “Fusion Container”? It’s most likely the former, but I thought I’d ask anyway.
Hi,
Thanks very much for your kind reply.
I have never touched the Fusion Drive apart from the conversion to APFS when Apple introduced this with one of the upgrades to the related MacOS X version. So to answer the question: It is actually an ” Apple_APFS Container”
“diskutil list” shows:
/dev/disk0 (internal, physical):
#: TYPE NAME SIZE IDENTIFIER
0: GUID_partition_scheme *121.3 GB disk0
1: EFI EFI 209.7 MB disk0s1
2: Apple_APFS Container disk2 121.1 GB disk0s2
/dev/disk1 (internal, physical):
#: TYPE NAME SIZE IDENTIFIER
0: GUID_partition_scheme *3.0 TB disk1
1: EFI EFI 209.7 MB disk1s1
2: Apple_APFS Container disk2 3.0 TB disk1s2
/dev/disk2 (synthesized):
#: TYPE NAME SIZE IDENTIFIER
0: APFS Container Scheme – +3.1 TB disk2
Physical Stores disk0s2, disk1s2
1: APFS Volume Macintosh HD – Daten 1.7 TB disk2s1
2: APFS Volume Preboot 11.0 MB disk2s2
3: APFS Volume Recovery 529.0 MB disk2s3
4: APFS Volume VM 1.1 GB disk2s4
5: APFS Volume Macintosh HD 11.2 GB disk2s5
I am a little hesitent to follow your tutorial as I don’t want to “brick” my iMac. What would happen if I apply the modification to EFI on disk0 and/or disk1?
Also any experience re. performance on Fusion Drive Systems?
Would I alterntively be OK just using the boot usb stick and boot from there from now on. Maybe a little inconvenient but would that work?
Thanks very much!!!
Amazing tutorial and worked very well. I was also able to install OpenCore on my harddrive so I do not need a USB drive anymore to start.
The only question I have is now every time I start my Mac, it shows the boot menu (like if you start with Option button). Can I fix this?
Try holding down the CTRL key, the next time you select your desired boot volume. That should establish it as the default selection.
Neils-MacBook:~ neil$ sudo /Applications/Install\ macOS\ Monterey.app/Contents/Resources/createinstallmedia –volume /Volumes/32GUSB
/Applications/Install macOS Monterey.app does not appear to be a valid OS installer application.
any idea? on el captain.
trying to install on a early macbook 12 2015
How did you download the app? What is the size?
I’ve seen this before for an app that was smaller in size than expected (~20MB instead of ~few GB)
Did exactly what is written. Works great on macbook pro 9.2 mid2012. Great work thank you!
Its just somehow keyboard backlight is not working. I installed patch as well. Would be very appreciated for a help. Thanks in advance
This fixed it for me:
mkdir /Applications/Install\ macOS\ Monterey.app/Contents/SharedSupport
mv ~/Downloads/monterey/SharedSupport.dmg /Applications/Install\ macOS\ Monterey.app/Contents/SharedSupport/
Thanks! I used pkgutil to extract the pkg-file and the file SharedSupport.dmg was missing on my system, too.
Just an update. on a MacBook Pro late 2013 retina –just installed Monterey 12.2 beta. working great
Did exactly what is written. Works great on macbook pro 9.2 mid2012. Great work thank you!
Its just somehow keyboard backlight is not working. I installed patch as well. Would be very appreciated for a help. Thanks in advance
UPDATE:
I updated mojave 12.1 and ınstalled optional patches again. Everything works good.
Attempting install on iMac8,1 and using the GUI open core installer. Stuck in step 4. I always get placed back into the Recovery. I believe the install worked, but how do I now progress to step 5?
Very well written by the way. I like your style!
Fails at:
Step 4) Boot from the USB drive and install macOS Monterey
“Holding down the Option key brings up the bootloader.’
is there a way to verify:
Step 3) Build and install OpenCore on the USB drive
“This will install the OpenCore bootloader to the EFI partition on the USB drive.”
System Preferences / StartUp Disk
does not list the USB as bootable option.
Hi,
Many thanks for the detailed and straightforward guide.
Following these instructions – mostly by following your youtube video, I have successfully installed Monterey on 4 iMacs, as listed below. Here is my experience with this.
1) iMac (27-inch, Mid 2011) 3.4 GHz Quad-Core Intel Core i7, AMD Radeon HD 6970M 2 GB
This was the first one I did, and all together it took the best part of 4 hours, mostly waiting around for the installer to be written to the USB stick – because this iMac only has USB2 ports and not the faster USB3, so it was about 2 hours writing to the USB stick (12gb of data). The installation also took a long time, but not because there was lots to do, 95% was waiting around.
My top tip for anyone trying this: it’s very important to make sure each stage completes as per the youtube video. This is in the terminal command line stuff. It can look like nothing is happening for long periods and several times I thought it had frozen or actually finished, but it hadn’t. I just had to keep waiting, especially after 90 minutes of writing to the usb drive, it seemed to be complete – even after it said “Copying to disk: … 90%… 100%” it then seemed to be finished, no activity, but it took another 20+ minutes before saying “Install media now available at “/Volumes/Install macOS Monterey”
Pay careful attention to the readout on the terminal in the youtube video and it should be exactly mirrored on your terminal.
When I first booted it up in Monterey it was very slow / unresponsive, as described in the video. After I installed OpenCore to the internal hard drive and did the patches and restarted, it was fast and responsive. The patcher gave me a warning that the graphics might strobe and they did, rapidly switching colours when I moved the mouse. The patcher told me that the solution was to install “SwitchResX” or “ResXtreme” (which are little programs to switch and set the screen resolution) and to set / force the colours to 1 million (instead of 16 million?) – this is 8 bit verses 10 bit on the ResXtreme options. I did that and it worked. Not sure how this will effect the experience.
I’ve installed Garageband (which I couldn’t do with High Sierra – unsupported) and it runs but stops working when I try to bring up the virtual instruments for programming – it doesn’t crash, but pops up a window with this message:
“Unable to Initialise Graphics.
Unable to initialise graphics. This typically happens when running inside of an unsupported virtual machine environment, or when running on an unsupported Mac.”
There is an “OK” button to click, which then quits GarageBand.
On the activity monitor, after clicking the CPU Load display the CPU History window opens showing the individual Core activities. This CPU has 4 cores with another 4 virtual cores. All 8 show up in the CPU history, but 99% of the activity is in the odd numbered cores, the even numbered cores are barely used. No idea why this is.
2) iMac (27-inch, Late 2013) 3.5 GHz Quad-Core Intel Core i7, NVIDIA GeForce GTX 780M 4GB
3) iMac (27-inch, Late 2013) 3.2 GHz Quad-Core Intel Core i5, NVIDIA GeForce GTX 755M 1GB
I used the same installation USB drive that I created for the first iMac above, so I didn’t need to spend ages writing the Monterey files, but just needed to replace the OpenCore files on the USB drive – I followed the exact same sequence as before – the OpenCore terminal program did everything automatically, clearing the old files and replacing them with the new ones. Both these iMacs identify as “iMac14,2” but I repeated the OpenCore stages for each one separately. Both were slow on initial startup but were fast after patching etc. There were no problems with the graphics and GarageBand functions completely.
4) iMac (20-inch, Mid 2009) 2 GHz Intel Core 2 Duo, NVIDIA GeForce 9400 256MB
Again, same installation drive with updated OpenCore files for this specific iMac. The installation took a very long time – the installer “time remaining” numbers should be completely ignored. When it got to the very end, stating “less than a minute remaining” it stayed like that for half an hour or more – the feeling that it had crashed or frozen was very strong – several times I nearly gave up and was tempted to restart via the power button, but eventually it completed and restarted on its own. Before installing the patches, it was unable to see any wifi networks, but it was able to work with a network cable and download the OpenCore file, then download the patches. It was very sluggish before patching, but afterwards it picked up a lot, but the performance is slow for everything. Monterey is running but the iMac is struggling to keep up. Apps take ages to open. With this iMac and the first one (above), there are residual artefacts with the graphics – mostly a slight change in the background colour as I move the mouse pointer around inside system / program menu dropdown windows and right-click menus.
This iMac has only 4GB of RAM and a mechanical hard drive, but on the activity monitor it’s the CPU which is maxing out – even just playing a video on YouTube – and there are many videos it can’t / won’t play. Installing Monterey on this iMac was really just an experiment and it may be fine for graphics-lite activities (I will try it further) but it will probably work and feel better with a Linux OS. Any recommendations?
Hi Steve,
had any of your iMacs a fusion drive and if yes how have you installed the OCLP boot loader on that fusion drive (SSD EFI partition or harddrive EFI partition or both)?
Or did you use the usb stick to boot?
I would like to install Monterey on my fusion drive over an esiting Catalina installation. I just cannot find anyone who has successfully done that. See my question on this page in the above to see the partition layout.
Thanks very much and kind regards
Marco
Unfortunately I don’t have any Mac with a Fusion drive. I do know they are just logically merged together, not sure how OpenCore handles this.
Should try to get my hands on something with a fusion drive to play with it a bit more.
I came here to ask Exactly this question, as yet another person with very limited Geek skills at this level and a deep paranoia of Bricking my iMac! :+)
Hi Marco,
Sorry, none of my iMacs has a fusion drive. My gut instinct would be to install on which ever drive is listed first / has the lowest number.
Steve
Thanks for the good tutorial. Installation worked fine on my MacBook Pro Retina Mid 2012.
The only annoying i have is that even in standby mode the fan is going crazy… any known issues about that?
Is there an easy way to uninstall Monterey, to reverse this process? I installed it on several iMacs (see my previous reply), as dual boots with the original MacOS (various) I’d like to take one of them back to just the original OS, and recover the hard drive space and remove all traces of OCLP.
Just installed Monterey 12.2 beta 2. still working fine on a late 2013 Macbook pro retina 15 inch
I just finished the Monterey install It seems to be working except there is no WiFi and cant even get to internet with ethernet connected
You will most likely need to patch the install. This can be done with the OpenCore Legacy Patcher. Use another machine to download the offline version and run in on your Monterey-device to fix this.
Hi,
thanx for this great tutorial. I planned to install Montery 12.1 on my MacBook Pro 15 Retina
with Intel Iris Pro 1536 MB graphics
Must i install a patch after the installation?
Hard to tell without the exact model number or Intel Iris Pro number. But you can just run the patch option and it will auto-select patches if they are needed.
Thank you, i just installed Monterey 12.1 and all worked perfect
only the Boot Time is very long, but this is no problem
Perfect guide!
Thank you!
No further comment. Works great on an iMac late 2012. Happy with this. Thanx.
Thanks for the positive feedback. Good to see it helped you :)
Hi I follow your instruction on my mac mini 2012 fusion model, it works fine except one thing. I could not connect to my bluetooth heaset nc700, is it a limitation on the bluetooth discovery, Thank you.
Did you run the patches from OpenCore?
Worked great on my MacBook Pro (Retina, 13-inch, Late 2013) – MacBookPro 11,1!
I had to run the install of OpenCore twice on the hard drive as the first time it just wouldn’t boot.
Thank you SO much for this. It was ridiculous to have to buy a new Mac to get this update and I HAD to get it to meet OS security requirements for a client or I wouldn’t be able access their network after Jan 31.
Hi! thanks for the great write up! everything worked for me, but only issue i have is, I cant reboot without the USB, I patched opensource after the restart, and still don’t have the EFI boot option
Hello,
I have MBP 17” (Mid-2010, MacBookPro6,1) with 2.66-GHz i7 processor and NVIDA GeForce GT 330M/Intel HD Graphic video cards. I was able to install Mojave with no issues, but I wasn’t able to install Catalina, Big Sur, and Monterey thereafter. Boot-ROM Version is 99.0.0.0.0
I kept receiving the dreadful error message: An error occurred loading the update.
I have tried disabling the SIP, doing the PRMN reset, installing from Mojave, etc. It is so frustrating when I cannot figure out what triggered the error message when it doesn’t have any error code or additional information. I’ve spent a long time researching for the workarounds or solutions. Yet, many of them didn’t really give me much information on diagnosing the issue or have found the solutions but couldn’t be replicated on my MBP.
Please help! Thanks very much!
Just installed 12.3 beta Monterey on my Macbook Pro 15 inch late 2013 retina working great !!!!
and is your nividia gt750m working?
absolutely
Thanks a lot for your recipe :-)
works great. Did it on a iMac late 2014 with 1TB fusion drive. I take disk0 for EFI boot option. I thought this would be the right deciosion because the MBR ist on disk0. So far it works great. But in my opinion the fans go on more often. But I will take an eye on that…
Peter
Hi Peter,
that’s good news.
Could you do me a favour and check whether your fusion drive looks similar to mine:
My “diskutil list” shows:
/dev/disk0 (internal, physical):
#: TYPE NAME SIZE IDENTIFIER
0: GUID_partition_scheme *121.3 GB disk0
1: EFI EFI 209.7 MB disk0s1
2: Apple_APFS Container disk2 121.1 GB disk0s2
/dev/disk1 (internal, physical):
#: TYPE NAME SIZE IDENTIFIER
0: GUID_partition_scheme *3.0 TB disk1
1: EFI EFI 209.7 MB disk1s1
2: Apple_APFS Container disk2 3.0 TB disk1s2
/dev/disk2 (synthesized):
#: TYPE NAME SIZE IDENTIFIER
0: APFS Container Scheme – +3.1 TB disk2
Physical Stores disk0s2, disk1s2
1: APFS Volume Macintosh HD – Daten 1.7 TB disk2s1
2: APFS Volume Preboot 11.0 MB disk2s2
3: APFS Volume Recovery 529.0 MB disk2s3
4: APFS Volume VM 1.1 GB disk2s4
5: APFS Volume Macintosh HD 11.2 GB disk2s5
So looking at the above, have you been installing the OCLP boot on #1 (1: EFI EFI 209.7 MB disk0s1) as shown below?
/dev/disk0 (internal, physical):
#: TYPE NAME SIZE IDENTIFIER
0: GUID_partition_scheme *121.3 GB disk0
1: EFI EFI 209.7 MB disk0s1
2: Apple_APFS Container disk2 121.1 GB disk0s2
Thanks very much and kind regards
Marco
Question to ALL here…
Does any of this do anything at a ‘Firmware’ level, Such that (if it all goes horribly wrong) it’s no longer possible to Revert by starting up off an external Clone of the drive and Copying it all back?
When I input the “~ % sudo /Applications/Install\ macOS\ Monterey.app/Contents/Resources/createinstallmedia –volume /Volumes/…” code for booting the usb, terminal responds with “-bash: /Users/user: is a directory”… what am I doing wrong???
You need to start the command with sudo only, the entry before is your prompt (~ refers to your home directory).
So you need to enter sudo /Applications/…
Just an update. on a MacBook Pro late 2013 retina –just installed Monterey 12.3 beta 2 –working great
just an update and a warning. i installed the latest Monterey 12.3 beta 3 on my MacBook Pro retina late 2013–beta 2 was fine but the beta 3 wouldn’t allow me to install the patches–asked for my admin password and always said it was incorrect soooo started over and back on 12.2.1
oh yah—had the latest open core patch 0.4.2
Dear Jens
I am new comer to Mac world. I got a old MacBook from my friend and play with it. With you kind instruction, I installed Monterey on my MacBook Pro 13inch Early 2011 Dual core i7 16GB memory. graphic is Microsoft HD 3000 with 521M Vram. after upgrade, the Tram become 3M. may I ask how to fix this problem?
many thanks
Peter
Did you do the “post install” steps? (Step 6 – Optionally install patches)
Hi there. I have used Monterey with your instructions for a while now and it was lovely. Thank you. But now i want to sell my MacBook and want to restore the factory settings with cmd-R on a reboot. But i can’t get that to work. Whats the best way to proceed ? Thanks so much for your help. Best regards, Chris
Hey Jens,
thanks for this tut! Worked fine so far!
But i now have an issue with booting from my external drive that holds my old system backup. Usually i can just set this external drive to “set as start volume” and reboot. But this time when i reboot, it won’t start from my external drive but ALWAYS from the OpenCore loader. So my question is how can i start again from my e.d. bc i need to get some infos from my old system and need to reboot this one…
thanks for advise!
Regards, Boris
update on my Macbook Pro Late 2013 Retina 15. instaled the newest open core 0.4.3 and updated to macos 12.3. no issues
I have a question, when a new version of Monterey is available on app store as update, can I do it? Everything works or I have to apply opencore again?
You can update as normal. If you need the patch, you might need to re-apply that. So it’s a good idea to download an offline version of opencore before running the update.
absolutely correct—-every time i have updated. had to re patch
update i’m on a Macbook pro retina 15 late 2013–just updated to 12.3.1. no issues
I tried to instal this on a old iMac from 2008 with El Capitan, after I completed the installation the system reboots emediatly to the recovery program instead of the new macOS software. Please can anyone help me out?
Sorry for the bad English this is send from the Netherlands!
I have an iMac Late 2013, I did all the steps perfectly and the process was flawless, but I have one problem, everytime I reboot the computer it goes to bootloader with 4 icons, I can’t select anything, so I have to force restart and now it boots, any help?
tried to install monterey ( hackintosh) and while patching it says
OpenCore Legacy Patcher v0.4.3 #
# Selected Model: H310M S2
please advise
Hey!
I followed your steps about Monterey installation on unsupported macs and I face problem with SIP. I can’t disable it.
The command: “csrutil disable” on Recovery mode doesn’t work.
How I can fix it?
Do I use the OpenCore Patcher GUI for it? If yes, how?
I think I just installed 12.3.1 on the slowest supported Mac :)
iMac 7,1 late 2007, 6 GB, 240 GB SSD, exchanged 64Bit Peryn Core2Duo CPU-400Mhz FSB
Geekbench: single core: 352, multi core: 644
OK for Watching TV in FullHD … :)
No Bluetooth
No IR-remote
No DVD
Transparency flickering in Menus/Windows
Some graphic errors after sleep
Cam/mic are working in Skype but not for PhotoBooth
Stocks has chrashed
did you patch the install after you rebooted
Hi jens. I’m going to install on a MacBook Pro 7.1, I don’t know if it’s metal, but will I encounter anything if I do this installation?
Hi
Im on a Mid 2012 6 core 3.33Ghz Mac Pro with 128 gig RAM. Mojave and Catalina were fine but I have never been able to get any type of boot screen. Big Sur install was perfect with V0.7.9 Opencore but yet again I get zero boot screen with and without holding ALT. GPU is a Radeon RX570 4gig. I have tried everything but nothing works for me to get a boot screen or bootpicker options. I do a Carbon Copy Cloner backup of my apps etc daily (as you know CCC won’t let you do a full system backup of Big Sur and their legacy backup option works only now and then). So I have both my SSD’s with Big Sur installed ((with latest updates). I can enter Recovery Mode and I get the screen options but I want the bootpicker. Any advice
Ive updated my Macbook Pro late 2013 retina 15 inch to latest macos12.4 no issues. also using latest open core 0.4.5
thank you Jens,
just installed it on a old iMac late 2009 with intel core 2 duo, and it runs fine.
had a few issues with booting, but i had to read the whole instruction.. my bad..
my kid can now play a up to date imac for some time to come.
thanks,
Richard
a little update,
i have this to:
Transparency flickering in Menus/Windows
did the whole patching of drivers but stil happens
it only happens with the transparent windows not the dark windows.
also not in the browsers or other windows
Not sure what could be the cause of this. 2009 is pretty old so maybe a workaround could be to disable window transparency as a whole?
Pingback: E se il Chromebook migliore fosse un MacBook Air? Proviamo Chrome OS Flex – SaggiaMente | DailyNews
Ive updated my Macbook Pro late 2013 retina 15 inch to latest macos12.5.1 no issues. also using latest open core 0.4.1.0
0.4.10 sorry was typing to fast lol
Question. should this work fine in iOS
12.6
Hello! I am trying to update a 2012 iMac 27″ with this Monterey installer. I have previously done it with another 2012 model and it worked perfectly. The process worked perfectly up until the software had been installed the machine. I could use my magic keyboard only if it was plugged in, this meant that I couldn’t use my Magic Mouse at all. So I couldn’t navigate through the set up of my Mac to access bluetooth functions. The odd thing is they are paired to that iMac because I wiped the machine and loaded Catalina onto it and the mouse and keyboard worked instantly. Has anyone had this issue and if so, have you found a fix?
Pingback: Install macOS Ventura on unsupported models | Jensd's I/O buffer
installed latest open core patchet 0.5.1. installed ventura on my Macbook pro 15″ retina late 2013. is awesome. no issues
Great to hear. I did see there is a new release already, adding support for some more devices.
I do like you and I am having trouble installing monterey. When installing with opencore patcher, I get the error: “Installation failed, An error occurred while installing the selected updates”. What to do? :( Macbook pro 9,2 2012 mid
just updated to Ventura 13.0.1 on my Macbook pro 15″ retina late 2013 no issues sweet
just updated to Ventura 13.1 on my Macbook
Pro 15″ retina late 2013. no issues so far lol
Hi Jens,
Trying to upgrade from Big Sur 1.7 to Monterey 12.6.
Macbook Pro 2014 model I am working with.
OpenCore now has its own program when you open it, eliminating the need to use terminal.
Have you seen this program and can guide through the steps? I tried following your tutorial but got lost after the first reboot. I think I got to disk utility, however was unable to erase the drive. The option was not available
I’d be grateful for assistance as I’m trying to download Logic Pro for Mac which only runs on OS 12.3 or later
Kind Regards
Justin
Have a look at the post I made for Ventura. That should cover the steps pretty well: https://jensd.be/1897/apple/install-macos-ventura-on-unsupported-models
Thanks for this
Needs one update though – the text version is no longer available, its gui only
You can use the same process for Ventura, just select Monterey as version in the downloaded. This has been explained in this post: https://jensd.be/1897/apple/install-macos-ventura-on-unsupported-models
If you really want to use the CLI-version, you can download an older release of OCLP but I would recommend to go with one of the newer versions.
Thank you for the very detailed tutorial. I followed it successfully to update my OS but I goofed because I did a new install instead of an upgrade. It looks like there is no recovering what I lost so I’m hoping I saved all pertinent files somewhere important. The only feedback I have is a heads up when listing the options in terms of what each one does. I was so focused on following your steps that I completely spaced and failed to realize doing things exactly as you did would result in losing everything on my Mac.
Thanks for providing a detailed explanation of each step. I successfully upgraded to Monterey with my 2013 iMac, added an NVMe SSD, and installed 16GB of RAM. Thanks you so much!!
I can’t get past the sudo /Applications/Install\ macOS\ Monterey.app/Contents/Resources/createinstallmedia –volume /Volumes/32GBUSB part just comes back with command not found.
Im not sure where spaces should be because the example goes over multiple lines (BTW my USB is called 32GBUSB). Oh and the – before volume is a double – –
Any ideas anyone. Thanks in advance
You can use the tab-key to complete the paths. So when you start to type /Applications, after typing /App, press tab and it will complete the rest automatically. That prevents mistakes.
Another way is to use the steps that I did in the post for Sonoma or Sequoia. Just choose for Monterey when downloading the installer. This will be quite a lot easier and doesn’t require the CLI.