
As with any new macOS major release, Apple decided to drop support for quite some older models. That means that it is not possible to run Ventura on that hardware in an official way. In a lot of cases these machines are more than capable of running the latest macOS release so in this post I will explain you step by step how to get macOS Ventura installed on unsupported Mac hardware.
Newer version of macOS: Sonoma
Although this post is still very relevant, in the meanwhile, macOS Sonoma has been released. A very similar method is available to install the latest version of macOS on unsupported hardware. I did a separate post that covers that version of macOS, so have a look at it over here if you are interested.
YouTube Video
If you are interested, I also created a YouTube video from this blogpost. If you prefer classic text, you can just follow the rest of this article:
Introduction
Last year, with the release of Monterey apple dropped support for basically anything older than a 2015 model. With Ventura, only a year later, this is more or less anything older than a 2017 model. So it looks like Apple is in a rush to drop support for Intel-based Macs since apple is moving everything to M1 and M2-based hardware.
macOS Ventura still has support for Intel-based Macs and obviously also for M1/M2 silicon-based machines. On Apple’s website you can see which models are officially supported: https://support.apple.com/en-us/HT213264
In summary, the following Macs can run macOS Ventura officially:
- MacBook models from 2017 or later
- MacBook Air models from 2018 or later
- MacBook Pro models from 2017 or later
- Mac mini models from 2018 or later
- iMac models from 2017 or later
- iMac Pro (all models)
- Mac Pro models from 2019 or later
- Mac Studio (all models)
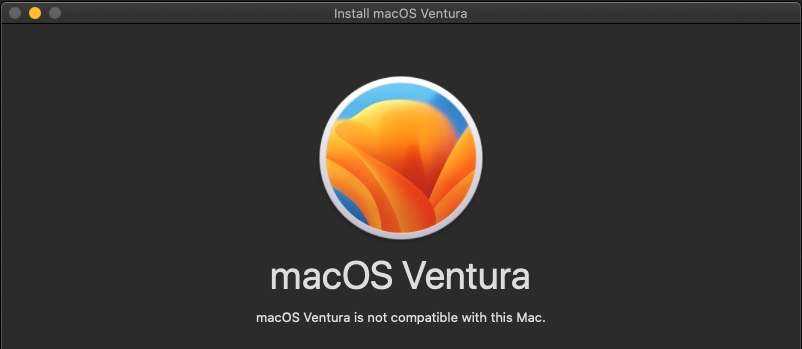
If you want to upgrade to, or install, Ventura on an older machine, the installer will tell you that your model is no longer supported or compatible with your device.
The method I will be using to get around this limitation involves OpenCore legacy patcher. I did a post and video earlier, using the same method for unsupported hardware and Monterey.
OpenCore legacy patcher allows you to use an unmodified macOS installer. It tricks that installer in thinking it is running on a newer, supported, model. In most cases it doesn’t stop there as a lot of changes have been introduced in Ventura. Mainly related to drivers and hardware support that require workarounds. After installing the unsupported OS, there is a good chance that not everything will work as expected so the tool will also install patches to fix some issues or restore functionality if that’s needed.
It should be possible to use this method on most 2012 or newer Mac models. With the exception of devices without Metal-supported graphic cards. You can find a comprehensive list of models on which OpenCore is supported for Ventura on the website of OpenCore Legacy Patcher: https://dortania.github.io/OpenCore-Legacy-Patcher/VENTURA-DROP.html#newly-dropped-hardware. The team behind OpenCore is still working on expanding that list but this is what’s working today.
Steps to go through
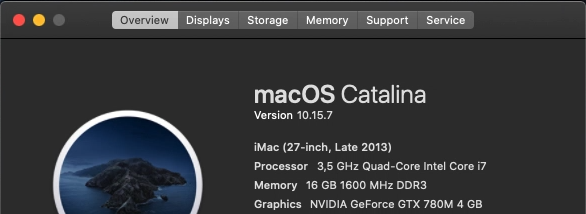
For this post, as with the one I did for Monterey, I will be using a Late 2013 iMac with model identifier iMac14,2. It’s equipped with an i7 4771, a 256GB SSD, 16GB RAM and the NVIDIA GeForce GTX 780M video card. This is a legacy Metal card but the patcher should be able to fix any issues with that.
The iMac is running macOS Catalina as a starting point, this is the last officially supported release on this model.
High-level, in order to get macOS Ventura installed and usable on unsupported hardware, we will need to do the following steps:
- Prepare a USB drive of at least 16GB
- Download OpenCore Legacy Patcher
- Download the macOS Ventura installer
- Create a bootable USB drive from the downloaded installer
- Install OpenCore on the bootable USB drive
- Boot the installer from the USB drive and install macOS
- Install OpenCore on the internal hard-drive/SSD
Step 1) Prepare a USB drive of at least 16GB
Although this step is optional in theory, as the OpenCore Legacy Patcher should take care of this, I think it is a good idea to make sure that the USB drive you will use for this is in good shape before we start. This will prevent possible problems later on, like not being able to boot from it.
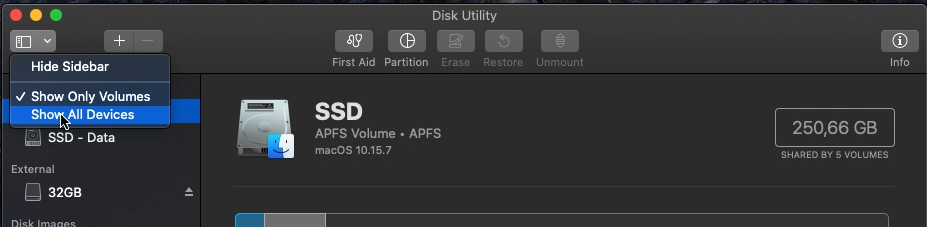
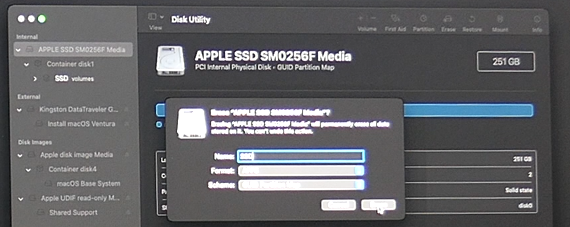
To do so, insert the USB drive and open Disk Utility. In Disk Utility, click to “Show All Devices”:
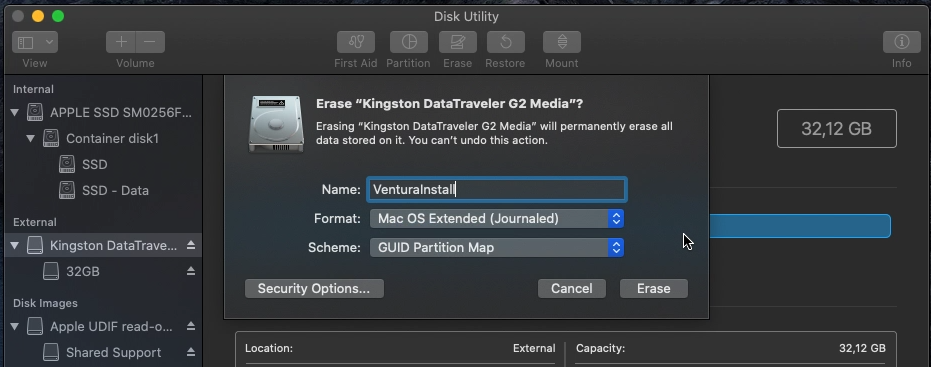
Then, in the left column, select your USB drive and click “Erase” on the top menu. Now give the drive a name, I chose VenturaInstall. Select “Mac OS Extended (Journaled)” and “GUID Partition Map” as scheme and click “Erase”:
That should be all it takes for this step.
Step 2) Download OpenCore Legacy Patcher
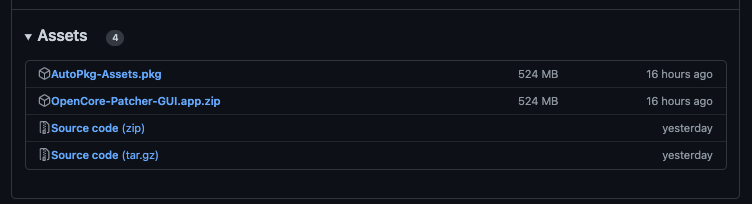
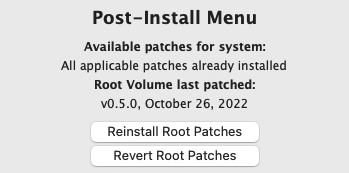
The next steps will be done using OpenCore Legacy patcher, hence we first need to download it. This can be done from Github: https://github.com/dortania/OpenCore-Legacy-Patcher/releases. At the time of writing the latest version was release 0.5.0.
Scroll down a bit in the latest release notes and choose to download the OpenCore-Patcher-GUI.app.zip.
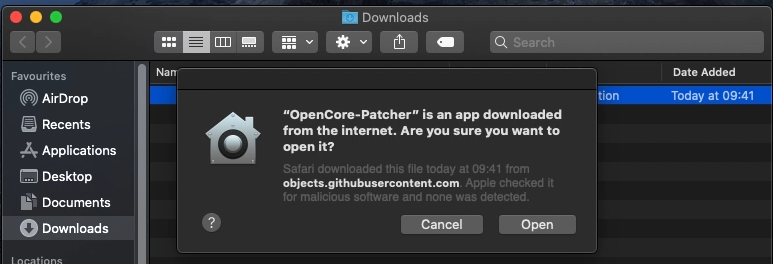
Once downloaded, extract the package by double-clicking on it and launch the OpenCore-Patcher.app. Click open to continue:
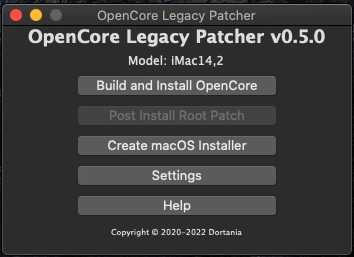
This will display you the main menu of OpenCore Legacy Patcher:
Step 3) Download the macOS Ventura installer
The first thing we need to do from OpenCore Legacy Patcher is to get our hands on the installer for Ventura. As the device which we want to get Ventura on is officially not supported, the installer will not be shown in the App Store on this device.
Earlier versions of OpenCore Legacy Patcher did not have this feature so you’d have to download the installer yourself from other sources. This new functionality makes things easier.
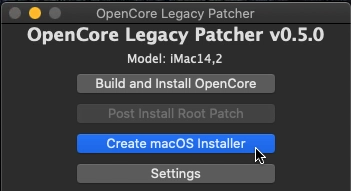
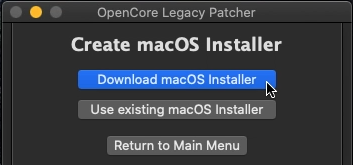
In OpenCore Legacy Patcher, click on “Create macOS Installer”:
Then choose “Download macOS Installer”:
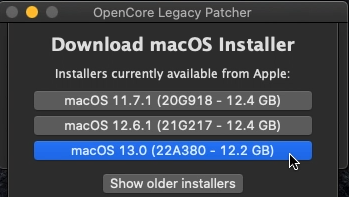
Select which version you want to download. Since our goal is to install Ventura, choose here for macOS 13.0:
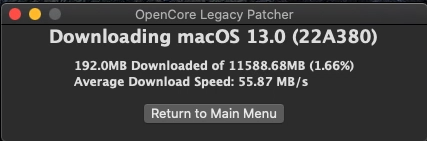
Once you did, the tool will download the installer which is about 12GB in size so this can take some time:
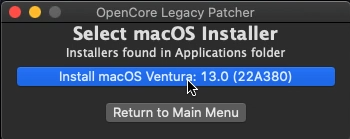
When finished downloading, the installer .pkg will be installed:

At this point, the installer has been downloaded and exists as an application in your Applications folder in Finder. Running it from there doesn’t allow you to continue unfortunately:
Step 4) Create a bootable USB drive from the downloaded installer
Now that we have the installer downloaded, we can write it to the USB drive which we prepared in step 1. You can do this by either clicking directly on “Flash installer” after the download completed or by going through the menu again: “Create macOS Installer” – “Use Existing macOS Installer” – “Install macOS Ventura”:
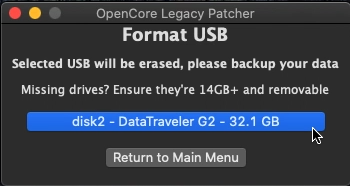
In the Format USB screen, select the drive which you prepared in step 1:
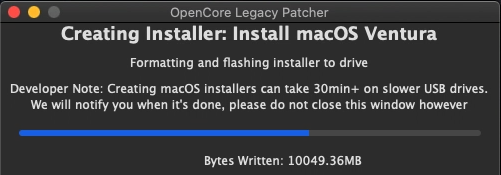
Again you will be tested for patience here as about 12GB of data needs to be written to your USB drive. The time this takes largely depends on the speed of that USB drive:
When all data is copied to your USB drive and it is verified, you will get a message telling you this went fine:
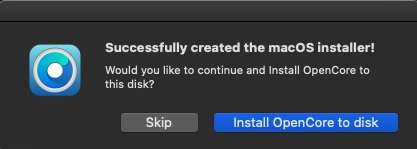
Step 5) Install OpenCore on the bootable USB drive
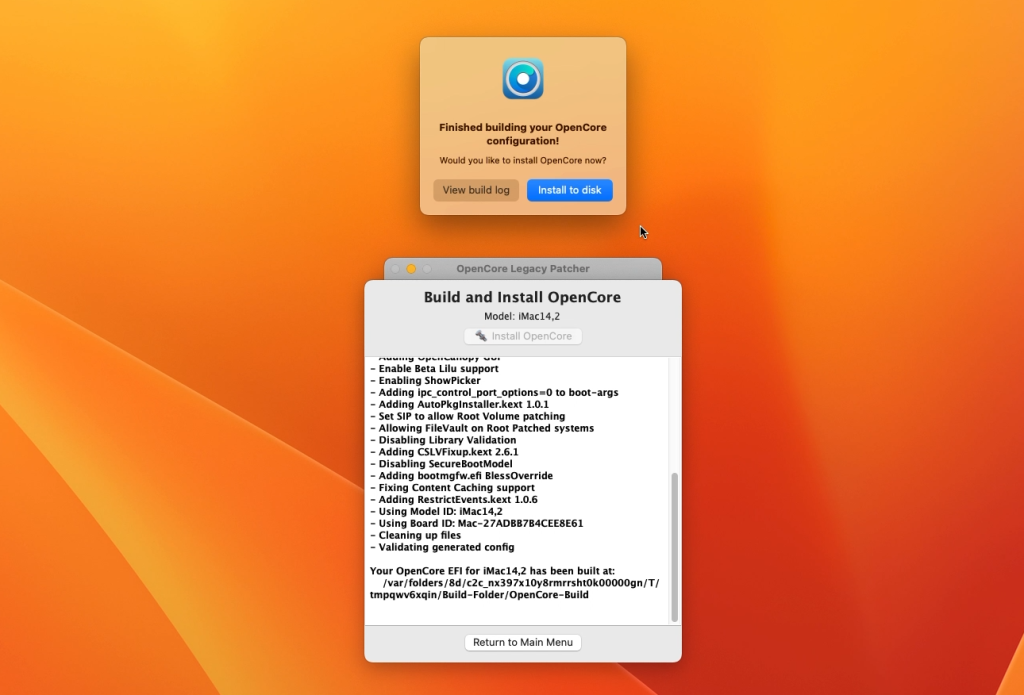
As with the previous step, you can choose right away to install openCore to the USB drive after the files were copied or from the main menu, go to: “Build and Install OpenCore”:
After clicking on “Build OpenCore”, click on “Install to disk”:
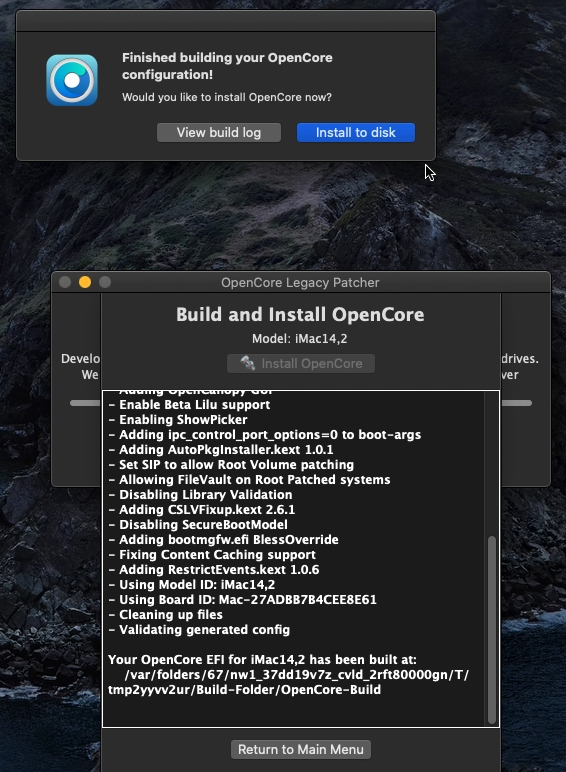
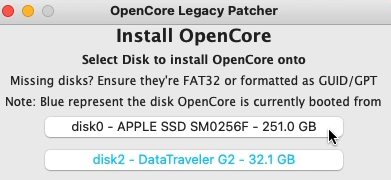
Here, make sure you select your USB drive from the list:
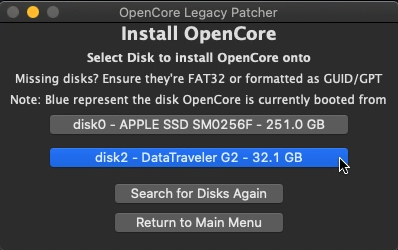
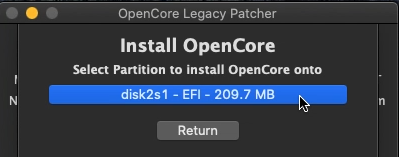
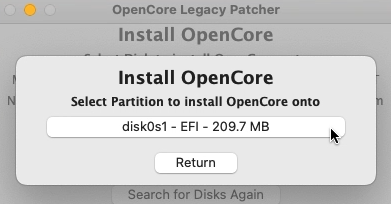
Then click on the EFI partition listed to get OpenCore installed on the USB drive;
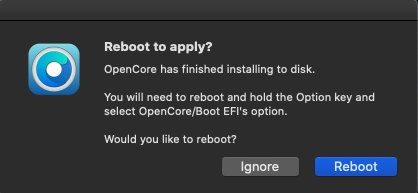
After entering your password, you get the option to reboot right away to start the installer. You can do that or take the optional next step below:
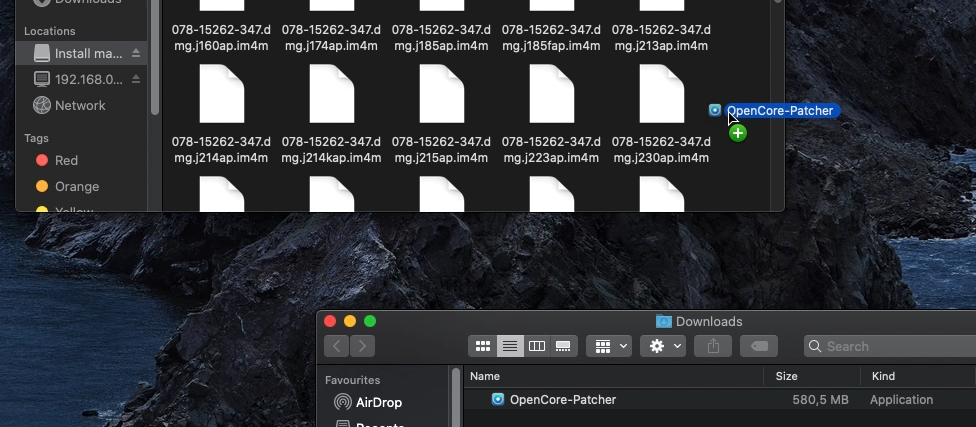
Optional here,l but not a bad idea if you ask me, I recommend to copy the OpenCore Patcher application over to the USB drive. Simply open the USB drive in Finder and copy the application from your Downloads folder to the drive.
The reason to do this is that after installing macOS Ventura, you might need to re-run the patcher. This could be to install OpenCore to the internal drive, change the configuration or possibly to (re-)apply some patches. So unless you plan to upgrade this would require you to re-download the patcher. On top of that, it could be that something goes wrong with the patching and your wifi or Ethernet adapter is not working after installation so it can make things more complicated if you no longer have that file/application.
Step 6) Boot the installer from the USB drive and install macOS
So far we’ve only been preparing things for this step. Here we will do the actual installation of macOS Ventura on our unsupported Mac model. To do so, we will boot the Mac off the USB-drive which we created.
Leave the USB drive in the Mac and reboot it while holding the Alt/Option key during boot time.
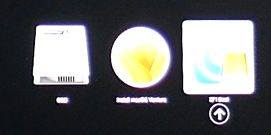
If all goes well, holding down the Option key brings up the bootloader. In there, you should see the currently installed system (named SSD in my case), an entry to install macOS Ventura and an EFI boot entry with the OpenCore logo. The last two are on our USB drive.
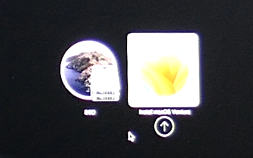
From here, the standard bootloader, we can’t start the installation as we need to do this from OpenCore to hide the real system identifier. Instead, select the EFI boot entry using the arrow keys and press enter:
This brings you in OpenCore, which looks very similar to the standard bootloader. The only difference is the text at the right bottom corner. From here you can now choose the “Install macOS Ventura” option:
This will launch the installer from the USB drive, which can take some time. Once you arrived in the installer, you should see something like this:
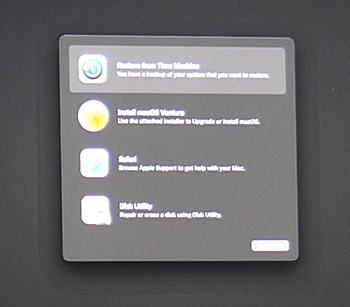
Prepare your internal SSD/HD for the installation
At this point we need to decide where we will install Ventura:
- Fresh install: remove the existing installed system, and give the full drive to Ventura
- Dual boot: add a new Volume and resize the existing one(s) to keep your current macOS and add Ventura
- Upgrade: upgrade your existing installation
For the first two, we need to launch Disk Utility first from the menu as we need to prepare our drive. In Disk Utility, first click on the button to show All devices:
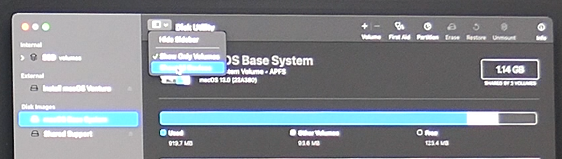
For option 1, to go for a single OS and do a fresh install of Ventura, click your drive (internal SSD/HD) on the left side and click Erase. Give your drive a name (I chose SSD), choose APFS as Format and GUID as scheme:
For option 2, to add Ventura together with your current macOS install, click your drive (internal SSD/HD) on the left side and click Partition. Click the plus sign here to add a partition and choose to add a partition rather than a volume. You can change the size on the left side, name the volume and choose APFS as format:
As soon as Disk Utility is ready with the operations on the drive, we are good to move to the next step.
Install macOS Ventura
Now that our disk is prepared, or you decided to upgrade the existing install, you can start the installation from the menu:
Click Continue, accept the license agreement and select the volume on which you want to install Ventura. Here you need to select:

- Fresh install: the only internal volume you see here (called SSD in my example)
- Dual boot: the volume which you added during the partition part.
- Upgrade: select the volume which you want to upgrade (called SSD in my case)
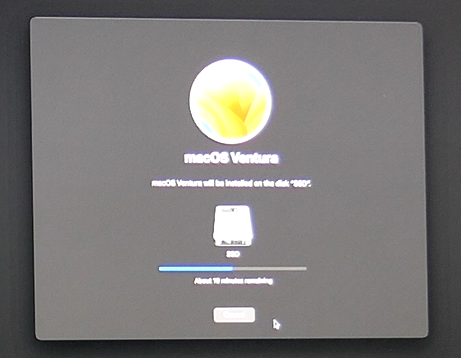
Navigate through the questions, which differ depending on which type of install you decided to go for. Eventually, if all goes well, the installation will do the necessary changes. Once more, this takes quite some time. I believe it was about 45 minutes in my case:
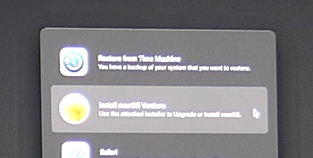
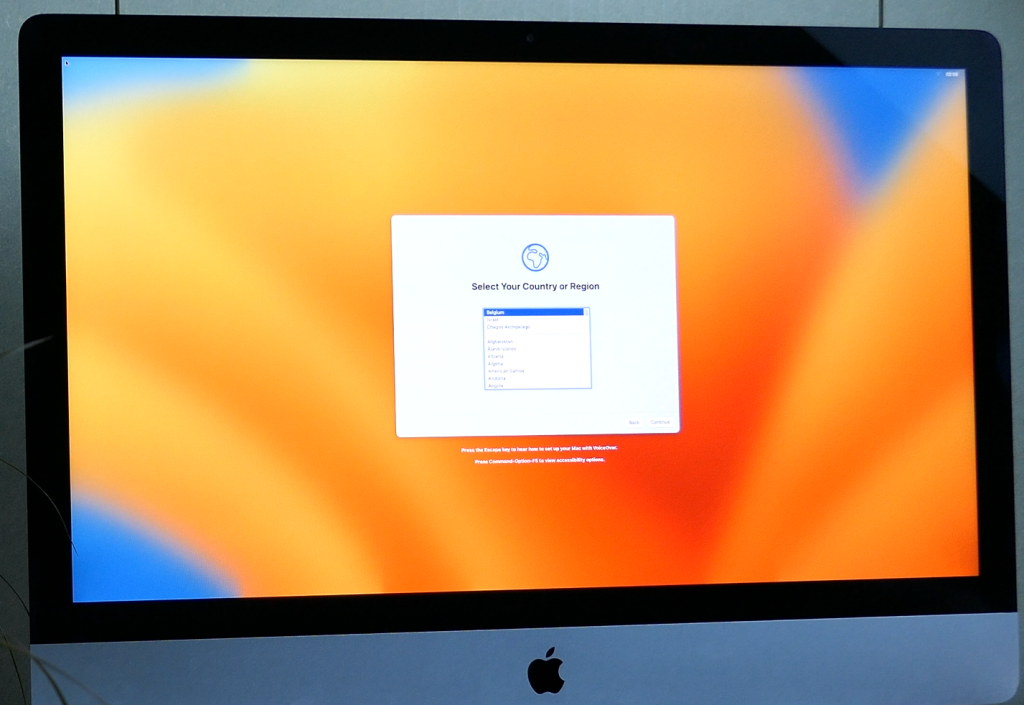
If all goes well, you should end up with the wizard for a new installation or login screen in case you performed an upgrade.
After going through this, your system has macOs Ventura and any required patches will be installed automatically:
Step 7) Install OpenCore on the internal hard-drive/SSD
So far we have successfully installed Ventura on our Mac. But to start it, we still need to boot from the USB drive as that is where OpenCore is currently installed. In order to fix this, we need to install OpenCore to the internal HD/SSD instead. This goes in the same way as we did in step 5) for the USB drive.
In most cases, when Ventura is started the first time, the patcher will actually detect this situation and will ask you to go through this step:

You can click Ok here or start the patcher which we copied to the USB drive and choose “Build and Install OpenCore”, “Build OpenCore” and click on “Install to disk”:
Here, make sure you select your internal drive from the list:
Then click on the EFI partition listed to get OpenCore installed on the internal drive:
That’s all it should take. Now you can remove the USB drive and try a reboot. This should boot openCore which will load macOS Ventura on your unsupported Mac.
Optionally remove the boot picker and boot directly to macOS
You might have noticed that during boot, openCore briefly shows you a boot picker. Some people might not like the delay this causes. In order to get rid of it, you can re-install OpenCore to the internal drive without this option enabled.
In order to do so, launch OpenCore Legacy Patcher (from the USB drive or re-download it) and navigate to Settings:
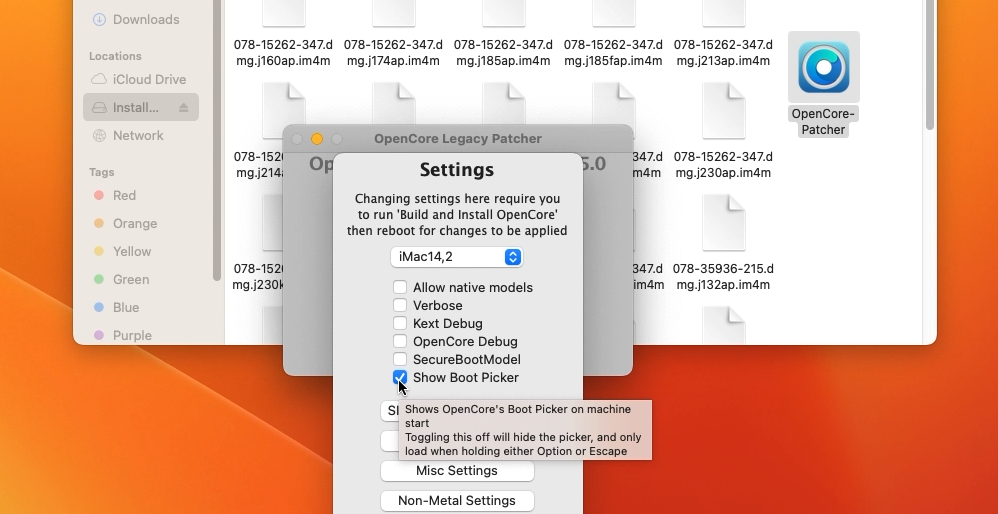
In there, uncheck the “Show Boot Picker” option and repeat Step 7 to re-install OpenCore with that option disabled.
Is it possible to install Mac OS on windows laptop? If yes please do a video on that. Thanks
Just wanted to say thank you for the NAS on the Think Pad machine. I plan I building it.
Do you offer help or service on the system in case I screw up?
I know some linux but I can see I could easily mess something up.
If I was willing to pay you via Upwork or Venmo (or whatever) would you be willing to assist if I ran into a problem?
Lastly, do you do any consulting? I have a few basic configuration questions and I cannot seem to find an answer anywhere on the internet. I do not mind paying for your service.
V/r,
W V Rose
Just got macOS Ventura 13.2 on my iMac late 2012. 1000 thanks!
how does it work, I have an iMac late 2012 model I am looking to install a current iOS on as well?
I have installed on 2013 iMac 27″ with Intel processor. Everything is fine, but the system got frozen in few minutes. I have to reboot and it was working few minutes and frozen again.
as this is now the Normal process for Monterey as its gui only install. what about patching the os as per the txt version on your original Monterey post?
You can use the same process for Ventura, just select Monterey as version in the downloaded.
If you really want to use the CLI-version, you can download an older release of OCLP but I would recommend to go with one of the newer versions.
Just updated to 13.3.1 on my macbook pro late 2013 15 inch retina using newest open core. Working– no issues
Hi and thanks! Does using the OpenCore legacy patcher create a backdoor into the system( is there any security data on it)? And once you’ve updated to macOS Ventura, can your computer then continue with Apple updated of Ventura (to include the Rapid Response Security updates)?
I have imac retina 5K, 27-inch, Late 2014. When I boot it with the USB prepared (as your described), I got a black screen with a circle that has a line drawn across it and text below it that says support.apple.com/mac/startup
Is there a way this can be solved?
I also have an iMac retina 5K, 27-inch, Late 2014 with 32 gigs of ram. I was originally running an official version of Big Sur and just had the same issue after using Open Core Legacy Patcher and installing Monterey 12.5. I was restarting my iMac and now I am being forced to roll back using Time Machine to Catalina as Time Machine isn’t even recognizing Big Sur.
Just updated to 13.4 on my macbook pro late 2013 15 inch retina using newest open core. Working– no issues
Thank you for the guide. The actually process may not be exactly as described on this article, but I managed to complete the migration.
Hello
I keep on trying and I get this error, can you check and give me feedback plz
https://prnt.sc/S9rOlSy-DFCt
that’s a screen shot of the error
All I can say is what is in the screenshot already. Try to re-download the installer using OCLP. Maybe it was an issue on your side or a temporarily issue on the Apple server’s side.
I want to extend my deepest gratitude for the wealth of knowledge you’ve shared on this website. It has been an invaluable source of knowledge and inspiration for me. It’s evident that the creators have a deep understanding of the topics covered, and their passion for sharing knowledge shines through. Thank you for curating such an exceptional platform. Sankyu tsym! ID : CMT-PS37NHXK1R29A3TR16
Thank you very much ! i have installed Ventura in my Mac mini 2012 , it works Great !
But OLP not installed on the internal Drive. Booting from USB drive … please advise .Thanks
Step 7 in the guide should take care of that: Step 7) Install OpenCore on the internal hard-drive/SSD
Maybe repeat these steps and double-check that you select your internal drive as destination.
I tried to install Sonoma on my computer, and everything went fine until it was time to install Sonoma when I got the message from which disk I chose my external USB 128 GB and I got the message ” Disk is Lock”. Any suggestions?
By the way, I formatted the USB in one computer to use it in my other Mac that has no Operating System.
Thanks
What are the high-level steps involved in installing macOS Ventura on an unsupported Mac using OpenCore Legacy Patcher?