
As most know, it is possible, and quite easy, to install Windows 10 on your x86-based Mac. Wether it’s a Mac Pro, iMac, Mac mini or Macbook. Now, as Windows 11 has some specific hardware requirements like TPM 2.0 and Secure Boot, you will not pass the hardware check. An unmodified installation will fail to get installed exactly due to this. In this article, I’ll explain how to get around these limitations and to get Windows 11 properly installed and working on your Mac.
YouTube Video
If you are interested, I also created a YouTube video from this blogpost. If you prefer classic text, you can just follow the rest of this article:
Introduction
Windows 11 is about to be released at the time of writing this and I was very curious to find out if I would manage to get it to work on one of my Macs. As by default, due to the specific hardware requirements mentioned above, it refuses to get installed without any further changes. For this article I used a Macbook Air Early 2015 which has a Core I5-5250U and 8GB of RAM and with a few minor tweaks, I got Windows 11 to install and everything working just fine, including updates.
Keep in mind that running Windows 11 natively on a M1 Mac currently is not working with this method. There is an ARM-based version of Windows 11 on the way but I haven’t tested that yet. Nevertheless, nothing stops you in using a M1 Mac to create the USB installer.
Creating the bootable Windows 11 USB installer
The approach will be to use the “old” Windows 10 installer and combine that with the Windows 11 installation files. The result of that will be written to a USB drive which then can be used to boot from and launch the installation. That way there is no need for Bootcamp Assistant and you are free to choose how to partition your drive.
Getting the Windows 10 and Windows 11 ISO
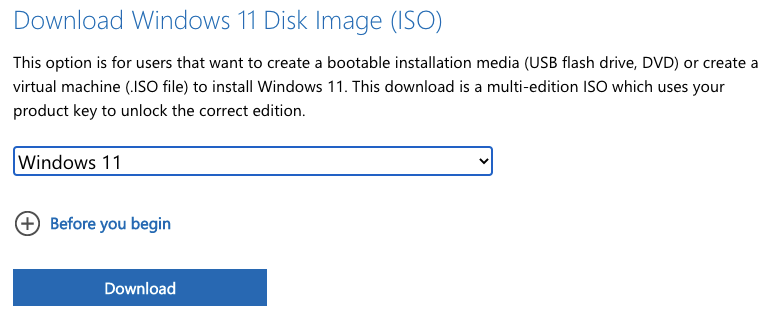
First thing we need to do, is to download both the Windows 10 and Windows 11 ISO files. These can be downloaded from Microsoft’s website:
- You can download the Windows 10 ISO from: https://www.microsoft.com/en-us/software-download/windows10ISO
- and the Windows 11 insider build ISO from: https://www.microsoft.com/en-us/software-download/windows11
Prepare the USB drive for the Windows installer
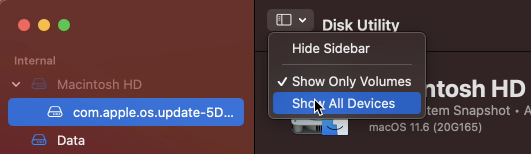
While both the ISOs are downloading, we can prepare our USB drive. You will need one that is at least 8GB. Insert the drive in your Mac and start Disk Utility.
In Disk Utility, choose to show all devices:
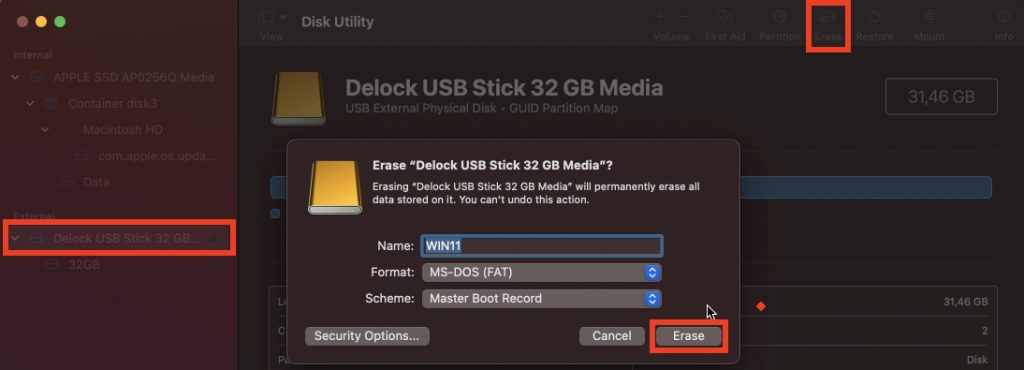
Then, on the left side, select your USB drive from the list and click Erase on the top left menu. In the dialog, enter a name for the drive (WIN11 here), choose to format as “MS-DOS (FAT)” and “Master Boot Record” as scheme. Finally click “Erase” to complete the process.
Copy Windows 10 files to the USB drive
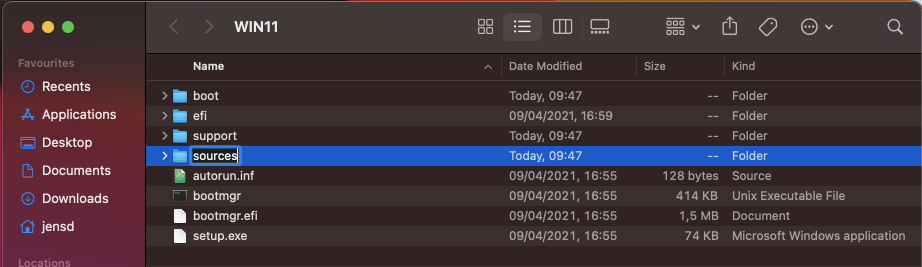
After the previous step, our USB drive is prepared. As mentioned, the way I use to get around the hardware requirements check is to use the Windows 10 installer to install Windows 11. To do so, we need to copy all files from the Windows 10 ISO, with the exception of sources/install.wim to the USB drive.
Start by double-clicking on the Windows 10 ISO, called Win10_21H1_English_x64.iso, in order to mount it. Double-check to make sure you’re mounting the Windows 10 one and not the one for Windows 11. Once you did this, open it in Finder alongside the newly created partition on the USB drive, which I called WIN11 in Disk Utility.
I typically start by copying all separate files and folders, except for the sources folder:
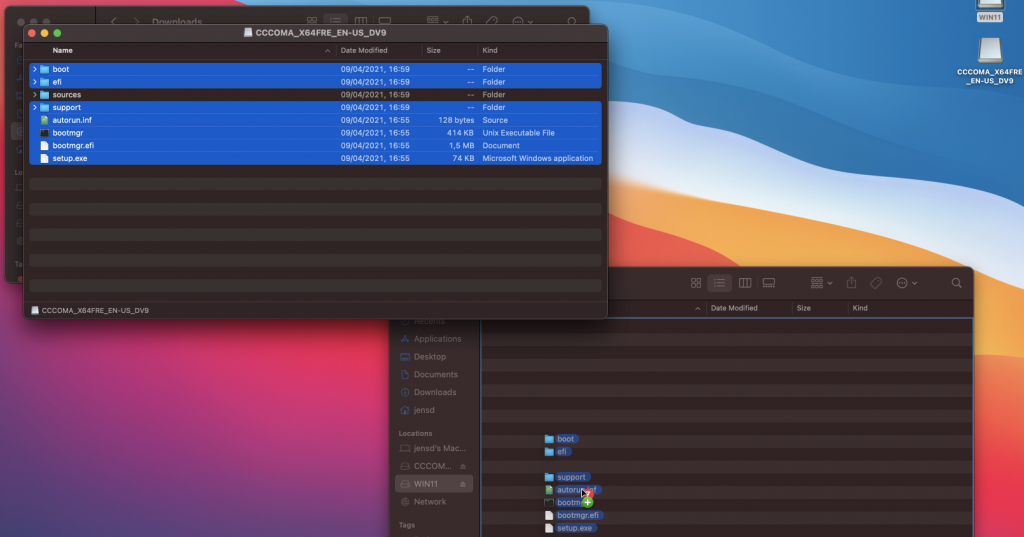
Then I create the sources folder and copy all files from sources with the exception of install.wim:
Prepare to split the Windows 11 install.wim
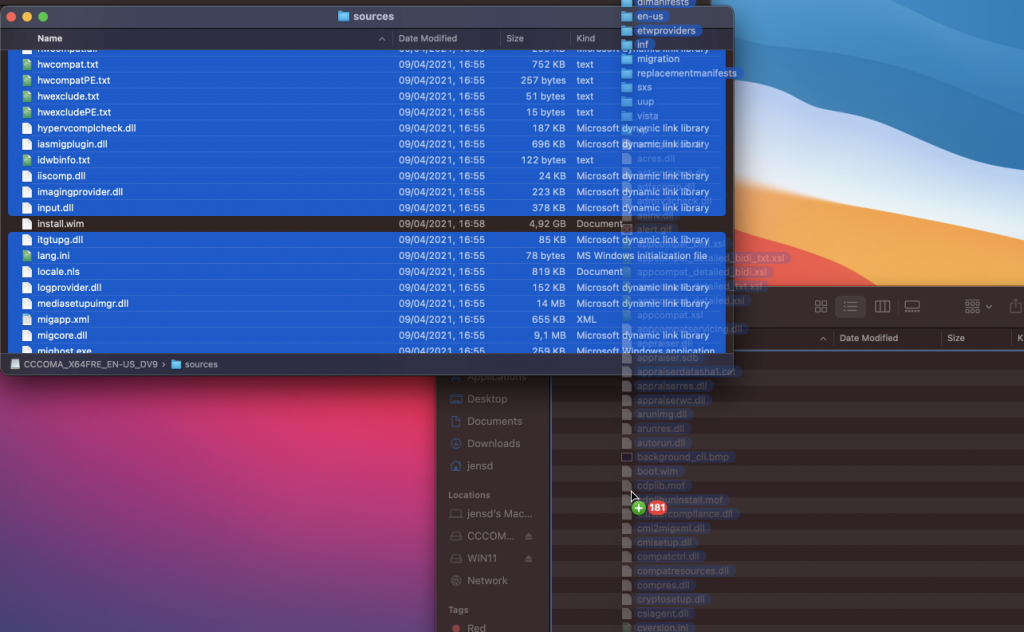
The next thing we need to do, is to copy the install.wim file from the Windows 11 ISO to the sources directory on the USB drive. Unfortunately, install.wim is over 4GB. As we formatted our USB drive with the FAT32 file system, it can handle files only up to 4GB. We could’ve theoretically also formatted the USB drive with exFAT but I’ve had mixed results doing so.
The solution is to split the file in two parts, smaller than the limit of our file system on the USB drive. To accomplish this, we can use Wimlib (https://wimlib.net/). This is a tool that is developed to work with, and modify, .wim files. The easiest way to get this installed on your Mac is by using Brew (https://brew.sh/).
So, as just mentioned, we start by installing Brew. As is instructed on the Brew website, copy and paste the mentioned line in a terminal and execute it.
jensd@jensds-MacBook-Air ~ % /bin/bash -c "$(curl -fsSL https://raw.githubusercontent.com/Homebrew/install/HEAD/install.sh)"
==> Checking for `sudo` access (which may request your password).
Password:
==> This script will install:
/opt/homebrew/bin/brew
/opt/homebrew/share/doc/homebrew
...
==> Next steps:
- Run these two commands in your terminal to add Homebrew to your PATH:
    echo 'eval "$(/opt/homebrew/bin/brew shellenv)"' >> /Users/jensd/.zprofile
    eval "$(/opt/homebrew/bin/brew shellenv)"
- Run `brew help` to get started
- Further documentation:
    https://docs.brew.sh
jensd@jensds-MacBook-Air ~ %
Once Brew is installed, we can can add it to the path as instructed in the Next steps of the previous output:
jensd@jensds-MacBook-Air ~ % echo 'eval "$(/opt/homebrew/bin/brew shellenv)"' >> /Users/jensd/.zprofile
jensd@jensds-MacBook-Air ~ % eval "$(/opt/homebrew/bin/brew shellenv)"
Then we can use it to install the tool which we need: Wimlib:
jensd@jensds-MacBook-Air ~ % brew install wimlib
==> Downloading
...
==> Installing wimlib dependency: openssl@1.1
==> Pouring openssl@1.1--1.1.1l.arm64_big_sur.bottle.tar.gz
==> Regenerating CA certificate bundle from keychain, this may take a while...
🍺  /opt/homebrew/Cellar/openssl@1.1/1.1.1l: 8,073 files, 18MB
==> Installing wimlib
==> Pouring wimlib--1.13.4.arm64_big_sur.bottle.tar.gz
🍺  /opt/homebrew/Cellar/wimlib/1.13.4: 65 files, 3.0MB
Split install.wim and get it on the USB drive
Now that we have Wimlib installed, we can use it to split the large install.wim file from the Windows 11 ISO and copy it to our USB drive.
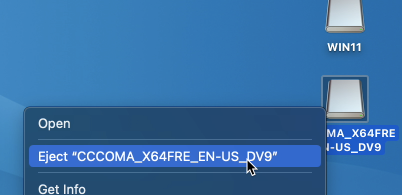
First, we need to unmount the Windows 10 ISO and mount the Windows 11 one instead. The Volume name is exactly the same so again, better to double-check here:

Now in the same or a new Terminal session, first list the volume names to make sure you pick the right ones to construct the command:
jensd@jensds-MacBook-Air ~ % ls -1 /Volumes
CCCOMA_X64FRE_EN-US_DV9
Macintosh HD
WIN11
Then construct the wimlib-imagex command parameters to match this:
jensd@jensds-MacBook-Air ~ % wimlib-imagex split /Volumes/CCCOMA_X64FRE_EN-US_DV9/sources/install.wim /Volumes/WIN11/sources/install.swm 4000
Splitting WIM: 4526 MiB of 4526 MiB (100%) written, part 2 of 2
Finished splitting "/Volumes/CCCOMA_X64FRE_EN-US_DV9/sources/install.wim"
In the command above, we told to execute the wimlib-imagex tool (part of Wimlib) and passed some arguments:
- “split” to indicate that we want to split this larger file
- “/Volumes/CCCOMA_X64FRE_EN-US_DV9/sources/install.wim” which is the source file to split. Keep in mind that the name under /Volumes depends on the ISO name so you need to adjust this to the output of the previous command (ls -1 /Volumes)
- “/Volumes/WIN11/sources/install.swm” the destination of where the split files should end. As with the ISO name, here WIN11 is the volume label I gave to my USB drive when erasing it with Disk Utility. Again, you need to adjust this to the output of the previous command (ls -1 /Volumes)
- 4000 the max. size of the destination file, so the file will be split in a part of 4000MB and the rest.
After this command completes, you can see that now two files were created on the USB drive:
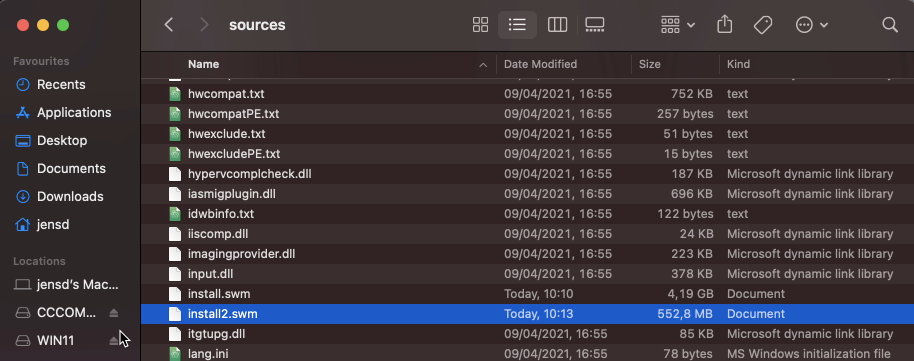
The Windows 10 installer knows how to deal with these and will just work fine. Even if these are actually for Windows 11.
(Optionally) download Windows drivers for your Mac
If you plan to use the USB drive, which you created with the above steps, to use this for installation on a Mac, it is a good idea to go through these additional steps.
The goal of this is to fetch the necessary drivers for use on Mac. I will use Brigadier for this. Brigadier, which is basically a script that will fetch all drivers based on the current or given Mac model identifier.
In case you plan to install Windows 11 on another Mac than the one which you are using to create the USB drive, first find the model identifier of that Mac by opening System Information (or top right Apple icon -> About This Mac -> System Report…):
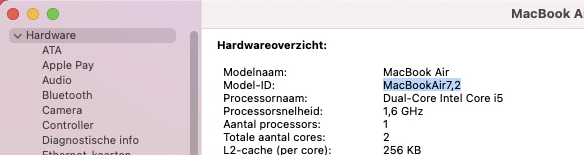
As you can seem the Model Identifier for the Macbook Air on which I plan to install Windows 11 is: MacBookAir7,2.
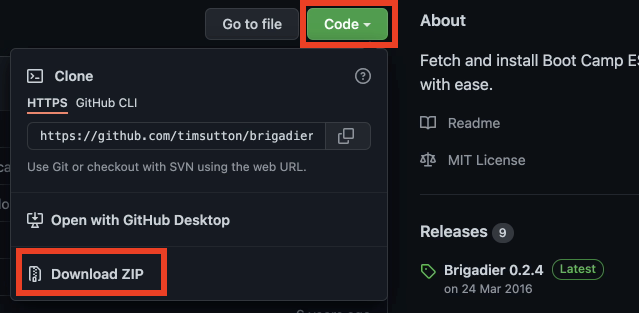
Now that we have that info, from the Github page of Brigadier: https://github.com/timsutton/brigadier, click the green Code button then choose to “Download ZIP”:
Once the file is downloaded, open a fresh Terminal session and navigate to the “brigadier-master” in your Downloads folder, then simply execute it using ./brigadier and pass the model number as an argument:
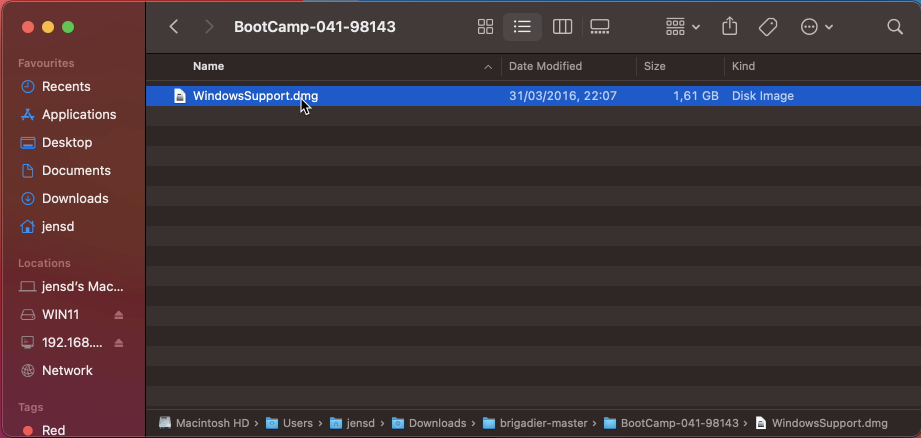
jensd@jensds-MacBook-Air ~ % cd Downloads/brigadier-master
jensd@jensds-MacBook-Air ~ % ./brigadier --model MacBookAir7,2
Using Mac model: MacBookAir7,2
...
Expanding flat package...
Extracting Payload...
Extracted to /Users/jensd/Downloads/brigadier-master/BootCamp-041-98143/WindowsSupport.dmg
jensd@jensds-MacBook-Air ~ %
As you can see in the output, the files got downloaded as a subfolder of brigadier-master as WindowsSupport.dmg:
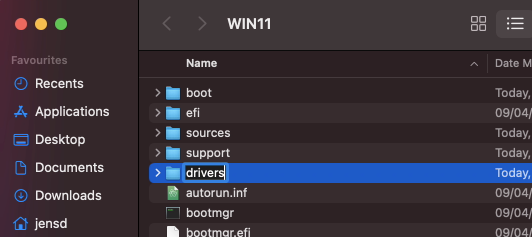
All that is left to do is to navigate to the folder using Finder, then to open WindowsSupport.dmg to mount it and to copy those files to the USB drive. I typically first create a folder drivers to put these in:
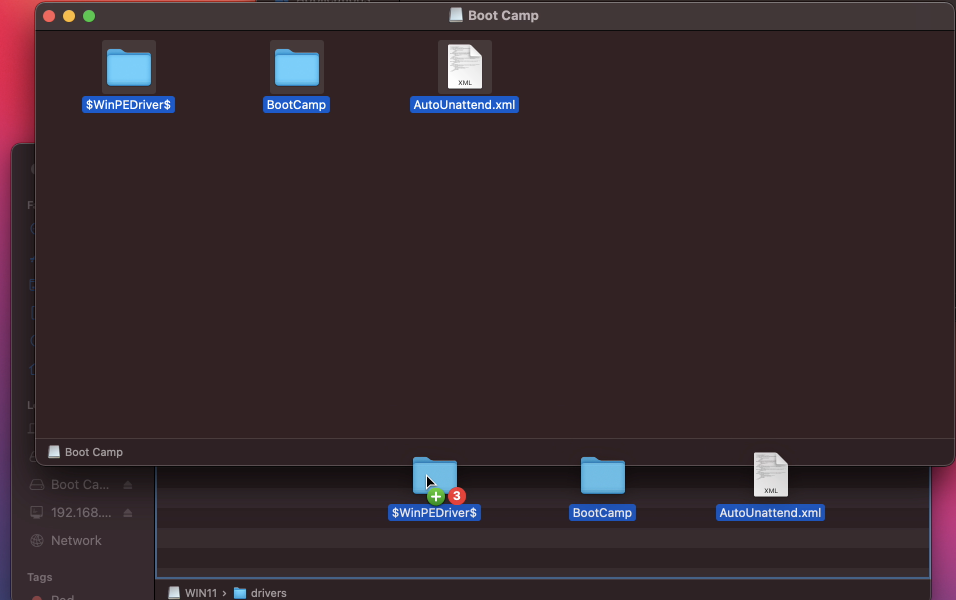
After going through the installation, executing BootCamp/setup.exe will install most of the required drivers or at least enough to continue the rest of the driver installation using Windows update.
Prepare your Mac for the Windows 11 installation
Now that we have the USB drive fully prepared, there is one more step to go through before we can do the installation. That is to partition your hard drive or SSD in order to have a place to install Windows 11. For this post, I will go for a dual boot where I will have Windows 11 and macOS next to each other on the same disk.
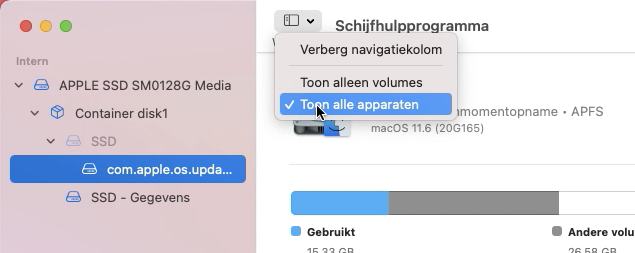
For this we need to launch Disk Utility on the Mac where you want to install Windows 11. In Disk Utility, just as we did for when preparing the USB drive, select to show All Devices first:
Then, select the SSD or Hard drive in your mac on the left side and choose “Partition”:

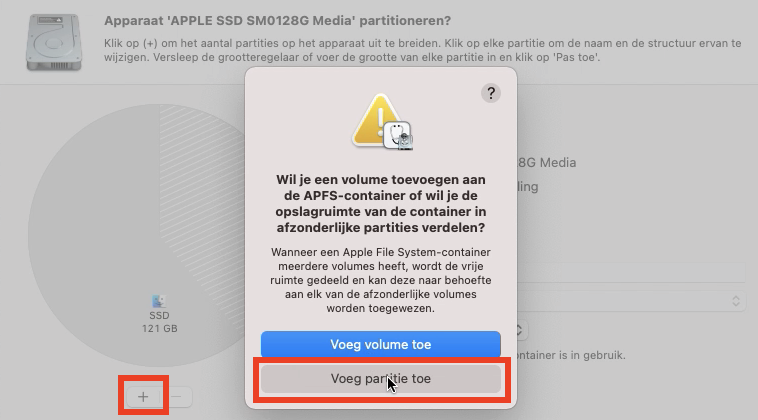
Click the + on the bottom of the window and choose to add a partition rather than a volume:
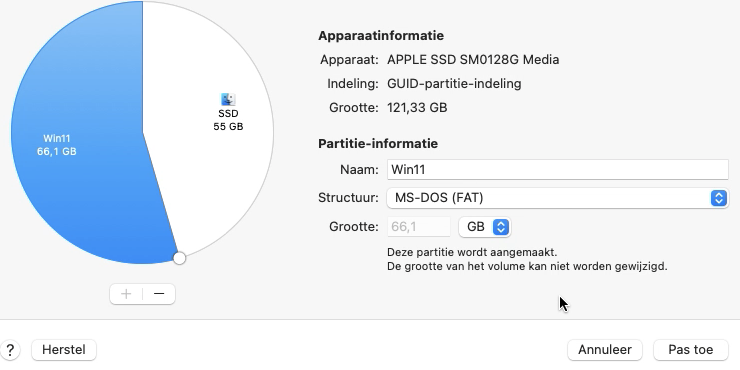
You can use the pie chart on the left side to resize the second, newly added partition, to the size which you prefer. Then give the partition a name, choose MS-DOS (FAT) as file system and click Apply:
Click continue when you get a warning that the system can become unresponsive for some time, while creating the partition and wait for the process to finish.
Don’t be surprised if you see the following or a similar error message:
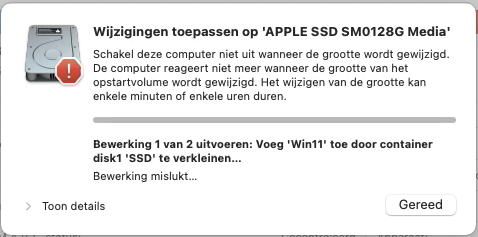
This is related to a bug in Big Sur and, as you might see, Disk Utility did not create a new partition for our Windows install but rather added a container disk.
To work around this, simply repeat the previous steps (select disk on the left side and click “Partition”). Now just change the type from APFS to MS-DOS (FAT):

After this, choose Partition and continue. This step shouldn’t take long at all and the result in Disk Utility looks like this:
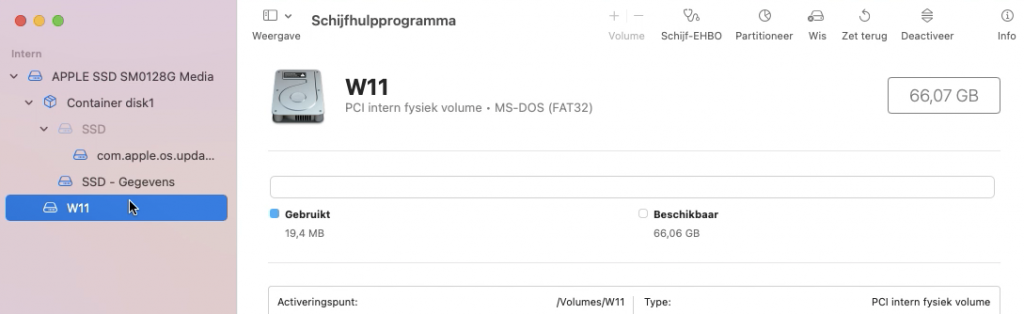
As you can see, another bug in Disk Utility changes the name to only keep the first letter of the Volume name… Nevertheless, we are good to continue to the next step and finally get Windows 11 installed on our Mac.
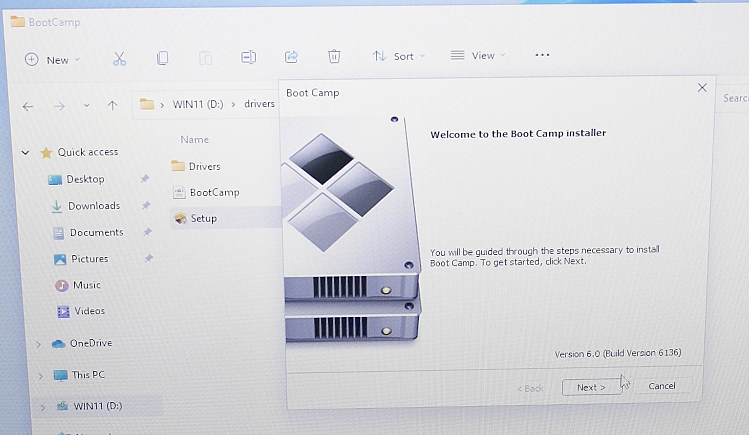
Install Windows 11 on your Mac
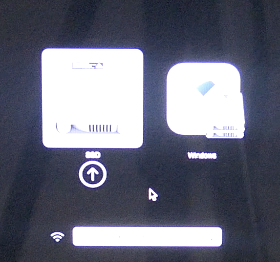
As the final step, the actual installation of Windows 11, we need to let the Mac on which you want to install boot from the USB drive. This is done by holding down the Alt key on boot and to select the USB drive from the boot loader. Don’t forget to first insert the USB drive you created in that machine :)
If all goes well, you should see the bootloader after some time. In there you will see your current macOS installation and the USB drive which you created:
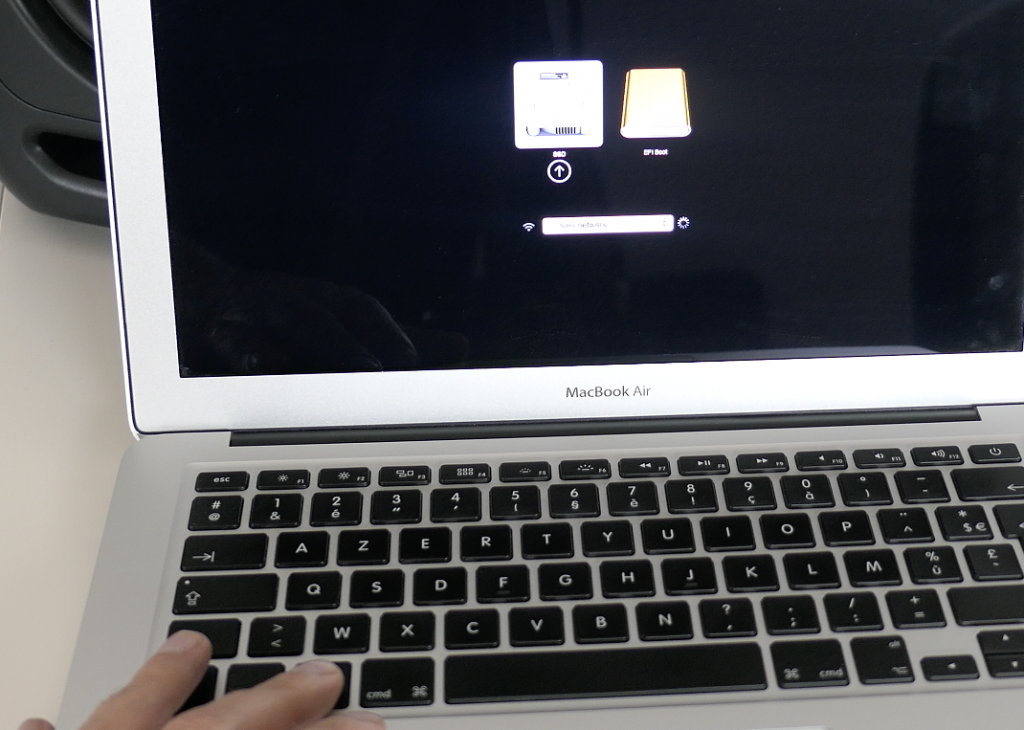
Select EFI Boot here to start the installation. Initially, it will have the look and feel as the Windows 10 installer. Which makes sense as that is actually what we are launching:
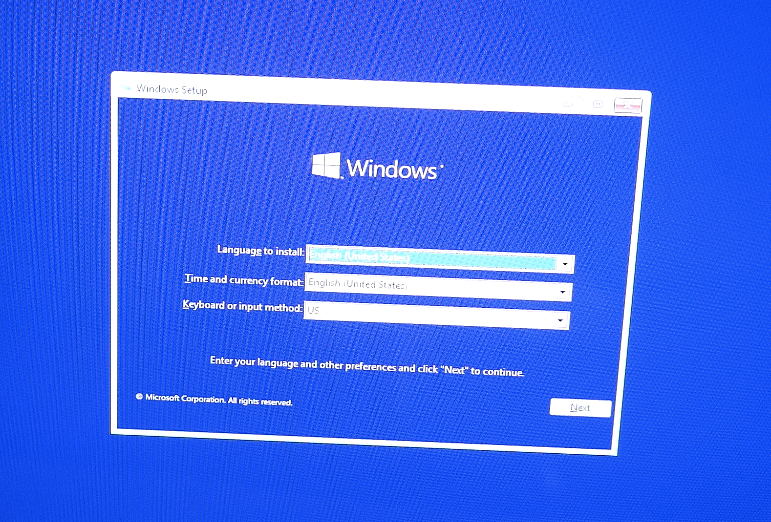
Select the language, region and keyboard of choice, click “Next”, then “Install Now”. In the next screen choose “I do not have a product key” and as soon as you arrive at the screen where you need to select which version to use, we can see the Windows 11 versions instead:
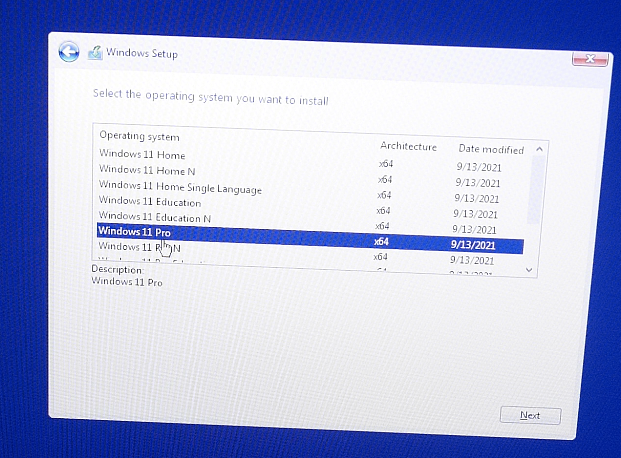
Here, select the version of choice and click “Next”. In the next screen, choose to accept the license and continue. Then choose for a custom install (Windows only (advanced)). In the next screen, you need to select where to install Windows 11:
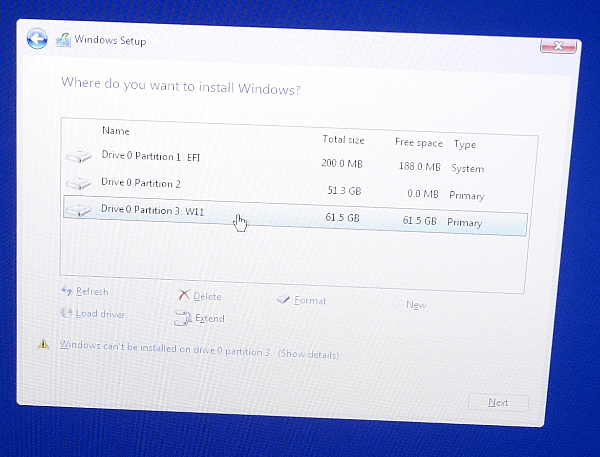
Here you have two options:
- If you only want Windows 11 on your Mac, you can delete all of the volumes shown here. Then click New, select it and click Next.
- In case you want to have both Windows 11 and macOS in dual boot, select only the volume which we created in the previous step (W11 in my case) and choose Format, then click Next.
The next steps are pretty straightforward and no different from a regular Windows 10/11 installation. After some time, you should be presented with the following dialog:
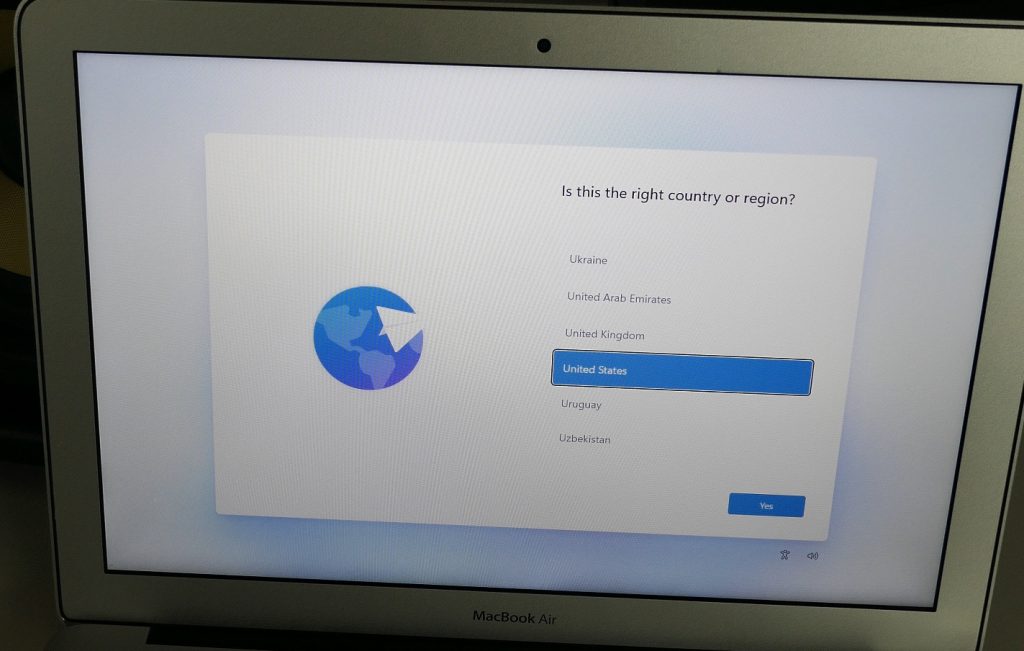
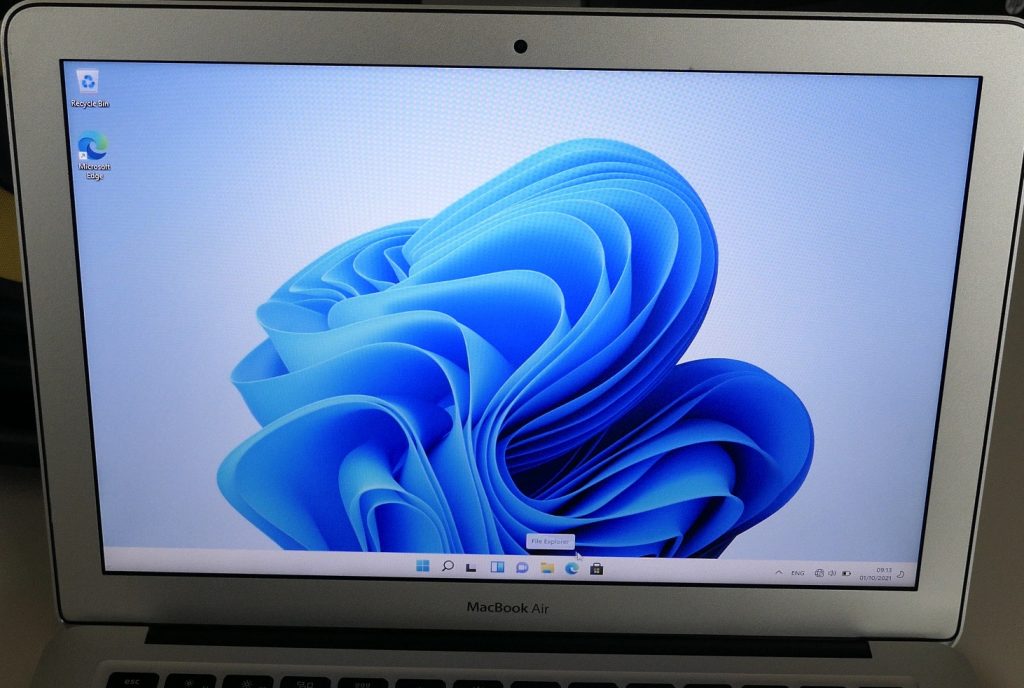
Here you need to answer some basic questions like your location, keyboard layout, network, username, password and some more questions regarding location and diagnostic info. After going through all of these and waiting a bit more, you should end up with the Windows 11 desktop on your Mac:
Install all drivers and tools
Although Windows 11 is now theoretically installed and working on your Mac, not everything is functioning just yet. Depending on your model of Mac and included drivers in Windows 11, some devices might not work yet. In my case for example, the wireless network adapter was not detected.
Exactly for this, we prepared those drivers with Brigadier. So we can simply navigate to our USB drive and launch Setup.exe from the drivers\BootCamp folder:
When the installer is complete, click Finish and choose to restart your device.
After the reboot, most devices and at least your device to connect to the network should be working again. From here, we will launch Windows Update and make sure we have the latest updates and potential remaining missing drivers:
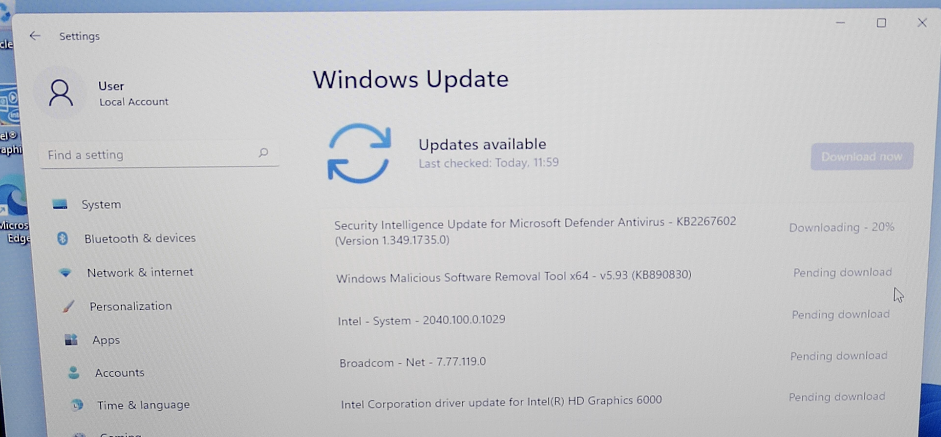
One more reboot later, you are done and have a Mac with Windows 11!
Switch between Windows and Mac when you decided to go for a dual boot install
After going through all the steps above, your Mac will boot by default in Windows 11. In order to switch back to macOS (temporarily), you can reboot and hold down the Alt key. Exactly the same as you did to boot from the USB drive when installing Windows 11.
In the boot loader, simply select the name of your macOS volume to boot to macOS and Windows to boot to Windows:
In case you want to change which one of these two boots by default, you can boot to macOS and start the “Startup Disk” utility. Here click the lock to be able to make changes, select the OS which you want to boot as default and click restart:
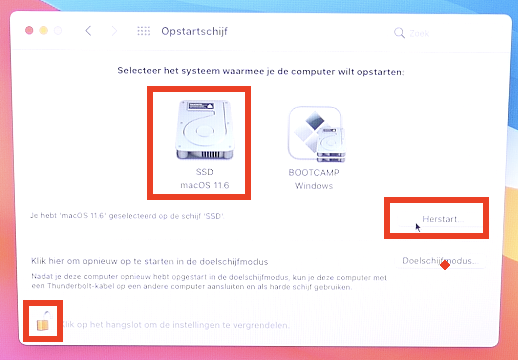
From here, the OS you selected will be the default.
Super post. Instructions worked well to get w11 on my MacBook Air 2015.
I am doing this now. Super awesome. I am posting a TikTok about it as well.
HI, thx for this excelent HowTo. My Problem: I did exactly what you say, but i can’t see any Partition that i could select (?) In MacOs i can see the correct Win11 Fat Partition. What i’m missing (?)
KBest regards, Arnold
It could be that the drivers for your SSD are missing in the Windows installer. One the screen where you need to select where to install Windows, you can browse for a driver, then navigate to the Brigadier-drivers copied to the USB drive – WinPEDriver – AppleSSD (see my post about installing Windows 10 on 2019/2020 MacBooks for detailed info: https://jensd.be/1011/windows/install-windows-10-on-a-macbook-air-2019-2020-with-t2-chip)
Hello once i got to the setup page for windows, my keyboard and trackpad stopped working. is there a fix for this? I have a MBP A1707
Most likely this is because the drivers for your keyboard/trackpad are missing in the Windows installer. You will need to use an external keyboard and then install the drivers (using Brigadier) once Windows is installed. I noticed the same for Windows 10 on my 2019 MacBook. Have a look here for more details: https://jensd.be/1011/windows/install-windows-10-on-a-macbook-air-2019-2020-with-t2-chip
Hi, sounds interesting and I’m prepared to give it a try. What I’d like to know before starting is: will it be possible to install “your” Win 11 on an external disk? Not on a partition of the internal Mac HD? TIA.
Should work, haven’t tried it though.
Hi, sadly it doesn’t. Installer says that Windows cannot install on a USB drive.
Thanks for your excellent article. I’m saving the Win 11 USB stick for later.
Hi, I successfully used “your” Win 11 USB stick to install Win 11 into a VMWare virtual machine:
1. Create a blank Windows VM.
2. Insert the USB stick.
3. Start the VM. The VM tries to find a startup disk. You then have about 60 seconds to attach the USB stick to the VM via the VMWare menu. (*)
4. The USB stick is used as startup disk and installation starts.
(*) This vital information is from Paul Melekhov : https://superuser.com/questions/810744/install-windows-on-vmware-using-usb-flash-drive .
Hi, done all this. I am now at Windows initial screen where it asks for Language input, time and currency etc however my mouse and keyboard don’t work so can’t progress. Any ideas?
Most likely this is because the drivers for your keyboard/trackpad are missing in the Windows installer. You will need to use an external keyboard and then install the drivers (using Brigadier) once Windows is installed. I noticed the same for Windows 10 on my 2019 MacBook. Have a look here for more details: https://jensd.be/1011/windows/install-windows-10-on-a-macbook-air-2019-2020-with-t2-chip
All done. I am now back in MacOS and can’t see the Bootcamp option in Parallels – can you advise again?
Have you tried gaming on Windows 11 for ARM? What issues did you encounter?
I am assuming your procedure works on an M1 Mac .
No, it’s not possible to install Windows 11 natively on M1 macs yet (as mentioned in the article as well).
I did do a post on getting Windows 11 ARM on it using UTM, you can find it here: https://jensd.be/1533/windows/windows-11-arm-on-m1-based-macs-with-utm
Gaming on Windows on M1 is not really an option (yet) as there are no drivers for the GPU cores on M1.
My idea is to play some AAA games on M1. While Parallels can run them all, it really kills performance: I tried RE3 and it plays like a slideshow. CrossOver make the experience great fps-wise, but the games has artifacts and hangs often: at some point I was getting unstuck by playing my game save on Parallels, then going back to CrossOver for the best experience – back and forth like this a couple of times. I have reached a point I am unable to load that save via CrossOver – the save still works in Parallels but, like I said, it’s a slideshow.
Hi,
Great guide, I succeed to install win11 pro on my macmini5,2.
It’s very reactive but, I can’t install properly the graphic driver for the AMD Radeon HD 6630M. Is someone have any clue to help me.
Installing ATI drivers from bootcamp crashes the system. I found no compatible driver from AMD>Support and Drivers>Graphics>Mac Graphics>Apple BootCamp
It’s a pity, video acceleration is not working so I can’t watch my phone videos and sometimes the screen just split with the left part of the screen on the right side… Help me please!
Thank you
I would be grateful getting some help!
Just for fun I used a Win20 media creation tool usb stick to install directly on a circa 2015 MacBook Air. First I formatted as a single FAT partition, selected MBR as the disk type, inserted the usb stick, rebooted with option held down, selected Windows volume. To my astonishment the install ran perfectly and booted into Windows 10. Didn’t install any drivers at all and not sure how it even worked without a BIOS.
*Win10
Hey this is a really great guide. I have managed to follow it through as far as selecting my partition and formating it in Winodows set up. When I hit next I get the error message “We couldn’t crete a new partition or locate an existing one. For more infoemation see the Setup log files”. Up to this point every stage matched yours pefectly. Any suggestions? Cheers.
zsh: ./brigadier: bad interpreter: /usr/bin/python: no such file or directory
Hello Jensd,
Could you consider making a new post explaining how to remove all this (even if you installed only windows) and install back only macOS (as if you just bought the machine new)?
Have a nice day : )
This post should cover that I believe: https://jensd.be/1412/apple/perform-a-clean-install-of-macos-on-your-device
Pingback: Windows 11 may soon natively run on Apple M1 and more thanks to this new project - TECHTELEGRAPH
Pingback: Windows 11 natively on Apple M1? In the future it might be possible – 3arabapp News
Pingback: Windows 11 may soon natively run on Apple M1 and more thanks to this new project – Neowin – 7th Information Technologies
Hello jensd, during my process in terminal, I have a message from terminal that saying an error message like this :
“”gabingaucher@macbook-air-of-muren ~ % cd Downloads/brigadier-main
gabingaucher@macbook-air-of-muren brigadier-main % ./brigadier –model MacBookAir7,2
env: python: No such file or directory””
How can I fix it ? It can really help me because I have an error message when I Boot Windows, error from my drivers that my computer can’t find them…
Could you plz help me ? Thx !
Brigadier won’t work on newer MacOS versions. Just get the EXE and use it once under windows. I think they made a precompiled version that doesn’t need python to work.
Great tutorial.
Installed W11 on my MacBook Pro mid 2012.
However brigadier comes with message that Windows 7 should be installed and does not install bootcamp.
It is a Windows11 only install so no OSX on a partition.
Sound card does not work.
Any tip or so how to fix?
cant wait to try this on my 2010 macbook air with 64 gb storage and catalina on it
did you ever get it working on your 2010?
i have a macbook air a1466 and i cant get the trackpad oar sound to work in windows 11
Awesome. Thanks for this. How about Windows 10?
I ‘m going to buy an early 2015 macbook Air for writing solely because of the keyboard.
Do I have to follow the same steps to install Windows 10 as well?
Or is it “less complicated”? ;)
For windows 10 only, do everything the same EXCEPT you will split the install file from windows 10 ISO, not windows 11.
UPDATE: If you have a newish version of MacOS, like say Big Sur and newer, Brigadier will not work even if you download Python 2 and 3. Save your time and just run it under windows.
Here is the new code to use brigadiers with python3. You just have to create a new text file and paste it inside, then save it without extension:
#!/usr/bin/env python3
import os
import sys
import subprocess
import urllib.request as urllib2
import plistlib
import re
import tempfile
import shutil
import optparse
import datetime
import platform
import requests
from pprint import pprint
from urllib.request import urlretrieve
from xml.dom import minidom
VERSION = ‘0.2.6’
SUCATALOG_URL = ‘https://swscan.apple.com/content/catalogs/others/index-11-10.15-10.14-10.13-10.12-10.11-10.10-10.9-mountainlion-lion-snowleopard-leopard.merged-1.sucatalog’
# 7-Zip MSI (15.14)
SEVENZIP_URL = ‘https://www.7-zip.org/a/7z2201-x64.msi’
def status(msg):
print(“%s\n” % msg)
def getCommandOutput(cmd):
p = subprocess.Popen(cmd, stdout=subprocess.PIPE)
out, err = p.communicate()
return out
# Returns this machine’s model identifier, using wmic on Windows,
# system_profiler on OS X
def getMachineModel():
if platform.system() == ‘Windows’:
rawxml = getCommandOutput([‘wmic’, ‘computersystem’, ‘get’, ‘model’, ‘/format:RAWXML’])
dom = minidom.parseString(rawxml)
results = dom.getElementsByTagName(“RESULTS”)
nodes = results[0].getElementsByTagName(“CIM”)[0].getElementsByTagName(“INSTANCE”)[0]\
.getElementsByTagName(“PROPERTY”)[0].getElementsByTagName(“VALUE”)[0].childNodes
model = nodes[0].data
elif platform.system() == ‘Darwin’:
plistxml = getCommandOutput([‘system_profiler’, ‘SPHardwareDataType’, ‘-xml’])
plist = plistlib.readPlistFromString(plistxml)
model = plist[0][‘_items’][0][‘machine_model’]
return model
def downloadFile(url, filename, use_requests=False):
# http://stackoverflow.com/questions/13881092/
# download-progressbar-for-python-3/13895723#13895723
def reporthook(blocknum, blocksize, totalsize):
readsofar = blocknum * blocksize
if totalsize > 0:
percent = readsofar * 1e2 / totalsize
console_out = “\r%5.1f%% %*d / %d bytes” % (
percent, len(str(totalsize)), readsofar, totalsize)
sys.stderr.write(console_out)
if readsofar >= totalsize: # near the end
sys.stderr.write(“\n”)
else: # total size is unknown
sys.stderr.write(“read %d\n” % (readsofar,))
if use_requests:
resp = requests.get(url, stream=True)
with open(filename, ‘wb’) as fd:
for chunk in resp.iter_content(chunk_size=1024):
fd.write(chunk)
return
# urlretrieve method will likely just go away soon, and we’ll use only requests
# with some kind of report/progress output
urlretrieve(url, filename, reporthook=reporthook)
def sevenzipExtract(arcfile, command=’e’, out_dir=None):
cmd = [os.path.join(os.environ[‘SYSTEMDRIVE’] + “\\”, “Program Files”, “7-Zip”, “7z.exe”)]
cmd.append(command)
if not out_dir:
out_dir = os.path.dirname(arcfile)
cmd.append(“-o” + out_dir)
cmd.append(“-y”)
cmd.append(arcfile)
status(“Calling 7-Zip command: %s” % ‘ ‘.join(cmd))
retcode = subprocess.call(cmd)
if retcode:
sys.exit(“Command failure: %s exited %s.” % (‘ ‘.join(cmd), retcode))
def postInstallConfig():
regdata = “””Windows Registry Editor Version 5.00
[HKEY_CURRENT_USER\Software\Apple Inc.\Apple Keyboard Support]
“FirstTimeRun”=dword:00000000″””
handle, path = tempfile.mkstemp()
fd = os.fdopen(handle, ‘w’)
fd.write(regdata)
fd.close()
subprocess.call([‘regedit.exe’, ‘/s’, path])
def findBootcampMSI(search_dir):
“””Returns the path of the 64-bit BootCamp MSI”””
# Most ESDs contain ‘BootCamp.msi’ and ‘BootCamp64.msi’
# Dec. 2012 ESD contains only ‘BootCamp.msi’ which is 64-bit
# The top-level structure of the ESD files depends on whether
# it’s an AutoUnattend-based ESD as well, ie:
# /Drivers/Apple/BootCamp64.msi, or
# /BootCamp/Drivers/Apple/BootCamp.msi
candidates = [‘BootCamp64.msi’, ‘BootCamp.msi’]
for root, dirs, files in os.walk(search_dir):
for msi in candidates:
if msi in files:
return os.path.join(root, msi)
def installBootcamp(msipath):
logpath = os.path.abspath(“/BootCamp_Install.log”)
cmd = [‘cmd’, ‘/c’, ‘msiexec’, ‘/i’, msipath, ‘/qb-‘, ‘/norestart’, ‘/log’, logpath]
status(“Executing command: ‘%s'” % ” “.join(cmd))
subprocess.call(cmd)
status(“Install log output:”)
with open(logpath, ‘r’) as logfd:
logdata = logfd.read()
print(logdata.decode(‘utf-16’))
postInstallConfig()
def main():
scriptdir = os.path.abspath(os.path.dirname(sys.argv[0]))
o = optparse.OptionParser()
o.add_option(‘-m’, ‘–model’, action=”append”,
help=”System model identifier to use (otherwise this machine’s \
model is used). This can be specified multiple times to download \
multiple models in a single run.”)
o.add_option(‘-i’, ‘–install’, action=”store_true”,
help=”After the installer is downloaded, perform the install automatically. \
Can be used on Windows only.”)
o.add_option(‘-o’, ‘–output-dir’,
help=”Base path where the installer files will be extracted into a folder named after the \
product, ie. ‘BootCamp-041-1234’. Uses the current directory if this option is omitted.”)
o.add_option(‘-k’, ‘–keep-files’, action=”store_true”,
help=”Keep the files that were downloaded/extracted. Useful only with the \
‘–install’ option on Windows.”)
o.add_option(‘-p’, ‘–product-id’,
help=”Specify an exact product ID to download (ie. ‘031-0787’), currently useful only for cases \
where a model has multiple BootCamp ESDs available and is not downloading the desired version \
according to the post date.”)
o.add_option(‘-V’, ‘–version’, action=”store_true”,
help=”Output the version of brigadier.”)
opts, args = o.parse_args()
if opts.version:
print(VERSION)
sys.exit(0)
if opts.install:
if platform.system() == ‘Darwin’:
sys.exit(“Installing Boot Camp can only be done on Windows!”)
if platform.system() == ‘Windows’ and platform.machine() != ‘AMD64’:
sys.exit(“Installing on anything other than 64-bit Windows is currently not supported!”)
if opts.output_dir:
if not os.path.isdir(opts.output_dir):
sys.exit(“Output directory %s that was specified doesn’t exist!” % opts.output_dir)
if not os.access(opts.output_dir, os.W_OK):
sys.exit(“Output directory %s is not writable by this user!” % opts.output_dir)
output_dir = opts.output_dir
else:
output_dir = os.getcwd()
if output_dir.endswith(‘ystem32’) or ‘\\system32\\’ in output_dir.lower():
output_dir = os.environ[‘SystemDrive’] + “\\”
status(“Changing output directory to %s to work around an issue \
when running the installer out of ‘system32’.” % output_dir)
if opts.keep_files and not opts.install:
sys.exit(“The –keep-files option is only useful when used with –install option!”)
if opts.model:
if opts.install:
status(“Ignoring ‘–model’ when ‘–install’ is used. The Boot Camp ”
“installer won’t allow other models to be installed, anyway.”)
models = opts.model
else:
models = [getMachineModel()]
if len(models) > 1:
status(“Using Mac models: %s.” % ‘, ‘.join(models))
else:
status(“Using Mac model: %s.” % ‘, ‘.join(models))
for model in models:
sucatalog_url = SUCATALOG_URL
# check if we defined anything in brigadier.plist
config_plist = None
plist_path = os.path.join(scriptdir, ‘brigadier.plist’)
if os.path.isfile(plist_path):
try:
config_plist = plistlib.readPlist(plist_path)
except:
status(“Config plist was found at %s but it could not be read. \
Verify that it is readable and is an XML formatted plist.” % plist_path)
if config_plist:
if ‘CatalogURL’ in config_plist.keys():
sucatalog_url = config_plist[‘CatalogURL’]
urlfd = urllib2.urlopen(sucatalog_url)
data = urlfd.read()
p = plistlib.loads(data)
allprods = p[‘Products’]
# Get all Boot Camp ESD products
bc_prods = []
for (prod_id, prod_data) in allprods.items():
if ‘ServerMetadataURL’ in prod_data.keys():
bc_match = re.search(‘BootCamp’, prod_data[‘ServerMetadataURL’])
if bc_match:
bc_prods.append((prod_id, prod_data))
# Find the ESD(s) that applies to our model
pkg_data = []
re_model = “([a-zA-Z]{4,12}[1-9]{1,2}\,[1-6])”
for bc_prod in bc_prods:
if ‘English’ in bc_prod[1][‘Distributions’].keys():
disturl = bc_prod[1][‘Distributions’][‘English’]
distfd = urllib2.urlopen(disturl)
dist_data = distfd.read().decode(‘utf-8’)
if re.search(model, dist_data):
supported_models = []
pkg_data.append({bc_prod[0]: bc_prod[1]})
model_matches_in_dist = re.findall(re_model, dist_data)
for supported_model in model_matches_in_dist:
supported_models.append(supported_model)
status(“Model supported in package distribution file at %s.” % disturl)
status(“Distribution %s supports the following models: %s.” %
(bc_prod[0], “, “.join(supported_models)))
# Ensure we have only one ESD
if len(pkg_data) == 0:
sys.exit(“Couldn’t find a Boot Camp ESD for the model %s in the given software update catalog.” % model)
if len(pkg_data) == 1:
pkg_data = pkg_data[0]
if opts.product_id:
sys.exit(“–product-id option is only applicable when multiple ESDs are found for a model.”)
if len(pkg_data) > 1:
# sys.exit(“There is more than one ESD product available for this model: %s. ”
# “Automically selecting the one with the most recent PostDate..”
# % “, “.join([p.keys()[0] for p in pkg_data]))
print(“There is more than one ESD product available for this model:”)
# Init latest to be epoch start
latest_date = datetime.datetime.fromtimestamp(0)
chosen_product = None
for i, p in enumerate(pkg_data):
product = list(p.keys())[0]
postdate = p[product].get(‘PostDate’)
print(“%s: PostDate %s” % (product, postdate))
if postdate > latest_date:
latest_date = postdate
chosen_product = product
if opts.product_id:
if opts.product_id not in [k.keys()[0] for k in pkg_data]:
sys.exit(“Product specified with ‘–product-id %s’ either doesn’t exist ”
“or was not found applicable to models: %s”
% (opts.product_id, “, “.join(models)))
chosen_product = opts.product_id
print(“Selecting manually-chosen product %s.” % chosen_product)
else:
print(“Selecting %s as it’s the most recently posted.” % chosen_product)
for p in pkg_data:
if list(p.keys())[0] == chosen_product:
selected_pkg = p
pkg_data = selected_pkg
pkg_id = list(pkg_data.keys())[0]
pkg_url = list(pkg_data.values())[0][‘Packages’][0][‘URL’]
# make a sub-dir in the output_dir here, named by product
landing_dir = os.path.join(output_dir, ‘BootCamp-‘ + pkg_id)
if os.path.exists(landing_dir):
status(“Final output path %s already exists, removing it…” % landing_dir)
if platform.system() == ‘Windows’:
# using rmdir /qs because shutil.rmtree dies on the Doc files with foreign language characters
subprocess.call([‘cmd’, ‘/c’, ‘rmdir’, ‘/q’, ‘/s’, landing_dir])
else:
shutil.rmtree(landing_dir)
status(“Making directory %s..” % landing_dir)
os.mkdir(landing_dir)
arc_workdir = tempfile.mkdtemp(prefix=”bootcamp-unpack_”)
pkg_dl_path = os.path.join(arc_workdir, pkg_url.split(‘/’)[-1])
status(“Fetching Boot Camp product at URL %s.” % pkg_url)
downloadFile(pkg_url, pkg_dl_path)
if platform.system() == ‘Windows’:
we_installed_7zip = False
sevenzip_binary = os.path.join(os.environ[‘SYSTEMDRIVE’] + “\\”, ‘Program Files’, ‘7-Zip’, ‘7z.exe’)
# fetch and install 7-Zip
if not os.path.exists(sevenzip_binary):
tempdir = tempfile.mkdtemp()
sevenzip_msi_dl_path = os.path.join(tempdir, SEVENZIP_URL.split(‘/’)[-1])
downloadFile(SEVENZIP_URL, sevenzip_msi_dl_path, use_requests=True)
status(“Downloaded 7-zip to %s.” % sevenzip_msi_dl_path)
status(“We need to install 7-Zip..”)
retcode = subprocess.call([‘msiexec’, ‘/qn’, ‘/i’, sevenzip_msi_dl_path])
status(“7-Zip install returned exit code %s.” % retcode)
we_installed_7zip = True
status(“Extracting…”)
# BootCamp.pkg (xar) -> Payload (gzip) -> Payload~ (cpio) -> WindowsSupport.dmg
for arc in [pkg_dl_path,
os.path.join(arc_workdir, ‘Payload’),
os.path.join(arc_workdir, ‘Payload~’)]:
if os.path.exists(arc):
sevenzipExtract(arc)
# finally, 7-Zip also extracts the tree within the DMG to the output dir
sevenzipExtract(os.path.join(arc_workdir, ‘WindowsSupport.dmg’),
command=’x’,
out_dir=landing_dir)
if we_installed_7zip:
status(“Cleaning up the 7-Zip install…”)
subprocess.call([‘cmd’, ‘/c’, ‘msiexec’, ‘/qn’, ‘/x’, sevenzip_msi_dl_path])
if opts.install:
status(“Installing Boot Camp…”)
installBootcamp(findBootcampMSI(landing_dir))
if not opts.keep_files:
subprocess.call([‘cmd’, ‘/c’, ‘rmdir’, ‘/q’, ‘/s’, landing_dir])
# clean up the temp dir always
subprocess.call([‘cmd’, ‘/c’, ‘rmdir’, ‘/q’, ‘/s’, arc_workdir])
elif platform.system() == ‘Darwin’:
status(“Expanding flat package…”)
subprocess.call([‘/usr/sbin/pkgutil’, ‘–expand’, pkg_dl_path,
os.path.join(arc_workdir, ‘pkg’)])
status(“Extracting Payload…”)
subprocess.call([‘/usr/bin/tar’, ‘-xz’, ‘-C’, arc_workdir, ‘-f’, os.path.join(arc_workdir, ‘pkg’, ‘Payload’)])
output_file = os.path.join(landing_dir, ‘WindowsSupport.dmg’)
shutil.move(os.path.join(arc_workdir, ‘Library/Application Support/BootCamp/WindowsSupport.dmg’),
output_file)
status(“Extracted to %s.” % output_file)
# If we were to also copy out the contents from the .dmg we might do it like this, but if you’re doing this
# from OS X you probably would rather just burn a disc so we’ll stop here..
# mountxml = getCommandOutput([‘/usr/bin/hdiutil’, ‘attach’,
# os.path.join(arc_workdir, ‘Library/Application Support/BootCamp/WindowsSupport.dmg’),
# ‘-mountrandom’, ‘/tmp’, ‘-plist’, ‘-nobrowse’])
# mountplist = plistlib.readPlistFromString(mountxml)
# mntpoint = mountplist[‘system-entities’][0][‘mount-point’]
# shutil.copytree(mntpoint, output_dir)
# subprocess.call([‘/usr/bin/hdiutil’, ‘eject’, mntpoint])
shutil.rmtree(arc_workdir)
elif platform.system() == ‘Linux’:
status(“Extracting for Linux…”)
for arc in [pkg_dl_path,
os.path.join(arc_workdir, ‘Payload’),
os.path.join(arc_workdir, ‘Payload~’)]:
if os.path.exists(arc):
status(“Extracting {}”.format(arc))
subprocess.call([‘7z’,’x’,arc, ‘-o{}’.format(arc_workdir)])
# BootCamp.pkg (xar) -> Payload (gzip) -> Payload~ (cpio) -> WindowsSupport.dmg
output_file = os.path.join(arc_workdir, ‘WindowsSupport.dmg’)
shutil.move(os.path.join(arc_workdir, ‘Library/Application Support/BootCamp/WindowsSupport.dmg’),
output_file)
subprocess.call([‘7z’,’-o{}’.format(landing_dir),’x’,’WindowsSupport.dmg’,])
status(“Extracted to %s.” % output_file)
if os.path.exists(‘/mnt/c/Windows/explorer.exe’):
subprocess.call([‘/mnt/c/Windows/explorer.exe’,’.’])
else:
print(“Platform not supported! ({})”.format(platform.system()))
pass
status(“Done.”)
if __name__ == “__main__”:
main()
Hi, Thank you so much for the tutorial, so far i have successfully installed win11 on my macbookpro7,1. The only issue i have is getting the support drivers as they need me running win7 to update the drivers. Is there any advice on how to overcome this issue of updating the drivers?
Would really appreciate if you could share your insights/solution for this.
Thank you
Merci pour cet article utile qui aborde l’installation de Windows 11 sur des Macs, illustrant ainsi les défis de la virtualisation dans un environnement technologique complexe. La virtualisation, en particulier à travers des solutions telles que les machine virtuelle et les serveur privé cloud, joue un rôle important dans la gestion flexible des ressources informatiques et la transformation digitale des entreprises. La méthode décrite dans l’article, qui consiste à utiliser un programme d’installation modifié pour contourner les restrictions matérielles de Windows 11, est un excellent exemple de comment la virtualisation et les outils de cloud computing univirtual peuvent être utilisés pour surmonter les limitations des systèmes traditionnels. En créant une clé USB bootable avec les fichiers combinés de Windows 10 et 11, les utilisateurs peuvent virtualiser leurs environnements de travail de manière plus efficace et adaptable, même sur des matériels qui ne supportent pas nativement les dernières exigences logicielles. Cela souligne l’importance de l’intégration des technologies de virtualisation univirtual et du cloud dans le processus de transformation digitale, permettant aux entreprises et aux particuliers d’exploiter pleinement leurs ressources informatiques tout en répondant aux exigences modernes de sécurité et de performance.
Hi there Jens,
David from Antwerp here. Last year I got my hands on a batch of old Imac 21,5 mid 2011s and some Dell Optiplexes. Almost all of the Imacs had a faulty hard drive, so I decided to swap them out for the SSD’s from the Optiplexes. (So no MacOS and therefore no bootcamp) Those SSD’s had Windows 10 installed. After performing clean installs everywhere all of them booted up nicely and I installed the Cirrus audio driver for sound afterwards.
In the meanwhile I upgraded to Win 11 and the OS itself runs very smooth on these oldtimers. No issues there. But I have an annoying problem however:
Like with Windows 10, the installation (performed with Hasleo win-to-usb) is complete besides the audio. I don’t get to find the correct audio driver. Realtek is mentioned a lot online, but no succes there either. Every attempt so far resulted in nothing. Do you have a clue? Does Bootcamp searches and installs an audio driver? And if so: which one would that be?
Many thanks, D
Ok: the above mentioned Cirrus driver does the trick for both 10 and 11.
https://oemdrivers.com/sound-cirrus-logic-cs4206b-driver
Cheers, D
Fantastic documentation!
I used your Windows 10 process which worked perfectly on my MacBookPro 11,4.
Now that I have a clean install of Windows 10, I want to grab a backup, preferably something I can restore to bare metal SAFELY without impacting my MacOS install BEFORE I take this machine online in case all of the “phoning home and updating” nonsense that Windows does breaks something.
Do you have recommendations for an open-source/free reliable backup solution?
And do you have any recommendations to block all of the updating traffic from MS servers, since I don’t want the game stuff, cortana, MS store, etc.?